Subaru XV Crosstrek (2016 year). Instruction - part 15


  Index      Subaru     Subaru XV Crosstrek - instruction 2016 year in english


Search            copyright infringement  


Content   ..  13  14  15  16   ..


Subaru XV Crosstrek (2016 year). Instruction - part 15


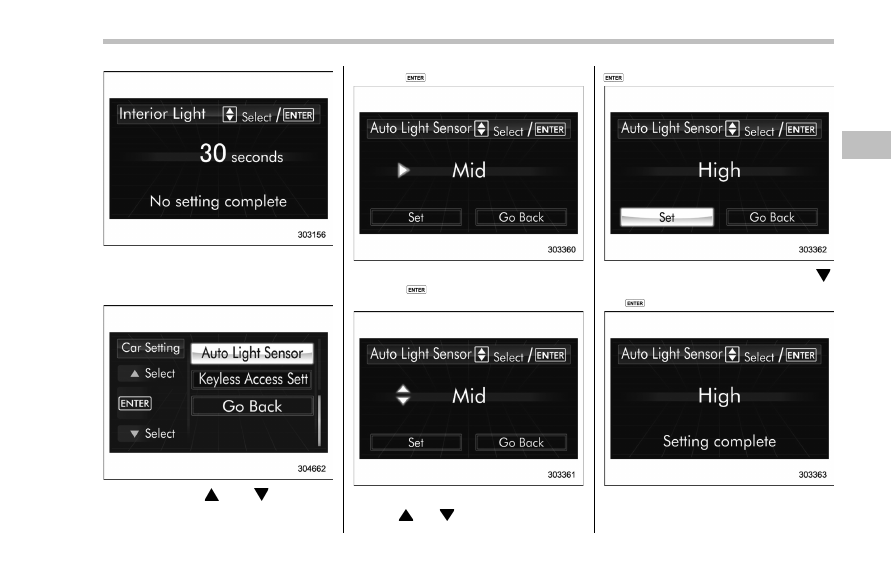
! Auto light sensor sensitivity setting
1. Perform the preparation steps accord-
ing to

“Preparation for car settings” F3-78.

2. Operate the

“ ” or “ ” switch to

select the

“Auto Light Sensor” item. Then

push the

button.

3. The current setting will be displayed.
Push the

button to enter the selection

mode.

4. Select the preferred setting by operat-
ing the

“ ” or “ ” switch. Then push the

button.

5. Select

“Set” by operating the “ ”

switch, and confirm the setting by pushing
the

button.

6. The system will notify you that the
setting is complete.

Instruments and controls/Multi function display

– CONTINUED –

3-83

Instruments and controls/Multi function display

If the setting is not available, the following
notification will be displayed. In this case,
perform the setting procedure again.

! Keyless access setting (models

with

“keyless access with push-

button start system

”)

! Preparation for keyless access

settings

1. Perform the preparation steps accord-
ing to

“Preparation for car settings” F3-78.

2. Operate the

“ ” or “ ” switch to

select the

“Keyless Access Setting” item.

Then push the

button.

! Driver’s door unlock setting

1. Perform the preparation steps accord-
ing to

“Preparation for keyless access

settings

” F3-84.

2. Operate the

“ ” or “ ” switch to

select the

“Driver’s Door Unlock” item.

Then push the

button.

3. The current setting will be displayed.
Push the

button to enter the selection

mode.

3-84

4. Select the preferred setting by operat-
ing the

“ ” or “ ” switch. Then push the

button.

5. Select

“Set” by operating the “ ”

switch, and confirm the setting by pushing
the

button.

6. The system will notify you that the
setting is complete.
If the setting is not available, the following
notification will be displayed. In this case,
perform the setting procedure again.

! Rear gate unlock setting

1. Perform the preparation steps accord-
ing to

“Preparation for keyless access

settings

” F3-84.

2. Operate the

“ ” or “ ” switch to

select the

“Rear Gate Unlock” item. Then

push the

button.

Instruments and controls/Multi function display

– CONTINUED –

3-85

Instruments and controls/Multi function display

3. The current setting will be displayed.
Push the

button to enter the selection

mode.

4. Select the preferred setting by operat-
ing the

“ ” or “ ” switch. Then push the

button.

5. Select

“Set” by operating the “ ”

switch, and confirm the setting by pushing
the

button.

6. The system will notify you that the
setting is complete.
If the setting is not available, the following

notification will be displayed. In this case,
perform the setting procedure again.

& Initialize

Items that have been set to your pre-
ference can be initialized. To select an
initialization menu, operate the

“ ” or “ ”

switch as follows.

! Preparation for initialization
1. Turn the ignition switch to the

“ON”

position.
2. Push and hold the

button to show

the selection screen.

3-86

3. After the selection screen is displayed,
operate the

“ ” or “ ” switch to show the

“Initialize” item. Then, push the

button.

! Reset to factory default settings
1. Perform the preparation steps accord-
ing to

“Preparation for initialization” F3-

86.

2. Operate the

“ ” or “ ” switch to

select the

“Reset to Defaults” item. Then

push the

button.

3. The system will prompt a Yes/No
dialogue (

“No” is selected first). To return

to the factory default settings, select

“Yes”

by operating the

“ ” switch.

4. Confirm the setting by pushing the
button.

5. The system will notify you that the
setting is complete.

Instruments and controls/Multi function display

– CONTINUED –

3-87

Instruments and controls/Multi function display

! Lifetime fuel consumption resetting
1. Perform the preparation steps accord-
ing to

“Preparation for initialization” F3-

86.

2. Operate the

“ ” or “ ” switch to

select the

“Lifetime Fuel Consumption

Resetting

” item. Then push the

button.

3. The system will prompt a Yes/No
dialogue (

“No” is selected first). To reset

the lifetime fuel consumption, select

“Yes”

by operating the

“ ” switch.

4. Confirm the setting by pushing the
button.

5. Reconfirmation will be displayed. If
you are sure you want to proceed, select

“Yes” by operating the “ ” switch.

6. Confirm the setting again by pushing
the

button.

3-88

7. The system will notify you that the
setting is complete.

Light control switch

& Precautions and tips

CAUTION

. Use of any lights for a long period

of time while the engine is not
running can cause the battery to
discharge.

. Before leaving the vehicle, make

sure that the lights are turned off.
If the vehicle is left unattended
for a long time with the lights
illuminated, the battery may be
discharged.

NOTE

. Even if the key is removed from the
ignition switch, the lights can be illu-
minated by operating the light control
switch from the

“ ” (off) position to the

” or “ ” position.

. If the driver’s door is opened while
the lights are illuminated and the key is
removed from the ignition switch, the
chirp sound will inform the driver that
the lights are illuminated.

& Headlights

To turn on the headlights, turn the knob on
the end of the turn signal lever.

“ ” position
Instrument panel illumination, headlights,
parking lights, front side marker lights, rear
side marker lights, tail lights and license
plate lights are on.

” position

Instrument panel illumination, parking
lights, front side marker lights, rear side
marker lights, tail lights and license plate
lights are on.

Instruments and controls/Light control switch

– CONTINUED –

3-89

Instruments and controls/Light control switch

” position: auto on/off headlights (if

equipped)
When the ignition switch is in the

“ON”

position, the instrument panel illumination,
headlights, parking lights, front side mar-
ker lights, rear side marker lights, tail lights
and license plate lights are automatically
on or off depending on the level of the
ambient light.

“ ” position
The headlights are all off.

NOTE

The sensitivity of the auto on/off head-
lights can be changed by a SUBARU
dealer. Consult your SUBARU dealer
for details. Also, for models with a multi
function display, the setting can be
changed using the display. For details,
refer to

“Auto light sensor sensitivity

setting

” F3-83.

! Welcome lighting function (if

equipped)

The welcome lighting function turns on the
low beam headlight for smooth approach-
ing to or exiting from the vehicle at night or
in a dark place.

The function is activated while all of the
following conditions are met.
. The light control switch is in the

“AUTO” position

. It is dark enough to turn on the auto on/
off headlights

When approaching:
While the welcome lighting function is
activated, the low beam headlights will
automatically illuminate when unlocking
the doors (for 5-door, including the rear
gate) by using the remote keyless entry
system.

The low beam headlights will remain
illuminated for 30 seconds

*1

and then turn

off. However, if any of the following
operations is done, the low beam head-
lights will turn off.
. The doors are locked.

. The light control switch is turned to a
position other than

“AUTO”.

. The ignition switch is turned to the “ON”
position.

When exiting:
While the welcome lighting function is
activated, the low beam headlights will
remain illuminated even when either of the
following operation is done.
. The push-button ignition switch is
turned to the

“OFF” status (models with

“keyless access with push-button start
system

”)

. The key is pulled out from the ignition
switch (models without

“keyless access

with push-button start system

”)

The low beam headlights will turn off
under any of the following conditions.
. 3 minutes have passed since the low
beam headlights were illuminated by the
welcome lighting function.
. 30 seconds have passed since the
door is opened and closed.

*1

. The light control switch is turned to a
position other than

“AUTO”.

. The locking procedure is performed
twice. When performing the unlocking
procedure after performing the locking
procedure, perform the locking procedure
twice again.

*1: The setting for the period of time in which
the low beam headlights remain on by the
welcome lighting function can be changed by a
SUBARU dealer. Contact your SUBARU dealer
for details.

3-90

! Sensor for the auto on/off head-

lights (if equipped)

The sensor is on the instrument panel as
shown in the illustration.

CAUTION

If any object is placed on or near the
sensor, the sensor may not detect
the level of the ambient light cor-
rectly and the auto on/off headlights
may not operate properly.

& High/low beam change

(dimmer)

To change from low beam to high beam,
push the turn signal lever forward. When
the headlights are on high beam, the high
beam indicator light

” on the combina-

tion meter is also on.
To switch back to low beam, pull the lever
back to the center position.

& Headlight flasher

CAUTION

Do not hold the lever in the flashing
position for more than just a few
seconds.

To flash the headlights, pull the lever
toward you and then release it. The high
beam will stay on for as long as you hold
the lever. The headlight flasher works
even though the lighting switch is in the

“ ” (off) position.

When the headlights are on high beam,
the high beam indicator light

” on the

combination meter also illuminates.

Instruments and controls/Light control switch

– CONTINUED –

3-91

Instruments and controls/Turn signal lever

& Daytime running light system

WARNING

The brightness of the illumination of
the high beam headlights is reduced
by the daytime running light system.
The light switch must always be
turned to the

“ ” position when it

is dark outside.

The high beam headlights will automati-
cally illuminate at reduced brightness
when the following conditions are fulfilled.
. The engine is running.

. The parking brake is fully released.

. The light control switch is in the

“AUTO” (if equipped), “

” or off position.

. For CVT models, the select lever is in a
position other than the

“P” position.

NOTE

. When the light switch is in the “

position, the instrument panel illumina-
tion, front side marker lights, tail lights
and license plate lights are also illumi-
nated.

. For models with the auto on/off
headlights, while the light control
switch is in the

“AUTO” position and

the system is activated to the auto-on
mode depending on the ambient light

level, the high beam headlights that
have illuminated at reduced brightness
turn off, and the low beam headlights
turn on alternatively. At this time, the
instrument panel illumination, front
side marker lights, tail lights and
license plate lights are also illuminated.

Turn signal lever

To activate the right turn signal, push the
turn signal lever up. To activate the left
turn signal, push the turn signal lever
down. When the turn is finished, the lever
will return automatically. If the lever does
not return after cornering, return the lever
to the neutral position by hand.

To signal a lane change, push the turn
signal lever up or down slightly and hold it
during the lane change. The turn signal
indicator lights will flash in the direction of
the turn or lane change. The lever will
return automatically to the neutral position
when you release it.

3-92

& One-touch lane changer

To flash the turn signal and turn signal
indicator light three times, push the turn
signal lever up or down slightly and
immediately release it.

The operational/non-operational setting of
the one-touch lane changer

’s can be

changed by a SUBARU dealer. Contact
the nearest SUBARU dealer for details.

Illumination brightness con-
trol

The illumination brightness of the instru-
ment panel dims under the following
conditions.
. when the light switch is in the “

” or

“ ” position

. when the light control switch is in the

“AUTO” position and the headlights illumi-
nate automatically (models with auto on/
off headlights: Refer to

“Headlights” F3-

89.)

You can also adjust the illumination bright-
ness for better visibility in the following
ways.

To brighten, turn the control dial upward.

To darken, turn the control dial downward.

NOTE

. When the control dial is turned fully
upward, the illumination brightness
becomes the maximum and the auto-
matic dimming function does not work
at all.

. The brightness setting is not can-
celed even when the ignition switch is
turned to the

“LOCK”/“OFF” position.

Instruments and controls/Illumination brightness control

3-93

Instruments and controls/Headlight beam leveler

Headlight beam leveler (if
equipped)

& Automatic headlight beam

leveler (models with HID
headlights)

The HID headlights generate more light
than conventional halogen headlights.
Therefore a driver of an oncoming vehicle
may experience too much glare if your
headlight beam height adjustment is high
when the vehicle is carrying a heavy load.
The automatic headlight beam leveler
adjusts the headlight beam height auto-
matically and optimally according to the
load being carried by the vehicle.

Fog light switch (if equipped)

1)

Headlight switch

2)

Fog light switch

The front fog lights will turn on when the
fog light switch is placed in the

“ ”

position while the headlights are in the
following condition.
. while the headlight switch is in the “ ”
position
. for models with the auto on/off head-
lights, while the headlight switch is in the

“AUTO” position and the low beam head-
lights turn on automatically

To turn off the front fog lights, turn the
switch back down to the

“ ” position.

Indicator light (type A)

Indicator light (type B)

The indicator light on the combination
meter will illuminate when the front fog
lights are illuminated.

3-94

& Steering responsive fog

lights system (models with
EyeSight system)

The steering responsive fog lights system
automatically turns the front fog light on
and off based on the steering angle and
vehicle speed when entering a curve or
driving on curved roads. The system is
intended to help prevent accidents by
enabling better visibility of curves ahead
and early recognition of any disabled
vehicles or other obstacles.

The front fog light on the inside of a curve
will turn on if all of the following conditions
are met.
. The light control switch is in the “ ”
position
. The light control switch is in the

“AUTO” position and the low beam head-
lights turn on automatically
. The fog light switch is in the “ ”
position
. The low beam mode is selected

. The select lever is in a position other
than the

“R” position

. The steering response fog lights sys-
tem has not been deactivated
. The operating conditions such as the
steering angle and vehicle speed are met

The front fog lights on both sides will turn

on as usual if all of the following conditions
are met.
. The light control switch is in either of
the following conditions.

– in the “ ” position

– in the “AUTO” position and the low
beam headlights turn on automatically

. The fog light switch is in the “ ”
position
. The low beam mode is selected

! Steering responsive fog lights OFF

switch

Steering responsive fog lights OFF switch

Press this switch to deactivate the steer-
ing responsive fog lights system. Press
the switch again to activate the system.

Instruments and controls/Fog light switch

– CONTINUED –

3-95

Instruments and controls/Wiper and washer

! Steering responsive fog lights OFF

indicator

Steering responsive fog lights OFF indica-
tor

This indicator appears when the steering
responsive fog lights system is deacti-
vated. This indicator disappears when the
system is activated.

Wiper and washer

WARNING

In freezing weather, do not use the
windshield washer until the wind-
shield is sufficiently warmed by the
defroster.

Otherwise the washer fluid can
freeze on the windshield, blocking
your view.

CAUTION

. Do not operate the washer con-

tinuously for more than 10 sec-
onds, or when the washer fluid
tank is empty. This may cause
overheating of the washer motor.
Check the washer fluid level
frequently, such as at fuel stops.

. Do not operate the wipers when

the windshield or rear window is
dry. This may scratch the glass,
damage the wiper blades and
might cause the wiper motor to
fail. Before operating the wiper
on a dry windshield or rear
window, always use the wind-
shield washer.

. In freezing weather, be sure that

the wiper blades are not frozen to
the windshield or rear window
before switching on the wipers.
Attempting to operate the wiper
with the blades frozen to the
window glass could cause not
only the wiper blades to be
damaged but also might cause
the wiper motor to fail. If the
wiper blades are frozen to the
window glass, be sure to operate
the defroster, windshield wiper
deicer (if equipped) or rear win-
dow defogger before turning on
the wiper.

. If the wipers stop during opera-

tion because of ice or some other
obstruction on the window, this
might cause the wiper motor to
fail even if the wiper switch is
t ur ne d o f f . I f t h i s o c c ur s ,
promptly stop the vehicle in a
safe place, turn the ignition
switch to the

“LOCK”/“OFF” po-

sition and clean the window
glass to allow proper wiper op-
eration.

. Use clean water if windshield

washer fluid is unavailable. In
areas where water freezes in
winter, use SUBARU Windshield

3-96

Washer Fluid or the equivalent.
Refer to

“Windshield washer

fluid

” F11-28.

Also, when driving the vehicle
when there are freezing tempera-
tures, use non-freezing type wi-
per blades.

. Do not clean the wiper blades

with gasoline or a solvent, such
as paint thinner or benzine. This
will cause deterioration of the
wiper blades.

NOTE

. The windshield wiper motor is pro-
tected against overloads by a circuit
breaker. If the motor operates continu-
ously under an unusually heavy load,
the circuit breaker may trip to stop the
motor temporarily. If this happens, park
your vehicle in a safe place, turn off the
wiper switch, and wait for approxi-
mately 10 minutes. The circuit breaker
will reset itself, and the wipers will
again operate normally.

. Clean your wiper blades and win-
dow glass periodically with a washer
solution to prevent streaking, and to
remove accumulations of road salt or
road film. Operate the windshield
washer for at least 1 second so that

washer solution will be sprinkled all
over the windshield or rear window.

. Grease, wax, insects or other mate-
rial on the windshield or the wiper
blade results in jerky wiper operation
and streaking on the glass. If you
cannot remove those streaks after
operating the washer or if the wiper
operation is jerky, clean the outer sur-
face of the windshield or rear window
and the wiper blades using a sponge or
soft cloth with a neutral detergent or
mild-abrasive cleaner. After cleaning,
rinse the window glass and wiper
blades with clean water. The glass is
clean if no beads form on the glass
when you rinse with water.

. If you cannot eliminate the streaking
even after following this procedure,
replace the wiper blades with new
ones. For replacement instructions,
refer to

“Replacement of wiper blades”

F11-30.

& Windshield wiper and washer

switches

The wiper operates only when the ignition
switch is in the

“ON” or “ACC” position.

! Windshield wipers

: Mist (for a single wipe)

: Off

: Intermittent

: Low speed

: High speed

To turn the wipers on, push the wiper
control lever down.

To turn the wipers off, return the lever to
the

“ ” position.

Instruments and controls/Wiper and washer

– CONTINUED –

3-97

Instruments and controls/Wiper and washer

For a single wipe of the wipers, push the
lever up. The wipers operate until you
release the lever.
! Wiper intermittent time control

When the wiper switch is in the

“ ”

position, turn the dial to adjust the operat-
ing interval of the wiper. The operating
interval can be adjusted in several steps
from the shortest interval to the longest.

! Windshield washer

To wash the windshield, pull the wiper
control lever toward you. The washer fluid
sprays until you release the lever. The
wipers operate while you pull the lever.

NOTE

Windshield washer fluid warning light
(type A)

3-98


Content   ..  13  14  15  16   ..