SsangYong Rexton. Service manual - part 337


  Index      SsangYong     SsangYong Rexton - service and repair manual


Search            


Content   ..  335  336  337  338   ..


SsangYong Rexton. Service manual - part 337


M161 ENGINE MECHANICAL  1B2-31

SSANGYONG  Y200

YAD1B6D0

YAD1B6F0

YAD1B6J0

Tools Required

116 589 20 33 00

Sliding Hammer

116 589 01 34 00

Threaded Pin

Removal & Installation Procedure

1. Remove the power steering belt pulley and A/C

compressor bracket.

2. Remove the oil line from power steering pump.

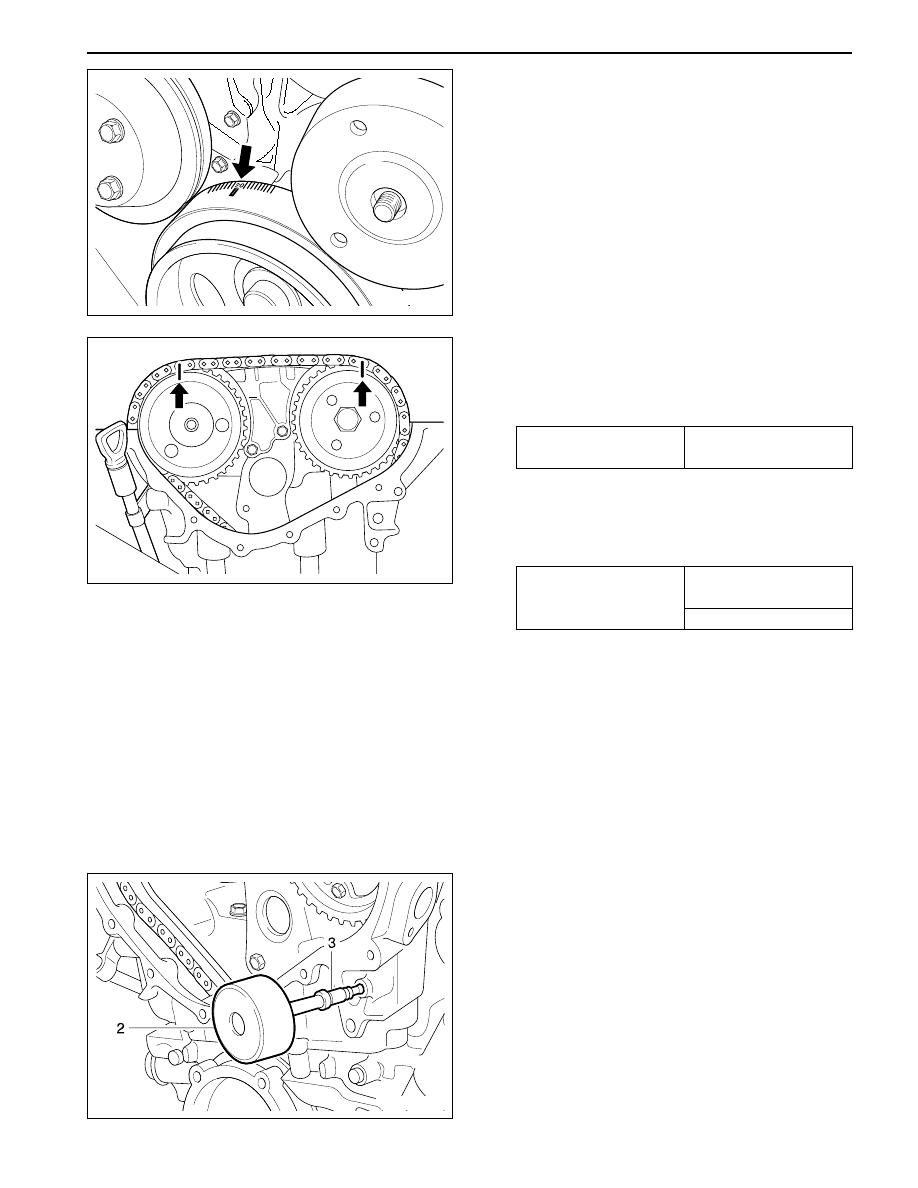
3. Rotate the crankshaft so that the piston of number,

cylinder is at ATDC 20 ° .

7. Remove the guide rail pin using the sliding hammer

116 589 20 33 00 (02) and the threaded pin 116
589 01 34 00 (03).

Notice: Apply the sealant on guide rail pin when
installation.

4. Put the alignment marks (arrows) on the timing

chain and camshaft sprocket.

5. Remove the chain tensioner.

Installation Notice

Notice:  The flange bolt is designed to be used
only once, so always replace with new one.

6. Remove the intake and exhaust camshaft sprocket

(remove the camshaft adjuster assembly in E23
engine).

Installation Notice

Tightening Torque

1st  step: 18 - 22 N•m

(13 - 16 lb-ft)

2nd step: 60° ± 5°

Tightening Torque

72 - 88 N•m

(53 - 65 lb-ft)

SSANGYONG  Y200

1B2-32  M161 ENGINE MECHANICAL

YAD1B6K0

YAD1B6Q0

YAD1B6R0

8. Unscrew the bolts (A).

Installation Notice

10. Unscrew the bolts (1, 2) on timing gear case cover

and remove the timing gear case cover.

Installation Notice

9. Remove the belt pulley and vibration damper.

Installation Notice (Center Bolt)

Notice:  Be careful not to damage the cylinder
head gas-ket.

11. Remove the radial shaft seal.

Notice: Installation note replace the seal with new
one.

12. Clean the timing gear case cover and crankcase

sealing surface.

13. Replace the O-ring with new one and apply the

sealant on the sealing surface.

Notice: Be careful not to stain the oil chamber of
chain tensioner with the sealant.

14. Installation should follow the removal precedure

in the reverse order.

15. Warm up the engine and check for oil leaks.

Tightening Torque

22.5 - 27.5 N•m

(16.6 - 20.3 lb-ft)

Tightening Torque

1st step: 200 + 20 N•m

(148 +15 lb-ft)

2nd step: 90° ± 10°

Tightening Torque

22.5 - 27.5 N•m

(16.6 - 20.3 lb-ft)

M161 ENGINE MECHANICAL  1B2-33

SSANGYONG  Y200

CRANKSHAFT SEALING REAR COVER

Preceding Work:

Removal of the automatic transmission drive plate or flywheel

1 Bolt (M6 x 20, 6 pieces)

.................................... 9 - 11 N•m (80 - 97 lb-in)

2 Radial Shaft Seal
3 Rear Cover

YAD1B6S0

4 Sleeve
5 Bolt (M6 x 85, 2 pieces)

.................................... 9 - 11 N•m (80 - 97 lb-in)

6 Washer

SSANGYONG  Y200

1B2-34  M161 ENGINE MECHANICAL

YAD1B740

YAD1B750

YAD1B760

YAD1B6T0

Tools Required

601 589 03 43 00

Crankshaft Rear Seal Installer

Removal & Installation Procedure

1. Unscrew the bolts (1) and (5) and remove the

closing cover by pulling the rear cover lug (arrows).

Notice:  Be careful not to damage the oil pan
gasket.

7. Install the crankshaft sealing rear cover mounting

bolts and remove the crankshaft rear seal installer
601 589 03 43 00.

Installation Notice

6. Install the crankshaft rear radial seal and the

crankshaft sealing rear cover, using crankshaft
rear seal installer 601 589 03 43 00.

2. Clean the sealing surface of the crankcase and

the rear sealing cover.

3. Check the radial shaft seal and replace it if

necessary.

4. Apply the Loctite 573 to the rear cover sealing

surface.

5. Apply the engine oil to the dust lip of the radial

shaft seal.

Notice: Do not use the grease.

8. Installation should follow the removal procedure

in the reverse order.

Tightening Torque

9 - 11 N•m

(80 - 97 lb-ft)


Content   ..  335  336  337  338   ..