Skoda Kodiaq (2019 year). Instruction - part 5


  Index      Skoda     Skoda Kodiaq (2019 year) - instruction in english


Search            copyright infringement  


Content      ..     3      4      5      6     ..


Skoda Kodiaq (2019 year). Instruction - part 5


If there is a fault, the error message will appear in the instrument cluster dis-

play. Seek help from a specialist garage.

WARNING

The system is used only for support, thus the driver is not released from his

obligation to instructionly adjust the main or low beam according to the given

ambient conditions (e.g. in unfavourable lighting and weather conditions, as

when passing poorly lit road users, if necessary, when the area in front of

the sensor is covered by an obstacle).

CAUTION

Do not cover the sensor and keep the front screen clean - system functionality

can be impaired.

Note

The setting for the high-beam assistant in Infotainment is stored (depending

on the Infotainment type) in the active user account for personalisation

» page 59

.

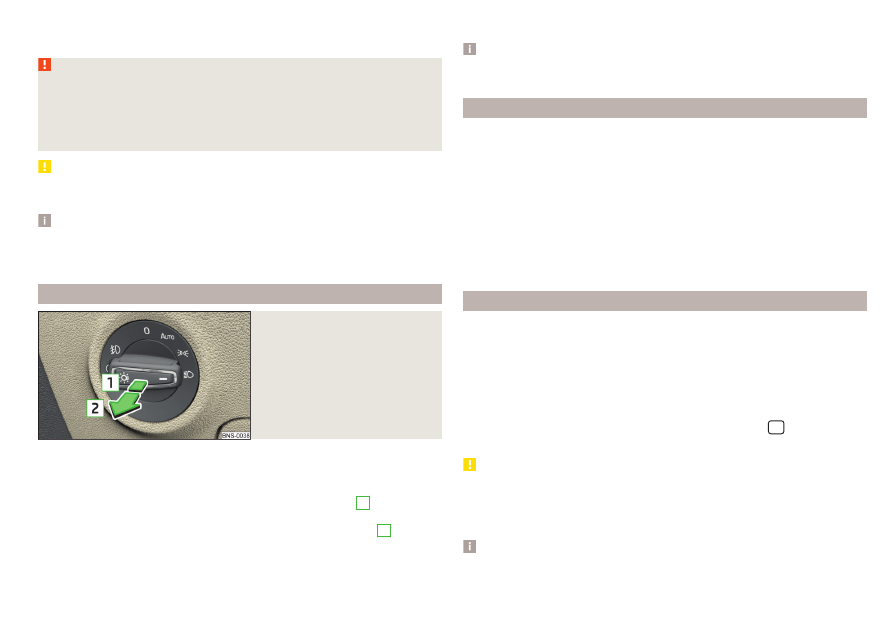
Fog lights/rear fog light

Fig. 72 

Light switch – switch on front

and rear fog lights

Switching on the fog lights/rear fog lights is possible under the following

conditions.

The lights switch is in position ,  or  

» Fig. 72

.

To switch on the fog lights, turn the light switch to position 

1

; the warning

light 

 illuminates in the instrument cluster.

To switch on the rear fog lights, pull the light switch to position 

2

; the

warning light 

 illuminates in the instrument cluster.

If the vehicle is not equipped with fog lights, the rear fog lights can be switch-

ed on by pulling the light switch to the only possible setting.

Switch off the fog lights/rear fog lights in reverse order.

Note

If an accessory is connected to the trailer socket, the rear fog lamp does not

light up on the vehicle.

function CORNER

The CORNER function automatically switches on the fog lights on the respec-

tive side of the vehicle (e.g. when cornering or steering), if the following condi-

tions are fulfilled.

The turn signal is turned on or the front wheels are severely locked (in the

event of conflict between the two versions, has turn signal has the higher

priority).
The vehicle speed is below 40 km/h.
The low beam is switched on.
The fog lights are not switched on.

The two fog lights are switched on when you shift into the reverse gear.

COMING HOME / LEAVING HOME

The function COMING HOME ensures that the vehicle's environment is illumi-

nated after switching off the ignition and opening the driver's door.
The function LEAVING HOME ensures that the vehicle's environment is illumi-

nated after unlocking the vehicle with the radio remote control unit.
The function switches the light on only if there is poorer visibility and the light

switch is in the position .

The two functions can be used in Infotainment in the menu 



/  →  → Light

(activated/deactivated and adjusted).

CAUTION

Poorer visibility is evaluated by a sensor mounted below the windscreen in

the holder of the rear-view mirror. Do not cover the sensor - the system can

be affected.

If this option is always enabled, then the battery is heavily loaded.

Note

The setting of the two functions is stored (depending on the Infotainment

type) in the active user account personalisation 

» page 59

.

77

Lights and visibility

-------------------------------------------------------------------------------------------------------------------------------------------------------------

Hazard warning light system

Fig. 73 

Button for hazard warning light

system

To switch on/off, press the 

 button 

» Fig. 73

.

When switching on, all the turn signal lights as well as the warning light 

 in

the button flash simultaneously with the control lights 


 in the instrument

cluster.

The hazard warning light system can also be operated if the ignition is switch-

ed off.
If one of the airbags is deployed, the hazard warning light system will switch

on automatically.
The automatic activation of hazard warning lights can take place during a

heavy braking. After starting or accelerating the hazard warning system is au-

tomatically switched off.
When the hazard warning system is on and the turn signal is switched on, the

hazard warning lights are switched off temporarily and only the turn signal

flashes on the relevant side of the vehicle.

Parking light

The side light is provided for lighting of the parked vehicle.

Switching on the side light  on one side

Switch off the ignition.

Press the control lever all the way into position or until it stops 

» Fig. 69

on page 75.

The parking lights on the respective side of the vehicle are turned on.

Switching on the side light on both sides 

Turn the ignition on and turn the light switch to position  

» page 74

.

Switch off the ignition and lock the car.

After removing the ignition key and opening the driver's door, an audible warn-

ing sounds. After a few seconds, or after closing the driver's door, the acoustic

warning signal stops.

CAUTION

Turning on the parking light means the battery is heavily loaded.

The parking lights may switch off automatically due to a low battery charge.

If the two-sided parking lights are switched on when the ignition is off, the

parking lights will not switch on automatically.

Entry space lighting

The lighting is positioned on the lower edge of the exterior mirror and illumi-

nates the entry area of the front door.
The lighting switches on after unlocking or opening the vehicle door (depend-

ing on the lighting conditions).
The lighting switches off after around 30 seconds after closing the front door

or switching on the ignition.

Driving abroad

When driving in countries with opposing traffic system (traffic on the

left/right), headlights may dazzle oncoming traffic.
Therefore, the LEDFront headlight setting must be adapted by turning on trav-

el mode in infotainment in the 



/  →  → Light menu. In this mode, no auto-

matic beam adjustment is made ahead of the vehicle.
It is necessary to have the headlights adapted by a specialist garage.

Interior lighting

Introduction

The inner lighting also works if the ignition is switched off. With the ignition

off (or after a door is opened),the lights will automatically switch off after ap-

proximately 10 minutes.

78

Operation

-------------------------------------------------------------------------------------------------------------------------------------------------------------

Operation of the lights from the front seats

Fig. 74 

Operation of the lights from the

front seats

Switch on/off (by pressing the relevant switch) 

» Fig. 74

 Automatic operation

  Rear lighting

Depending on equipment fitted:

 Reading lamp left

 Front and rear lighting

 Reading lamp right

Automatic operation - switch 

The system is turned on when any of the following is present.

The vehicle is unlocked.

One of the doors is opened.

The ignition key is removed.

The system is turned off when any of the following is present.

The vehicle is locked.

The ignition is switched on.

About 30 seconds after all the doors have been closed.

A
B
C

D

Interior light, rear

Fig. 75 

Interior lights at the rear: Variant

1

Fig. 76  Interior lights at the rear: Version 2/version 3

The rear lighting (variants 1 and 3) is controlled together with the automatic

operation of the lighting from the front seats.
Variant 1 - switch on/off (by pressing the relevant switch) 

» Fig. 75

 Reading lamp left

 Reading lamp right

Variant 2 - operation (by moving the light lens 

C

) 

» Fig. 76

Switching on
Switching off
Automatic operation (the light is switched on/off automatically together

with the front light)

Variant 3 - switch on/off (by pressing the relevant switch) 

» Fig. 76

 Reading lamp left

 Reading lamp right

A
B

D

79

Lights and visibility

-------------------------------------------------------------------------------------------------------------------------------------------------------------

Ambient lighting

Fig. 77 

Setting the ambient lighting

The ambient lighting illuminates the side door trim panels in colour, and the

footwell in white.
The switching on of the lighting takes place automatically after opening the

door, switching off occurs automatically after the locking of the vehicle or 30

seconds after the closing of the door with the ignition switched off.
The ambient lighting can be adjusted in Infotainment in the menu 



/  → 

→ Background lighting.
Description of the function surfaces 

» Fig. 77

Enable / disable the background lighting
Activating of the brightness setting for all areas at the same time
Activating the brightness controls for the door area
Activating the brightness setting for the footwell area
Choice of colour options / brightness adjustment
Function surfaces for selecting lighting colour / brightness adjustment

To display 

B

C

, and 

D

, tap the function surface .

Vehicles by selecting the driving mode

For vehicles with driving mode selection 

» page 251

 The lighting can be

switched on automatically or instructionly 

A


» Fig. 77

. A change in the illumination

colour occurs automatically due to the driving mode change or instructionly by se-

lecting one of the colour options. In individual mode, the last instructionly selected

colour is displayed.

Note

The adjustment of the ambient lighting is stored (depending on Infotainment

type) in the active user account personalisation 

» page 59

.

A
B
C
D

E
F

Visibility

Introduction

WARNING

No objects should be attached to the sun visors, which could limit the view

or endanger the vehicle occupants during sudden braking or should the ve-

hicle collide.

Windscreen and rear window heater

Fig. 78  Buttons for the front and rear window heater: Climatronic /

instruction air conditioning

Read and observe   on page 80 first.

The heating for quick defrosting and ventilation of the front /and rear window.
The heating only works when the engine is running.
Buttons for the heating (depending on vehicle equipment) 

» Fig. 78

Switching the windscreen heater on/off
Switch on/off the rear window heater

When the heating is switched on, a light illuminates inside or below the button.

The heating automatically switches off after ten minutes.
If the engine is switched off when the heating is on and turned back on again

within 10 minutes, the heating is continued.

80

Operation

-------------------------------------------------------------------------------------------------------------------------------------------------------------

Note

If the on-board voltage decreases, the heating switches off automatically

» page 282

Automatic consumer shutdown - discharge protection of the vehi-

cle battery.

If the lighting inside or below the button flashes, the heater will not work be-

cause of the low charge of the battery.

If the Climatronic recognises that the windshield could fog up, the windshield

heating is automatically switched on. This function can be activated/deactiva-

ted on the Climatronic control panel in the menu 



 → 

Front sun visors

Fig. 79  Fold down flap / flip up flap / make-up mirror and parking per-

mit holder

Read and observe   on page 80 first.

Operation and description of the sun visor 

» Fig. 79

Swivel the visor towards the windscreen
Swivel cover towards the door
Make-up mirror with cover (the cover can be pushed in the direction of

the arrow)
Light (turns on when the cover of the make-up mirror is pushed to one

side)
Parking ticket holder

1

2

A

B

C

Sunshade in the rear doors

Fig. 80  Sun blind on the rear door

Read and observe   on page 80 first.

To roll down, pull out the sunshade by the handle 

A

 in direction of arrow 

1

and suspend in the holder 

B

 on top edge of the door in the direction of ar-

row 

2


» Fig. 80

.

To roll up, hold the sunshade by the handle 

A

 and remove it from the holder

B

 against the direction of arrow 

2

. Hold the sunshade so that this can

slowly roll back in without damaging.

Windscreen wipers and washers

Introduction

The windscreen wipers and the wash system operate if the ignition is switched

on and the bonnet and boot are closed.

WARNING

Do not use the windscreen washer system at low temperatures, without

heating the windscreen beforehand. The window washer fluid could other-

wise freeze on the windscreen and restrict the view to the front.

81

Lights and visibility

-------------------------------------------------------------------------------------------------------------------------------------------------------------

CAUTION

If the windscreen wipers are in rest position, they cannot be folded out from

the windscreen. The wipers must be set to the service position to raise them

off the windscreen 

» page 303

.

In cold temperatures and during the winter, check before switching on the

ignition that the wiper blades are not frozen to the windscreen. If the wind-

screen wipers are switched on when the blades are frozen to the windscreen,

this may damage both the blades and windscreen wiper motor.

Carefully release the frozen-on windscreen wiper blades from the wind-

screen and remove snow and ice.

Handle the windscreen wipers with care - there is the risk of damaging the

windscreen with the windscreen wiper arms.

Do not switch on the ignition when the front windscreen wiper arms are fol-

ded down - there is the danger of damaging the bonnet by the windscreen

wiper arms.

If there is an obstacle on the windscreen, the wipers will try to push away the

obstacle five times. Thereafter, the wipers will stop to prevent them becoming

damaged. Turn on the wipers again only after the obstacle has been removed.

Note

Each time the ignition switches off for the third time, the position of the

windscreen wipers changes. This counteracts an early fatigue of the wiper

blades.

The windscreen washer nozzles for the windscreen are heated when the en-

gine is running and the outside temperature is less than +10 °C.

Front wipers and washers

Fig. 81 

Operating the windscreen wip-

ers and washing system at the

front

Read and observe   and   on page 81 first.

Fast disk wiping

Slow disk wiping

Depending on equipment fitted:

Intermittent wipe of the windscreen

Automatic windscreen wiping in the rain

Wipers and washers off
Single windscreen wipe (sprung position)

 Setting of windscreen wiper interval for the position  - by setting the

switch in the direction of the arrow, the windscreen wipers will wipe more

often
Spraying and wiping the windscreen (sprung position)

 Spraying and wiping the windscreen

After releasing the operating lever, the wipers will make from 2 to 3 wiper

strokes.
At a speed of more than 2 km/h, the wiper wipes once again 5 seconds after

the last wiper stroke in order to wipe the last drops from the windscreen. This

function can be activated/deactivated by a specialist garage.

Automatic windscreen wiping in the rain can be used in Infotainment in the

menu 



/  →  → Mirrors and wipers (activated/deactivated).

WARNING

Automatic wiping during rain is only a support. The driver is not released

from the responsibility to set the function of the windscreen wipers man-

ually depending on the visibility conditions.

Note

If the wiping is carried out without interruption, the wiping speed varies de-

pending on the vehicle speed.

The setting (activation/deactivation) of the automatic windscreen wiping in

the rain is stored (depending on the Infotainment type) in the active user ac-

count personalisation 

» page 59

.











A

82

Operation

-------------------------------------------------------------------------------------------------------------------------------------------------------------

Rear window wipers and washers

Fig. 82 

Operating the windscreen wip-

ers and washing system

Read and observe   and   on page 81 first.

Spraying and wiping the windscreen (sprung position) - after releasing the

control stalk, the wipers perform another 2 to 3 wiper strokes
Windscreen wiping
Wipers and washers off

Automatic rear wiper

If the windscreen wiping is performed without interruption, then the automat-

ic regular intermittent wiping of the rear window takes place.
This function can be used in Infotainment in the menu 



/  →  → Mirrors and

wipers (activated/deactivated).

Note

The rear window is wiped automatically if the windscreen wipers are on

when reverse gear is selected.

The setting (activation/deactivation) of the automatic rear window wiping in

the rain is stored (depending on the Infotainment type) in the active user ac-

count personalisation 

» page 59

.

Headlight cleaning system

Read and observe   and   on page 81 first.

Headlights are cleaned under the following conditions.

The low beam is switched on.
The outside temperature is about -12° C to +39° C.



The headlights are cleaned every first and tenth (for every twentieth, for some

countries) spray of the front windscreen. Setting the spray interval can be car-

ried out by a specialist garage.
To ensure the correct functioning of the system, even in winter, this needs to

be regularly cleared of snow and ice (e.g. using the de-icing spray).

Rear view mirror

Introduction

WARNING

Exterior mirrors increase the field of view, however, make objects appear

smaller and further away. Therefore, use the rear-view mirror to determine

the distances to the following vehicles.

WARNING

The mirrors with automatic dimming contain electrolyte fluid which may

leak if the mirror glass is broken - this can irritate skin, eyes and the respira-

tory system.

If your eyes or skin come into contact with the electrolyte fluid, immedi-

ately wash the affected area for a few minutes with plenty of water. Seek

medical assistance if required.

83

Lights and visibility

-------------------------------------------------------------------------------------------------------------------------------------------------------------

Interior mirror dimming

Fig. 83  Interior rear-view mirror: with instruction dimming/auto-darkening

Read and observe   on page 83 first.

Mirrors with instruction dimming 

» Fig. 83

Basic position of the mirror (not dimmed)
Mirror blackout

Mirror with automatic dimming

The mirror dimming 

» Fig. 83

 is automatically controlled after the engine start.

When the interior lights are switched on or the reverse gear is engaged, the

mirror moves back into the basic position (not dimmed).

WARNING

Attach external devices (e.g. navigation system) not in the vicinity of the

mirror with automatic dimming. The illuminated display of an external de-

vice can affect the function of the rear-view mirror - it could cause an acci-

dent.

The automatic dimming mirror only functions smoothly if the light falling

on the sensors is not compromised (e.g. by the sunshade at the back). The

sensors are located on the front and back of the mirror.

1

2

Exterior mirrors

Fig. 84 

Exterior mirror operation

Read and observe   on page 83 first.

The exterior mirrors can (depending on vehicle equipment) have a instruction or

electric fold-in function, automatic dimming and memory function.
The rotary knob can be moved into the following positions (depending on

vehicle equipment)

Adjusting the left-hand mirror area
Switch off mirror control
Adjusting the right-hand mirror area
Mirror heating (only works when the engine is running)
Folding in the mirrors electrically (to fold back, move the rotary knob to

another position) 

» 

Setting the mirror area

Move the rotary knob in the direction of arrows 

» Fig. 84

.

If the mirror setting fails at any time, the mirrors can be adjusted instructionly by

pressing on the edge of the mirror area.

Setting the mirror surfaces synchronously

This function allows the simultaneous adjustment of the two mirror areas. The

function can be activated/deactivated in Infotainment in the menu 



/  → 

→ Mirrors and wipers (activated/deactivated).

Turn the knob for the mirror control to the position for the driver mirror ad-

justment.

Adjust the mirror areas to the desired position.

84

Operation

-------------------------------------------------------------------------------------------------------------------------------------------------------------

Instruction folding mirrors

The mirror can be instructionly folded towards the side windows. To put it back to

its original position, it should be folded back from the side window until it audi-

bly clicks into place.

Automatic folding in/back of both mirrors

The exterior mirrors are automatically collapsed after locking the vehicle in the

park position. After unlocking the vehicle, the mirrors are folded back to the

driving position 

» 

.

This function can be used in Infotainment in the menu 



/  →  → Mirrors and

wipers (activated/deactivated).

Mirror with automatic dimming

The exterior mirror dimming is controlled together with the automatic rear-

view mirror dimming 

» page 84

.

Memory function for mirror (vehicles with electrically adjustable driver's

seat)

It is possible to save the current setting of the exterior mirror when saving the

driver's seat position with 

» page 87

Memory Function of the electrically ad-

justable seat or 

» page 87

Memory function of the remote control key.

Tilting the mirror area of the front passenger mirror (vehicles with

electrically adjustable driver's seat)

The front passenger mirror area can be tilted to the stored position to improve

the view to the curb when reversing.
Operating conditions

The function can be activated in Infotainment in the menu 



/  →  →

Mirrors and wipers.
The setting of the mirror area has been previously stored 

» page 87

,

Memory Function of the electrically adjustable seat or. 

» page 87

Memo-

ry function of the remote control key.
The reverse gear is engaged.
The knob for the mirror control is in the position for the passenger mirror

adjustment.

The mirror area returns to its initial position after the rotary knob is set to an-

other position or if the speed is greater than 15 km/h.

WARNING

Do not touch the exterior mirror surfaces, if the exterior mirror heating is

switched on - hazard of burning.

CAUTION

Never manually fold in/out the electrically folding exterior mirrors - there is a

risk of damage to the mirror!

When the mirror is swung by external influences (due to impact during ma-

noeuvring, for example), then first fold-in the mirror by turning the knob and

wait for a loud clapping noise.

Note

The setting of the mirror functions is stored in Infotainment (depending on the

Infotainment type) in the active user account personalisation 

» page 59

.

85

Lights and visibility

-------------------------------------------------------------------------------------------------------------------------------------------------------------

Seats and head restraints

Front seats

Introduction

WARNING

Only adjust the driver's seat when the vehicle is stationary – risk of acci-

dent!

Caution when adjusting the seat! You may suffer injuries or bruises as a

result of adjusting the seat without paying proper attention.

Manual adjustment

Fig. 85 

Control elements on the seat

Read and observe   on page 86 first.

Adjusting the seat in the longitudinal direction (after releasing the control

lever must lock audibly)
Adjusting height of seat
Adjust the tilt of the backrest (do not lean on the backrest when adjusting)
Setting the extent of the curvature of the lumbar support

Note

After a certain time, play can develop within the adjustment mechanism of the

backrest angle.

A

B
C
D

Electrical adjustment

Fig. 86  Control elements on the seat

Read and observe   on page 86 first.

seat adjustment

1 - Move in the longitudinal direction

2 - Change in inclination

3 - Change in height

Adjusting the seat backrest

4 - Change in inclination

Adjusting lumbar support

5 - Change curvature

6 - The degree of curvature change

WARNING

The electric front seat adjustment is functional even with the ignition off.

Therefore, when leaving the vehicle, never leave people who are not com-

pletely independent, such as children, unattended in the vehicle - there is a

danger of injury!

Note

If the inclination angle of the seat backrest relative to the seat surface is

greater than approx. 110°, then it is not possible for safety reasons to save this

setting in the memory of the electrically adjustable seats or the remote control

key.

On vehicles with personalisation, the driver's seat setting is stored in the ac-

tive user account personalisation 

» page 59

.

A

B

C

86

Operation

-------------------------------------------------------------------------------------------------------------------------------------------------------------

Memory Function of the electrically adjustable seat

Fig. 87 

SET button and memory but-

tons

Read and observe   on page 86 first.

Among the memory buttons 

B

 on the driver's seat, a setting for the driver´s

seat and exterior mirror position can be saved 

» Fig. 87

.

Storing seat and exterior mirror settings for driving forward

Switch on the ignition, adjust the seat and the exterior mirrors, as required.

Press the  

A


» Fig. 87

 button and then, within 10 seconds, press the de-

sired memory button 

B

. Storing is confirmed by an acoustic signal.

Storing front passenger´s exterior mirror settings for reversing

The function for lowering the front passenger's mirror area during reversing

can be activated in Infotainment in the menu 



/  →  → Mirrors and wipers.

Turn on the ignition and press the desired memory button 

B


» Fig. 87

.

Turn the rotary knob for the exterior mirror control to the position for the

front passenger mirror area 

» page 84

.

Engage reverse gear.

Adjust the front passenger's mirror to the desired position.

Disengage reverse gear. The set position of the exterior mirror is stored.

Retrieving the saved setting

With the ignition off and the driver’s door open-press- the desired memory

button B.

In other cases (e.g. if the ignition is switched on or the driver's door closed),

hold the button.

Stopping the ongoing adjustment

Press any button on the seat that is to be set. The driver's seat can also be

stopped by pressing the  button on the radio-operated key.

Note

Every time you save new seat and exterior mirror settings for driving forwards,

you must also save the front passenger mirror setting for reversing again.

Memory function of the remote control key

Applies to vehicles that do not have the personalisation function.

Read and observe   on page 86 first.

Every time the vehicle is locked, the driver´s seat and exterior mirror settings

are saved and assigned to the key with which the vehicle was locked.
After the following unlocking of the vehicle with the same key and opening the

driver’s door, the driver´s seat and exterior mirrors that are saved to this key

will be adopted.
This function can be used in Infotainment in the menu 



/  →  → Seats acti-

vated/deactivated.

Storing front passenger´s exterior mirror settings for reversing

The function for lowering the front passenger's mirror area during reversing

can be activated in Infotainment in the menu 



/  →  → Mirrors and wipers.

Unlock the vehicle with the remote control key and switch on the ignition.

Turn the rotary knob for the exterior mirror control to the position for the

front passenger mirror area 

» page 84

.

Engage reverse gear.

Adjust the front passenger's mirror to the desired position.

Disengage reverse gear. The adjusted position of the exterior mirror is stored

in the remote control key memory.

Stopping the ongoing adjustment

Press any button on the driver's seat or the  button on the remote control

key.

87

Seats and head restraints

-------------------------------------------------------------------------------------------------------------------------------------------------------------

Folding front passenger seat

Fig. 88 

Folding the front passenger seat

forward

Read and observe   on page 86 first.

The front passenger seat can, (depending on equipment fitted), be folded for-

ward into a horizontal position.

To fold down, pull the lever in direction of arrow 

1

, fold the seat backrest in

the direction of arrow 

2


» Fig. 88

. The locking mechanism must audibly snap

into place.

To fold up, pull the lever in direction of arrow 

1

, fold back the seat backrest

against the direction of arrow 

2

. The locking mechanism must audibly snap

into place.

Check this by pulling on the seat and on the backrest.

WARNING

If the seat backrest is folded down, only the seat behind the driver´s seat

can be used to transport passengers.

When transporting objects on the folded seat backrest, the front passen-

ger airbag should be deactivated 

» page 28

.

Do not adjust the seat backrest while driving - it can cause injury and ac-

cidents!

When moving the seat backrest, keep limbs out of the area between the

seat and seat backrest – risk of injury!

Never transport the following items on the seat backrest when folded

forwards.

Objects that could restrict the driver's view.

Objects which make it impossible for the driver to control the vehicle,

e.g. if they roll under the pedals, or could protrude into the driver's zone.

Objects which could lead to injury to passengers due to a change of di-

rection or braking manoeuvre when accelerating sharply.

Armrest setting

Fig. 89 

Adjust armrest

Read and observe   on page 86 first.

To adjust the height, lift the armrest in the direction of the arrow

A

 into one

of the locking positions 

» Fig. 89

.

To close, lift the armrest in the direction of arrow 

A

past the stop and then

fold down again.

To Set the armrest lengthways in the direction of arrow 

B

 Move to the de-

sired position.

Rear seats

Setting the second seat row

Fig. 90 

Setting the second seat row

88

Operation

-------------------------------------------------------------------------------------------------------------------------------------------------------------

Fig. 91 

Adjusting the seat backrest

Move in the longitudinal direction

Pull lever 

A

in the direction of arrow 

1

and move the seat to the desired po-

sition in the direction of arrow 

2


» Fig. 90

. After releasing the control lever

the latch must engage audibly.

Adjusting the angle of the seat backrest

Pull on the strap in the direction of arrow 

1


» Fig. 91

 and press the seat

backrest in direction of arrow 

2

. The locking mechanism must audibly snap

into place.

To adjust the seat backrest to upright position, pull on the loop in the direc-

tion of arrow 

1

 and hold the arm in the forward movement until the lock

clicks.

Easy Entry function

Fig. 92  Easy Entry function

The Easy Entry function provides the access to the third seat row of the seat-

seat version

Fold and slide the seat forward

Pull the unlock handle in the direction of arrow 

1


» Fig. 92

.

Fold the seat forwards and slide the seat in the direction of arrow 

2

.

An reach the third seat row easier, the seat belt to the strap can be fastened to

the tab

A

 on the interior trim of the rear body pillar.

Fold back seat

Adjust the seat longitudinally and fold back the backrest.

Check this by pulling on the seat and on the backrest.

Fold down outer backrests of the second seat row

Fig. 93  Fold forward from the passenger compartment / from the lug-

gage compartment

Before folding the seat backrests forwards, adjust the position of the front

seats in such a way that they are not damaged by the seat backrests. Remove

the rear headrests if required 

» page 92

.

Folding forwards from the passenger compartment

Pull on the strap in the direction of arrow 

1

 in the side seating area and fold

forward the seat backrest in the direction of arrow 

2


» Fig. 93

. The locking

mechanism must audibly snap into place.

Fold forward from the luggage compartment

Pull the corresponding lever in the direction of the arrow 

» Fig. 93

. The re-

spective seat backrest is unlocked or folded forward.

Folding backwards

Pull on the strap 

1

 and fold back the seat backrest against the direct of ar-

row 

2


» Fig. 93

. The seat backrest mechanism must audibly snap into place.

89

Seats and head restraints

-------------------------------------------------------------------------------------------------------------------------------------------------------------

Fold forward middle seat backrest

Fig. 94 

Fold forward middle seat back-

rest

Before folding the middle seat back, set the headrest as low as possible - there

is a risk of damage to the slats of the air vents at the rear.

To fold forward, press the securing tab in direction of arrow 

1

 and fold for-

ward the backrest in the direction of arrow 

2


» Fig. 94

.

To fold back, lift the seat backrest in the opposite direction to arrow 

2

. The

seat backrest mechanism must audibly snap into place.

WARNING

The seat backrests in the occupied rear seats must be properly engaged.

When transporting objects in the luggage compartment that has been en-

larged by folding the backrest forward, ensure the safety of the passengers

transported on the other rear seats.

The seat backrests must be securely latched in position so that no objects

from the luggage compartment can slip into the passenger compartment

under sudden braking – risk of injury.

CAUTION

When operating the seat backrests, the seat belts must not be pinched - there

is a risk of damage to the seat belts.

Folding seat backs of the third row of seats up / down

Fig. 95  Fold up/down seat backrests

Before folding up/folding down the seat backrests, move the second row

of seats forward, otherwise there is a risk of damaging the seats,
Before folding up the seat backrest, the foldable luggage compartment cover

must be removed .

To fold up, pull the strap 

A

 in direction of arrow 

1


» Fig. 95

. The seat back

must engage audibly after folding up.

To fold down, press the unlocking tab 

B

 in direction of arrow 

2

 and fold

forward the seat backrests in the direction of arrow 

3

.

When seat backrests are folded down in vehicles with the variable loading

floor, place the foldable parts 

C

 on the variable loading floor.

Third-row seats fold up / fold down

Fig. 96  Fold seats up/down

90

Operation

-------------------------------------------------------------------------------------------------------------------------------------------------------------

Before lowering the seats, the buckle tongues of the seat belts are to unlock

(the straps must be completely rolled up under the trim of the rear body pillar)

- otherwise there is a risk of damage to the locks, lock tongues as well as the

seats.

Fold the seat backs forwards.

To fold up, pull the straps simultaneously in the direction of arrow 

1

» Fig. 96

. The seats are raised in the direction of arrow 

2

.

To fold down, press the seats in the direction of arrow 

3

.

Fold down armrest

Fig. 97 

Fold down armrest

The armrest can be folded down by pulling on the loop 

A

 in the direction of

arrow 

» Fig. 97

.

The folded-down armrest can be used as a side table.

Headrests

Introduction

Note

In sports seats, the headrests are integrated into the seat backrests and can-

not be adjusted in height.

Adjust height of front head restraint

Fig. 98 

Setting the height of the front

headrest

To adjust the height, hold the locking button 

A

 and move the rest in the de-

sired direction 

» Fig. 98

.

CAUTION

If the tablet holder adapter is secured to the guide rods of the headrests

» page 107

, do not push the headrests down to the stop - risk of damaging the

headrests.

Adjust head restraints in the second seat row

Fig. 99  Adjust the height of the headrest in the second seat row

91

Seats and head restraints

-------------------------------------------------------------------------------------------------------------------------------------------------------------

Fig. 100 

Fold down side bolsters of the

comfortable headrests

Setting the height

Grasp the headrest and move upwards in the direction of 

1


» Fig. 99

.

To move the restraint down, hold the locking button 

A

 in the direction of

arrow 

2

 and push the rest in the direction of arrow 

3

.

Comfortable headrests

The head restraints of the second row of seats can be equipped with side bol-

sters. These reduce uncontrolled movement of the head sideways (e.g. when

sleeping).

Adjust the headrest to the initial pulled out position 

» page 91

Adjust head

restraints in the second seat row.

Fold down the sides of the head restraint in the direction of arrow 

» Fig. 100

.

Removing / insert headrests in the second seat row

Fig. 101  Removing / inserting headrest in the second seat row

To remove, pull the rest out of the seat backrest up to the stop.

Press locking button 

A

 in the direction of arrow 

1,

 and pull out the head

restraint in the direction of arrow 

2


» Fig. 101

.

To insert, push the rest into the seat backrest in the direction of arrow 

3

until the locking button clicks into place.

Adjust the height of the head restraints of the third seat row

Fig. 102  Adjust the height of the headrest of the third seat row

Grasp the headrest and move upwards in the direction of 

1


» Fig. 102

.

To move the restraint down, hold the locking button 

A

 in the direction of

arrow 

2

 and push the rest in the direction of arrow 

3

.

Note

The head restraints of the third seat row can not be removed.

Seat heating and ventilation

Introduction

Fig. 103  Button arrangement: Heated front seats (and ventilation) /

heated rear seats

92

Operation

-------------------------------------------------------------------------------------------------------------------------------------------------------------


Content      ..     3      4      5      6     ..