Renault Clio (2017 year). Manual - part 9


  Index      Renault     Renault Clio - service manual 2017 year in english


Search            


Content   ..  7  8  9  10   ..


Renault Clio (2017 year). Manual - part 9


2.42

ASSISTED PARKING 

(3/4)

Your speed should not exceed around 

4 mph (7 km/h).

Once in position to exit the space, the 

system will notify you of the end of the 

manoeuvre.

Once the warning light 

 on the 

instrument panel goes off and a beep 

sounds, the manoeuvre has been com-

pleted.

Suspending the manoeuvre

The manoeuvre is suspended in the fol-

lowing circumstances:

–  you take control of the wheel;

–  a door or the boot is opened;

–  the vehicle is at a standstill for too 

long;

–  an obstacle in the direction of move-

ment prevents the manoeuvre from 

being completed;

–  the engine will stop.

Once the warning light 

 on the 

instrument panel goes off and a beep 

sounds, the manoeuvre has been sus-

pended. To resume the manoeuvre, 

press and hold the system activation 

switch.

In this case, the reason for suspending 

the manoeuvre will be displayed on the 

multifunction screen.
Make sure:

–  you have released the steering wheel 

and;

–  that all doors and the boot are closed, 

and;

–  that no obstacles are in the way of 

the direction of movement, and;

–  that the engine is started.

Cancelling the manoeuvre

The manoeuvre can be stopped in the 

following cases:

–  by pressing the system activation 

switch;

– the vehicle speed has exceeded 

4 mph (7 km/h);

–  you have performed more than ten 

forwards/backwards movements in 

one manoeuvre;

–  the parking distance control sensors 

are dirty or blocked;

–  the vehicle wheels have skidded.

Once the warning light 

 on the 

instrument panel goes off and a beep 

sounds, the manoeuvre has been com-

pleted.

Exiting a parallel parking space
–  Select “Exit parallel parking space” 

mode;

–  activate the direction indicator on the 

side you wish to go out of;

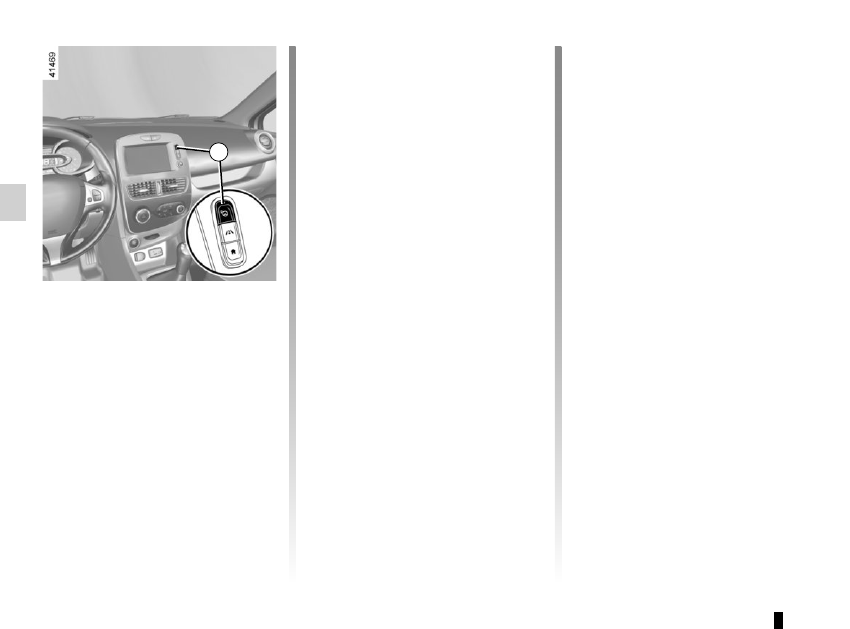
– press and hold switch 1 (around 

2 seconds).

The 

 indicator light lights up 

on the instrument panel and a beep 

sounds;

–  release the steering wheel;

–  go forwards and backwards using 

the parking distance control system 

alerts.

1

2.43

ASSISTED PARKING 

(4/4)

This function is an additional driving aid. This function is not under any circumstances intended to replace the due care 

and attention of the driver, who should at all times be in control of the vehicle.
Make sure that the manoeuvre complies with the applicable traffic regulations at your location.

–  The driver should always be ready for sudden incidents while driving: always ensure that there are no small, narrow moving 

obstacles (such as a child, animal, pushchair, bicycle, stone, post etc.) in the blind spot when manoeuvring.

–  The system cannot detect objects located in the sensor blind spots.
–  When manoeuvring, the steering wheel may turn quickly: do not put your hands inside, and make sure that nothing is caught 

inside.

–  Always visually check that the parking space proposed by the system is still available and contains no obstacles.
–  The system should only be used when towing a trailer or when there is a towing or load carrying system on the vehicle.

2.44

Operation

With the selection lever 1 in position P

switch on the ignition.
To move out of position P, you must de-

press the brake pedal before pressing 

the unlocking button 2.
With your foot on the brake pedal 

(warning light 3 on the display goes 

out), move the lever out of position P.
Only engage D or R when the vehi-

cle is stopped, with your foot on the 

brake and the accelerator pedal re-

leased.

Selector lever 1

P: park
R: reverse
N: Neutral
D: automatic mode
M: manual mode
+: upper gear
: lower gear
4:  displays the gear engaged in manual 

mode.

Note: Press the button 2 to go from po-

sition D or N to R or P.

AUTOMATIC TRANSMISSION 

(1/3)

1

4

3

2

Gear change paddles 5

The paddles 5 enable you to change 

gear while the gear lever is in ‘manual 

mode’ position or, if driving, in ‘auto-

matic mode’ position.
PN and R are not accessible using the 

paddles.
The display 4 notifies the driver about 

the current mode and gear.

5

5

2.45

AUTOMATIC TRANSMISSION 

(2/3)

Driving in manual mode

With the selector lever in position D

move the lever to the left into the M po-

sition. Shifting the lever or the paddles 

repeatedly allows you to change gears 

manually:

–  to move down through the gears, 

push the lever forwards or press the 

left-hand paddle;

–  to move up through the gears, push 

the lever backwards or press the 

right-hand paddle.

The gear selected is displayed on the 

instrument panel.

Special cases

In certain driving conditions (for exam-

ple, engine protection, operation of the 

Electronic Stability Programme: the au-

tomatic system may change gear auto-

matically. Likewise, to prevent incorrect 

manoeuvres, a gear change may be re-

fused by the automatic system: in this 

case the gear display flashes for a few 

seconds as a warning.

Special circumstances

–  If the bends and road surface do 

not allow you to stay in automatic 

mode (e.g. in the mountains), we 

recommend that you change to 

manual mode. This will prevent the 

automatic gearbox from changing 

gear repeatedly when climbing, and 

permit engine braking on long de-

scents.

Driving in automatic mode

Put lever 1 into position D.
In most road conditions you will en-

counter, you will not need to touch your 

lever again: the gears will change au-

tomatically at the right time and at the 

most suitable engine speed because 

the automatic system takes into ac-

count the vehicle load and road contour 

and adjusts itself to the particular driv-

ing style you have chosen.

Economical driving
When driving, always leave the lever 

in position D, keeping the accelerator 

pedal lightly depressed to ensure auto-

matic gear changes at a lower engine 

speed.

Accelerating and overtaking
Depress the accelerator pedal firmly 

and fully (so that it goes beyond the 

kickdown point).
This will enable you to change down 

to the optimum gear within the 

engine range.

When facing uphill, to remain 

stopped, do not keep your foot on 

the accelerator.
Risk of overheating the automatic 

gearbox.

2.46

AUTOMATIC TRANSMISSION 

(3/3)

Parking the vehicle

When the vehicle is stopped, move the 

lever to position P while keeping your 

foot on the brake pedal: the gearbox is 

in neutral and the drive wheels are me-

chanically locked by the driveshaft.

Apply the handbrake.

When setting off, if the lever is locked 

in position P even though you are press-

ing the brake pedal, the lever can be re-

leased manually. To do this, release the 

base of the lever, then use a tool (rigid 

rod) in the slot 6 and simultaneously 

press button 7 to unlock the lever.
Contact an authorised dealer as soon 

as possible.

Operating faults

–  when driving, if the “CHECK AUTO 

GEARBOX ” message appears on 

the instrument panel, it indicates a 

fault.
Contact your approved Dealer as 

soon as possible;

–  when driving, if the message 

“Gearbox overheating” appears on 

the instrument panel, stop as soon 

as possible to let the gearbox cool 

down and wait for the message to 

disappear;

–  If a vehicle with an automatic 

gearbox breaks down, refer to the 

information on “Towing” in Section 5.

For safety reasons, do not 

switch off the ignition before 

the vehicle has come to a 

complete standstill.

An impact to the under-

side of the vehicle while 

manoeuvring (e.g.: strik-

ing a post, raised kerb or 

other street furniture) may result in 

damage to the vehicle (e.g.: defor-

mation of an axle).
To avoid any risk of accident, have 

your vehicle checked by an ap-

proved Dealer.

6

7

3.2

AIR VENTS, air outlets 

(1/2)

3

8

5

6

1

2

7

  1  left-hand side window demister 

vent.

  2  left-hand side air vent.

  3  windscreen demisting vents.

  4  centre air vents.

  5  right-hand side air vent.

  6  right-hand side window demister 

outlet.

  7  passenger footwell heater outlets.

  8 control panel.

7

4

3.3

Side air vents

Air flow
To open air vent 11, press on the air 

vent (point 12) until it is open as far as 

required.

Direction
To direct the air flow, swivel side air 

vent 11.

Centre air vents.

Air flow
Move the control knob 9 (beyond the 

resistance point).
Upwards: opened to maximum.
Down: closed.

Direction
Move cursors 10 to the required posi-

tion.

AIR VENTS, air outlets 

(2/2)

11

12

To remove bad odours from your ve-

hicles, only use the systems designed 

for this purpose. Consult an approved 

Dealer.

Do not add anything to the 

vehicle’s ventilation circuit 

(for example, to remove 

bad odours).

There is a risk of damage or of 

fire.

9

10

3.4

Switching air conditioning on 

or off

(depending on vehicle)
The air conditioning is switched on (in-

dicator light on) or off (indicator light off) 

using button 3.
Activation is not possible if control 2 is 

set to OFF.

The controls

1  Adjusting the air temperature.
2  Adjusting the ventilation speed.
3 Air conditioning.
4  Distribution of air in the passenger 

compartment.

5  De-icing/demisting of the rear screen 

and, depending on the vehicle, the 

door mirrors.

6 Air recirculation.

MANUAL AIR CONDITIONING 

(1/3)

1

2

3

4

6

5

The air conditioning system is used 

for:
  lowering the temperature inside the 

passenger compartment;

– eliminating condensation more 

quickly.

3.5

Air recirculation is for:

–  isolating the vehicle from the exter-

nal atmosphere (driving in polluted 

areas, etc.);

– lowering the passenger compart-

ment temperature as quickly as pos-

sible.

Switching the air 

recirculation on

Press button 6: the integrated indicator 

light comes on. In these conditions, air 

is taken from the passenger compart-

ment and is recycled, with no air being 

taken from outside the vehicle.

MANUAL AIR CONDITIONING 

(2/3)

Prolonged use of air recirculation can lead to condensation forming on the side 

windows and windscreen, and discomfort due to the use of non-renewed air in 

the passenger compartment. We therefore advise you to return to normal mode 

(external air) as soon as the air recirculation function is no longer required, by 

pressing the button 6 again.

1

2

3

4

6

5

Distribution of air in the 

passenger compartment

There are five air distribution options. 

Turn control 4 to choose the distribution 

option.

W

The air flow is directed to the 

windscreen and the front side 

window demisting vents.

i

The air flow is distributed be-

tween all the air vents, the 

front side window demisting vents, the 

windscreen demisting vents and the 

footwells.

ó

The air flow is directed mainly 

towards the footwells.

G

The air flow is directed towards 

the dashboard air vents, the 

front footwells and, depending on the 

vehicle, the second row footwells.

J

All the air flow is directed to the 

dashboard vents.

3.6

Adjusting the ventilation 

speed

Move control 2. The further the control 

is positioned to the right, the greater the 

amount of air blown into the passenger 

compartment. If you want to shut off the 

flow of air, set control 2 to OFF.

4

5

MANUAL AIR CONDITIONING 

(3/3)

The system is deactivated: the ventila-

tion speed is zero (vehicle stationary). 

You can, however, still feel a slight flow 

of air when the vehicle is moving.

Rapid demisting

Turn controls 1,  2 and 4 to positions 

W

:

–  air from the outside;

– maximum temperature;

– demisting.

1

2

3

4

6

5

Positions 

W

 and 

i

 prevent air recirculation mode to avoid any risk of 

condensation forming on the windscreen and triggers the air conditioning func-

tion. The integrated light in button 3 does not come on.

Adjusting the air temperature

Turn control 1 to obtain the desired 

temperature. The further towards the 

red the slide is, the higher the tempera-

ture will be.
When the air conditioning system is 

used for long periods, it may begin to 

feel cold. To increase the temperature, 

turn control 1 to the right.

Rear screen de-icing/

demisting

With the engine running, press 

button 5. The operating tell-tale comes 

on.
This function permits rapid demisting/

de-icing of the rear screen and de-icing 

of the door mirrors (on equipped vehi-

cles).
To exit this function, press button 5 

again.
Demisting automatically stops.

3.7

Varying the ventilation speed

In automatic mode, the system uses 

the most suitable amount of air to reach 

and maintain the desired comfort level.
You can still adjust the ventilation 

speed by turning control 6 to increase 

or reduce the ventilation speed.

Adjusting the air temperature

Turn control 2 to obtain the desired 

temperature. 
Turning the control to the right in-

creases the temperature.
Special note: the maximum and mini-

mum settings allow the system to pro-

duce a minimum or maximum tempera-

ture (18°C and 26°C).

The controls

1   Automatic mode.
2   Air temperature adjuster.
3   “Clear View” function.
4   Passenger compartment air distribu-

tion adjustment.

5   Air conditioning control.
6   Adjusting the ventilation fan speed.
7   Air recirculation.
8   De-icing/demisting of the rear screen 

and, depending on the vehicle, the 

door mirrors.

AUTOMATIC CLIMATE CONTROL 

(1/4)

2

3

5

7

8

6

Automatic mode

The automatic climate control system 

guarantees comfort in the passen-

ger compartment and good visibility 

(except in the event of extreme condi-

tions), while optimising consumption. 

The system controls the ventilation 

speed, air distribution, air recirculation, 

and starting and stopping the air condi-

tioning and air temperature.
AUTO: allows the selected comfort 

level to be best attained, depending on 

the exterior conditions. Press button 1.

1

4

3.8

Clear View function

Press button 3 – the integrated indica-

tor light comes on.
This function quickly demists and de-

ices the windscreen, the rear screen, 

the front side windows, and the door 

mirrors (depending on the vehicle). The 

air conditioning and rear screen de-ic-

ing functions must be activated.
Press button 8 to stop the heated rear 

screen operating, and the integrated in-

dicator goes out.
To exit this function, press button 3 

or 1.

AUTOMATIC CLIMATE CONTROL 

(2/4)

Ø

The air flow is distributed be-

tween all the air vents, the 

front side window demisting air vents 

and the windscreen demisting vents.

½

The air flow is mainly directed 

to the dashboard air vents.

¿

The air flow is directed mainly 

towards the footwells.

Adjusting the distribution 

of air in the passenger 

compartment

Press one of the buttons 4. The in-

tegrated warning light in the button 

comes on.
It is possible to combine two positions 

simultaneously – press both buttons 4.

8

3

Some buttons have an operating 

tell-tale which indicates the operat-

ing status.

1

4

3.9

Rear screen de-icing/

demisting

Press button 8 – the integrated indica-

tor light comes on. This function en-

ables rapid demisting or de-icing of the 

rear screen and de-icing of the door 

mirrors (on equipped vehicles).
To exit this function, press button 8 

again. Demisting automatically stops.

AUTOMATIC CLIMATE CONTROL 

(3/4)

8

Switching air conditioning on 

or off

In automatic mode, the system switches 

the air conditioning system on or off, 

depending on the climate conditions.
Press button 5 to switch off the air 

conditioning; the integrated indicator 

comes on.

5

9

Vehicles fitted with the ECO 

mode (button  9): Once activated, 

the ECO mode may reduce the ef-

fective performance of the air condi-

tioning. Please refer to the informa-

tion on “Driving advice, Eco-driving” 

in Section 2.

3.10

AUTOMATIC CLIMATE CONTROL 

(4/4)

7

6

Air recirculation (isolation of 

the passenger compartment) 

K

This function is managed automatically 

(operation is confirmed by a warning 

light on button 7), but you can also acti-

vate it manually.
The system determines whether or not 

the air recycling function is used, based 

on the quality of the outside air.

Stopping the system
Turn control 6 to “OFF” to stop the 

system. To start, turn control 6 again 

to adjust the blower speed or press 

button 1.

1

Manual use
Press button 7 – the integrated indica-

tor light comes on.
Prolonged use of this position may lead 

to odours, caused by non-renewal of 

air, and the formation of condensation 

on the windows.
We therefore advise you to return to au-

tomatic mode as soon as air recircula-

tion is no longer needed, by pressing 

button 7.
To exit this function, press button 7 

again.

The demisting/de-icing will still take 

priority over the air recirculation.

3.11

AIR CONDITIONING: information and advice on use

Do not open the refriger-

ant fluid circuit. The fluid 

may damage eyes or skin.

Fuel consumption

You will normally notice an increase in 

fuel consumption (especially in town) 

when the air conditioning is operating.
For vehicles fitted with air conditioning 

with no automatic mode, switch off the 

system when it is not required.
Advice for reducing consumption 

and helping to preserve the environ-

ment
Drive with the air vents open and the 

windows closed.
If the vehicle has been parked in the 

sun, open the doors for a few moments 

to let the hot air escape before starting 

the engine.

Maintenance

Refer to the Maintenance Document 

for your vehicle for the inspection fre-

quency.

Operating faults

As a general rule, contact your ap-

proved dealer in the event of an oper-

ating fault.
–  Reduction in de-icing, demisting 

or air conditioning performance.

This may be caused by the passen-

ger compartment filter cartridge be-

coming clogged.

–  No cold air is being produced.

Check that the controls are set cor-

rectly and that the fuses are sound. 

Otherwise, switch off the system.

Presence of water under the 

vehicle

After prolonged use of the air condi-

tioning system, it is normal for water 

to be present under the vehicle. This is 

caused by condensation.

Advice on use

In some situations, (air conditioning 

off, air recirculation activated, ventila-

tion speed at zero or low, etc.) you may 

notice that condensation starts to form 

on the windows and windscreen.
If there is condensation, use the “Clear 

View” function to remove it, then use 

the air conditioning in automatic mode 

to stop it forming again.

3.12

ELECTRIC WINDOWS 

(1/2)

1

2

3

4

5

6

Avoid resting any objects against 

a half-open window: there is a risk 

that the electric window could be 

damaged.

Driver’s responsibility
Never leave your vehicle 

with the RENAULT card or 

key inside, and never leave 

a child, adult who is not self-suffi-

cient or a pet, even for a short while. 
They may pose a risk to themselves 

or to others by starting the engine 

or activating equipment (such as the 

gear lever or electric windows). 
If any part of the body becomes 

trapped, reverse the direction of the 

window immediately by pressing the 

relevant switch.
Risk of serious injury.

Passenger safety
The driver can prevent the 

front and rear passenger 

electric windows from op-

erating (and the driver’s window) 

by pressing switch 4. A confirmation 

message is displayed on the instru-

ment panel.

Electric windows

Press or pull the switch to raise or lower 

a window to the desired height (the rear 

windows do not open fully);
From the driver’s seat, use switch:

  1  for the driver’s side;

  2  for the front passenger side;

  3 and  5 for the rear passenger win-

dows.

From the passenger seats, use 

switch 6.

These systems operate with the igni-

tion on or off, until one of the front doors 

is opened (limited to about 3 minutes).


Content   ..  7  8  9  10   ..