Peugeot RCZ (2015 year). Manual - part 12


  Index      Peugeot     Peugeot RCZ - service manual 2015 year in english


Search            copyright infringement  


Content   ..  10  11  12  13   ..


Peugeot RCZ (2015 year). Manual - part 12


8/

PRACTICAL

 INFORMA

TION

175

RCZ_en_Chap08_info-pratiques_ed01-2015

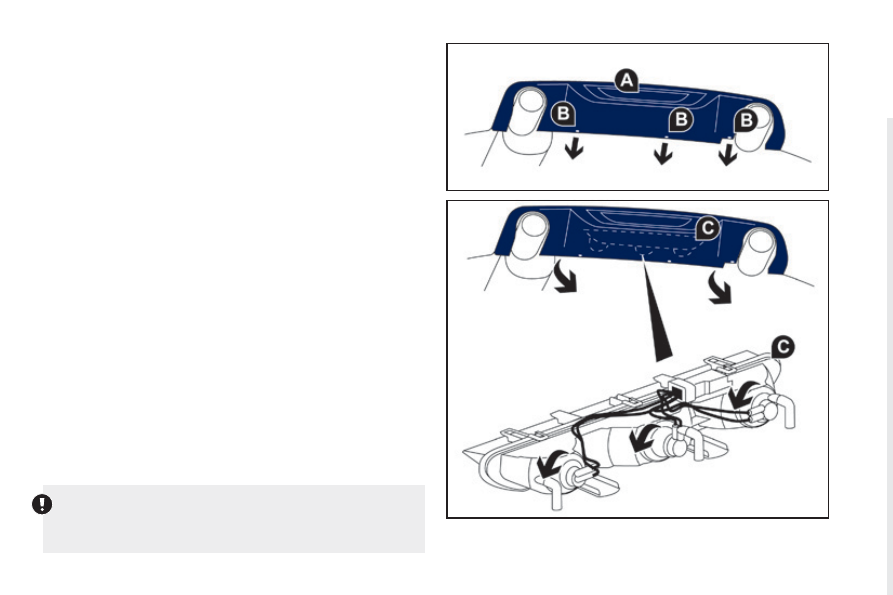
Version with symmetrical twin exhaust tailpipes

The bulbs on these two types of lamp are changed by partly removing 
the lamp unit A in the rear bumper:
F

 using a screwdriver, remove the 3 fixing screws B located under the 

vehicle,

Take care not to touch the silencer; risk of burns, if you 
change the bulb immediately after switching off the ignition.

F  without forcing, lower the rear part of the lamp unit for access to the 

bulb holders C,

F

 turn the corresponding bulb holder a quarter of a turn then remove

it towards the front of the vehicle,

F

 turn the bulb one quarter of a turn and change it.

To refit, carry out these operations in reverse order.

176

RCZ_en_Chap08_info-pratiques_ed01-2015

Changing sidelamps and direction indicators

For the replacement of this type of LED lamp, contact a PEUGEOT 
dealer or a qualified workshop.

When using this type of washing on stubborn dirt, do not persist 
on the headlamps, the lamps and their surrounds to avoid 
damaging their protective coating and seals.

Changing number plate lamps (W5W)

F  Insert the end of the vehicle's key in the hole in the transparent 

cover.

F  Push towards the outside to unclip it.
F  Remove the transparent cover.
F  Pull the bulb out and change it.

Changing the third brake lamp (LEds)

For the replacement of this type of LED lamp, contact a PEUGEOT 
dealer or a qualified workshop.

High pressure washing

8/

PRACTICAL

 INFORMA

TION

177

RCZ_en_Chap08_info-pratiques_ed01-2015

CHANGING A FUSE

ACCESS TO THE TOOLS

The extraction tweezer is fitted to the back of the dashboard fusebox
cover.

To gain access to them:
F

 turn the screw a quarter of a turn to the left,

F  unclip the cover by pulling at the top right,
F  remove the cover completely and turn it over,
F

 remove the carrier on which is fitted the tweezer.

CHANGING A FUSE

Before changing a fuse, tit is necessary to:
F  identify the cause and correct it,
F  switch off all electrical consumers,
F  immobilise the vehicle and switch off the ignition,
F  identify the failed fuse using the allocation tables and drawings 

presented on the following pages.

To replace a fuse, you must:

use the special tweezer to extract the fuse from its housing and 
check the condition of its filament,

always replace a failed fuse with a fuse of the same rating (same 
colour); a different rating fuse may cause malfunctions (risk of fire).

Good

Failed

Tweezer

If the fault recurs soon after changing a fuse, have the electrical 
system of your vehicle checked by a PEUGEOT dealer or a 
qualified workshop.

178

RCZ_en_Chap08_info-pratiques_ed01-2015

Installing electrical accessories

Your vehicle's electrical system is designed to operate with 
standard or optional equipment.
Before installing other electrical equipment or accessories on your

vehicle, contact a PEUGEOT dealer or a qualified workshop.

PEUGEOT will not accept responsibility for the cost incurred in 
repairing your vehicle or for rectifying malfunctions resulting from 
the installation of accessories not supplied and not recommended 
by PEUGEOT and not installed in accordance with its instructions, 
in particular when the combined consumption of all of the 
additional equipment connected exceeds 10 milliamperes.

8/

PRACTICAL

 INFORMA

TION

179

RCZ_en_Chap08_info-pratiques_ed01-2015

dASHBOARd FUSES

The fusebox is placed in the lower section of the dashboard (left-hand 
side). It consists of two boxes.

Access to the fuses

F  Refer to the paragraph "Access to the tools".

Fuse tables

Fuse N°

Rating

Functions

F2

30 A

Locking and deadlocking earth.

F3

5 A

Airbags, active bonnet and pretensioners 
control unit.

F4

10 A

Clutch pedal switch, electrochromatic 
rear view mirror, automatic gearbox, 
switching and protection unit.

F5

30 A

One-touch electric windows, folding door 
mirrors supply.

F7

5 A

Front and rear courtesy lamps, map 
reading lamps, sun visor lighting, glove 
box lighting.

F8

20 A

Audio equipment, audio/telephone,

multifunction screen, tyre under-inflation
detection, clock.

F9

30 A

12 V socket.

F10

15 A

Steering mounted controls.

F11

15 A

Low current ignition switch.

F12

15 A

Instrument panel, air conditioning, 
driver's seat memory unit, rain / 
sunshine sensor, airbags.

Box 1

180

RCZ_en_Chap08_info-pratiques_ed01-2015

Fuse N°

Rating

Functions

F13

5 A

Engine fusebox, active bonnet.

F14

15 A

Multifunction screen, seat belt and 
passenger's front airbag warning lamps 
display, instrument panel screen, 
amplifier, Bluetooth system, parking
sensors control unit, USB Box.

F15

30 A

Locking and deadlocking.

F17

40 A

Rear screen and door mirrors demist/
defrost.

Fuse N°

Rating

Functions

G36

30 A

Hi-Fi amplifier.

G37

30 A

Passenger's seat memory unit.

G38

30 A

Driver's seat memory unit.

G39

5 A

Lighting memory unit.

G40

30 A

Driver and passenger heated seats.

Box 2

8/

PRACTICAL

 INFORMA

TION

181

RCZ_en_Chap08_info-pratiques_ed01-2015

ENGINE COMPARTMENT FUSES

The fusebox is placed in the engine compartment near the battery  
(left-hand side).

Access to the fuses

F  Unclip the cover.
F  Change the fuse (see corresponding paragraph).
F

 When you have finished, close the cover carefully to assure the

sealing of the fusebox.

Fuse table

Fuse N°

Rating

Functions

F2

15 A

Horn.

F3

10 A

Front wash-wipe.

F4

20 A

Daytime running lamps.

F5

15 A

Air flow sensor, coolant pump, oil pump,
thermostat, blow-by heater (petrol), 
by-pass and EGR electrovalves (Diesel), 
diesel heater (Diesel).

F6

10 A

Steering wheel angle sensor, ABS/DSC 
control unit, DSC sensor.

F7

10 A

Power steering control unit, automatic 
gearbox, dual function brake switch.

F8

25 A

Starter motor control.

F9

10 A

Diagnostic socket, directional 
headlamps, particle emission filter pump
(Diesel).

F11

40 A

Air conditioning blower.

182

RCZ_en_Chap08_info-pratiques_ed01-2015

Fuse N°

Rating

Functions

F12

40 A

Windscreen wipers slow / fast speed.

F15

10 A

Right-hand main beam headlamp.

F16

10 A

Left-hand main beam headlamp.

F17

15 A

Left-hand dipped headlamp.

F18

15 A

Right-hand dipped headlamp.

8/

PRACTICAL

 INFORMA

TION

183

RCZ_en_Chap08_info-pratiques_ed01-2015

Table of fuses over the battery

Fuse N°

Rating

Functions

F2

5 A

Dual function brake switch.

F3

5 A

Battery charge unit.

F4

25 A

ABS/ESC electrovalves.

F6

15 A

Automatic gearbox.

All work on the other types of fuses (midi-fuses and maxi-fuses) 
must be carried out only by a PEUGEOT dealer or a qualified
workshop.

184

RCZ_en_Chap08_info-pratiques_ed01-2015

TOWING A VEHICLE

TOWING EYE

This is stored in the boot under the floor.
For access to it:
F  open the boot,
F

 raise the floor using the strap,

F  secure it in the vertical position beyond the stops, located on the 

sides of the boot,

F  remove the towing eye from the storage box.

GENERAL RECOMMENdATIONS

Observe the legislation in force in your country.

Ensure that the weight of the towing vehicle is higher than that of 
the towed vehicle.

The driver must remain at the wheel of the towed vehicle and 
must have a valid driving licence.

When towing a vehicle with all four wheels on the ground, always 
use an approved towing arm; rope and straps are prohibited.

The towing vehicle must move off gently.

When towing a vehicle with the engine off, there is no longer any 
power assistance for braking or steering.

In the following cases, you must always call on a professional 
recovery service:

vehicle broken down on a motorway or fast road,

four-wheel drive vehicle,

when it is not possible to put the gearbox into neutral, unlock 
the steering, or release the parking brake,

towing with only two wheels on the ground,

where there is no approved towing arm available...

8/

PRACTICAL

 INFORMA

TION

185

RCZ_en_Chap08_info-pratiques_ed01-2015

TOWING YOUR VEHICLE

Towing from the front

F  On the front bumper, unclip the cover by pressing on the left.
F  Screw the towing eye in fully.
F  Install the towing arm.

F  Place the gear lever in neutral (position N for an automatic 

gearbox).


Failure to follow this advice could result in damage to certain 
components (braking, transmission...) and the absence of 
braking assistance the next time the engine is started.

F  Unlock the steering by turning the ignition key one notch and 

release the parking brake.

F  Switch on the hazard warning lamps on both vehicles.
F  Move off gently and drive slowly and for a short distance only.

Towing from the rear

It is also possible to pull your vehicle from the rear, but only in 
exceptional circumstances (vehicle in a parking space, off the road...).
F  On the rear bumper, unclip the cover by pressing on the left.
F  Screw the towing eye in fully.
F  Install the towing bar.
F  Place the gear lever in neutral (position N for an automatic 

gearbox).

F  Switch on the hazard warning lamps on both vehicles.
F  Move off very gently to pull the vehicle out.

* Except version with symmetrical twin exhaust tailpipes.

TOWING ANOTHER VEHICLE*

F  On the rear bumper, unclip the cover by pressing on the left.
F  Screw the towing eye in fully.
F  Install the towing bar.
F  Switch on the hazard warning lamps on both vehicles.
F  Move off gently and drive slowly and for a short distance only.

186

RCZ_en_Chap08_info-pratiques_ed01-2015

TOWING A TRAILER

Towbar suitable for the attachment of a trailer with additional lighting 
and signalling.

We recommend use of the PEUGEOT genuine towbar with ball 
which can be removed without tools and its harness that have 
been tested and approved from the design stage of your vehicle, 
and that the fitting of the towbar is entrusted to a PEUGEOT

dealer or a qualified workshop.
If the trailer is fitted outside the PEUGEOT dealer network, it must

be fitted in accordance with the manufacturer's instructions.

dRIVING AdVICE

Driving with a trailer subjects the towing vehicle to more significant
stress and its driver must be particularly careful.

distribution of loads

F  Distribute the load in the trailer so that the heaviest items are as 

close as possible to the axle and the nose weight approaches the 
maximum permitted without exceeding it.

Air density decreases with altitude, thus reducing engine performance. 
Above 1 000 metres, the maximum towing load must be reduced by 
10 % and so on for every 1 000 metres of altitude.

Refer to the "Technical data" section for details of the weights and 
towing loads which apply to your vehicle version.

Side wind

F  Take into account the increased sensitivity to side wind.

Your vehicle is primarily designed for transporting people and luggage, 
but it may also be used for towing a trailer.

Versions that have asymmetrical twin exhaust tailpipes cannot be 
fitted with a towbar.

8/

PRACTICAL

 INFORMA

TION

187

RCZ_en_Chap08_info-pratiques_ed01-2015

Cooling

Towing a trailer on a slope increases the temperature of the coolant.

As the fan is electrically controlled, its cooling capacity is not dependent 
on the engine speed.
F  To lower the engine speed, reduce your speed.
The maximum towing load on a long slope depends on the gradient and 
the ambient temperature.

In all cases, pay attention to the coolant temperature.

Braking

Towing a trailer increases the braking distance.

Tyres

F  Check the tyre pressures of the towing vehicle and of the trailer, 

observing the recommended pressures.

Lighting

F  Check the electrical signalling on the trailer.

F  If the warning lamp and the STOP warning lamp come 

on, stop the vehicle and switch off the engine as soon as 
possible.

The rear parking sensors will be deactivated automatically if a 
genuine PEUGEOT towbar is used.

When not towing a trailer, remove the quickly-detachable tow ball
before driving, so as to avoid masking the central rear lamp.

188

RCZ_en_Chap08_info-pratiques_ed01-2015

CLEANING AND MAINTENANCE

The general recommendations on cleaning and maintaining your vehicle 
are given in the servicing and warranty booklet.

ALUMINIUM ARCHES

To clean these arches, do not use a dry cloth with an abrasive product. 

Use a sponge and soapy water.

PEUGEOT TECHNO TEP

To clean this trim, do not use solvents or detergents with a dry cloth.

First remove dust, then use a soft cloth and soapy water. Dry with 
another soft cloth.

HEAdLAMPS ANd LAMPS

The headlamps have polycarbonate lenses, finished with a protective

lacquer.
Do not clean them with a dry or abrasive cloth, nor with detergent or 
solvent products.

Use a sponge and soapy water.

CUSTOMISING STICKERS

These customising parts are self-adhesive stickers, treated to give good 
resistance to ageing and tearing.

They are intended for customising the body.
Available also as accessories, we recommend that you have them fitted

by a PEUGEOT dealer or a qualified workshop.

The use of a high pressure jet wash for cleaning the headlamps, 
lamps and their surrounds may damage the lacquer and seals.
Observe the recommendations on pressure and distance for jet 
washing.

First clean persistent stains with a sponge and warm soapy water.

When washing your vehicle, keep the end of a high-pressure 
lance at least 30 centimetres from the stickers.

8/

PRACTICAL

 INFORMA

TION

189

RCZ_en_Chap08_info-pratiques_ed01-2015

MATT PAINT

If you vehicle is finished with a clear matt lacquer, please observe the
following recommendations to avoid damaging the paintwork by the use 
of an inappropriate cleaning procedures.
These recommendations are also valid for alloy road wheels finished

with clear matt lacquer.

Never clean the vehicle without water.

Never wash your vehicle in an automatic roller brush car wash.

Never polish the vehicle body, nor the alloy wheels. Doing this will 
make the paintwork shiny.

Do not use paint cleaners, abrasive products or paint polishing or 
preserving products (such as wax, for example) on the paintwork. 
These products are only suitable for bright finishes. Application of

these products on vehicles with a matt finish will seriously damage
the paint surface of the vehicle, giving rise to irreversible shiny or 
stained areas.
Never use a high pressure jet wash with a lance fitted with a
brush, this may scratch the paintwork.
Never select a wash programme that finishes with a hot wax
cycle.

From the range of cleaning and maintenance products in the 
"TECHNATURE" range recommended and approved by PEUGEOT, 
use only the insect remover and car shampoo, which are the only 
products to be used on the bodywork.

The insect remover can also be used to remove minor marks  
(for example: finger marks...).
Always have paint repairs done by a PEUGEOT dealer or a qualified
workshop.

We recommend the use of a high pressure jet wash, or at least a 
water hose with a high output.

We recommend that the vehicle be rinsed using de-ionised water.
Use only a microfibre cloth to dry the vehicle. It must be clean and
used without heavy pressure.

Lightly wipe off any fuel stains present on the bodywork using a 
soft cloth, then leave to dry.

190

RCZ_en_Chap08_info-pratiques_ed01-2015

ACCESSORIES

A wide range of accessories and genuine parts is available from the 
PEUGEOT dealer network.
These accessories and parts are all suitable for your vehicle and benefit
from PEUGEOT's recommendation and warranty.

"Comfort":

front parking sensors, cool box...

"Transport solutions":

boot tray, boot spacers, towbar bicycle carrier, towbar with quickly
detachable ball, towbar harnesses...

"Style":

leather and alcantara sport steering wheel, alcantara gear lever gaiter, 
alloy wheels, door mirror shells in carbon fibre...

"Safety and security":

anti-theft alarm, window etching, wheel security bolts, breathalyser, first

aid kit, fire extinguisher, warning triangle, high visibility jacket, booster
cushions and child seats, stolen vehicle tracking system, snow chains, 
anti-skid tyre covers...

"Protection":

boot liner, mats*, bumper protective strips, vehicle protective cover...

To avoid any risk of jamming of the pedals:

-  ensure that the mat is positioned and secured correctly,
-  never fit one mat on top of another.

When fitting a trailer towbar and its harness outside the
PEUGEOT dealer network, this must be done following the 
manufacturer's recommendations.


Content   ..  10  11  12  13   ..