Peugeot Boxer (2016 year). Manual - part 11


  Index      Peugeot     Peugeot Boxer - service manual 2016 year in english


Search            copyright infringement  


Content   ..  9  10  11  12   ..


Peugeot Boxer (2016 year). Manual - part 11


Puncture

 159

QUICK HELP


8

boxer_en_Chap08_Aide-Rapide_ed01-2015

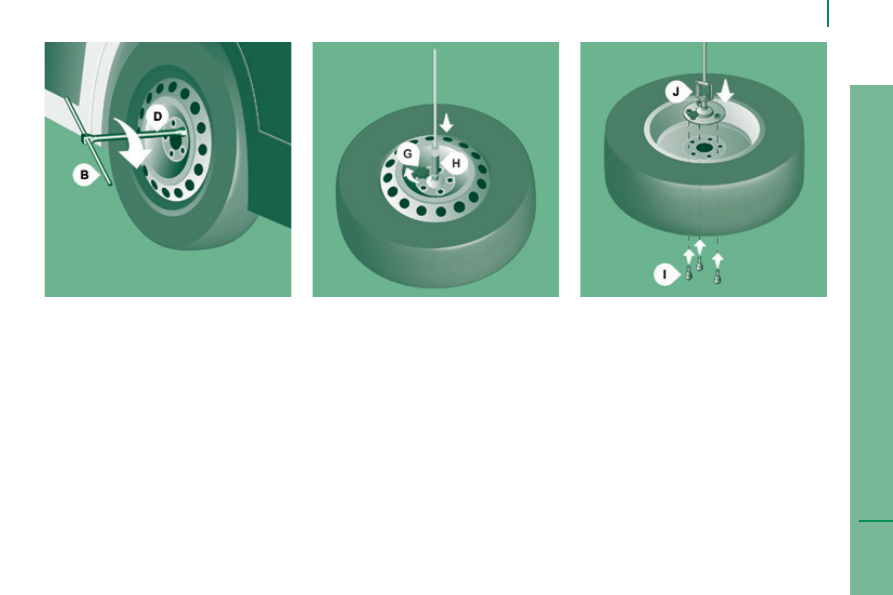
Fitting the spare wheel

Stowing the wheel

Put the spare wheel in place on the hub 
and fit the bolts by hand.

Pre-tighen the bolts using the 
wheelbrace d and the bar B.

Lower the vehicle completely by folding 
the jack c, then remove the jack.

tighten the bolts again using the 
wheelbrace d and the bar B (tighten 
them fully without forcing them).

You must place the wheel to be repaired or 
the spare wheel under the vehicle to secure 
the carrier system.

Place the wheel at the rear of the vehicle.

●  For eversions with steel wheels, hook 

the carrier H on the outside.

●  Screw in the grip G to secure the carrier 

and wheel.

●  For versions with alloy wheels, position 

the strap j on the outside.

●  Fit the three strap fixing screws I to the 

alloy wheel.

Puncture

 160

boxer_en_Chap08_Aide-Rapide_ed01-2015

Refer to the "technical data - 
Identification markings" section for the 

location of the tyre pressure label.

Fit the long socket A, the wheelbrace d 
and bar B to the securing screw.

turn the assembly clockwise to fully 
draw in the cable and raise the wheel 
under the vehicle.

Check that the wheel is positioned 
horizontally flat against the floor of the 
vehicle and that the the cut-out for the 
carrier system is visible.

Stow the tools and the trim (depending 
on version).

refitting the repaired wheel

Refitting the repaired wheel is the same as 
fitting the spare wheel; don't forget to refit 
the wheel trim.

the spare wheel is not designed to be used 
over long distances. Have the tightening 
of the bolts and pressure of the spare 
wheel checked by a PeugeOt dealer or a 
qualified workshop without delay.

Also, have the original wheel repaired and 
refitted by a PeugeOt dealer or a qualified 
workshop as soon as possible.

Puncture

 161

QUICK HELP


8

boxer_en_Chap08_Aide-Rapide_ed01-2015

PuncturE rEPAIr KIt

repairing the tyre

Apply the parking brake.

unscrew the tyre valve cap, remove the 
filling hose B and screw the ring E onto 
the valve.

Start the engine.

Insert the connector G into the nearest 
power socket on the vehicle.

Switch on the compressor by placing the 
switch F in position "I" (on).

Inflate the tyre to a pressure of 5 bar.

to obtain a more accurate reading, you are 
advised to check the pressure value on the 
pressure gauge H, with the compressor off.

Check that the switch F on the 
compressor is in position "0" (off).

this temporary puncture repair kit stowed 
in a bag located in one of the front door 
pockets.

It consists of:

a cartridge A, containing the sealant 
fluid, equipped with:

●  a filling hose B,
●  a sticker c indicating "max. 80 km/h", 

which the driver must affix in full view 
(on the dashboard) after repairing 
the tyre,

a quick guide to use of the repair kit,

a compressor d equipped with a 
pressure gauge and unions,

adaptors, for the inflation of various 
items.

Puncture

 162

boxer_en_Chap08_Aide-Rapide_ed01-2015

If a pressure of at least 3 bar is not 
reached within 5 minutes, disconnect 
the compressor from the valve and the 
power socket, then move the vehicle 
forward by approximately 10 metres to 
distribute the sealant fluid inside the 
tyre.

then repeat the inflation operation:

●  if a pressure of at least 3 bar is not 

reached within 10 minutes, switch off 
your vehicle: the tyre has suffered 
too much damage and repair has not 
been possible. Contact a PeugeOt 
dealer or a qualified workshop.

●  if the tyre has been inflated to a 

pressure of 5 bar, set off again 
immediately.

After driving for approximately 10 minutes, 
stop and check the pressure of the tyre 
again.

Adjust the pressure to the value given on the 
label on the driver's door pillar, and contact 
a PeugeOt dealer or a qualified workshop 
as soon as possible.

checking and adjusting the 
pressure

the compressor can only be used to check 
and adjust the pressure.

Disconnect the hose I and connect it to 
the tyre valve directly; the cartridge will 
then be connected to the compressor 
and the filling fluid will not be injected.

If it is necessary to deflate the tyre, connect 
the hose I to the tyre valve and press the 
yellow button, placed in the centre of the 
switch on the compressor.

replacing the cartridge

to replace the sealant cartridge, carry out 
the following operations:

disconnect the hose I,

turn the cartridge to be replaced 
anticlockwise and lift it,

insert the new cartridge and turn it 
clockwise,

reconnect the hose I and connect the 
hose B in its location.

the cartridge contains ethylene-glycol, 
a product which is harmful if swallowed 

and which causes irritation to the eyes.

Keep out of reach of children.

After use, do not discard the cartridge in the 
environment, take it to a PeugeOt dealer 
or an appropriate waste disposal 
organisation.

this puncture repair kit and 
replacement cartridges are available 
from PeugeOt dealers.

Being towed or towing

 163

QUICK HELP


8

boxer_en_Chap08_Aide-Rapide_ed01-2015

toWInG

towing the vehicle

the removable towing eye is located in the 
tool box under the front passenger seat.

unclip the cover using a flat tool.

Screw the removable towing eye in fully.

Attach the approved towing arm to to the 
removable towing eye.

Place the gear lever in neutral.

towing another  
vehicle

the fixed towing eye is located on the right 
below the bumper.

Attach the approved towing arm to the fixed 
eye.

Failure to observe this requirement 
may result in damage to certain braking 

components and the lack of some braking 
assistance systems when the engine is  
re-started.

General recommendations

Observe the legislation in force in your 
country.

ensure that the weight of the towing vehicle 
is higher than that of the towed vehicle.

the driver must remain at the wheel of the 
towed vehicle and must have a valid driving 
licence.

When towing a vehicle with all four wheels 
on the ground, always use an approved 
towing arm; rope and straps are prohibited.

the towing vehicle must move off gently.

When towing a vehicle with the engine off, 
there is no longer any power assistance for 
braking or steering.

In the following cases, you must always call 
on a professional recovery service:

vehicle broken down on a motorway or 
fast road,

four-wheel drive vehicle,

when it is not possible to put the 
gearbox into neutral, unlock the 
steering, or release the parking brake,

towing with only two wheels on the 
ground,

where there is no approved towing arm 
available...

Transport solutions

 164

boxer_en_Chap08_Aide-Rapide_ed01-2015

toWBAr WItH QuIcKLY  
dEtAcHABLE toWBALL

Presentation

this towball can be fitted and removed 
quickly and easily without the use of tools.

For information on the maximum 
trailer weight and the recommended 

nose weight, refer to the "technical data - 
Weights" section.

For information on safely towing a trailer, 
refer to the "Accessories - towing a trailer" 
section.

1. Carrier.

2.  Connector socket.

3.  Safety eye.

4.  Detachable towball.

5.  Locking / unlocking wheel.

6.  Key lock.

7.  Key reference label.

A.  Locked position; the locking wheel is in 

contact with towball (no gap).

B.  unlocked position; the locking wheel 

and towball are no longer in contact 
(gap of about 5 mm).

Before each use

Check that the towball is correctly 

locked and verify the following points:

the green mark on the locking wheel 
is in line with the green mark on the 
towball,

the locking wheel is in contact with the 
towball,

the key lock is on and the key removed; 
the locking wheel can no longer be 
operated,

the towball must no longer move at all in 
its carrier; try to shake it by hand.

during use

Never unlock the device when a trailer or 
load carrier is fitted to the towball.

Never exceed the maximum authorised 
weight for the vehicle (the gross Vehicle 
Weight - gVW), the trailer, or the sum of the 
two (the gross train Weight - gtW).

Observe the legislation in force in the 
country in which you are driving.

After use

For journeys made without a trailer or load 
carrier, the towball must be removed and 
the blanking plug inserted in the carrier. this 
measure applies particularly if the towball 
could hinder visibility of the number plate or 
lighting.

 165

Transport solutions

QUICK HELP


8

boxer_en_Chap08_Aide-Rapide_ed01-2015

Fitting the towball

Below the rear bumper, remove the 
protective plug from the towball carrier.

Insert the end of the towball 4 into the 
carrier 1 and push upwards; it locks in place 
automatically.

Check that the mechanism has correctly 
locked in to place (position A).

Close the lock 6 using the key.

the locking wheel 5 turns a quarter of a turn 
anti-clockwise; take care to keep your hands 
clear.

Always remove the. the key cannot be 
removed when the lock is open.

Clip the cap onto the lock.

Transport solutions

 166

boxer_en_Chap08_Aide-Rapide_ed01-2015

removing the towball

Disconnect the trailer harness from the 
socket 2 on the carrier.

Detach the cable on the trailer from the 
safety ring 3 on the carrier.

unhook the trailer from the towball.

Refit the protective cover to the towball.

Remove the protective cover from the 
towball.

Attach the trailer to the towball.

Attach the cable on the trailer to the safety 
ring 3 on the carrier.

Connect the trailer harness to the socket 2 
on the carrier.

Remove the cap from the lock and press it 
onto the head of the key.

Insert the key into the lock 6.

Open the lock using the key.

 167

Transport solutions

QUICK HELP


8

boxer_en_Chap08_Aide-Rapide_ed01-2015

grasp the towball 4 firmly with one hand; 
with the other hand, pull and turn the locking 
wheel 5 clockwise as far as it will go; do not 
release the locking wheel.

Maintenance

Correct operation is only possible if the 
towball and its carrier remain clean.

Before cleaning the vehicle with a high 
pressure jet wash, the towball must be 
removed and the blanking plug inserted in 
the carrier.

Apply the label provided to a clearly 
visible area, close to the carrier or in 

the boot.

For any work on the towbar, got to a 
PeugeOt dealer or a qualified workshop.

Refit the protective blanking plug to the 
carrier.

Carefully stow the towball in its bag away 
from knocks and dirt.

extract the towball from the bottom of its 
carrier 1.

Release the locking wheel; this automatically 
stops in the unlocked position (position B).

Precautions...

 168

boxer_en_Chap08_Aide-Rapide_ed01-2015

GLoSSArY oF LABELS

this section groups together all of the texts that appear on labels present on the vehicle.

under the bonnet

A

Original painting

Colour

Code

ReFINISHINg CODe

B

AIR CONDItIONeD VeHICLe - R134A - 
"CFC" FRee

QtY R134A (kg)

c

ONLY FOR JuMP StARt

d

DANgeR

AutOMAtIC eNgINe ReStARt. eXtRACt 
tHe KeY FROM DASHBOARD WHeN 
HOOD IS OPeNeD

For the vehicle identification labels, refer to the "technical data" section.

Precautions...

 169

QUICK HELP


8

boxer_en_Chap08_Aide-Rapide_ed01-2015

E

1 - CAutION

ORIgINAL LuBRICANtS AND FLuIDS

engine oil

transmission

Radiater

Brake system

Windscreen Washer

Power steering

ReFeR tO OWNeR HANDBOOK

WeAR eYe PROteCtION

2 - SAFetY

the use of original parts, fluids and original lubrificants and respecting scheduled 
maintenance guarantees your cars reliability and safety overtime.

3 - DANgeR

KeeP Out  

OF CHILDReN'S ReACH

KeeP AWAY FROM 

FLAMeS

DO NOt tOuCH

DO NOt OPeN CAP WItH 

eNgINe WARM

eXPLOSION

CORROSIVe LIQuID

MAY StARt AutOMAtICALLY eVeN WItH eNgINe OFF

HIgH PReSSuRe gAS DO 

NOt OPeN

AutOMAtIC eNgINe ReStARt. eXtRACt tHe KeY 

FROM DASHBOARD WHeN BONNet HOOD IS OPeNeD

HIgH VOLtAge

Precautions...

 170

boxer_en_Chap08_Aide-Rapide_ed01-2015

Behind the fuel filler flap

WARNINg ReMOVe SLOWLY

FueL SPRAY MAY CAuSe INJuRY

on the rear seat

A

Push backrest before folding it

B

PuLL tO OPeN

c

PuLL LeVeR 1 tO FOLD BACK

PuLL LeVeR 2 tO PuLL DOWN BACK

d

DON't tRAVeL BeHIND tHe FOLDeD 
SeAt OR WItH LuggAge ON FIRSt ROW

E

PuLL tO FOLD

Precautions...

 171

QUICK HELP


8

boxer_en_Chap08_Aide-Rapide_ed01-2015

 172

Dimensions

boxer_en_Chap09_Caracteristiques-techniques_ed01-2015


 173

9

TECHNICAL

 DA

TA

Dimensions

boxer_en_Chap09_Caracteristiques-techniques_ed01-2015

dIMEnSIonS

the dimensions are given in millimetres.

this model is available in 4 lengths (L1...) and 3 heights (H1...); refer to the corresponding tables:

VAn

L1

L2

L3

L4

H1

H2

H1

H2

H2

H3

H2

H3

L

Overall length

4 963

5 413

5 998

6 363

H

Overall height

2 254

2 524

2 254

2 524

2 524

2 764

2 524

2 764

A

Wheelbase

3 000

3 450

4 035

B

Front overhang

948

c

Rear overhang

1 015

1 380

d

Overall width (incl./excl. mirrors)

2 508 / 2 050

E

Width of front track

1 810

F

Width of rear track

1 790

G

Height of load floor

535 to 565

I

Length of interior floor

2 670

3 120

3 705

4 070

j

Maximum interior load height

1 662

1 932

1 662

1 932

1 932

2 172

1 932

2 172

K

Maximum interior width

1 870

M

Interior width between wheel arches

1 422

Volume (m

3

)

8

9.5

10

11.5

13

15

15

17

 174

Dimensions

boxer_en_Chap09_Caracteristiques-techniques_ed01-2015

rEAr doorS

L1

L2

L3

L4

H1

H2

H1

H2

H2

H3

H2

H3

n

Rear door aperture height

1 520

1 790

1 520

1 790

1 790

2 030

1 790

2 030

o

Rear door aperture width

1 562


Content   ..  9  10  11  12   ..