Peugeot 1007 Dag (2005.5). Manual - part 8


  Index      Peugeot     Peugeot 1007 Dag 2005.5 - service manual in english


Search            


Content   ..  6  7  8  9   ..


Peugeot 1007 Dag (2005.5). Manual - part 8


108 - Accesses

01-10-2005

109

-

Accesses

01-10-2005

ELECTRONIC ENGINE 

IMMOBILISER

This  locks  the  engine  management 

system as soon as the ignition has been 

switched  off  and  therefore  prevents 

starting  of  the  vehicle  by  anyone  who 

does not have the key.

The  ignition  key  has  an  electronic  chip 

which has a special code. When the ignition 

is switched on, the code is recognised and 

starting is possible.

If  the  system  does  not  function 

correctly,  contact  a  PEUGEOT 

dealer as soon as possible.

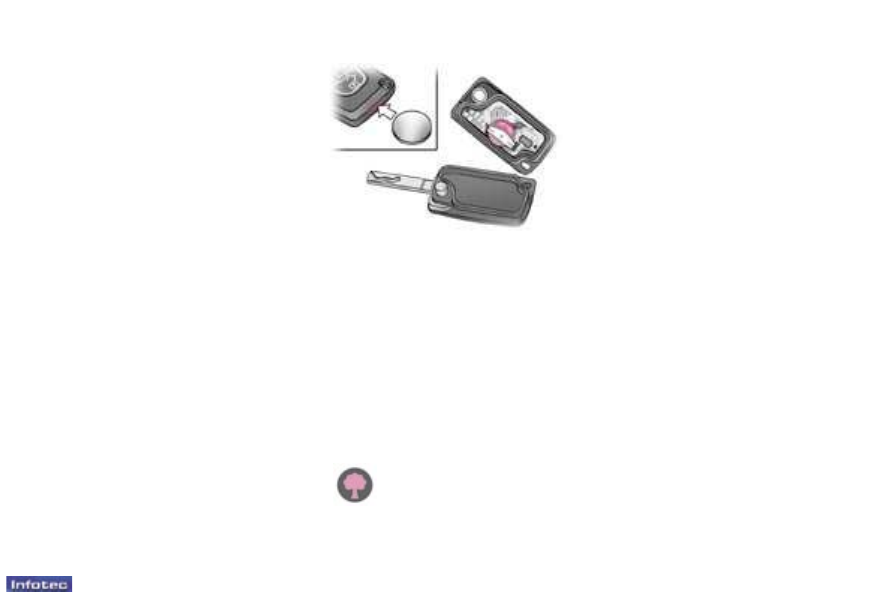
Changing the battery of the 

remote control

Battery ref.: CR1620/3 volts.

The information "battery lat" is given 

by  an  audible  signal,  accompanied 

by  a  message  on  the  multi-function 

display.

To replace the battery, unclip the casing 

using a coin at the ring.

If  the  remote  control  does  not  work 

after the battery has been changed, 

re- programme the remote control. 

Key in ignition

A message on the multi-function display, 

accompanied  by  a  buzzer  on  opening 

the driver's door, indicates that the key 

has been left in the ignition. 

Locating your vehicle

To  locate  your  vehicle,  if  you  have 

locked it, in a car park:
F

  press  button 

B,  the  courtesy  lights 

come on and the direction indicators 

lash for a few seconds. 

Programming the remote 

control 

Following  changing  of  the  remote 

control battery or disconnection of the 

vehicle battery, the remote control must 

be reprogrammed.
F

 Wait  at  least  one  minute  before 

using the remote control.

F

 Switch on the ignition.

F

 Press  button 

B  or  C  for  at  least 

ive  seconds  within  the  next  ten 

seconds.

F

 Switch off the ignition.

F

 Wait  at  least  one  minute  before 

using the remote control.

The  remote  control  is  now  working 

again.

Do  not  discard  the  remote 

control batteries, they contain 

metals  which  are  harmful  to 

the environment.

Take them to a PEUGEOT dealership, 

or  to  any  other  approved  collection 

point.

110 - Accesses

01-10-2005

111

-

Accesses

01-10-2005

ALARM* 

The alarm offers two types of protection.

external; the alarm sounds if one 

of  the  doors,  the  bonnet  or  the 

tailgate is opened,

internal; the alarm sounds if there 

is air movement in the passenger 

compartment (a broken window or 

movement within the car).

The  alarm  also  has  an  anti-tamper 

function.

If there is an attempt to tamper with 

the following equipment:

-  the  wires  to  the  siren  or  the  control 

unit, the siren sounds accompanied by 

lashing of the direction indicators.

-  the battery, the siren sounds.

Complete setting and 

disarming of the alarm

Complete setting of the alarm

Switch off the ignition and get out 

of the vehicle.

Lock or deadlock the vehicle.

The direction indicators light for two 

seconds.

The red indicator light on the switch 

lashes 

once a second.

5 seconds later, external protection is set.

45 seconds later, internal protection is set.

Note:  when  the  alarm  is  triggered, 

the  siren  sounds  for  thirty  seconds. 

However,  after  the  siren  stops,  the 

alarm remains set.

Complete disarming of the alarm

Press  the  unlocking  button  on  the 

remote control.

The direction indicators lash for two 

seconds.

The red indicator light on the switch 

goes out.

Note: if the indicator light continues to 

lash  after  de-activation  of  the  alarm, 

it  is  a  sign  that  the  alarm  has  been 

triggered  during  your  absence.  The 

lashing  will  stop  when  the  ignition  is 

switched on.

*  According to country

When the alarm is set, if a door, 

the  tailgate  or  the  bonnet  is 

not  closed  correctly,  the  siren 

sounds  for  a  moment.  If  the 

vehicle is closed correctly in the following 

45 seconds, the alarm is set. In all cases, 

the alarm is set after 45 seconds.

Automatic setting*

The alarm is set automatically 2 minutes 

after the last door or the boot is closed.

To prevent the alarm being triggered 

when  a  door  or  the  boot  is  opened, 

the  remote  control  unlocking  button 

must be pressed again.

Locking  the  vehicle  without 

alarm

To  lock  the  vehicle  without  activating 

the alarm (for example when washing), 

insert the key in the lock, then lock it.

110 - Accesses

01-10-2005

111

-

Accesses

01-10-2005

Selection of the type of 

protection

To set the alarm to external 

protection only 

If you want to leave a window partially 

open, or a pet inside the vehicle, you 

need  to  select  external  protection 

only:

-  switch off the ignition,

-  within  the  next  ten  seconds,  press 

the control button 

1 until the warning 

light comes on continuously, 

-  get out of the vehicle,

-  lock or deadlock the vehicle,

-  the direction indicators light for two 

seconds,

-  the red indicator light on the switch 

lashes once a second.

Remote control failure

Unlock the doors using the key.

Open the door.

The alarm is triggered.

Switch on the ignition.

The  electronic  engine  immobiliser 

system recognises the key.

The siren stops and the alarm is dis-

armed.

Do not make any modiications 

to the alarm system, this could 

result in malfunctions.

To de-activate external protection 

only

Press  the  unlocking  button  on  the 

remote control.

The direction indicators lash for two 

seconds.

The red indicator light on the switch 

goes out.

Work on the battery

The alarm must not be set when the 

battery  is  disconnected.  Otherwise, 

the siren will sound.

After reconnecting the battery:

-  lock  or  deadlock,  then  unlock  the 

vehicle using the remote control,

-  the alarm will be operational again 

the next time the vehicle is locked 

or deadlocked.

112 - Accesses

01-10-2005

113

-

Accesses

01-10-2005

ELECTRIC WINDOWS

1 -  Driver's electric window 

switch.

2 -  Passenger electric window 

switch.

Notes:

The electric window controls are not 

active  when  the  door  concerned  is 

open.

The movement of a window stops if 

the door is opened. A second action 

on  the  electric  window  control  will 

only be taken into account when the 

door is closed.

The electrical functions of the electric 

windows  are  deactivated  approxi-

mately  one  minute  after  the  ignition 

is switched off.

Always remove the key from 

the ignition when leaving the 

vehicle, even for a short time.

In  the  event  of  contact  when 

operating the windows, you must reverse 

the movement of the window. To do this, 

press the control concerned.

When the driver operates the passenger 

window controls, he must ensure that no 

one is preventing correct closing of the 

window.

The driver must ensure that passengers 

use the electric windows correctly.

Be aware of children when operating 

the windows.

Safety auto-reverse

When  the  window  rises  and  meets 

an  obstacle,  it  stops  and  partially 

lowers again.

Note:

In  the  case  of  unwanted  opening  of 

the window on closing or if the win-

dow will not rise, lower it completely 

and  raise  it  again  immediately,  by 

pulling  the  control  until  the  window 

closes completely. Continue to press 

the  control  for  approximately  one 

second after closing.

You have two options:

-  Manual operation: 

Press  or  pull  control 

1  gently.  The 

window stops as soon as the control 

is released.

-  Automatic operation: 

Press  or  pull  control 

1  fully.  The  window 

opens or closes completely when the control 

is released. Pressing the control again stops 

the movement of the window.

112 - Accesses

01-10-2005

113

-

Accesses

01-10-2005

THE "SESAME" DOORS

The  exterior  and  interior  handles 

only  permit  triggering  of  the  electric 

movement of the door when it is fully 

closed or fully open.

Opening and closing of the doors is 

accompanied by an audible signal.

Closing from outside

Give a irm, fast push forwards on the 

handle,  without  guiding  the  door,  to 

trigger  the  electric  movement  of  the 

door.

Opening from outside

Using  your  hand,  tilt  the  handle  to-

wards  the  rear  of  the  vehicle  and 

remove  your  hand  from  the  handle 

when  the  electric  movement  of  the 

door begins.

Locking/Unlocking from inside

Press button 

A, the red warning light 

comes on when the vehicle is locked 

and switches off when it is unlocked.

This locks/unlocks the doors and the 

tailgate.

If  the  vehicle  is  locked  or  deadlocked 

from  outside,  the  red  warning  light 

lashes and button

 A does not function. 

In this case, use the key or the remote 

control for unlocking.

Opening/Closing from inside 

The opening and closing operates in 

the same way as from outside.

None  of  the  door  opening  switches 

function  when  the  vehicle  is  dead-

locked.

To  open  using  the  interior 

handle: tilt the handle, with the 

palm  of  your  hand  towards 

the door.

114 - Accesses

01-10-2005

115

-

Accesses

01-10-2005

Automatic central locking

The  doors  can  lock  automatically 

when you are driving (at a speed of 

more than 6 mph (10 km/h)).

You  can  activate  or  deactivate  this 

function.

Driving with the doors locked may 

make  access  to  the  passenger 

compartment  by  the  emergency 

services  more  dificult  in  an 

emergency.

Activation

With the ignition on, press and hold 

button

 A.

Activation of the function is accompanied 

by an audible signal and a message on 

the multifunction display.

Deactivation

With the ignition on, press and hold 

button 

A.

Deactivation of the function is accompanied 

by an audible signal.

"Door open" alert

When the vehicle is moving, a diagram 

or a message locating the door on the 

multi-function display, accompanied by 

a permanent audible signal and lash-

ing of the courtesy light warn you that a 

door or the boot is not properly closed. 

Opening/Closing from the front

Press switch 

B to open or close the 

corresponding door.

Choosing the movement of the door 

using the switches:
-  pull è opens the door,

-  push è closes,

-  second press è stops the movement,

-  the switches do not function above 

3 mph (5 km/h).

Opening/Closing using the 

remote control

Press button 

C or D to open or close 

the left or right door.

The opening and closing of the door is 

accompanied by an audible signal.

2nd  press  on  button 

C  or  D  during 

opening/closing è interruption of the 

movement.
3rd press on button 

C or D è movement 

of the door in the opposite direction.

You  are  advised  to  use  the 

remote control or the switches 

as much as possible.

114 - Accesses

01-10-2005

115

-

Accesses

01-10-2005

General 

recommendations

Always check that it is safe to operate 

the door and be sure, in particular, not 

to  leave  children  or  animals  near  the 

door controls without supervision.

When  opening  the  door,  with  the 

window open, ensure that no person, 

animal  or  object  is  hanging  through 

the window.

Before  any  opening  or  closing  and 

during  any  movement  of  the  doors, 

ensure  that  no  person,  animal  or 

object  is  preventing  the  required 

manoeuvre,  either  inside  or  outside 

the vehicle.

It  is  imperative  that  the  doors  are 

operated  only  when  the  vehicle  is 

stationary.

For  your  safety  and  for  that  of  your 

passengers, you are strongly advised 

not  to  drive  with  a  door  open.  The 

lashing of the courtesy light + audible 

warning  +  "door  open"  message  are 

there to remind you.


Lock  your  vehicle  when  using  an 

automatic carwash.


The doors and the overall 

dimensions of the vehicle

Safety/Obstacle detection

The obstacle detection system is triggered 

when  an  obstacle  of  a  certain  physical 

resistance  hinders  the  movement  of  the 

door.

• If an obstacle is detected while the 

door is closing, the door stops then 

opens fully.

•  If an obstacle is detected while the door 

is  opening,  the  door  stops.  When  you 

have removed the obstacle, complete or 

restart the action using buttons 

C or D on 

the remote control or the switches 

B.

When open, a door never protrudes 

beyond the rear bumper.

When  open,  a  door  exceeds  the 

width of the exterior mirror by 8 mm, 

be  sure  to  take  this  into  account 

when  you  park  alongside  a  wall,  a 

post or a high kerb...

116 - Accesses

01-10-2005

117

-

Accesses

01-10-2005

Behaviour in the case of 

a steep slope

It  is  possible  to  open  and  close  the 

doors electrically up to a gradient of 

20 %.

In the case of a steep slope, 

the door may be driven by 

its  own  weight  and  as  a 

consequence may open or 

close sharply. Therefore:

•  There would not be time for operation 

of  one  of  the  electric  controls  to  be 

taken into account.

• There  would  not  be  time  for  the 

obstacle  detection  system  to  be 

triggered.

Take care not to leave the vehicle on 

a steep slope with the door(s) open 

without  supervision.  If  this  advice  is 

not followed, injuries or damage may 

occur if a part of the body or an ob-

ject is trapped or caught.

In the event of an impact

The electric controls are deactivated 

in  the  event  of  an  impact.  Manual 

opening and closing is still possible.

Special features of operation

With the ignition off,

• doors  open,  power  consuming 

equipment on (radio, lights…),

or

• doors  in  an  intermediate  position 

(door  neither  fully  open  nor  fully 

closed).

After  30  minutes,  the  vehicle  auto-

matically  switches  to  energy  econo-

my mode.

However,  if  your  vehicle  is  on  a 

slope,  with  the  front  of  the  vehicle 

facing  up,  open  the  door  with  care. 

The door may open more quickly due 

to the incline of the ground.

However,  if  your  vehicle  is  on  a 

slope,  with  the  front  of  the  vehicle 

facing  down,  the  door  may  not  stay 

open  and  may  close  again  sharply 

with the risk of injury.

Before any opening or closing 

and during any movement of 

the  doors,  ensure  that  no 

person,  animal  or  object  is 

preventing  the  required  manoeuvre, 

either  inside  or  outside  the  vehicle.  If 

this  advice  is  not  followed,  injuries  or 

damage may occur if a part of the body 

or an object is trapped or caught.

Electric  closing  and  opening  of  the 

doors  is  not  possible  above  3  mph 

(5 km/h):

•  If you set off with the door(s) open, 

you  must  slow  down  to  below  the 

threshold of 3 mph (5 km/h) in order 

to close the door(s).

•  Any attempt to open a door electrically 

using the interior handle, while driving, 

results  in  the  door  opening  partially 

and, as a safety measure, locking in 

this position immediately. Flashing of 

the courtesy light + audible warning + 

"door open" message accompany this 

situation. In order to release the door 

and  be  able  to  operate  it  again,  you 

must slow down to below the thresh-

old of 3 mph (5 km/h) again.

116 - Accesses

01-10-2005

117

-

Accesses

01-10-2005

TAILGATE

Simultaneous locking or

unlocking of the tailgate and the 

doors

The  tailgate  is  locked  or  unlocked 

by the remote control or the driver's 

door lock.

To open, press the control 

1 and lift 

the tailgate.

Note: the tailgate locks automatically 

when  the  vehicle  speed  reaches 

6 mph  (10  km/h).  It  unlocks  when 

one  of  the  doors  is  opened  if  the 

speed  is  below  6  mph  (10  km/h)  or 

when  the  central  locking  button  on 

the centre console is pressed.

Tailgate release

This enables the tailgate to be unlocked 

in the event of a central locking fault.

-  Fold  back  the  rear  seats  to  gain 

access  to  the  lock

  from  inside  the 

boot,

-  Insert a small screwdriver into hole 

A 

of the lock to unlock the tailgate. 

"Tailgate open" warning

With the engine running, an audible 

signal and a diagram or a message 

displayed briely on the multi-function 

screen  warn  you  that  the  tailgate  is 

not properly closed.

In  this  case,  or  following  reconnec-

tion  of  the  battery,  with  the  doors 

open,  it  may  be  necessary  to  close 

the doors manually, in order to reini-

tialise them, and start the engine.

When the door has stopped in an inter-

mediate position (neither fully open nor 

fully closed), only the remote control or 

the switches permit electric operation of 

the door.

When  closing  requests  are  made 

when  the  door  is  in  a  partially  open 

position,  the  door  may  open  slightly 

before closing.

When closing a door electrically when 

the battery is low, you are advised to 

guide  the  door  manually.  Recharge 

the battery as soon as possible.

If the electric controls (remote control 

or switches) no longer operate, reini-

tialise the doors(s) as follows:

1.  Start the engine.

2.  Manually open the door(s) fully.

3.  Close the door(s) fully.

On completion of this procedure, electric 

operation of the doors is restored.

However, if a problem persists following 

this  procedure,  contact  a  PEUGEOT 

dealer.

118 - Accesses

01-10-2005

119

-

Accesses

01-10-2005

PANORAMIC SUNROOF

This sunroof is a panoramic assembly 

which  provides  maximum  brightness 

and visibility in the passenger compart-

ment.

It consists of two parts:

-  a ixed rear part,

-  a moving front part.

Each part has an independent manual 

shutter.

The sunroof is controlled electrically 

by a dial with 9 opening positions.

To open: turn the dial to the left (nine 

possible settings).

Once the roof is open, the front shutter 

cannot be closed.

To  close:  return  the  control  to  the 

initial position 

"O".

Following  reconnection  of  the  battery, 

in the event of a malfunction or in the 

event of unwanted opening of the roof 

on  closing,  the  safety  auto-reverse 

must be reinitialised:

-  place the dial in the fully closed position 

(initial position 

"O"),

-  press the dial immediately,

-  continue  to  press  until  the  roof  is 

fully closed.

The  safety  auto-reverse  function  is 

not operational during this operation.

Always  remove  the  ignition 

key when leaving the vehicle, 

even for a short time.

In the event of contact during 

operation of the roof, the movement of 

the roof must be reversed. To do this, 

operate the control concerned.

When  the  driver  operates  the  roof 

control, he must ensure that no one 

is  preventing  the  roof  from  closing 

correctly.

The driver must ensure that the pas-

sengers use the sunroof correctly.

Be aware of children when operating 

the roof.

Check that the slides are clean to ensure 

that the sunroof slides correctly.

Safety auto-reverse

When  the  roof  meets  an  obstacle 

while  closing,  it  partially  opens 

again. 

118 - Accesses

01-10-2005

119

-

Accesses

01-10-2005

FILLING THE FUEL TANK

The tank must be illed with fuel with 

the engine off.
F

 Open the fuel iller lap.

F

 Insert  the  key  then  turn  it  to  the 

left.

F

 Remove  the  cap  and  attach  it  to 

the  clip  located  on  the  inside  of 

the lap.

A label on the inside of the lap indicates 

which type of fuel to use.

If  you  ill  your  tank,  do  not  continue 

after  the  third  cut-off  of  the  pump 

nozzle.  This  could  result  in  vehicle 

malfunctions.

The capacity of the tank is approx-

imately 9 gallons (40 litres). 
F

 After illing the tank, lock the cap 

and close the lap.

You have enough fuel left to cover 

approximately 30 miles (50 km).

The electric opening of the 

left-hand  door  is  inhibited 

when  the  fuel  iller  lap  is 

open.

The key cannot be removed from the 

cap's lock until the cap is reitted on 

the tank. 

Low fuel level

When  the  tank's  mini-

mum  level  is  reached, 

this warning light comes 

on,  accompanied  by  a 

message  on  the  multi-

function display.

120 - Visibility

01-10-2005

121

-

Visibility

01-10-2005

THE LIGHTS STALK

Front and rear lights

Selection is by turning ring 

A.

Lights off

Side lights 

Dipped/main beam 

headlamps

Automatic switching on 

of lights

Dipped/Main beam change

Pull the stalk fully towards you.

Front fog lamps and rear fog 

lamp

Rotate the ring forwards to switch on 

and backwards to switch off. The sta-

tus is displayed by the indicator light 

on the instrument panel.

Vehicles itted with a rear fog 

lamp (ring B)

Rear fog lamp

Vehicles itted with front fog lamps 

and a rear fog lamp (ring C)

Front  fog  lamps  (1st  rota-

tion of the ring forwards)

These  operate  with  the  side  lights 

and dipped headlamps.

Front  fog  lamps  and 

rear  fog  lamp  (2nd 

rotation  of  the  ring  for-

wards)

Note:  to  switch  off 

the  rear  fog  lamp  and  the  front  fog 

lamps, turn the ring backwards twice 

in succession. 

Lights on

With the ignition off, when the driver's 

door is opened, if you have left your 

lights  on,  a  buzzer  sounds,  accom-

panied  by  a  message  on  the  multi-

function display.

This can only operate with the dipped 

and main beam headlamps.

Notes:

When the main beam headlamps are 

switched on, the front fog lamps are 

switched off.

When the lights are switched off au-

tomatically,  the  front  fog  lamps  and 

the  side  lights  will  remain  on  (turn 

the ring backwards to switch the fog 

lamps off).

120 - Visibility

01-10-2005

121

-

Visibility

01-10-2005

Direction indicators (lashers)

Left: downwards.

Right: upwards.

Follow-me-home lighting

In poor light or at night, if you leave 

your  vehicle,  the  side  lights  and 

dipped headlamps can be left on for 

approximately one minute.

To do this:

-  turn the key to the 

STOP position,

-  place the lights stalk in position 

0,

-  within  the  next  minute,  lash  the 

headlamps,

-  get out of the vehicle and lock it.

In  good  or  rainy  weather, 

both  day  and  night,  the 

front fog lamps and the rear 

fog lamps are dazzling and 

are prohibited.

Do  not  forget  to  switch 

them  off  when  they  are  no  longer 

needed.

AUTOMATIC SWITCHING ON 

OF LIGHTS

The  side  lights  and  dipped  beam 

headlamps switch on automatically if 

the light is poor and when the wind-

screen  wipers  operate  continuously. 

They  switch  off  when  the  light  be-

comes  bright  enough  or  the  wind-

screen wipers are switched off.

In  foggy  weather  or  in  snow,  the 

brightness  sensor  can  detect 

suficient  light,  the  lights  will  not 

come on automatically.

This function is active when the vehi-

cle is supplied

 to the customer.

To disarm or activate the function:

-  Place  the  key  in  the  accessories 

position (1st notch),

-  Place the lights stalk in position 

0,

-  Press the end of the lights stalk for 

more than two seconds.

Do  not  cover  the  brightness  sen-

sor, coupled with the rain sensor, 

located in the centre of the wind-

screen, behind the interior mirror. 

It is used for automatic switching 

on of the lights.

Operating check

Activation

The  activated  function  is  accompa-

nied by an audible signal and a mes-

sage on the multifunction display.

Disarming

The  disarmed  function  is  accompa-

nied by an audible signal and a mes-

sage on the multifunction display. 

When  the  driver  uses  the  manual 

lighting  controls,  the  function  is  dis-

armed temporarily.

If the brightness sensor does not 

function  correctly,  the  lights  come 

on accompanied by an audible signal 

and a message on the multifunction 

display.

Contact a PEUGEOT dealer.

122 - Visibility

01-10-2005

123

-

Visibility

01-10-2005

HEADLAMP ADJUSTMENT

Depending on the load in your vehi-

cle, adjusting the beam of the head-

lamps is recommended as follows.

0.  1 or 2 people in the front seats.

-.  3 people.

1.  4 people.

2.  4 people + maximum authorised 

load.

3.  Driver + maximum authorised 

load.

Initial setting is position 0. 

WINDSCREEN WIPER STALK

Front windscreen wiper with

automatic wipe

  2  Fast wipe

(heavy rain).

  1  Normal wipe

(moderate rain).

 AUTO  Automatic wipe. 

  0  Off.
  â

  Single wipe 

(press downwards).

In  the 

AUTO  position,  the  wiping 

speed is in proportion to the intensity 

of the rainfall.

The  command  must  be 

reactivated 

whenever 

the  ignition  has  been 

switched  off  for  more 

than one minute:

-  move the stalk to any position, 

-  then  move  it  back  to  the  required 

position. 

Front windscreen wiper with

intermittent wipe 

  2  Fast wipe

(heavy rain).

  1  Normal wipe

(moderate rain).

  l  Intermittent wipe.

  0  Off.
 

â

  Single wipe 

(press downwards).

In  the 

Intermittent  position,  the  wip-

ing speed is in proportion to the ve-

hicle speed.


Content   ..  6  7  8  9   ..