Nissan Versa Hatchback (2012 year). Manual - part 14


  Index      Nissan     Nissan Versa Hatchback - service manual 2012 year in english


Search            copyright infringement  


Content   ..  12  13  14  15   ..


Nissan Versa Hatchback (2012 year). Manual - part 14


3. Remove the shift lock release cover as

shown.

4. Insert a small screwdriver in the shift lock

release slot and push downward.

5. Move the shift selector to the N (Neutral)

position while holding down the shift lock
release.

6. Now the vehicle may be moved to the de-

sired location.

If the shift selector cannot be moved out of P
(Park), have a NISSAN dealer check the CVT
system as soon as possible.

WARNING

If the shift selector cannot be moved from
the P (Park) position while the engine is
running and the brake pedal is depressed,
the stop lights may not work. Malfunction-
ing stop lights could cause an accident
injuring yourself and others.

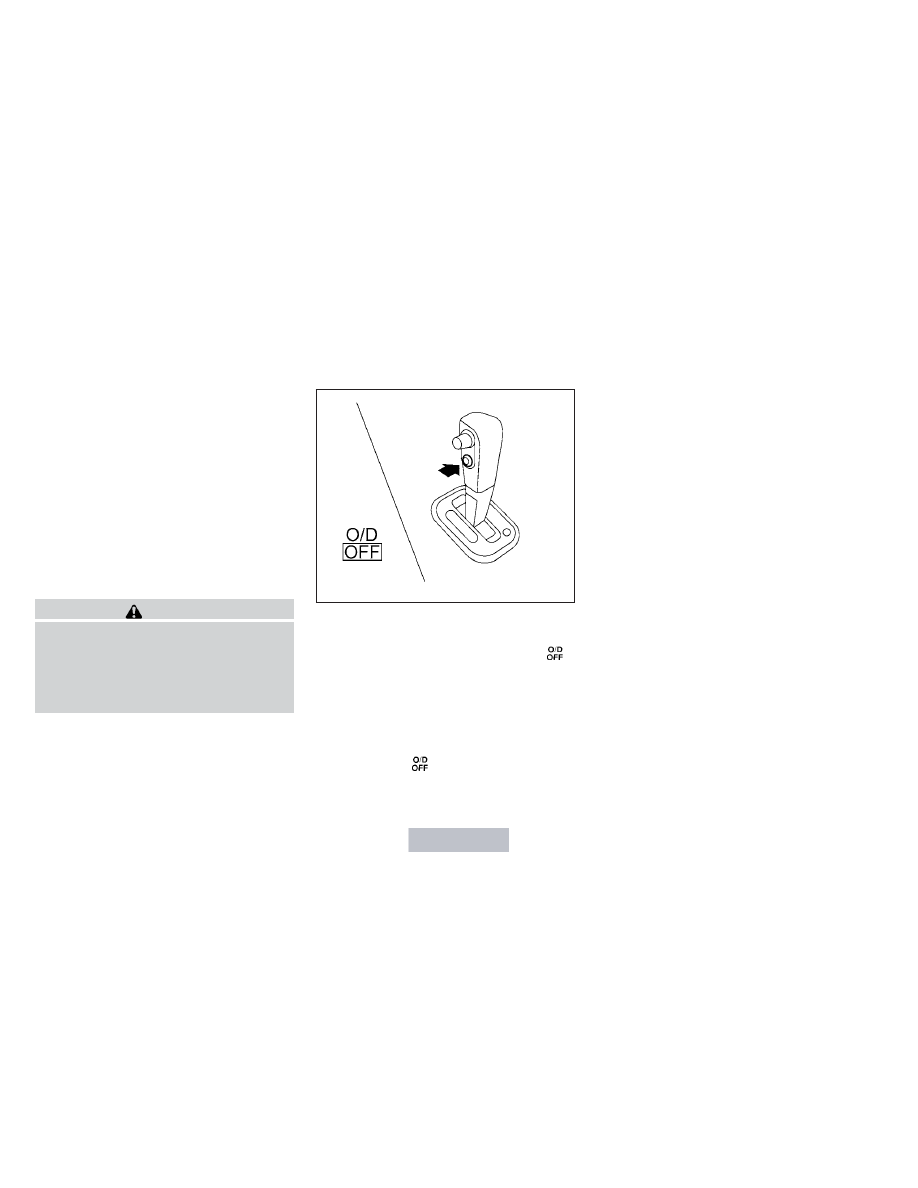
Overdrive (O/D) OFF switch

When the O/D OFF switch is pushed with the
shift selector in the D (Drive) position, the
light in the instrument panel illuminates. See
“Overdrive off indicator light (CVT models)” in the
“Instruments and controls” section of this manual.

Use the Overdrive off mode when you need im-
proved engine braking.

To turn off the Overdrive off mode, push the O/D OFF
switch again. The

indicator light will turn off.

Each time the engine is started, or when the shift
selector is shifted to any position other than D
(Drive), the Overdrive off mode will be automati-
cally turned off.

Accelerator downshift
— in D position —

For passing or hill climbing, depress the accel-
erator pedal to the floor. This shifts the transmis-
sion down into a lower gear, depending on the
vehicle speed.

Fail-safe

When the fail-safe operation occurs, the CVT will
not be shifted into the selected driving position.

If the vehicle is driven under extreme con-
ditions, such as excessive wheel spinning
and subsequent hard braking, the fail-safe
system may be activated. The MIL may
come on to indicate the fail-safe mode is
activated, see “Malfunction Indicator Light
(MIL)” in the “Instruments and controls”
section. This will occur even if all electrical
circuits are functioning properly. In this
case, place the ignition switch in the OFF
position and wait for 10 seconds. Then
place the ignition switch back in the ON
position. The vehicle should return to its
normal operating condition. If it does not
return to its normal operating condition,
have a NISSAN dealer check the transmis-
sion and repair if necessary.

WSD0164

5-16

Starting and driving

WARNING

When the high fluid temperature protec-
tion mode or fail-safe operation occurs,
vehicle speed may be gradually reduced.
The reduced speed may be lower than
other traffic, which could increase the
chance of a collision. Be especially care-
ful when driving. If necessary, pull to the
side of the road at a safe place and allow
the transmission to return to normal op-
eration, or have it repaired if necessary.

AUTOMATIC TRANSMISSION (if so
equipped)

WARNING

● Do not depress the accelerator pedal

while shifting from P (Park) or N (Neu-
tral) to R (Reverse), D (Drive), 2 or 1.
Always depress the brake pedal until
shifting is completed. Failure to do so
could cause you to lose control and
have an accident.

● Cold engine idle speed is high, so use

caution when shifting into a forward or
reverse gear before the engine has
warmed up.

● Never shift to P (Park) or R (Reverse)

while the vehicle is moving. This could
cause an accident.

● Except in an emergency, do not shift to

the N (Neutral) position while driving.
Doing so can cause a loss of engine
braking which may result in a collision,
serious personal injury or death. In ad-
dition, coasting with the transmission
in the N (Neutral) position may cause
serious damage to the transmission.

CAUTION

● When stopping the vehicle on an uphill

grade, do not hold the vehicle by de-
pressing the accelerator pedal. The foot
brake should be used for this purpose.

● Do not downshift abruptly on slippery

roads. This may cause a loss of control.

The automatic transmission in your vehicle is
electronically controlled to produce maximum
power and smooth operation.

The recommended operating procedures for this
transmission are shown on the following pages.
Follow these procedures for maximum vehicle
performance and driving enjoyment.

Starting the vehicle

1. After starting the engine, fully depress the

foot brake pedal before moving the shift
selector out of the P (Park) position.

2. Keep the foot brake pedal depressed and

move the shift selector into a driving gear.

3. Release the foot brake, then gradually start

the vehicle in motion.

The automatic transmission is designed so
the foot brake pedal MUST be depressed
before shifting from P (Park) to any drive
position while the ignition switch is in the
ON position.

The shift selector cannot be moved out of
the P (Park) position and into any of the
other gear positions if the ignition switch is
placed in the LOCK, OFF or ACC position.

Starting and driving

5-17

To move the shift selector:

Push the button

A

while depressing the

brake pedal

Push the button

A

to shift

Shift without pushing button

A

Shifting

After starting the engine, fully depress the brake
pedal, push the shift selector button and move
the shift selector out of the P (Park) position.

WARNING

● Apply the parking brake if the shift se-

lector is in any position while the en-
gine is not running. Failure to do so
could cause the vehicle to move unex-
pectedly or roll away and result in seri-
ous personal injury or property damage.

● If the shift selector cannot be moved

from the P (Park) position while the
engine is running and the brake pedal is
depressed, the stop lights may not
work. Malfunctioning stop lights could
cause an accident injuring yourself and
others.

If the ignition switch is placed in the OFF or ACC
position for any reason while the vehicle is in N
(Neutral), or any D (Drive) position, the ignition
switch cannot be turned to the LOCK position
and the key cannot be removed from the ignition
switch. If this occurs, perform the following steps:

1. Apply the parking brake when the vehicle is

stopped.

2. Move the shift selector to P (Park) to park the

vehicle and place the ignition switch in the
LOCK position.

3. Remove the key.

P (Park):

CAUTION

To prevent transmission damage, use the
P (Park) or R (Reverse) position only when
the vehicle is completely stopped.

Use the P (Park) position when the vehicle is
parked or when starting the engine. Make sure
the vehicle is completely stopped. The brake
pedal must be depressed and the shift se-
lector button pushed in to move the shift
selector from N (Neutral) or any drive posi-
tion to P (Park). 
Apply the parking brake. When
parking on a hill, apply the parking brake first,
then shift the shift selector into the P (Park)
position.

R (Reverse):

CAUTION

To prevent transmission damage, use the
P (Park) or R (Reverse) position only when
the vehicle is completely stopped.

Use the R (Reverse) position to back up. Make
sure the vehicle is completely stopped before
selecting R (Reverse) position. The brake
pedal must be depressed and the shift se-
lector button pushed in to move the shift

WSD0224

5-18

Starting and driving

selector from P (Park), N (Neutral) or any
drive position to R (Reverse).

N (Neutral):

Neither forward nor reverse gear is engaged. The
engine can be started in this position. You may
shift to N (Neutral) and restart a stalled engine
while the vehicle is moving.

D (Drive):

Use this position for all normal forward driving.

2 (Second gear):

Use this position for hill climbing or engine brak-
ing on downhill grades.

1 (Low gear):

Use this position when climbing steep hills slowly
or driving slowing through deep snow, sand or
mud, or for maximum engine braking on steep
downhill grades.

Do not shift into the gears when the vehicle
speed exceeds the following limits, otherwise the
engine may over-rev and cause engine damage.

Shift Selector position

1

2

MR18DE

35 MPH (55

km/h)

62 MPH (100

km/h)

Shift lock release

If the battery is discharged, the shift selector may
not be moved from the P (Park) position even with
the brake pedal depressed.

To move the shift selector, release the shift lock.
The shift selector can be moved to N (Neutral).

To push the shift lock release, complete the fol-
lowing procedure:

1. Place the ignition switch in the LOCK posi-

tion and remove the key.

2. Apply the parking brake.

3. Remove the shift lock release cover as

shown.

4. Insert a small screwdriver in the shift lock

release slot and push down.

5. Move the shift selector to the N (Neutral)

position while holding down the shift lock
release.

6. Now the vehicle may be moved to the de-

sired location.

If the shift selector cannot be moved out of P
(Park), have a NISSAN dealer check the auto-
matic transmission system as soon as possible.

WARNING

If the shift selector cannot be moved from
the P (Park) position while the engine is
running and the brake pedal is depressed,
the stop lights may not work. Malfunction-
ing stop lights could cause an accident
injuring yourself and others.

Accelerator downshift
— in D position —

For passing or hill climbing, depress the accel-
erator pedal to the floor. This shifts the transmis-
sion down into a lower gear, depending on the
vehicle speed.

WSD0195

Starting and driving

5-19

Fail-safe

When the fail-safe operation is activated, the
automatic transmission will be locked in third
gear.

If the vehicle is driven under extreme con-
ditions, such as excessive wheel spinning
and subsequent hard braking, the fail-safe
system may be activated. This will occur
even if all electrical circuits are functioning
properly. In this case:

● Place the shift selector in the P (Park)

position.

● Place the ignition switch in the OFF

position and wait for 3 seconds.

● Then place the ignition switch back in

the ON position.

The vehicle should return to its normal op-
erating condition. If it does not return to its
normal

operating

condition,

have

a

NISSAN dealer check the transmission and
repair it if necessary.

Overdrive switch

Each time your vehicle is started, the transmis-
sion is automatically “reset” to overdrive ON.

ON:

With the engine running and the
shift selector in the D (Drive)
position, the transmission upshifts
into Overdrive as vehicle speed
increases.

Overdrive does not engage until the engine
has reached operating temperature.

OFF:

For driving up and down long
slopes where engine braking is nec-
essary push the Overdrive switch
once. The

indicator light in

the instrument panel will illuminate.

When cruising at a low speed or climbing a
gentle slope, you may feel uncomfortable shift
shocks as the transmission shifts into and out of
Overdrive repeatedly. In this case, push the Over-
drive switch to turn the Overdrive off. The
indicator light in the instrument panel will illumi-
nate.

When driving conditions change, push the Over-
drive switch to turn the Overdrive on. The
indicator light in the instrument panel will turn off.

Remember not to drive at high speeds for ex-
tended periods of time with the Overdrive off.
This reduces fuel economy.

SSD0533

5-20

Starting and driving

MANUAL TRANSMISSION (if so
equipped)

WARNING

● Do not downshift abruptly on slippery

roads. This may cause a loss of control.

● Do not over-rev the engine when shift-

ing to a lower gear. This may cause a
loss of control or engine damage.

● Do not shift to the N (Neutral) position

while driving. Doing so may result in an
accident due to loss of engine braking.

CAUTION

● Do not rest your foot on the clutch pedal

while driving. This may cause clutch
damage.

● Fully depress the clutch pedal before

shifting to help prevent transmission
damage.

● Stop your vehicle completely before

shifting into R (Reverse).

● When the vehicle is stopped with the

engine running (for example, at a stop
light), shift to N (Neutral) and release
the clutch pedal with the foot brake
applied.

Shifting

To change gears or when upshifting or down-
shifting, depress the clutch pedal fully, shift into
the appropriate gear, then release the clutch
slowly and smoothly.

To ensure smooth gear changes, fully depress
the clutch pedal before operating the shift selec-
tor. If the clutch pedal is not fully depressed
before the transmission is shifted, a gear noise
may be heard. Transmission damage may occur.

Start the vehicle in 1st gear and shift to 2nd, 3rd,
4th and 5th up to 6th gear in sequence according
to vehicle speed.

To back up, lift up on the shift selector ring

1

and

then move it to the R (Reverse) position after
stopping the vehicle completely.

The shift selector ring

1

returns to its original

position when the shift selector is moved to the N
(Neutral) position.

If it is difficult to move the shift selector into R
(Reverse) or 1 (1st), shift into N (Neutral), then
release the clutch pedal. Depress the clutch
pedal again and shift into R (Reverse) or 1 (1st).

Suggested up-shift speeds

The following are suggested vehicle speeds for
shifting into a higher gear. These suggestions
relate to fuel economy and vehicle performance.
Actual upshift speeds will vary according to road
conditions, the weather and individual driving
habits.

For normal acceleration in low altitude areas (less
than 4,000 ft [1219 m]):

GEAR CHANGE

MPH (km/h)

1st to 2nd

8 (13)

2nd to 3rd

17 (27)

3rd to 4th

25 (40)

4th to 5th

36 (58)

5th to 6th

51 (82)

SSD0552

Starting and driving

5-21

For quick acceleration in low altitude areas and
high altitude areas (over 4,000 ft [1219 m]):

Gear change

MPH (km/h)

1st to 2nd

15 (24)

2nd to 3rd

25 (40)

3rd to 4th

40 (64)

4th to 5th

45 (72)

5th to 6th

51 (82)

Suggested maximum speed in each
gear

Downshift to a lower gear if the engine is not
running smoothly, or if you need to accelerate.

Do not exceed the maximum suggested speed
(shown below) in any gear. For level road driving,
use the highest gear suggested for that speed.
Always observe posted speed limits, and drive
according to the road conditions, which will en-
sure safe operation. Do not over-rev the engine
when shifting to a lower gear as it may cause
engine damage or loss of vehicle control.

GEAR

MPH (km/h)

1st

29 (47)

2nd

51 (83)

3rd

74 (120)

4th

5th

6th

WARNING

● Be sure the parking brake is fully re-

leased before driving. Failure to do so
can cause brake failure and lead to an
accident.

● Do not release the parking brake from

outside the vehicle.

● Do not use the shift selector in place of

the parking brake. When parking, be
sure the parking brake is fully engaged.

● Do not leave children unattended in a

vehicle. They could release the parking
brake and cause an accident.

To engage: Pull the parking brake lever up

A

.

To release:

1. Firmly apply the foot brake.

2. Manual transmission models:

Place the shift selector in the N (Neutral)
position.

Automatic Transmission (A/T) or Con-
tinuously Variable Transmission (CVT)
models:

Move the shift selector to the P (Park) posi-
tion.

WSD0169

PARKING BRAKE

5-22

Starting and driving

3. While pulling up on the parking brake lever

slightly, push the button

B

and lower the

lever completely .

4. Before driving, be sure the brake warning

light goes out.

1.

ACCEL/RES switch

2.

COAST/SET switch

3.

CANCEL switch

4.

ON/OFF switch

PRECAUTIONS ON CRUISE
CONTROL

● If the cruise control system malfunctions, it

cancels automatically. The SET indicator
light in the instrument panel then blinks to
warn the driver.

● If the SET indicator light blinks, turn the

cruise control switch off and have the sys-
tem checked by a NISSAN dealer.

● The SET indicator light may blink when the

cruise control switch is turned ON while
pushing the ACCEL/RES, COAST/SET, or
CANCEL switch. To properly set the cruise
control system, use the following proce-
dures.

WARNING

Do not use the cruise control when driving
under the following conditions:

● When it is not possible to keep the

vehicle at a set speed.

● In heavy traffic or in traffic that varies in

speed.

● On winding or hilly roads.
● On slippery roads (rain, snow, ice, etc.).
● In very windy areas.
Doing so could cause a loss of vehicle
control and result in an accident.

LSD0160

CRUISE CONTROL (if so equipped)

Starting and driving

5-23

CAUTION

On manual transmission models, do not
shift into N (Neutral) without depressing
the clutch pedal when the cruise control is
set. Should this occur, depress the clutch
pedal and turn the main switch off imme-
diately. Failure to do so may cause engine
damage.

CRUISE CONTROL OPERATIONS

The cruise control allows driving at a speed be-
tween 25 - 89 MPH (40 - 144 km/h) without
keeping your foot on the accelerator pedal.

To turn on the cruise control, push the
ON·OFF switch. The CRUISE indicator light in
the instrument panel comes on.

To set cruising speed, accelerate the vehicle to
the desired speed, push the COAST/SET switch
and release it. The SET indicator light in the
instrument panel comes on. Take your foot off the
accelerator pedal. Your vehicle maintains the set
speed.

● To pass another vehicle, depress the ac-

celerator pedal. When you release the
pedal, the vehicle returns to the previously
set speed.

● The vehicle may not maintain the set speed

when going up or down steep hills. If this
happens, drive without the cruise control.

To cancel the preset speed, use one of the
following three methods.

● Push the CANCEL button; the SET indicator

light in the instrument panel goes out.

● Tap the brake pedal; the SET indicator light

goes out.

● Push the ON·OFF switch off. Both the

CRUISE indicator light and SET indicator
light in the instrument panel go out.

The cruise control is automatically canceled and
the SET light in the instrument panel goes out if:

● you depress the brake or clutch pedal while

pushing the ACCEL/RES or SET/COAST
switch. The preset speed is deleted from
memory.

● the vehicle slows down more than 8 MPH

(13 km/h) below the set speed.

● you depress the clutch pedal (manual trans-

mission), or move the shift selector to N
(Neutral) (CVT or A/T).

To reset at a faster cruising speed, use one
of the following three methods.

● Depress the accelerator pedal. When the

vehicle attains the desired speed, push and
release the COAST/SET switch.

● Push and hold the ACCEL/RES switch.

When the vehicle attains the speed you de-
sire, release the switch.

● Push and release the ACCEL/RES switch.

Each time you do this, the set speed in-
creases by about 1 MPH (1.6 km/h).

To reset at a slower cruising speed, use one
of the following three methods.

● Lightly tap the brake pedal. When the ve-

hicle attains the desired speed, push the
COAST/SET switch and release it.

● Push and hold the COAST/SET switch. Re-

lease the switch when the vehicle slows to
the desired speed.

● Push and release the COAST/SET switch.

Each time you do this, the set speed de-
creases by about 1 MPH (1.6 km/h).

To resume the preset speed, push and re-
lease the ACCEL/RES switch. The vehicle re-
turns to the last set cruising speed when the
vehicle speed is over 25 MPH (40 km/h).

5-24

Starting and driving

CAUTION

During the first 1,200 miles (2,000 km),
follow these recommendations to obtain
maximum engine performance and en-
sure the future reliability and economy of
your new vehicle. Failure to follow these
recommendations may result in short-
ened engine life and reduced engine
performance.

● Avoid driving for long periods at constant

speed, either fast or slow, and do not run the
engine over 4,000 rpm.

● Do not accelerate at full throttle in any gear.
● Avoid quick starts.
● Avoid hard braking as much as possible.

● Accelerate slowly and smoothly. Maintain

cruising speeds with a constant accelerator
position.

● Drive at moderate speeds on the highway.

Driving at high speed lowers fuel economy.

● Avoid unnecessary stopping and braking.

Maintain a safe distance behind other ve-
hicles.

● Use a proper gear range which suits road

conditions. On level roads, shift into high
gear as soon as possible.

● Avoid unnecessary engine idling.
● Keep your engine tuned up.
● Follow the recommended periodic mainte-

nance schedule.

● Keep the tires inflated to the correct pres-

sure. Low tire pressure increases tire wear
and lowers fuel economy.

● Keep the wheels in correct alignment. Im-

proper alignment increases tire wear and
lowers fuel economy.

● Air conditioner (if so equipped) operation

lowers fuel economy. Use the air conditioner
only when necessary.

● When cruising at highway speeds, it is more

economical to use the air conditioner and
leave the windows closed to reduce drag.

● Use the recommended viscosity engine oil.

See

“Capacities

and

recommended

fuel/lubricants” in the “Technical and con-
sumer information” section of this manual.

BREAK-IN SCHEDULE

INCREASING FUEL ECONOMY

Starting and driving

5-25

WARNING

● Do not stop or park the vehicle over

flammable materials such as dry grass,
waste paper or rags. They may ignite
and cause a fire.

● Safe parking procedures require that

both the parking brake be set and the
transmission placed into P (Park) or in
an appropriate gear for manual trans-
mission models. Failure to do so could
cause the vehicle to move unexpectedly
or roll away and result in an accident.

Make sure the shift selector has been
pushed as far forward as it can go and
cannot be moved without depressing
the foot brake pedal.

● Never leave the engine running while

the vehicle is unattended.

● Do not leave children unattended inside

the vehicle. They could unknowingly ac-
tivate switches or controls. Unattended
children could become involved in seri-
ous accidents.

1. Firmly apply the parking brake.

2. Manual transmission models:

Place the shift selector in the R (Reverse)
position. When parking on an uphill grade,
place the shift selector in 1st gear.

Automatic Transmission (A/T) or Con-
tinuously Variable Transmission (CVT)
models:

Move the shift selector to the P (Park) posi-
tion.

3. To help prevent the vehicle from rolling into

traffic when parked on an incline, it is a good
practice to turn the wheels as illustrated.

● HEADED DOWNHILL WITH CURB:

1

Turn the wheels into the curb and move the
vehicle forward until the curb side wheel
gently touches the curb.

● HEADED UPHILL WITH CURB:

2

Turn the wheels away from the curb and
move the vehicle back until the curb side
wheel gently touches the curb.

● HEADED UPHILL OR DOWNHILL, NO

CURB:

3

Turn the wheels toward the side of the road
so the vehicle will move away from the cen-
ter of the road if it moves.

4. Place the ignition switch in the LOCK posi-

tion and remove the key.

SSD0488

PARKING/PARKING ON HILLS

5-26

Starting and driving

WARNING

● If the engine is not running or is turned

off while driving, the power assist for
the steering will not work. Steering will
be harder to operate.

● When the power steering warning light

illuminates with the engine running,
there will be no power assist for the
steering. You will still have control of
the vehicle but the steering will be
harder to operate. Have the power
steering system checked by a NISSAN
dealer.

The power steering system is designed to pro-
vide power assist while driving to operate the
steering wheel with light force.

When the steering wheel is operated repeatedly
or continuously while parking or driving at a very
low speed, the power assist for the steering
wheel will be reduced. This is to prevent over-
heating of the power steering system and protect
it from getting damaged. While the power assist
is reduced, steering wheel operation will become
heavy. When the temperature of the power steer-
ing system goes down, the power assist level will
return to normal. Avoid repeating such steering
wheel operations that could cause the power
steering system to overheat.

You may hear a sound when the steering wheel is
operated quickly. However, this is not a malfunc-
tion.

If the electric power steering warning light PS
illuminates while the engine is running, it may
indicate the power steering system is not func-
tioning properly and may need servicing. Have
the power steering system checked by a
NISSAN dealer.

When the electric power steering warning light
illuminates with the engine running, there will be
no power assist for the steering but you will still
have control of the vehicle. At this time, greater
steering effort is required to operate the steering
wheel, especially in sharp turns and at low
speeds.

For additional information see “Electric power
steering warning light” in the “Instruments and
controls” section.

The brake system has two separate hydraulic
circuits. If one circuit malfunctions, you will still
have braking at 2 wheels.

BRAKE PRECAUTIONS

Vacuum assisted brakes

The brake booster aids braking by using engine
vacuum. If the engine stops, you can stop the
vehicle by depressing the brake pedal. However,
greater foot pressure on the brake pedal will be
required to stop the vehicle and stopping dis-
tance will be longer.

Using the brakes

Avoid resting your foot on the brake pedal while
driving. This will overheat the brakes, wear out the
brake pads faster, and reduce gas mileage.

To help reduce brake wear and to prevent the
brakes from overheating, reduce speed and
downshift to a lower gear before going down a
slope or long grade. Overheated brakes may
reduce braking performance and could result in
loss of vehicle control.

POWER STEERING

BRAKE SYSTEM

Starting and driving

5-27

WARNING

● While driving on a slippery surface, be

careful when braking, accelerating or
downshifting. Abrupt braking or accel-
erating could cause the wheels to skid
and result in an accident.

● If the engine is not running or is turned

off while driving, the power assist for
the brakes will not work. Braking will be
harder.

Wet brakes

When the vehicle is washed or driven through
water, the brakes may get wet. As a result, your
braking distance will be longer and the vehicle
may pull to one side during braking.

To dry the brakes, drive the vehicle at a safe
speed while lightly pressing the brake pedal to
heat up the brakes. Do this until the brakes return
to normal. Avoid driving the vehicle at high
speeds until the brakes function correctly.

Parking brake break-in

Break-in the brake shoes whenever the stopping
effect of the parking brake is weakened or when-
ever the brake shoes and/or drums are replaced,
in order to assure the best brake performance.

This procedure is described in the vehicle service
manual and can be performed by a NISSAN
dealer.

ANTI-LOCK BRAKING SYSTEM
(ABS)

WARNING

● The Anti-lock Braking System (ABS) is a

sophisticated device, but it cannot pre-
vent accidents resulting from careless
or dangerous driving techniques. It can
help maintain vehicle control during
braking on slippery surfaces. Remem-
ber that stopping distances on slippery
surfaces will be longer than on normal
surfaces even with ABS. Stopping dis-
tances may also be longer on rough,
gravel or snow covered roads, or if you
are using tire chains. Always maintain a
safe distance from the vehicle in front
of you. Ultimately, the driver is respon-
sible for safety.

● Tire type and condition may also affect

braking effectiveness.

– When replacing tires, install the

specified size of tires on all four
wheels.

– When installing a spare tire, make

sure that it is the proper size and type
as specified on the Tire and Loading
Information label. See “Tire and
Loading Information label” in the
“Technical and consumer informa-
tion” section of this manual.

– For

detailed

information,

see

“Wheels and tires” in the “Mainte-
nance and do-it-yourself” section of
this manual.

The Anti-lock Braking System (ABS) controls the
brakes so the wheels do not lock during hard
braking or when braking on slippery surfaces.
The system detects the rotation speed at each
wheel and varies the brake fluid pressure to pre-
vent each wheel from locking and sliding. By
preventing each wheel from locking, the system
helps the driver maintain steering control and
helps to minimize swerving and spinning on slip-
pery surfaces.

Using the system

Depress the brake pedal and hold it down. De-
press the brake pedal with firm steady pressure,
but do not pump the brakes. The ABS will oper-
ate to prevent the wheels from locking up. Steer
the vehicle to avoid obstacles.

5-28

Starting and driving

WARNING

Do not pump the brake pedal. Doing so
may

result

in

increased

stopping

distances.

Self-test feature

The ABS includes electronic sensors, electric
pumps, hydraulic solenoids and a computer. The
computer has a built-in diagnostic feature that
tests the system each time you start the engine
and move the vehicle at a low speed in forward or
reverse. When the self-test occurs, you may hear
a “clunk” noise and/or feel a pulsation in the brake
pedal. This is normal and does not indicate a
malfunction. If the computer senses a malfunc-
tion, it switches the ABS off and illuminates the
ABS warning light on the instrument panel. The
brake system then operates normally, but without
anti-lock assistance.

If the ABS warning light illuminates during the
self-test or while driving, have the vehicle
checked by a NISSAN dealer.

Normal operation

The ABS operates at speeds above 3 - 6 MPH (5
- 10 km/h). The speed varies according to road
conditions.

When the ABS senses that 1 or more wheels are
close to locking up, the actuator rapidly applies
and releases hydraulic pressure. This action is
similar to pumping the brakes very quickly. You
may feel a pulsation in the brake pedal and hear a
noise from under the hood or feel a vibration from
the actuator when it is operating. This is normal
and indicates that the ABS is operating properly.
However, the pulsation may indicate that road
conditions are hazardous and extra care is re-
quired while driving.

The Vehicle Dynamic Control (VDC) system uses
various sensors to monitor driver inputs and ve-
hicle motion. Under certain driving conditions,
the VDC System helps to perform the following
functions:

● Controls brake pressure to reduce wheel

slip on one slipping drive wheel so power is
transferred to a non slipping drive wheel on
the same axle.

● Controls brake pressure and engine output

to reduce drive wheel slip based on vehicle
speed (traction control function).

● Controls brake pressure at individual wheels

and engine output to help the driver maintain
control of the vehicle in the following condi-
tions:

– understeer (vehicle tends to not follow

the steered path despite increased steer-
ing input)

– oversteer (vehicle tends to spin due to

certain road or driving conditions)

The VDC system can help the driver to maintain
control of the vehicle, but it cannot prevent loss of
vehicle control in all driving situations.

VEHICLE DYNAMIC CONTROL (VDC)
SYSTEM

Starting and driving

5-29

When the VDC system operates, the

indi-

cator in the instrument panel flashes so note the
following:

● The road may be slippery or the system may

determine some action is required to help
keep the vehicle on the steered path.

● You may feel a pulsation in the brake pedal

and hear a noise or vibration from under the
hood. This is normal and indicates that the
VDC system is working properly.

● Adjust your speed and driving to the road

conditions.

See “Slip indicator light” and ”Vehicle Dynamic
Control (VDC) off indicator light” in the ”Instru-
ments and controls” section.

If a malfunction occurs in the system, the
and

indicator lights come on in the instru-

ment panel. The VDC system automatically turns
off when these indicator lights are on.

The VDC OFF switch is used to turn off the VDC
system. The

indicator illuminates to indi-

cate the VDC system is off.

When the VDC switch is used to turn off the
system, the VDC system still operates to prevent
one drive wheel from slipping by transferring
power to a non slipping drive wheel. The

indicator flashes if this occurs. All other VDC
functions are off and the

indicator will not

flash.

The VDC system is automatically reset to on
when the ignition switch is placed in the off
position then back to the on position.

The computer has a built in diagnostic feature
that tests the system each time you start the
engine and move the vehicle forward or in reverse
at a slow speed. When the self-test occurs, you
may hear a clunk noise and/or feel a pulsation in
the brake pedal. This is normal and is not an
indication of a malfunction.

WARNING

● The VDC system is designed to help the

driver maintain stability but does not
prevent accidents due to abrupt steer-
ing operation at high speeds or by care-
less or dangerous driving techniques.
Reduce vehicle speed and be especially
careful when driving and cornering on
slippery surfaces and always drive
carefully.

● Do not modify the vehicle’s suspension.

If suspension parts such as shock ab-
sorbers, struts, springs, stabilizer bars,
bushings and wheels are not NISSAN
recommended for your vehicle or are
extremely deteriorated, the VDC system
may not operate properly. This could
adversely affect vehicle handling per-
formance, and the

indicator may

flash or both the

and

indi-

cator lights may illuminate.

● If brake related parts such as brake

pads,

rotors

and

calipers

are

not

NISSAN recommended or are extremely
deteriorated, the VDC system may not
operate properly and both the
and

the

indicator

lights

may

illuminate.

● If engine control related parts are not

NISSAN recommended or are extremely

deteriorated, both the

and

indicator lights may illuminate.

5-30

Starting and driving

● When driving on extremely inclined sur-

faces such as higher banked corners,
the VDC system may not operate prop-
erly and the

indicator may flash or

both

the

and

indicator

lights may illuminate. Do not drive on
these types of roads.

● When driving on an unstable surface

such as a turntable, ferry, elevator or
ramp, the

indicator may flash or

both

the

and

indicator

lights may illuminate. This is not a mal-
function. Restart the engine after driv-
ing onto a stable surface.

● If wheels or tires other than the NISSAN

recommended ones are used, the VDC
system may not operate properly and
the

indicator may flash or both

the

and

indicator lights may

illuminate.

● The VDC system is not a substitute for

winter tires or tire chains on a snow
covered road.

FREEING A FROZEN DOOR LOCK

To prevent a door lock from freezing, apply de-
icer through the key hole. If the lock becomes
frozen, heat the key before inserting it into the key
hole, or use the remote keyless entry keyfob (if so
equipped) or the NISSAN Intelligent Key™ (if so
equipped).

ANTI-FREEZE

In the winter when it is anticipated that the tem-
perature will drop below 32°F (0°C), check the
anti-freeze to assure proper winter protection.
For details, see “Engine cooling system” in the
“Maintenance and do-it-yourself” section of this
manual.

BATTERY

If the battery is not fully charged during extremely
cold weather conditions, the battery fluid may
freeze and damage the battery. To maintain maxi-
mum efficiency, the battery should be checked
regularly. For details, see “Battery” in the “Main-
tenance and do-it-yourself” section of this
manual.

DRAINING OF COOLANT WATER

If the vehicle is to be left outside without anti-
freeze, drain the cooling system, including the
engine block. Refill before operating the vehicle.
For details, see “Changing engine coolant” in the
“Maintenance and do-it-yourself” section of this
manual.

TIRE EQUIPMENT

1. SUMMER tires have a tread designed to

provide superior performance on dry pave-
ment. However, the performance of these
tires will be substantially reduced in snowy
and icy conditions. If you operate your ve-
hicle on snowy or icy roads, NISSAN recom-
mends the use of MUD & SNOW or ALL
SEASON TIRES on all four wheels. Please
consult a NISSAN dealer for the tire type,
size, speed rating and availability informa-
tion.

2. For additional traction on icy roads, studded

tires may be used. However, some U.S.
states and Canadian provinces prohibit their
use. Check local, state and provincial laws
before installing studded tires.

Skid and traction capabilities of studded
snow tires on wet or dry surfaces may be
poorer than that of non-studded snow tires.

COLD WEATHER DRIVING

Starting and driving

5-31


Content   ..  12  13  14  15   ..