Nissan Titan (2019 year). Manual - part 3


  Index      Nissan     Nissan Titan - service manual 2019 year in english


Search            copyright infringement  


Content   ..  1  2  3  4   ..


Nissan Titan (2019 year). Manual - part 3


∙ Do not allow children to play with the

seat belts. Most seating positions are
equipped with Automatic Locking Re-
tractor (ALR) mode seat belts. If the
seat belt becomes wrapped around a
child’s neck with the ALR mode acti-
vated, the child can be seriously in-
jured or killed if the seat belt retracts
and becomes tight. This can occur
even if the vehicle is parked. Unbuckle
the seat belt to release the child. If the
seat belt cannot be unbuckled or is
already unbuckled, release the child
by cutting the seat belt with a suitable
tool (such as a knife or scissors) to
release the seat belt.

Fastening the seat belts

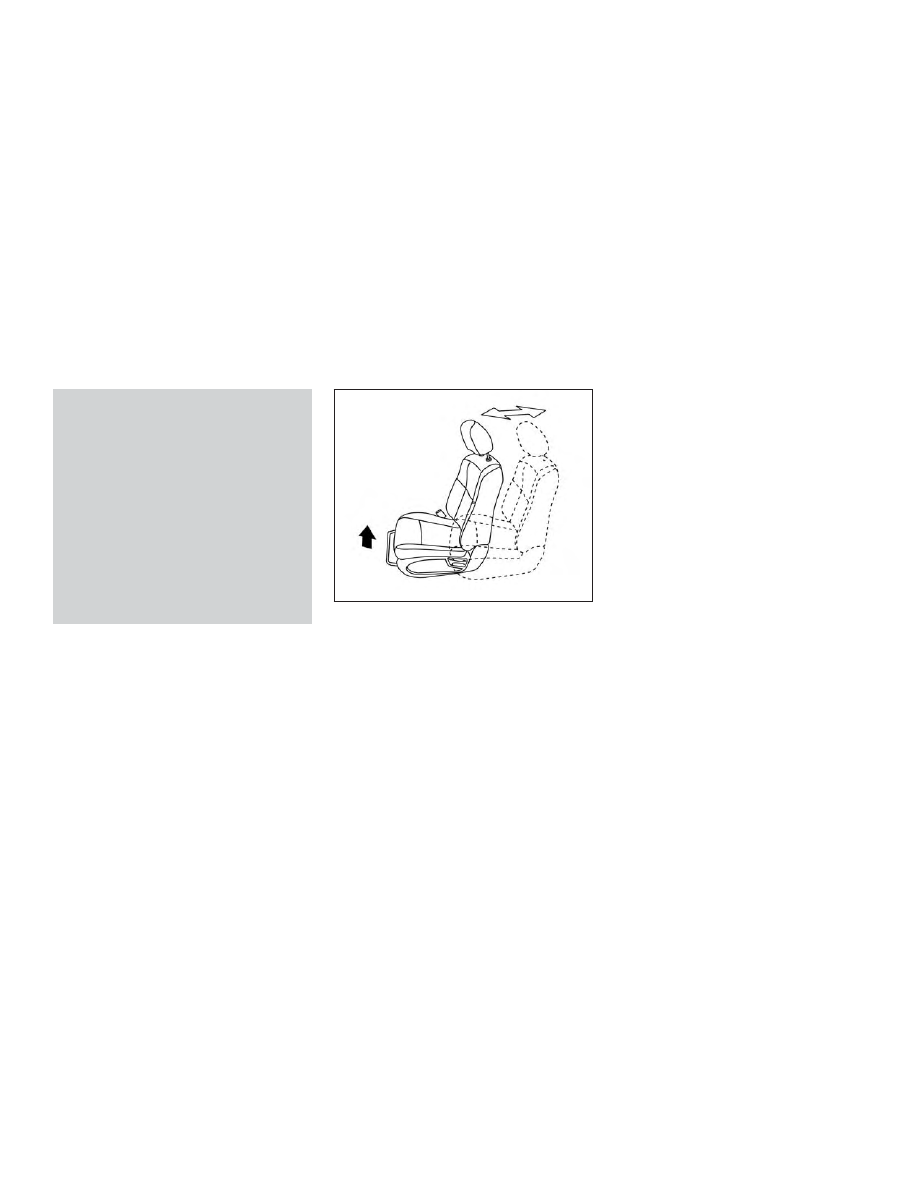
1. Adjust the seat. For additional informa-

tion, refer to “Seats” in this section.

Manual front seat shown (Single Cab
models and if so equipped for King Cab®

and Crew Cab models)

LRS2559

Safety—Seats, seat belts and supplemental restraint system

1-19

2. Slowly pull the seat belt out of the re-

tractor and insert the tongue into the
buckle

A

until you hear and feel the

latch engage.

∙ The retractor is designed to lock

during a sudden stop or on impact.
A slow pulling motion permits the
seat belt to move and allows you
some freedom of movement in the
seat.

∙ If the seat belt cannot be pulled

from its fully retracted position,
firmly pull the belt and release it.
Then smoothly pull the belt out of
the retractor.

Front power captain’s chair seat shown (if so equipped for King Cab® and Crew Cab

models)

LRS2743

LRS2674

1-20

Safety—Seats, seat belts and supplemental restraint system

3. Position the lap belt portion low and

snug on the hips

B

as shown.

4. Pull the shoulder belt portion toward

the retractor to take up extra slack

C

.

Be sure the shoulder belt is routed over
your shoulder and across your chest.

The front passenger seat, front center seat
(if so equipped), and the rear seating posi-
tions’ (if so equipped) three-point seat belts
have two modes of operation:

∙ Emergency Locking Retractor (ELR)

∙ Automatic Locking Retractor (ALR)

The ELR mode allows the seat belt to ex-
tend and retract to allow the driver and
passengers some freedom of movement
in the seat. The ELR locks the seat belt
when the vehicle slows down rapidly or
during certain impacts.

The ALR mode (child restraint mode) locks
the seat belt for child restraint installation.

When the ALR mode is activated, the seat
belt cannot be extended again until the
seat belt tongue is detached from the
buckle and fully retracted. The seat belt re-
turns to the ELR mode after the seat belt
fully retracts. For additional information, re-
fer to “Child restraints” in this section.

The ALR mode should be used only for
child restraint installation. During nor-
mal seat belt use by an occupant, the ALR
mode should not be activated. If it is ac-
tivated, it may cause uncomfortable seat
belt tension. It can also change the op-
eration of the front passenger air bag.
For

additional

information,

refer

to

“Supplemental Restraint System (SRS)”
in this section.

WARNING

When fastening the seat belts, be cer-
tain that the seatbacks are completely
secured in the latched position. If they
are not completely secured, passengers
may be injured in an accident or sudden
stop.

LRS2675

Safety—Seats, seat belts and supplemental restraint system

1-21

Unfastening the seat belts

To unfasten the seat belt, press the button
on the buckle

1

. The seat belt automati-

cally retracts.

Checking seat belt operation

Seat belt retractors are designed to lock
seat belt movement by two separate
methods:

∙ When the seat belt is pulled quickly from

the retractor

∙ When the vehicle slows down rapidly

To increase your confidence in the seat
belts, check the operation as follows:

∙ Grasp the shoulder belt and pull for-

ward quickly. The retractor should lock
and restrict further belt movement.

If the retractor does not lock during this
check, get the system checked. It is recom-
mended that you visit a NISSAN dealer for
this service, or to learn more about seat
belt operation.

Shoulder belt height adjustment
(front seats)

The shoulder belt anchor height should be
adjusted to the position best for you. For
additional information, refer to “Precau-
tions on seat belt usage” in this section. To
adjust, pull out the adjustment button

1

and move the shoulder belt anchor to the
desired position

2

, so the belt passes over

the center of the shoulder. The belt should
be away from your face and neck, but not
falling off your shoulder. Release the ad-
justment button to lock the shoulder belt
anchor into position.

WRS0139

LRS0242

1-22

Safety—Seats, seat belts and supplemental restraint system

WARNING

∙ After adjustment, release the adjust-

ment button and try to move the
shoulder belt anchor up and down to
make sure it is securely fixed in
position.

∙ The

shoulder

belt

anchor

height

should be adjusted to the position
best for you. Failure to do so may re-
duce the effectiveness of the entire
restraint system and increase the
chance or severity of injury in an
accident.

SEAT BELT EXTENDERS

If, because of body size or driving position, it
is

not

possible

to

properly

fit

the

lap/shoulder belt and fasten it, an extender
that is compatible with the installed seat
belts is available for purchase. The ex-
tender adds approximately 8 in (200 mm)
of length and may be used for either the
driver or front passenger seating position.
It is recommended that you visit a NISSAN
dealer for assistance with purchasing an
extender if an extender is required.

WARNING

∙ Only NISSAN seat belt extenders,

made by the same company which
made the original equipment seat
belts, should be used with NISSAN
seat belts.

∙ Adults and children who can use the

standard seat belt should not use an
extender.

Such

unnecessary

use

could result in serious personal injury
in the event of an accident.

∙ Never use seat belt extenders to in-

stall child restraints. If the child re-
straint is not secured properly, the
child could be seriously injured or
killed in a collision or a sudden stop.

SEAT BELT MAINTENANCE

∙ To clean the seat belt webbing, apply

a mild soap solution or any solution rec-
ommended for cleaning upholstery or
carpet. Then wipe with a cloth and allow
the seat belts to dry in the shade. Do not
allow the seat belts to retract until they
are completely dry.

∙ If dirt builds up in the shoulder belt

guide of the seat belt anchors, the
seat belts may retract slowly. Wipe the
shoulder belt guide with a clean, dry
cloth.

∙ Periodically check to see that the seat

belt and the metal components, such
as buckles, tongues, retractors, flexible
wires and anchors, work properly. If
loose parts, deterioration, cuts or other
damage on the webbing is found, the
entire seat belt assembly should be re-
placed.

Safety—Seats, seat belts and supplemental restraint system

1-23

WARNING

Do not allow children to play with the
seat belts. Most seating positions are
equipped with Automatic Locking Re-
tractor (ALR) mode seat belts. If the seat
belt becomes wrapped around a child’s
neck with the ALR mode activated, the
child can be seriously injured or killed if
the seat belt retracts and becomes
tight. This can occur even if the vehicle
is parked. Unbuckle the seat belt to re-
lease the child. If the seat belt cannot be
unbuckled or is already unbuckled, re-
lease the child by cutting the seat belt
with a suitable tool (such as a knife or
scissors) to release the seat belt.

Children need adults to help protect
them. They need to be properly re-
strained.

In addition to the general information in
this manual, child safety information is
available from many other sources, includ-
ing doctors, teachers, government traffic
safety offices, and community organiza-
tions. Every child is different, so be sure to
learn the best way to transport your child.

There are three basic types of child re-
straint systems:

∙ Rear-facing child restraints

∙ Forward-facing child restraints

∙ Booster seats

The proper restraint depends on the child’s
size. Generally, infants up to about 1 year
and less than 20 lbs. (9 kg) should be placed
in rear-facing child restraints. Forward-
facing child restraints are available for chil-
dren who outgrow rear-facing child re-
straints and are at least 1 year old. Booster
seats are used to help position a vehicle
lap/shoulder belt on a child who can no
longer use a forward-facing child restraint.

WARNING

Infants and children need special pro-
tection. The vehicle’s seat belts may not
fit them properly. The shoulder belt may
come too close to the face or neck. The
lap belt may not fit over their small hip
bones. In an accident, an improperly fit-
ting seat belt could cause serious or fa-
tal injury. Always use appropriate child
restraints.

All U.S. states and Canadian provinces or
territories require the use of approved child
restraints for infants and small children. For
additional information, refer to “Child re-
straints” in this section.

A child restraint may be secured in the ve-
hicle by using either the LATCH (Lower An-
chors and Tethers for CHildren) system or
with the vehicle seat belt. For additional
information, refer to “Child restraints” in this
section.

NISSAN recommends that all pre-teens
and children be restrained in the rear
seat (if so equipped). Studies show that
children are safer when properly re-
strained in the rear seat than in the front
seat.

This is especially important because
your vehicle has a supplemental re-
straint system (air bag system) for the
front passenger. For additional informa-
tion, refer to “Supplemental Restraint
System (SRS)” in this section.

CHILD SAFETY

1-24

Safety—Seats, seat belts and supplemental restraint system

INFANTS

Infants up to at least 1 year old should be
placed in a rear-facing child restraint.
NISSAN

recommends

that

infants

be

placed in child restraints that comply with
Federal Motor Vehicle Safety Standards or
Canadian Motor Vehicle Safety Standards.
You should choose a child restraint that fits
your vehicle and always follow the manu-
facturer’s instructions for installation and
use.

SMALL CHILDREN

Children that are over 1 year old and weigh
at least 20 lbs. (9 kg) should remain in a
rear-facing child restraint as long as pos-
sible up to the height or weight limit of the
child restraint. Children who outgrow the
height or weight limit of the rear-facing
child restraint and are at least 1 year old
should be secured in a forward-facing child
restraint with a harness. Refer to the manu-
facturer’s instructions for minimum and
maximum weight and height recommen-
dations. NISSAN recommends that small
children be placed in child restraints that
comply with Federal Motor Vehicle Safety
Standards or Canadian Motor Vehicle
Safety Standards. You should choose a
child restraint that fits your vehicle and al-

ways follow the manufacturer’s instruc-
tions for installation and use.

LARGER CHILDREN

Children should remain in a forward-facing
child restraint with a harness until they
reach the maximum height or weight limit
allowed by the child restraint manufac-
turer.

Once a child outgrows the height or weight
limit of the harness-equipped forward-
facing child restraint, NISSAN recommends
that the child be placed in a commercially
available booster seat to obtain proper
seat belt fit. For a seat belt to fit properly, the
booster seat should raise the child so that
the shoulder belt is properly positioned
across the chest and the top, middle por-
tion of the shoulder. The shoulder belt
should not cross the neck or face and
should not fall off the shoulder. The lap belt
should lie snugly across the lower hips or
upper thighs, not the abdomen. A booster
seat can only be used in seating positions
that have a three-point type seat belt. The
booster seat should fit the vehicle seat and
have a label certifying that it complies with
Federal Motor Vehicle Safety Standards or
Canadian Motor Vehicle Safety Standards.

A booster seat should be used until the
child can pass the seat belt fit test below:

∙ Are the child’s back and hips against the

vehicle seatback?

∙ Is the child able to sit without slouch-

ing?

∙ Do the child’s knees bend easily over

the front edge of the seat with feet flat
on the floor?

∙ Can the child safely wear the seat belt

(lap belt low and snug across the hips
and shoulder belt across mid-chest
and shoulder)?

∙ Is the child able to use the properly ad-

justed head restraint/headrest?

∙ Will the child be able to stay in position

for the entire ride?

Safety—Seats, seat belts and supplemental restraint system

1-25

If you answered no to any of these ques-
tions, the child should remain in a booster
seat using a three-point type seat belt.

NOTE:

Laws in some communities may follow
different guidelines. Check local and
state regulations to confirm your child is
using the correct restraint system before
traveling.

WARNING

Never let a child stand or kneel on any
seat and do not allow a child in the
cargo area. The child could be seriously
injured or killed in a sudden stop or
collision.

PRECAUTIONS ON CHILD
RESTRAINTS

WARNING

∙ Failure to follow the warnings and in-

structions for proper use and installa-
tion of child restraints could result in
serious injury or death of a child or
other passengers in a sudden stop or
collision:

LRS2690

ARS1098

CHILD RESTRAINTS

1-26

Safety—Seats, seat belts and supplemental restraint system

– The child restraint must be used

and installed properly. Always fol-
low all of the child restraint manu-
facturer’s instructions for installa-
tion and use.

– Infants and children should never

be held on anyone’s lap. Even the
strongest adult cannot resist the
forces of a collision.

– Do not put a seat belt around both

a child and another passenger.

– NISSAN recommends that all child

restraints be installed in the rear
seat (if so equipped). Studies show
that children are safer when prop-
erly restrained in the rear seat (if so
equipped) than in the front seat. If
you must install a forward-facing
child restraint in the front seat, re-
fer to “Forward-facing child re-
straint installation using the seat
belts — passenger seat and center
seat (Single Cab models and King
Cab® Rear Seat Delete models)” in
this section.

– Even with the NISSAN Advanced Air

Bag System (if so equipped), never
install a rear-facing child restraint
in the front seat. An inflating air
bag could seriously injure or kill a
child. A rear-facing child restraint
must only be used in the rear seat
(if so equipped).

– Be sure to purchase a child re-

straint that will fit the child and ve-
hicle. Some child restraints may
not fit properly in your vehicle.

– Child restraint anchorages are de-

signed to withstand only those
loads imposed by correctly fitted
child restraints. Under no circum-
stances are they to be used to at-
tach adult seat belts, or other items
or equipment to the vehicle. Doing
so could damage the child re-
straint anchorages. The child re-
straint will not be properly in-
stalled

using

the

damaged

anchorage, and a child could be se-
riously

injured

or

killed

in

a

collision.

– Never use the anchor points for

adult seat belts, or other items.

– A child restraint with a top tether

strap should not be used in the
front passenger seat.

– Keep seatbacks as upright as pos-

sible

after

fitting

the

child

restraint.

– Infants and children should always

be placed in an appropriate child
restraint while in the vehicle.

WRS0256

Safety—Seats, seat belts and supplemental restraint system

1-27

∙ When the child restraint is not in use,

keep it secured with the LATCH system
or a seat belt. In a sudden stop or col-
lision, loose objects can injure occu-
pants or damage the vehicle.

CAUTION

A child restraint in a closed vehicle can
become very hot. Check the seating
surface and buckles before placing a
child in the child restraint.

Vehicles equipped with rear seats are
equipped with a universal child restraint
anchor system, referred to as the LATCH
(Lower Anchors and Tethers for CHildren)
system. Some child restraints include rigid
or webbing-mounted attachments that
can be connected to these anchors. For
additional information, refer to “LATCH
(Lower Anchors and Tethers for CHildren)
system (Crew Cab models and King Cab®
models with rear bench seat)” in this sec-
tion.

If you do not have a LATCH compatible
child restraint, the vehicle seat belts can be
used.

Several

manufacturers

offer

child

re-

straints for infants and children of various
sizes. When selecting any child restraint,
keep the following points in mind:

∙ Choose only a restraint with a label cer-

tifying that it complies with Federal Mo-
tor Vehicle Safety Standard 213 or Cana-
dian Motor Vehicle Safety Standard 213.

∙ Check the child restraint in your vehicle

to be sure it is compatible with the vehi-
cle’s seat and seat belt system.

∙ If the child restraint is compatible with

your vehicle, place your child in the child
restraint and check the various adjust-
ments to be sure the child restraint is
compatible with your child. Choose a
child restraint that is designed for your
child’s height and weight. Always follow
all recommended procedures.

∙ If the combined weight of the child and

child restraint is less than 65 lbs.
(29.5 kg), you may use either the LATCH
anchors or the seat belt to install the
child restraint (not both at the same
time).

∙ If the combined weight of the child and

child restraint is greater than 65 lbs.
(29.5 kg), use the vehicle’s seat belt (not
the lower anchors) to install the child
restraint.

∙ Be sure to follow the child restraint

manufacturer’s instructions for installa-
tion.

All U.S. states and Canadian provinces or
territories require that infants and small
children be restrained in an approved
child restraint at all times while the ve-
hicle is being operated. Canadian law re-
quires the top tether strap on forward-
facing child restraints be secured to the
designated anchor point on the vehicle.

1-28

Safety—Seats, seat belts and supplemental restraint system

LATCH (Lower Anchors and
Tethers for CHildren) SYSTEM
(Crew Cab models and King Cab®
models with rear bench seat)

Your vehicle is equipped with special an-
chor points that are used with LATCH sys-
tem compatible child restraints. This sys-
tem may also be referred to as the ISOFIX
or ISOFIX compatible system. With this sys-
tem, you do not have to use a vehicle seat
belt to secure the child restraint unless the
combined weight of the child and child re-
straint exceeds 65 lbs. (29.5 kg). If the com-

bined weight of the child and child restraint
is greater than 65 lbs. (29.5 kg) use the vehi-
cle’s seat belt (not the lower anchors) to
install the child restraint. Be sure to follow
the child restraint manufacturer’s instruc-
tions for installation.

The LATCH anchor points are provided to
install child restraints in the rear outboard
seating positions only. Do not attempt to
install a child restraint in the center position
using the LATCH anchors.

LATCH lower anchor

WARNING

Failure to follow the warnings and in-
structions for proper use and installa-
tion of child restraints could result in
serious injury or death of a child or
other passengers in a sudden stop or
collision:

– Attach LATCH system compatible

child restraints only at the loca-
tions shown in the illustration.

– Do not secure a child restraint in

the center rear seating position us-
ing the LATCH lower anchors. The
child restraint will not be secured
properly.

– Inspect the lower anchors by in-

serting your fingers into the lower
anchor area. Feel to make sure
there are no obstructions over the
anchors such as seat belt webbing
or seat cushion material. The child
restraint will not be secured prop-
erly

if

the

lower

anchors

are

obstructed.

Child restraint anchorages are de-
signed to withstand only those loads
imposed by correctly fitted child re-
straints. Under no circumstances are
they to be used to attach adult seat
belts, or other items or equipment to
the vehicle. Doing so could damage the
child restraint anchorages. The child re-
straint will not be properly installed us-
ing the damaged anchorage, and a
child could be seriously injured or killed
in a collision.

LATCH system lower anchor locations

LRS2859

Safety—Seats, seat belts and supplemental restraint system

1-29

LATCH lower anchor location

The LATCH lower anchors are located as
shown. A label is attached to the seatback
to help you locate the LATCH lower an-
chors.

Installing child restraint LATCH
lower anchor attachments

LATCH compatible child restraints include
two rigid or webbing-mounted attach-
ments that can be connected to two an-
chors located at certain seating positions
in your vehicle. With this system, you do not
have to use a vehicle seat belt to secure the
child restraint. Check your child restraint for
a label stating that it is compatible with
LATCH. This information may also be in the
instructions provided by the child restraint
manufacturer.

LATCH lower anchor location

LRS3036

LATCH lower anchor point locations

LRS3148

LATCH webbing-mounted attachment

LRS0661

1-30

Safety—Seats, seat belts and supplemental restraint system

When installing a child restraint, carefully
read and follow the instructions in this
manual and those supplied with the child
restraint.

TOP TETHER ANCHOR POINT
LOCATIONS

Anchor points are located in the following
locations:

∙ Under the rear window behind the

bench seat (Single Cab models) or be-
hind the rear bench seat (Crew Cab
models and King Cab® models with rear
bench seat) as shown.

∙ On the back of the passenger and cen-

ter seats (King Cab® Rear Seat Delete
models) as shown.

LATCH rigid-mounted attachment

LRS0662

Crew Cab models and King Cab® models

with rear bench seat

LRS0393

Single Cab models

LRS2819

Safety—Seats, seat belts and supplemental restraint system

1-31

REAR-FACING CHILD RESTRAINT
INSTALLATION USING LATCH (Crew
Cab models and King Cab®
models with rear bench seat)

For additional information, refer to all Warn-
ings and Cautions in the “Child safety” and
“Child restraints” sections of this manual
before installing a child restraint.

Do not use the lower anchors if the com-
bined weight of the child and the child re-
straint exceeds 65 lbs. (29.5 kg). If the com-
bined weight of the child and the child
restraint is greater than 65 lbs. (29.5 kg), use
the vehicle’s seat belt (not the lower an-
chors) to install the child restraint. Be sure
to follow the child restraint manufacturer’s
instructions for installation.

Follow these steps to install a rear-facing
child restraint in the rear bench seats using
the LATCH system:

1. Position the child restraint on the seat.

Always follow the child restraint manu-
facturer’s instructions.

2. Secure the child restraint anchor at-

tachments to the LATCH lower an-
chors. Check to make sure the LATCH
attachment is properly attached to the
lower anchors.

King Cab® Rear Seat Delete models

LRS2879

Rear-facing webbing-mounted – step 2

LRS2997

1-32

Safety—Seats, seat belts and supplemental restraint system

3. For child restraints that are equipped

with webbing-mounted attachments,
remove any additional slack from the
anchor attachments. Press downward
and rearward firmly in the center of the
child restraint with your hand to com-
press the vehicle seat cushion and
seatback while tightening the webbing
of the anchor attachments.

4. After attaching the child restraint, test

it before you place the child in it. Push it
from side to side while holding the child
restraint near the LATCH attachment
path. The child restraint should not
move more than 1 inch (25 mm), from
side to side. Try to tug it forward and
check to see if the LATCH attachment
holds the restraint in place. If the re-
straint is not secure, tighten the LATCH
attachment as necessary, or put the
restraint in another seat and test it
again. You may need to try a different
child restraint or try installing by using

Rear-facing rigid-mounted – step 2

LRS2996

Rear-facing – step 3

LRS0673

Rear-facing – step 4

LRS0674

Safety—Seats, seat belts and supplemental restraint system

1-33

the vehicle seat belt (if applicable). Not
all child restraints fit in all types of ve-
hicles.

5. Check to make sure the child restraint

is properly secured prior to each use. If
the child restraint is loose, repeat
steps 2 through 4.

REAR-FACING CHILD RESTRAINT
INSTALLATION USING THE SEAT
BELTS (Crew Cab models and King
Cab® models with rear bench
seat)

WARNING

The three-point seat belt with Auto-
matic Locking Retractor (ALR) must be
used when installing a child restraint.
Failure to use the ALR mode will result in
the child restraint not being properly
secured. The restraint could tip over or
be loose and cause injury to a child in a
sudden stop or collision.

For additional information, refer to all Warn-
ings and Cautions in the “Child safety” and
“Child restraints” sections of this manual
before installing a child restraint.

Do not use the lower anchors if the com-
bined weight of the child and the child re-
straint exceeds 65 lbs. (29.5 kg). If the com-
bined weight of the child and the child
restraint is greater than 65 lbs. (29.5 kg), use
the vehicle’s seat belt (not the lower an-
chors) to install the child restraint. Be sure
to follow the child restraint manufacturer’s
instructions for installation.

Follow these steps to install a rear-facing
child restraint using the vehicle seat belts in
the rear seats:

1. Child restraints for infants must be

used in the rear-facing direction and
therefore must not be used in the
front seat. 
Position the child restraint
on the seat. Always follow the child re-
straint manufacturer’s instructions.

Rear-facing – step 1

WRS0256

1-34

Safety—Seats, seat belts and supplemental restraint system


Content   ..  1  2  3  4   ..