Nissan Rogue Select (2015 year). Manual - part 17


  Index      Nissan     Nissan Rogue Select - service manual 2015 year in english


Search            copyright infringement  


Content   ..  15  16  17  18   ..


Nissan Rogue Select (2015 year). Manual - part 17


SDI1753

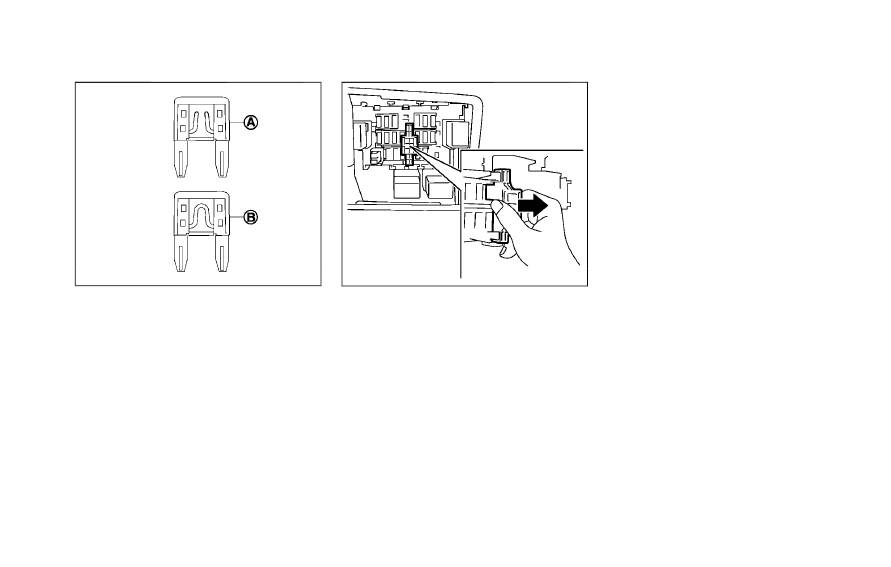
4. If the fuse is open

*

A

, replace it with a new

fuse

*

B

.

5. If a new fuse also opens, have the electrical

system checked and repaired by a NISSAN
dealer.

JVM0089X

Extended storage fuse switch (if so
equipped)

To reduce battery drain, the extended storage
fuse switch comes from the factory switched off.
Prior to delivery of your vehicle, the switch is
pushed in (switched on) and should always
remain on.

If the extended storage fuse switch is not
pushed in (switched on), the “Shipping mode
on, Push storage fuse” warning may appear in
the vehicle information display. See “11. Ex-
tended storage fuse warning” (P.2-19).

If any electrical equipment does not operate,
remove the extended storage switch and check

for an open fuse.

NOTE:

If the extended storage fuse switch mal-
functions, or if the fuse is open, it is not
necessary to replace the switch. In this
case, remove the extended storage fuse
switch and replace it with a new fuse of the
same rating.

How to remove the extended storage fuse
switch:

1. To remove the extended storage fuse switch,

be sure the ignition switch is in the “OFF” or
“LOCK” position.

2. Be sure the headlight switch is in the “OFF”

position.

3. Remove the fuse box cover.

4. Pinch the storage fuse switch and pull it in

the direction illustrated.

Maintenance and do-it-yourself

8-21

8-22

Maintenance and do-it-yourself

CAUTION

Be careful not to allow children to
swallow the battery and removed parts.

SDI2134

KEY FOB

Replace the battery in the key fob as follows:

1. Remove the screw.

2. Insert a small screwdriver into the slit of the

corner and twist it to separate the upper part
from the lower part. Use a cloth to protect

the casing.

3. Replace the battery with a new one.

Recommended battery:

CR1620 or equivalent

.

Do not touch the internal circuit and

electric terminals as doing so could
cause a malfunction.

.

Hold the battery by the edges. Holding

the battery across the contact points will
seriously deplete the storage capacity.

.

Make sure that the

+ side faces the

bottom case.

4. Close the lid securely and install the screw.

5. Operate the buttons to check its operation.

See a NISSAN dealer if you need any assistance
for replacement.

FCC Notice:

This device complies with Part 15 of the
FCC Rules. Operation is subject to the
following two conditions: (1) This device
may not cause harmful interference, and
(2) this device must accept any interfer-
ence received, including interference that
may cause undesired operation.

Note: Changes or modifications not ex-
pressly approved by the party responsible
for compliance could void the user’s

BATTERY REPLACEMENT

authority to operate the equipment.

Maintenance and do-it-yourself

8-23

8-24

Maintenance and do-it-yourself

JVM0520X

1.

Headlight (high-beam)

2.

Front turn signal/parking/side marker light

3.

Front map light

4.

Ceiling light

5.

Headlight (low-beam)

6.

High-mounted stop light

7.

Cargo light

8.

License plate light

9.

Back-up light

10.

Rear combination light (stop/tail/side marker
light)

11.

Rear turn signal light

HEADLIGHTS

Fog may temporarily form inside the lens of the
exterior lights in the rain or in a car wash. A
temperature difference between the inside and
the outside of the lens causes the fog. This is
not a malfunction. If large drops of water collect
inside the lens, contact a NISSAN dealer.

Replacing

The headlight is a semi-sealed beam type which
uses a replaceable headlight (halogen) bulb.

CAUTION

Do not leave the bulb out of the

headlight reflector for a long period
of time. Dust, moisture, smoke, etc.

LIGHTS

entering the headlight body may
affect bulb performance.

High pressure halogen gas is sealed

inside the halogen bulb. The bulb
may break if the glass envelope is
scratched or the bulb is dropped.

Only touch the plastic base when

handling the bulb. Never touch the
glass envelope.

Aiming is not necessary after repla-

cing the bulb. When aiming adjust-
ment is necessary, contact a
NISSAN dealer.

Use the same number and wattage as originally
installed:

Low beam:

Wattage: 55
Bulb no.: H11

High beam:

Wattage: 60
Bulb no.: HB3

SDI2137

Disconnect the battery negative cable before
replacing bulbs.

*

A

High-beam bulb

*

B

Low-beam bulb

Maintenance and do-it-yourself

8-25

8-26

Maintenance and do-it-yourself

EXTERIOR AND INTERIOR LIGHTS

Item

Wattage (W)

Bulb No.

Front turn signal/parking/side marker light

27/8

S25

Rear combination light

back-up

18

W16W

turn signal

21

W21W

stop/tail/side marker

21/5

W21/5W

License plate light

5

W5W

Front map light

8

Vanity mirror light (if so equipped)

2

High-mounted stop light*

LED

Ceiling light (if so equipped)

8

Cargo light

8

Glove box light*

3.4

*:

See a NISSAN dealer for replacement.

NOTE: Always check with the Parts Department at a NISSAN dealer for the latest information about parts.

SDI2306

:

REMOVE

:

INSTALL

Replacement procedures

All other lights are either type A, B, C, D or E.
When replacing a bulb, first remove the lens
and/or cover.

SDI2141

Front turn signal/parking/side marker light

Remove the bulb as illustrated.

SDI2138

Rear combination light (stop/tail/side marker/turn)

Open the lift gate to remove the rear combina-
tion light assembly.

*

A

: Clip

SDI2139

Back-up light

Open the lift gate to remove the back-up light
assembly. One screw is located behind the
cover on the lift gate.

Maintenance and do-it-yourself

8-27

8-28

Maintenance and do-it-yourself

SDI2140

License plate light

The license plate light bulb can be accessed by
removing the cover on the inside of the lift gate.

SDI2030

Front map light

SDI1499A

Ceiling light

SDI1500B

Cargo light

SDI2032

Vanity mirror light

If you have a flat tire, see “Flat tire” (P.6-2).

TIRE PRESSURE

Tire Pressure Monitoring System (TPMS)

This vehicle is equipped with the Tire Pressure
Monitoring System (TPMS). It monitors tire
pressure of all tires except the spare. When
the low tire pressure warning light is lit and the
CHECK TIRE PRESSURE warning appears on
the vehicle information display, one or more of
your tires is significantly under-inflated.

The TPMS will activate only when the vehicle is
driven at speeds above 16 MPH (25 km/h).
Also, this system may not detect a sudden drop
in tire pressure (for example a flat tire while
driving).

For more details, see “Low tire pressure warning
light” (P.2-12), “Tire Pressure Monitoring Sys-
tem (TPMS)” (P.5-3) and “Tire Pressure Mon-
itoring System (TPMS)” (P.6-2).

Tire inflation pressure

Check the pressure of the tires (including
the spare) often and always prior to long
distance trips. The recommended tire
pressure specifications are shown on the
Tire and Loading Information label under
the “Cold Tire Pressure” heading. The Tire
and Loading Information label is affixed to

the driver side center pillar. Tire pressures
should be checked regularly because:
. Most tires naturally lose air over time.
. Tires can lose air suddenly when driven

over potholes or other objects or if the
vehicle strikes a curb while parking.

The tire pressures should be checked
when the tires are cold. The tires are
considered COLD after the vehicle has
been parked for 3 or more hours, or driven
less than 1 mile (1.6 km) at moderate
speeds.

Incorrect tire pressure, including un-
der inflation, may adversely affect tire
life and vehicle handling.

WARNING

Improperly inflated tires can fail

suddenly and cause an accident.

The Gross Vehicle Weight rating

(GVWR) is located on the F.M.V.
S.S. certification label. The ve-
hicle weight capacity is indi-
cated on the Tire and Loading
Information label. Do not load

your vehicle beyond this capa-
city. Overloading your vehicle
may result in reduced tire life,
unsafe operating conditions due
to premature tire failure, or un-
favorable handling characteris-
tics and could also lead to a
serious accident. Loading be-
yond the specified capacity may
also result in failure of other
vehicle components.

Before taking a long trip, or

whenever you heavily load your
vehicle, use a tire pressure
gauge to ensure that the tire
pressures are at the specified
level.

For additional information re-

garding tires, refer to “Important
Tire Safety Information” in the
Warranty Information Booklet.

Maintenance and do-it-yourself

8-29

WHEELS AND TIRES

8-30

Maintenance and do-it-yourself

SDI2340

Tire and Loading Information label

*

1

Seating capacity: The maximum num-
ber of occupants that can be seated in
the vehicle.

*

2

Vehicle load limit: See “Vehicle load-
ing information” (P.9-12).

*

3

Original size: The size of the tires
originally installed on the vehicle at the
factory.

*

4

Cold tire pressure: Inflate the tires to
this pressure when the tires are cold.
Tires are considered COLD after the
vehicle has been parked for 3 or more

hours, or driven less than 1 mile (1.6
km) at moderate speeds. The recom-
mended cold tire inflation is set by the
manufacturer to provide the best
balance of tire wear, vehicle handling,
driveability, tire noise, etc., up to the
vehicle’s GVWR.

*

5

Tire size — see “Tire labeling” (P.8-
31).

*

6

Spare tire size or compact spare tire
size (if so equipped)

SDI1949

Checking the tire pressure

1. Remove the valve stem cap from the

tire.

2. Press the pressure gauge squarely onto

the valve stem. Do not press too hard or
force the valve stem sideways, or air will
escape. If the hissing sound of air
escaping from the tire is heard while
checking the pressure, reposition the
gauge to eliminate this leakage.

3. Remove the gauge.

4. Read the tire pressure on the gauge

stem and compare it to the specifica-

tion shown on the Tire and Loading
Information label.

5. Add air to the tire as needed. If too

much air is added, press the core of the
valve stem briefly with the tip of the
gauge stem to release pressure. Re-
check the pressure and add or release
air as needed.

6. Install the valve stem cap.

7. Check the pressure of all other tires,

including the spare.

SIZE

COLD TIRE

INFLATION

PRESSURE

FRONT

ORIGINAL

TIRE

P215/70-
R16 99H

230 kPa,
33 PSI

P225/60-
R17 98H

230 kPa,
33 PSI

REAR

ORIGINAL

TIRE

P215/70-
R16 99H

230 kPa,
33 PSI

P225/60-
R17 98H

230 kPa,
33 PSI

SPARE

TIRE

T155/90-
D16

420 kPa,
60 PSI

SDI1575

Example

TIRE LABELING

Federal law requires tire manufacturers to
place standardized information on the side-
wall of all tires. This information identifies
and describes the fundamental character-
istics of the tire and also provides the tire
identification number (TIN) for safety stan-
dard certification. The TIN can be used to
identify the tire in case of a recall.

Maintenance and do-it-yourself

8-31

8-32

Maintenance and do-it-yourself

SDI1606

Example

*

1

Tire size (example: P215/60R16 94H)

1. P: The “P” indicates the tire is designed

for passenger vehicles. (Not all tires
have this information.)

2. Three-digit number (215): This number

gives the width in millimeters of the tire
from sidewall edge to sidewall edge.

3. Two-digit number (60): This number,

known as the aspect ratio, gives the
tire’s ratio of height to width.

4. R: The “R” stands for radial.

5. Two-digit number (16): This number is

the wheel or rim diameter in inches.

6. Two- or three-digit number (94): This

number is the tire’s load index. It is a
measurement of how much weight each
tire can support. You may not find this
information on all tires because it is not
required by law.

7. H: Tire speed rating. You should not

drive the vehicle faster than the tire
speed rating.

SDI1607

Example

*

2

TIN (Tire Identification Number) for a
new tire (example: DOT XX XX XXX
XXXX)

1. DOT: Abbreviation for the “Department

of Transportation”. The symbol can be
placed above, below or to the left or
right of the Tire Identification Number.

2. Two-digit code: Manufacturer’s identifi-

cation mark

3. Two-digit code: Tire size

4. Three-digit code: Tire type code (Op-

tional)

5. Three-digit code: Date of Manufacture

6. Four numbers represent the week and

year the tire was built. For example, the
numbers 3103 means the 31st week of
2003. If these numbers are missing,
then look on the other sidewall of the
tire.

*

3

Tire ply composition and material
The number of layers or plies of
rubber-coated fabric in the tire.
Tire manufacturers also must indicate
the materials in the tire, which include
steel, nylon, polyester, and others.

*

4

Maximum permissible inflation pres-
sure
This number is the greatest amount of
air pressure that should be put in the
tire. Do not exceed the maximum
permissible inflation pressure.

*

5

Maximum load rating
This number indicates the maximum
load in kilograms and pounds that can
be carried by the tire. When replacing
the tires on the vehicle, always use a
tire that has the same load rating as
the factory installed tire.

*

6

Term of “tubeless” or “tube type”
Indicates whether the tire requires an
inner tube (“tube type”) or not (“tube-
less”).

*

7

The word “radial”
The word “radial” is shown, if the tire
has radial structure.

*

8

Manufacturer or brand name
Manufacturer or brand name is shown.

Other tire-related terminology:

In addition to the many terms that are
defined throughout this section, Intended
Outboard Sidewall is (1) the sidewall that
contains a whitewall, bears white lettering
or bears manufacturer, brand and/or model
name molding that is higher or deeper than
the same molding on the other sidewall of
the tire, or (2) the outward facing sidewall
of an asymmetrical tire that has a particular
side that must always face outward when
mounted on a vehicle.

TYPES OF TIRES

WARNING

When changing or replacing tires,

be sure all four tires are of the same
type (Example: Summer, All Season
or Snow) and construction. A
NISSAN dealer may be able to help
you with information about tire type,
size, speed rating and availability.

Replacement tires may have a lower

speed rating than the factory
equipped tires, and may not match
the potential maximum vehicle
speed. Never exceed the maximum
speed rating of the tire.

Replacing tires with those not ori-

ginally specified by NISSAN could
affect the proper operation of the
TPMS.

For additional information regard-

ing tires, refer to “Important Tire
Safety Information” in the Warranty
Information Booklet.

Maintenance and do-it-yourself

8-33

8-34

Maintenance and do-it-yourself

All season tires

NISSAN specifies all season tires on some
models to provide good performance all year,
including snowy and icy road conditions. All
Season tires are identified by ALL SEASON
and/or M&S (Mud and Snow) on the tire
sidewall. Snow tires have better snow traction
than All Season tires and may be more appro-
priate in some areas.

Summer tires

NISSAN specifies summer tires on some
models to provide superior performance on dry
roads. Summer tire performance is substantially
reduced in snow and ice. Summer tires do not
have the tire traction rating M&S on the tire
sidewall.

If you plan to operate your vehicle in snowy or
icy conditions, NISSAN recommends the use of
SNOW tires or ALL SEASON tires on all four
wheels.

Snow tires

If snow tires are needed, it is necessary to select
tires equivalent in size and load rating to the
original equipment tires. If you do not, it can
adversely affect the safety and handling of your
vehicle.

Generally, snow tires will have lower speed
ratings than factory equipped tires and may not

match the potential maximum vehicle speed.
Never exceed the maximum speed rating of the
tire.

If you install snow tires, they must be the same
size, brand, construction and tread pattern on all
four wheels.

For additional traction on icy roads, studded
tires may be used. However, some U.S. states
prohibit their use. Check local, state and
provincial laws before installing studded tires.
Skid and traction capabilities of studded snow
tires, on wet or dry surfaces, may be poorer than
that of non-studded snow tires.

All-Wheel Drive (AWD) models

CAUTION

Always use tires of the same type,

size, brand, construction (bias, bias-
belted or radial), and tread pattern
on all four wheels. Failure to do so
may result in a circumference differ-
ence between tires on the front and
rear axles which will cause exces-
sive tire wear and may damage the
transmission, transfer case and dif-
ferential gears.

ONLY use spare tires specified for

the AWD model.

If excessive tire wear is found, it is recom-
mended that all four tires be replaced with tires
of the same size, brand, construction and tread
pattern. The tire pressure and wheel alignment
should also be checked and corrected as
necessary. Contact a NISSAN dealer.

TIRE CHAINS

CAUTION

NISSAN recommends using the follow-
ing tire cables made by Peerless Chain
Company for this vehicle due to limited
tire clearance. Call 800-533-8056 to
order tire chains for your vehicle.

215/70R16 - Sno-trac1000 part num-

ber 0103855 with chain tightener
part number 2007020

225/60R17 - Sno-trac1000 part num-

ber 0103855 with chain tightener
part number 2007190

Failure to use the correct traction
device will cause damage to the brakes,
suspension or other vehicle parts.

The tire chain part numbers and Peerless Chain
Company phone number are correct at the time
of printing that is shown on the back cover of
this Owner’s Manual. Always confirm the correct
part numbers with Peerless Chain Company
before ordering.

Only use other types of traction devices if the
traction device manufacturer recommends it for
use on your specific vehicle and the tire and
wheel installed on your vehicle.

Use of traction devices may be prohibited
according to location. Check the local laws
before installing traction devices. When instal-
ling traction devices, make sure they are the
proper size for the tires on your vehicle and are
installed according to the traction device man-
ufacturer’s suggestions. When using traction
devices, avoid fully loading your vehicle and
drive at reduced speeds. Failure to do so may
cause damage to the brakes and suspension
and adversely affect handling and performance.

Traction devices must be installed only on
the front wheels and not on the rear
wheels.

Do not drive with traction devices on paved
roads that are clear of snow. Driving with
traction devices in such conditions can cause
damage to the various mechanisms of the
vehicle due to some overstress.

CAUTION

Do not use traction devices on dry

roads.

Never install traction devices on a T-

type spare tire as doing so could
damage the brakes, suspension or
other vehicle parts.

SDI1662

CHANGING WHEELS AND TIRES

Tire rotation

NISSAN recommends rotating the tires
every 5,000 miles (8,000 km). (See “Flat
tire” (P.6-2) for tire replacing procedures.)

As soon as possible, tighten the wheel
nuts to the specified torque with a
torque wrench.

Wheel nut tightening torque:

80 ft-lb (108 N·m)

The wheel nuts must be kept tigh-
tened to the specification at all times.
It is recommended that wheel nuts be

Maintenance and do-it-yourself

8-35

8-36

Maintenance and do-it-yourself

tightened to the specification at each
tire rotation interval.

WARNING

After rotating the tires, check

and adjust the tire pressure.

Retighten the wheel nuts when

the vehicle has been driven for
600 miles (1,000 km) (also in
cases of a flat tire, etc.).

Do not include the spare tire or

any other small size spare tire in
the tire rotation.

For additional information re-

garding tires, refer to “Important
Tire Safety Information” in the
Warranty Information Booklet.

SDI1663

1.

Wear indicator

2.

Wear indicator location mark

Tire wear and damage

WARNING

Tires should be periodically in-

spected for wear, cracking, bul-
ging or objects caught in the
tread. If excessive wear, cracks,
bulging or deep cuts are found,
the tire(s) should be replaced.

The original tires have built-in

tread wear indicators. When
wear indicators are visible, the
tire(s) should be replaced.

Tires degrade with age and use.

Have tires, including the spare,
over 6 years old checked by a
qualified technician, because
some tire damage may not be
obvious. Replace the tires as
necessary to prevent tire failure
and possible personal injury.

Improper service of the spare

tire may result in serious perso-
nal injury. If it is necessary to
repair the spare tire, contact a
NISSAN dealer.

For additional information re-

garding tires, refer to “Important
Tire Safety Information” in the
Warranty Information Booklet.


Content   ..  15  16  17  18   ..