Nissan Versa Note. Instruction - part 382
 

  Index      Nissan     Nissan Versa Note (2014 year) - Service and Repair Instruction


Search            copyright infringement  


Content   ..  380  381  382  383   ..


Nissan Versa Note. Instruction - part 382


EM-44

< REMOVAL AND INSTALLATION >

[HR16DE]

FUEL INJECTOR AND FUEL TUBE

• Handle O-ring with bare hands. Do not wear gloves.

• Lubricate O-ring with new engine oil.

• Do not clean O-ring with solvent.

• Check that O-ring and its mating part are free of foreign material.

• When installing O-ring, be careful not to scratch it.

• Do not twist or stretch O-ring. If O-ring was stretched while it was being attached, allow it to

retract before inserting it into fuel tube.

• Insert O-ring straight into fuel tube. Do not angle or twist it.

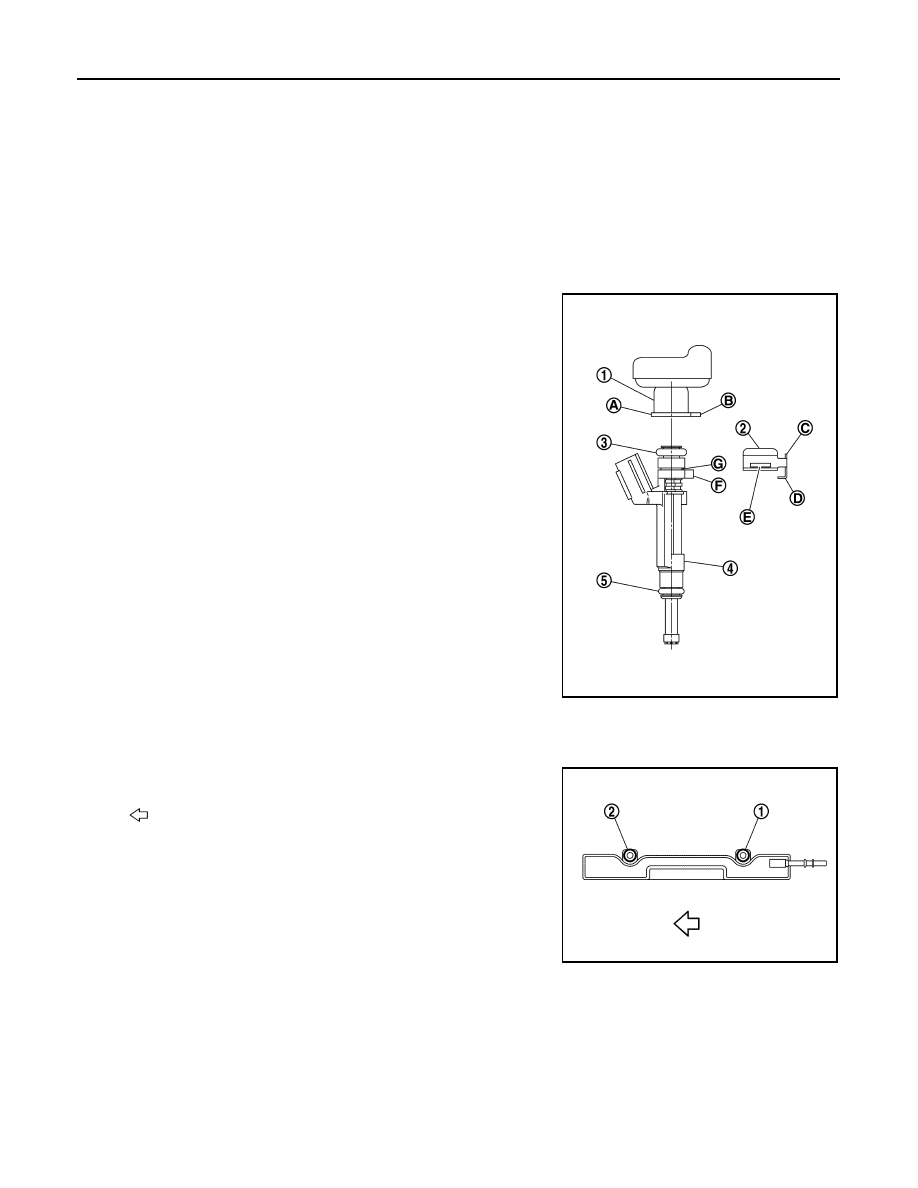
2. Install fuel injector (4) to fuel tube (1):
a. Insert new clip (2) into clip groove (G) on fuel injector (4).

• Insert new clip (2) so that protrusion (F) of fuel injector

matches cut-out (D) of clip.

CAUTION:

• Do not reuse clip. Replace it with a new one.

• Be careful to keep clip from interfering with O-ring. If

interference occurs, replace O-ring.

b. Insert fuel injector (4) into fuel tube (1) with clip (2) attached.

• Insert fuel injector (4) while matching it to the axial center.

• Insert fuel injector (4) so that protrusion (B) of fuel tube

matches cut-out (C) of clip (2).

• Check that fuel tube flange (A) is securely located in flange

groove (E) on clip (2).

c.

Check that installation is complete by checking that fuel injector

(4) does not rotate or come off.

3. Set fuel tube and fuel injector assembly in position for installation on cylinder head.

CAUTION:

For installation, be careful not to interfere with fuel injector nozzle.

• Tighten bolts in numerical order as shown. 

4. Install fuel tube protector.

Fuel tube side

: Black

Nozzle side

: Green

(3)

: O-ring (black)

(5)

: O-ring (green)

JPBIA4530ZZ

: Engine front

JPBIA4133ZZ

FUEL INJECTOR AND FUEL TUBE

EM-45

< REMOVAL AND INSTALLATION >

[HR16DE]

C

D

E

F

G

H

I

J

K

L

M

A

EM

N

P

O

• Tighten bolts in numerical order as shown. 

5. Connect harness connectors to fuel injectors.
6. Connect harness connectors to intake and exhaust valve timing control solenoid valves.
7. Connect fuel feed tube (engine side):
a. Check for damage or foreign material on the fuel tube and quick connector.
b. Apply new engine oil lightly to area around the top of fuel tube.
c. Align center to insert quick connector straight into fuel tube.

• Insert quick connector (1) to fuel tube until the top spool (C) on

fuel tube is inserted completely and the 2nd level spool (D) is

positioned slightly below quick connector bottom end.

CAUTION:

• Hold in position (A) as shown when inserting fuel tube

into quick connector.

• Carefully align center to avoid inclined insertion to pre-

vent damage to O-ring inside quick connector.

• Insert until you hear a “click” sound and actually feel

the engagement.

d. To avoid misidentification of engagement with a similar sound, pull quick connector hard by hand. Check it

is completely engaged (connected) so that it does not come out from fuel tube.

e. Install quick connector cap (engine side) (1) to quick connector

connection.

• Install quick connector cap (engine side) (1) with the side

arrow facing quick connector side (fuel feed tube side) as

shown.

CAUTION:

• Check that the quick connector and fuel tube are

securely engaged with the quick connector cap (engine

side) groove.

• If the quick connector cap (engine side) cannot be

installed easily the quick connector may not be con-

nected correctly. Remove and reconnect. 

f.

Install fuel feed hose to hose clamp.

8. Connect fuel feed tube (floor piping side):
a. Check the connection for damage or any foreign materials.
b. Align the quick connector with the tube, then insert the connector straight into the centralized under floor

piping until a click is heard.

: Engine front

JPBIA4132ZZ

(B)

: Upright insertion

(E)

: Correctly connected

JPBIA2256ZZ

JPBIA4131ZZ

EM-46

< REMOVAL AND INSTALLATION >

[HR16DE]

FUEL INJECTOR AND FUEL TUBE

c.

After connecting, check that the connection is secure:

• Visually confirm that the two retainer tabs are connected to the

connector.

• With the fuel feed hose not fixed to the clamp, pull quick con-

nector (A) hard by hand to check that the quick connector (A)

is not disconnected from the centralized underfloor piping (1)

and that the quick connector (1) is securely connected.

9. Install remaining parts in the reverse order of removal.

INSPECTION AFTER INSTALLATION

Check on Fuel Leaks

1. Turn ignition switch “ON” (with the engine stopped). With fuel pressure applied to fuel piping, check there

are no fuel leaks at connection points. Refer to.

NOTE:

Use mirrors for checking points out of clear sight.

2. Start the engine. With engine speed increased, check again that there are no fuel leaks at connection

points.

• Perform procedures for “Throttle Valve Closed Position Learning” after finishing repairs. Refer to 

EC-

127, "Description"

.

• If electric throttle control actuator is replaced, perform procedures for “Idle Air Volume Learning” after

finishing repairs. Refer to 

EC-128, "Description"

.

CAUTION:

Do not touch the engine immediately after stopping, as the engine becomes extremely hot.

PBIC3795E

IGNITION COIL

EM-47

< REMOVAL AND INSTALLATION >

[HR16DE]

C

D

E

F

G

H

I

J

K

L

M

A

EM

N

P

O

IGNITION COIL

Exploded View

INFOID:0000000009671307

Removal and Installation

INFOID:0000000009671306

REMOVAL

1. Disconnect the battery negative terminal.
2. Remove intake manifold. Refer to 

EM-28, "Removal and Installation"

.   

3. Remove ignition coil.

CAUTION:

• Do not drop or shock ignition coil.

• Do not disassemble ignition coil.

INSTALLATION

1. Installation is in the reverse order of removal.

1.

Ignition coil

2.

Spark plug

3.

Rocker cover

Front

AWBIA1599ZZ


Content   ..  380  381  382  383   ..