Nissan Versa Note. Instruction - part 365
 

  Index      Nissan     Nissan Versa Note (2014 year) - Service and Repair Instruction


Search            copyright infringement  


Content   ..  363  364  365  366   ..


Nissan Versa Note. Instruction - part 365


EC-442

< DTC/CIRCUIT DIAGNOSIS >

[HR16DE]

IGNITION SIGNAL

>> INSPECTION END

Component Inspection (Ignition Coil with Power Transistor)

INFOID:0000000009020934

1.

CHECK IGNITION COIL WITH POWER TRANSISTOR-I

1. Turn ignition switch OFF.

2. Disconnect ignition coil harness connector.

3. Check resistance between ignition coil terminals as follows.

Is the inspection result normal?

YES

>> GO TO 2.

NO

>> Replace malfunctioning ignition coil with power transistor. Refer to 

EM-47, "Removal and Installa-

tion"

.

2.

CHECK IGNITION COIL WITH POWER TRANSISTOR-II

CAUTION:

Do the following procedure in the place where ventilation is good without the combustible.

1. Turn ignition switch OFF.

2. Reconnect all harness connectors disconnected.

3. Remove fuel pump fuse in IPDM E/R to release fuel pressure.

NOTE:

Do not use CONSULT to release fuel pressure, or fuel pressure applies again during the following proce-

dure.

4. Start engine.

5. After engine stalls, crank it two or three times to release all fuel pressure.

6. Turn ignition switch OFF.

7. Remove all ignition coil harness connectors to avoid the electrical discharge from the ignition coils.

8. Remove ignition coil and spark plug of the cylinder to be checked.

9. Crank engine for 5 seconds or more to remove combustion gas in the cylinder.

10. Connect spark plug and harness connector to ignition coil.

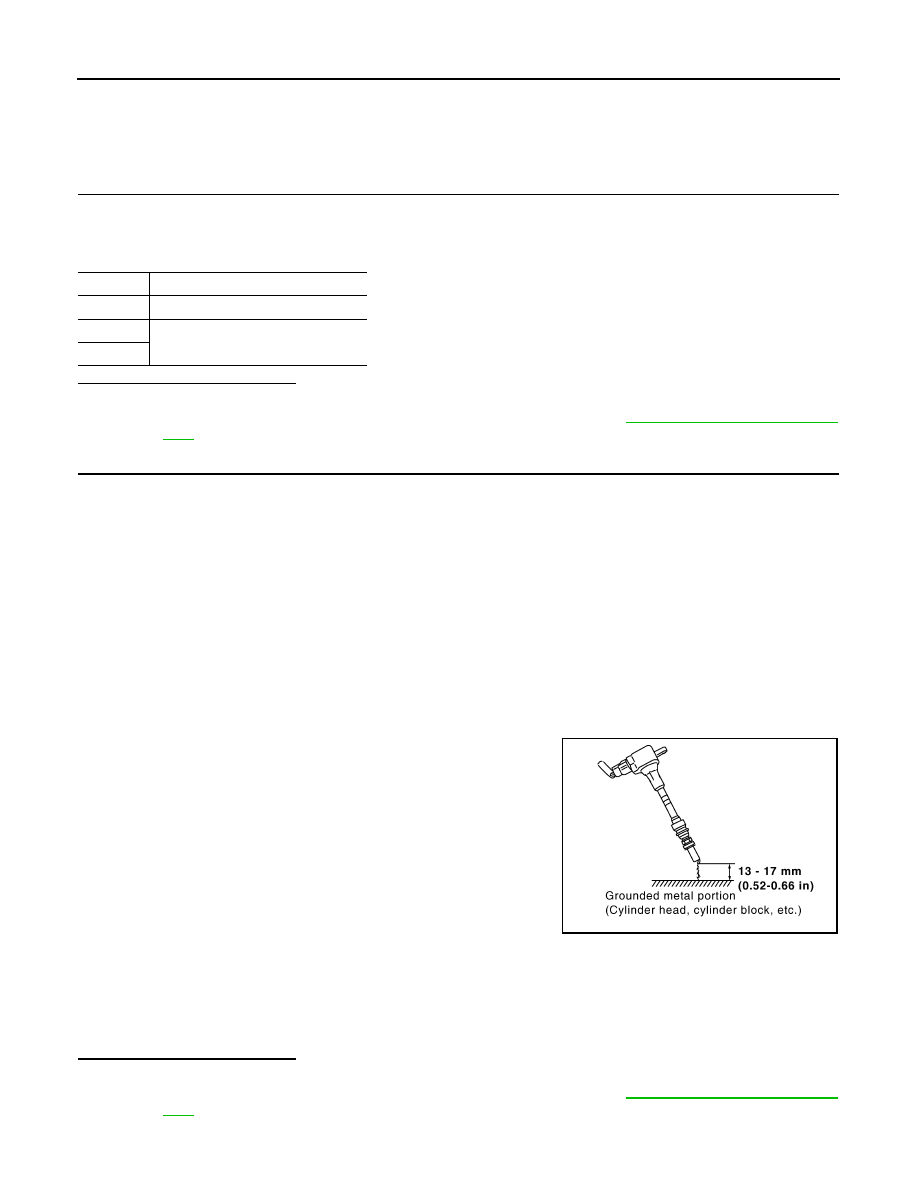
11. Fix ignition coil using a rope etc. with gap of 13 - 17 mm (0.52 -

0.66 in) between the edge of the spark plug and grounded metal

portion as shown in the figure.

12. Crank engine for about three seconds, and check whether spark

is generated between the spark plug and the grounded metal

portion.

CAUTION:

• Do not approach to the spark plug and the ignition coil

within 50 cm (19.7 in). Be careful not to get an electrical

shock while checking, because the electrical discharge

voltage becomes 20 kV or more.

• It might cause to damage the ignition coil if the gap of more than 17 mm (0.66 in) is taken.

NOTE:

When the gap is less than 13 mm (0.52 in), the spark might be generated even if the coil is mal-

functioning.

Is the inspection result normal?

YES

>> INSPECTION END

NO

>> Replace malfunctioning ignition coil with power transistor. Refer to 

EM-47, "Removal and Installa-

tion"

.

Terminals

Resistance

1 and 2

Except 0 or 

∞ Ω [at 25°C (77°F)]

1 and 3

Except 0 

Ω [at 25°C (77°F)]

2 and 3

Spark should be generated.

JMBIA0066GB

IGNITION SIGNAL

EC-443

< DTC/CIRCUIT DIAGNOSIS >

[HR16DE]

C

D

E

F

G

H

I

J

K

L

M

A

EC

N

P

O

Component Inspection (Condenser)

INFOID:0000000009020935

1.

CHECK CONDENSER

1. Turn ignition switch OFF.

2. Disconnect condenser harness connector.

3. Check resistance between condenser terminals as follows.

Is the inspection result normal?

YES

>> INSPECTION END

NO

>> Replace condenser.

Terminals

Resistance [at 25

°C (77°F)]

1 and 2

Above 1 M

EC-444

< DTC/CIRCUIT DIAGNOSIS >

[HR16DE]

MALFUNCTION INDICATOR LAMP

MALFUNCTION INDICATOR LAMP

Component Function Check

INFOID:0000000009020936

1.

CHECK MIL FUNCTION

1. Turn ignition switch ON.

2. Make sure that MIL lights up.
Is the inspection result normal?

YES

>> INSPECTION END

NO

>> Go to 

EC-444, "Diagnosis Procedure"

.

Diagnosis Procedure

INFOID:0000000009020937

1.

CHECK DTC

Check that DTC UXXXX is not displayed.
Is DTC detected?

YES

>> Perform trouble diagnosis for DTC UXXXX.

NO

>> GO TO 2.

2.

CHECK COMBINATION METER

Check DTC with combination meter. Refer to 

MWI-21, "DTC Index"

.

Is DTC detected?

YES

>> Perform troubleshooting relevant to DTC indicated.

NO

>> GO TO 3.

3.

CHECK INTERMITTENT INCIDENT

Refer to 

GI-41, "Intermittent Incident"

.

Is the inspection result normal?

YES

>> Replace combination meter. Refer to 

MWI-54, "Removal and Installation"

.

NO

>> Repair or replace harness or connectors.

ON BOARD REFUELING VAPOR RECOVERY (ORVR)

EC-445

< DTC/CIRCUIT DIAGNOSIS >

[HR16DE]

C

D

E

F

G

H

I

J

K

L

M

A

EC

N

P

O

ON BOARD REFUELING VAPOR RECOVERY (ORVR)

Component Function Check

INFOID:0000000009020938

1.

CHECK ORVR FUNCTION

Check whether the following symptoms are present.

• Fuel odor from EVAP canister is strong.

• Cannot refuel/Fuel odor from the fuel filler opening is strong while refueling.
Is any symptom present?

YES

>> Go to 

EC-445, "Diagnosis Procedure"

.

NO

>> INSPECTION END

Diagnosis Procedure

INFOID:0000000009020939

1.

INSPECTION START

Check whether the following symptoms are present.

A: Fuel odor from EVAP canister is strong.

B: Cannot refuel/Fuel odor from the fuel filler opening is strong while refueling.
Which symptom is present?

A

>> GO TO 2.

B

>> GO TO 8.

2.

CHECK EVAP CANISTER

1. Remove EVAP canister with EVAP canister vent control valve and EVAP control system pressure sensor

attached.

2. Weigh the EVAP canister with EVAP canister vent control valve and EVAP control system pressure sensor

attached.

The weight should be less than 1.6 kg (3.5 lb).

Is the inspection result normal?

YES

>> GO TO 3.

NO

>> GO TO 4.

3.

CHECK IF EVAP CANISTER IS SATURATED WITH WATER

Check if water will drain from EVAP canister.
Does water drain from the EVAP canister?

YES

>> GO TO 4.

NO

>> GO TO 7.

4.

REPLACE EVAP CANISTER

Replace EVAP canister with a new one.

>> GO TO 5.

5.

CHECK DRAIN FILTER

Refer to 

EC-449, "Component Inspection (Drain filter)"

.

Is the inspection result normal?

OK

>> GO TO 6.

NO

>> Replace drain filter.

6.

DETECT MALFUNCTIONING PART

PBIB1213E


Content   ..  363  364  365  366   ..