Nissan Versa Sedan. Instruction - part 159


  Index      Nissan     Nissan Versa Sedan (2014 year) - Service and Repair Instruction


Search            copyright infringement  


Content   ..  157  158  159  160   ..


Nissan Versa Sedan. Instruction - part 159


CO-16

< REMOVAL AND INSTALLATION >

[HR16DE]

RADIATOR

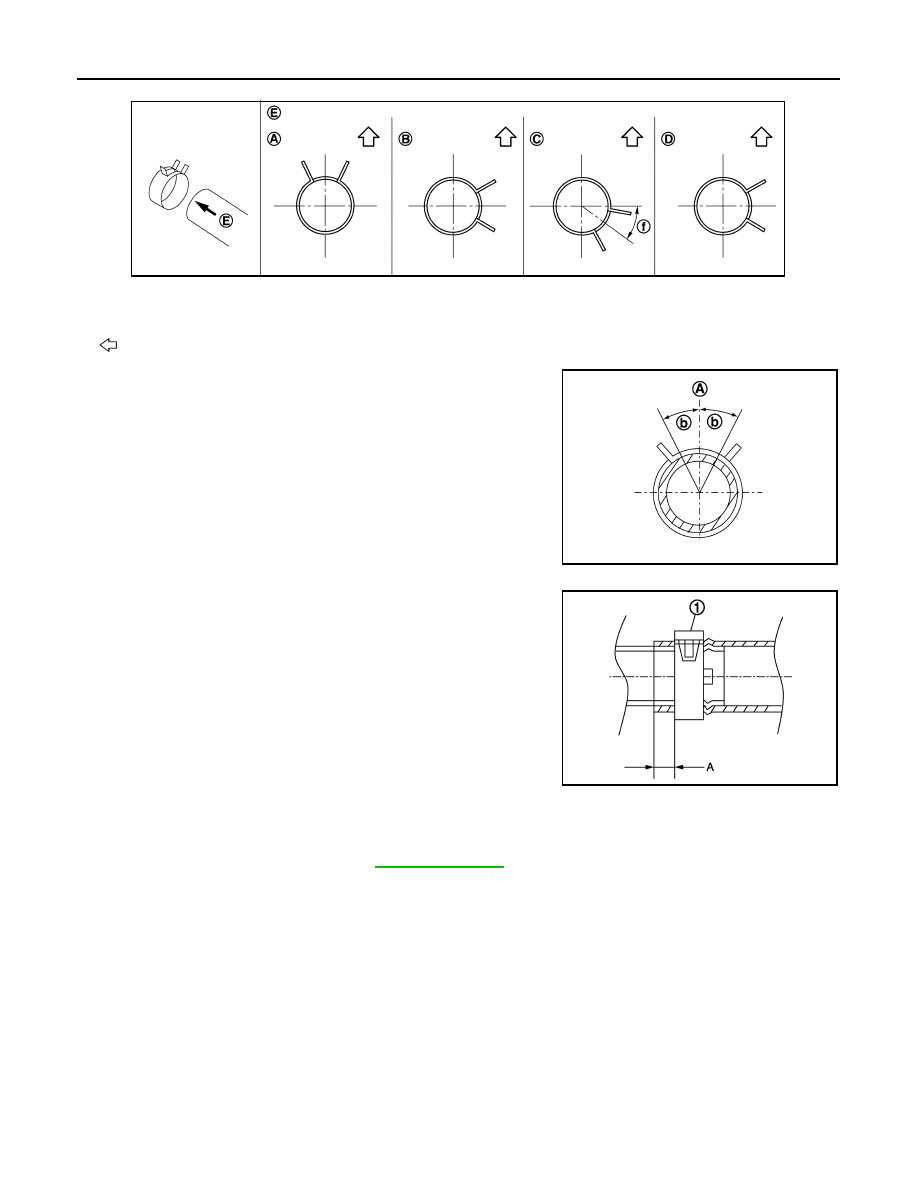
• The angle (b) created by the hose clamp pawl and the specified

line (A) must be within 

±30° as shown.

• To install hose clamps (1), check that the dimension (A) from the

end of the hose clamp on the radiator hose to the hose clamp is

within the reference value. 

CAUTION:

• When installing do not damage or scratch radiator core or A/C

condenser.

• Replace water hose clamp if it is removed.

• Use only Genuine NISSAN bolts for the cooling fan assembly

and strictly follow the tightening torque. Over tightening may

damage the radiator. 

INSPECTION AFTER INSTALLATION

• Check for engine coolant leaks. Refer to 

CO-8, "Inspection"

.

• Start and warm up the engine. Visually inspect for coolant leaks. Repair as necessary. 

A. View  A

B. View  B

C. View  C

D

View D

E. View E

f.

45

°

: Vehicle upper

JSBIA1299ZZ

JPBIA4295ZZ

Dimension (A)

: 3 – 7 mm (0.12 – 0.28 in)

JPBIA3527ZZ

COOLING FAN

CO-17

< REMOVAL AND INSTALLATION >

[HR16DE]

C

D

E

F

G

H

I

J

K

L

M

A

CO

N

P

O

COOLING FAN

Exploded View

INFOID:0000000009269210

Removal and Installation

INFOID:0000000009269211

REMOVAL

WARNING:

Do not remove the radiator cap when the engine is hot. Serious burns could occur from high-pressure

engine coolant escaping from the radiator. Wrap a thick cloth around the radiator cap. Slowly turn it a

quarter of a turn to release built-up pressure. Carefully remove radiator cap by turning it all the way.

NOTE:

When removing components such as hoses, tubes/lines, etc., cap or plug openings to prevent fluid from spill-

ing.
1. Partially drain engine coolant from radiator. Refer to 

CO-8, "Draining Engine Coolant"

.

CAUTION:

• Perform this step when the engine is cold.

• Do not spill engine coolant on drive belt.

2. Remove air duct (inlet). Refer to 

EM-25, "Removal and Installation"

.

3. Disconnect battery negative terminal. Refer to 

PG-63, "Removal and Installation"

.

4. Loosen the following from the radiator core support (upper):
a. Air bag harness
b. Hood lock cable
c. Radiator cap adapter
d. Horn harness
5. Remove radiator hose (upper) from water outlet.
6. Disconnect harness connector from fan motor, and move harness aside.
7. Disconnect reservoir tank hose, and remove reservoir tank. 
8. Remove radiator core support (upper).
9. Remove radiator hose (upper) from radiator.
10. Remove cooling fan assembly. Refer to 

CO-17, "Removal and Installation"

.

CAUTION:

1.

Fan shroud

2.

Fan motor

3.

Cooling fan

A.

Cooling fan nut

L.

Genuine NISSAN high strength lock-
ing sealant

AWBIA1140GB

CO-18

< REMOVAL AND INSTALLATION >

[HR16DE]

COOLING FAN

Be careful not to damage or scratch the radiator.

INSTALLATION

Installation is in the reverse order of removal.

CAUTION:

Only use Genuine NISSAN parts for the fan shroud bolt.

NOTE:

Cooling fan is controlled by ECM. For details, refer to 

EC-50, "Diagnosis Description"

.

Disassembly and Assembly

INFOID:0000000009269212

DISASSEMBLY

1. Remove cooling fan nut, and then remove the cooling fan.
2. Remove fan motor.

INSPECTION AFTER DISASSEMBLY

Cooling fan and shroud

Inspect cooling fan and shroud for nicks, cracks, breaks and warping. Replace if necessary. 

ASSEMBLY

Assembly is in the reverse order of disassembly.

CAUTION:

Apply Genuine NISSAN high strength thread locking sealant on fan motor shaft.

WATER PUMP

CO-19

< REMOVAL AND INSTALLATION >

[HR16DE]

C

D

E

F

G

H

I

J

K

L

M

A

CO

N

P

O

WATER PUMP

Exploded View

INFOID:0000000009269213

Removal and Installation

INFOID:0000000009269214

REMOVAL

CAUTION:

Do not remove the radiator cap when the engine is hot. Serious burns could occur from high-pressure

engine coolant escaping from the radiator. Wrap a thick cloth around the radiator cap. Slowly turn it a

quarter of a turn to release built-up pressure. Carefully remove radiator cap by turning it all the way.
1. Drain engine coolant from radiator. Refer to 

CO-8, "Draining Engine Coolant"

.

CAUTION:

• Perform this step when the engine is cold.

• Do not spill engine coolant on drive belt.

2. Remove front wheel and tire (RH). Refer to 

WT-39, "Adjustment"

.

3. Remove front fender protector (RH). Refer to 

EXT-26, "Removal and Installation"

.

4. Loosen water pump pulley bolts before loosening belt tension of drive belt.
5. Remove drive belt. Refer to 

EM-16, "Removal and Installation"

.

6. Remove water pump pulley.
7. Remove water pump.

• Loosen water pump bolts in reverse order as shown. 

• Engine coolant will leak from cylinder block, so have a recep-

tacle ready below.

CAUTION:

• Do not allow water pump vane to contact any other parts.

• Water pump cannot be disassembled and must be

replaced as an assembly.

INSPECTION AFTER REMOVAL

1.

Gasket

2.

Water pump

3.

Water pump pulley

JPBIA4104GB

KBIA3393J


Content   ..  157  158  159  160   ..