Nissan Leaf (2019 year). Manual - part 31


  Index      Nissan     Nissan Leaf - service manual 2019 year in english


Search            copyright infringement  


Content   ..  29  30  31  32   ..


Nissan Leaf (2019 year). Manual - part 31


Getting emergency tire puncture
repair kit

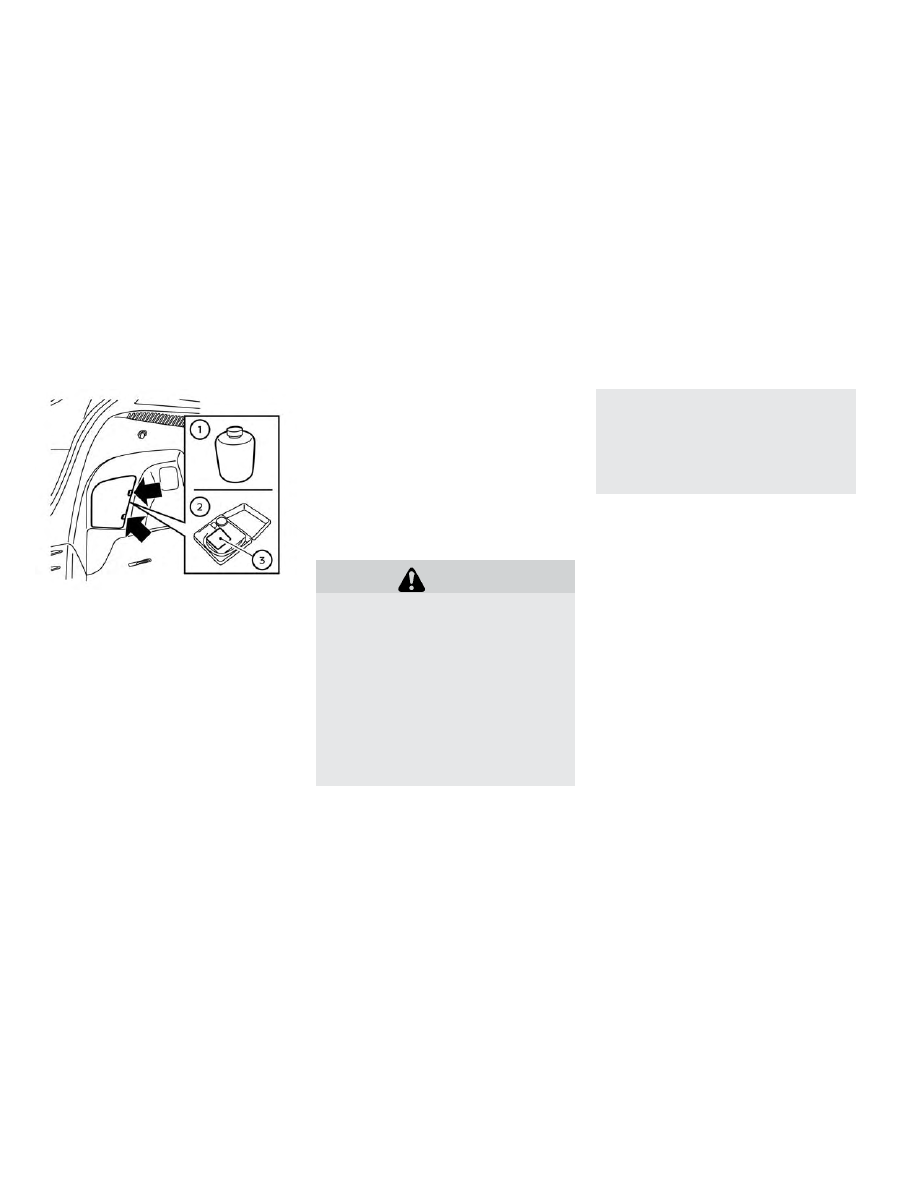
Take out the emergency tire puncture re-
pair kit located in the cargo area. The repair
kit consists of the following items:

1

Tire sealant bottle

2

Air compressor*

3

Speed restriction sticker

* The compressor shape may differ de-
pending on the models.

Before using emergency tire
puncture repair kit

• If any foreign object (for example, a screw

or nail) is embedded in the tire, do not
remove it.

• Check the expiration date of the sealant

(shown on the label attached to the
bottle). Never use a sealant whose expira-
tion date has passed.

Repairing tire:

WARNING

Observe the following precautions
when using the tire repair compound.
• Swallowing the compound is dan-

gerous. Immediately drink as much
water as possible and seek prompt
medical assistance.

• Rinse well with lots of water if the

compound comes into contact with
skin or eyes. If irritation persists,
seek prompt medical attention.

• Keep the repair compound out of the

reach of children.

• The emergency repair compound

may cause a malfunction of the tire
pressure sensors and cause the low
tire pressure warning light to illumi-
nate. Have the tire pressure sensor
replaced as soon as possible.

6-6

In case of emergency

1. Take out the speed restriction sticker

from the air compressor, then put it in a
location where the driver can see it while
driving.

CAUTION

Do not put the speed restriction label
on the steering wheel pad, the speed-
ometer or the warning light locations.

2. Take the hose

1

and the power plug

2

out of the air compressor. Remove the
cap of the bottle holder from the air
compressor.

3. Remove the cap from the tire sealant

bottle. Leave the bottle seal intact.
Screw the bottle clockwise into the
bottle holder to pierce the seal of the
bottle.

In case of emergency

6-7

4. Remove the cap from the tire valve on

the flat tire.

5. Remove the protective cap

A

of the

hose and screw the hose securely onto
the tire valve. Make sure that the pres-
sure release valve

B

is securely tight-

ened. Make sure that the air compressor
switch is in the OFF (O) position, and
then insert the power plug into the
power outlet in the vehicle.

6. Push the power switch to the ACC posi-

tion. Then turn the compressor switch
to the ON (−) position and inflate the tire
up to the pressure that is specified on
the Tire and Loading Information label
affixed to the driver’s side center pillar if
possible, or to the minimum of 26 psi
(180 kPa). Turn the air compressor off
briefly in order to check the tire pressure
with the pressure gauge.

If the tire is inflated to higher than the
specified pressure, lower the tire pres-
sure by releasing air with the pressure
release valve.

NOTE:

The compressor tire pressure gauge
may show a pressure reading of 87 psi
(600 kPa) for about 30 seconds while
inflating the tire. The pressure gauge
is indicating the pressure inside the
sealant can. When the sealant has
been injected into the tire the pres-
sure gauge will drop and indicate ac-
tual tire pressure.

6-8

In case of emergency

WARNING

To avoid serious personal injury while
using the emergency tire puncture re-
pair kit:
• Securely

tighten

the

compressor

hose to the tire valve. Failure to do so
can cause the sealant to spray into
the air and get into your eyes or on
the skin.

• Do not stand directly beside the dam-

aged tire while it is being inflated be-
cause of the risk of the rupture. If
there are any cracks or bumps, turn
the compressor off immediately.

If the tire pressure does not increase to
26 psi (180 kPa) within 10 minutes, the
tire may be seriously damaged and the
tire cannot be repaired with this tire
repair kit. 
It is recommended that you
visit a NISSAN certified LEAF dealer.

7. When the tire pressure is at the specified

amount, turn the air compressor off. If
the tire cannot be inflated to the speci-
fied amount, the air compressor can be
turned off at the minimum of 26 psi

(180 kPa). Remove the power plug from
the power outlet and quickly remove the
hose from the tire valve. Attach the pro-
tective cap and valve cap. Properly stow
the emergency tire puncture repair kit in
the cargo area.

CAUTION

To avoid serious personal injury when
stowing the emergency tire puncture
repair kit:
• Keep the sealant bottle screwed into

the compressor. Failure to do so can
cause the sealant to spray into the air
and get into your eyes or on the skin.

8. Immediately drive the vehicle for 10 min-

utes or 2 miles (3 km) at a speed below
50 mph (80 km/h).

9. After driving, make sure that the air

compressor switch is in the OFF posi-
tion, then screw the hose securely onto
the tire valve. Check the tire pressure
with the pressure gauge. Temporary re-
pair is completed if the tire pressure
does not drop.

Make sure the pressure is adjusted to
the pressure that is specified on the Tire
and Loading Information label before
driving.

10. If the tire pressure drops, repeat the

steps from 5 to 9. If the pressure drops
again or under 19 psi (130 kPa), the tire
cannot be repaired with this tire re-
pair kit
. If the tire cannot be repaired,
the driver should not drive on it any
further. The car should be towed to the
nearest dealership.

The sealant bottle and hose cannot be
reused to repair another punctured tire.
It is recommended that you visit a
NISSAN certified LEAF dealer to pur-
chase replacements.

After repairing tire:

It is recommended that you visit a NISSAN
certified

LEAF

dealer

for

tire

repair/

replacement as soon as possible.

In case of emergency

6-9

WARNING

• After using Emergency Tire Sealant

to repair a minor tire puncture, do
not drive the vehicle at speeds faster
than 50 mph (80 km/h).

• Immediately after using Emergency

Tire Sealant to repair a minor tire
puncture, it is recommended that
you visit a NISSAN certified LEAF
dealer. The Emergency Tire Sealant
cannot permanently seal a punc-
tured tire. Continuing operation of
the vehicle without a permanent tire
repair can lead to a crash.

• Do not inject any tire liquid or aero-

sol tire sealant into the tires, as this
may cause a malfunction of the tire
pressure sensors.

• If you used the Emergency Tire Seal-

ant to repair a minor tire puncture, it
is recommended that you visit a
NISSAN certified LEAF dealer to re-
place the TPMS sensor in addition to
repairing or replacing the tire.

• NISSAN

recommends

using

only

NISSAN Genuine Emergency Tire
Sealant provided with your vehicle.
Other tire sealants may damage the
valve stem seal which can cause the
tire to lose air pressure.

To start your EV system with a booster bat-
tery, the instructions and precautions be-
low must be followed.

Jump starting provides power to the 12-
volt system to allow the electrical systems
to operate. The electrical systems must be
operating to allow the Li-ion battery to be
charged. Jump starting does not charge
the Li-ion battery. The Li-ion battery must
be charged before the vehicle can be
driven.

WARNING

• If done incorrectly, jump starting can

lead to a 12-volt battery explosion,
resulting in severe injury or death. It
could also damage your vehicle.

• Explosive hydrogen gas is always

present in the vicinity of the 12-volt
battery. Keep all sparks and flames
away from the 12-volt battery.

JUMP STARTING

6-10

In case of emergency

• Do not allow battery fluid to come

into contact with eyes, skin, clothing
or painted surfaces. Battery fluid is a
corrosive sulfuric acid solution that
can cause severe burns. If the fluid
comes into contact with anything,
immediately flush the contacted
area with water.

• Keep the 12-volt battery out of the

reach of children.

• The booster battery must be rated

at 12 volt. Use of an improperly rated
battery can damage your vehicle.

• Whenever working on or near a

12-volt battery, always wear suit-
able eye protectors (for example,
goggles or industrial safety spec-
tacles) and remove rings, metal
bands, or any other jewelry. Do not
lean over the 12-volt battery when
jump starting.

• Do not attempt to jump start a fro-

zen battery. It could explode and
cause serious injury.

• Your vehicle has an automatic cool-

ing fan. It could come on at any time.
Keep hands and other objects away
from it.

WARNING

• Always follow the instructions be-

low. Failure to do so could result in
damage to the DC/DC converter and
cause personal injury.

• Do not attempt to perform a jump

start on the 12-volt battery at the
same time that the Li-ion battery is
being charged. Doing so may dam-
age the vehicle or charging equip-
ment and could cause an injury.

CAUTION

LEAF cannot be used as a booster ve-
hicle because it cannot supply enough
power to start a gasoline engine. How-
ever, a gasoline engine vehicle can be
used to jump start LEAF's 12-volt bat-
tery.

In case of emergency

6-11

1. If the booster battery is in another ve-

hicle

B

, position the two vehicles (

A

and

B

) to bring their 12-volt batteries

into close proximity to each other.

Do not allow the two vehicles to touch.

2. Apply the parking brake.

If the 12-volt battery is discharged,
the power switch cannot be moved
from the OFF position. Connect the
jumper cables to the booster vehicle

B

before pushing the power switch.

3. Push the P (Park) position switch to

place the vehicle in the P (Park) position.

4. Switch off all unnecessary electrical sys-

tems (headlights, heater, air conditioner,
etc.).

5. Place the power switch in the OFF

position.

6. Ensure vent caps are level and tight.

7. Connect jumper cables in the sequence

as illustrated (

1

2

3

4

).

CAUTION

• Always connect positive (+) to positive

(+) and negative (−) to body ground
(for example, as illustrated), not to the
12-volt battery.

• Make sure the jumper cables do not

touch moving parts in the motor
compartment and that the cable
clamps do not contact any other
metal.

8. Start the engine of the booster vehicle

B

.

9. While the booster vehicle

B

engine is

running, place the EV system in the
READY to drive position.

CAUTION

If the system does not start right away,
push the power switch to the OFF po-
sition and wait 10 seconds before try-
ing again.

10. After starting your EV system, carefully

disconnect the negative cable and
then the positive cable (

4

3

2

1

) and keep in the READY to drive po-

sition over 20 minutes to charge the
12-volt battery.

6-12

In case of emergency

11. If necessary, connect the vehicle to a

charging station or EVSE (Electric Ve-
hicle Supply Equipment) to charge the
Li-ion battery. For additional informa-
tion, refer to the “Charging” section. The
vehicle cannot be driven until the Li-ion
battery is charged.

NOTE:

If it is not possible to turn the system ON
by following this procedure, it is recom-
mended that you visit a NISSAN certified
LEAF dealer immediately.

If the power limitation indicator light
illuminates, the traction motor output is
limited resulting in reduced vehicle speed.
Stop the vehicle in a safe location before
the Li-ion battery becomes completely dis-
charged and no power is available to drive
the vehicle. Contact Roadside assistance;
refer to a NISSAN Warranty Information
Booklet.

If possible, place the power switch in the
OFF position while waiting for assistance to
prevent discharging the 12-volt battery.

NOTE:

If the Li-ion battery becomes completely
discharged:

• The vehicle is automatically placed in

the ON position and it will not be pos-
sible to switch to the READY to drive po-
sition.

• The vehicle is automatically switched to

the N (Neutral) position and it will not be
possible to drive the vehicle.

WARNING

If the vehicle is in the N (Neutral) posi-
tion and the Li-ion battery and the 12-

volt battery become completely dis-
charged, the vehicle cannot be placed
in the P (Park) position. If this occurs,
place suitable blocks at both the front
and back of a wheel to prevent the ve-
hicle from moving. Failure to block a
wheel may allow the vehicle to move
unexpectedly which may result in seri-
ous personal injury or death.

To place the vehicle in the READY to drive
position so the vehicle can be driven,
charge the Li-ion battery until the driving
range on the instrument panel changes
from “---” to a numeric distance.

NOTE:

• Some vibration may occur when the ve-

hicle is stopped in case the Li-ion bat-
tery becomes completely discharged.
This is not the malfunction of the sys-
tem.

• If the Li-ion battery is completely dis-

charged, it is required to charge until
the low battery charge warning light
turns off (white) from on (yellow).

IF THE LI-ION BATTERY BECOMES
COMPLETELY DISCHARGED

In case of emergency

6-13

Do not attempt to start the system by
pushing the vehicle.

CAUTION

An EV cannot be push-started or tow-
started. Attempting to do so may
cause traction motor damage.

When towing your vehicle, all State (Provin-
cial in Canada) and local regulations for
towing must be followed. Incorrect towing
equipment could damage your vehicle.
Towing instructions are available from a
NISSAN certified LEAF dealer. Local service
operators are familiar with the applicable
laws and procedures for towing. To assure
proper towing and to prevent accidental
damage to your vehicle, NISSAN recom-
mends that you have a service operator
tow your vehicle. It is advisable to have the
service operator carefully read the follow-
ing precautions.

WARNING

• Never ride in a vehicle that is being

towed.

• Never get under your vehicle after it

has been lifted by a tow truck.

CAUTION

• When towing, make sure that the ax-

les, steering system and power train
are in working condition. If any unit
is damaged, dollies must be used.

• Always attach safety chains before

towing.

For additional information about towing
your vehicle behind a Recreational Vehicle
(RV), refer to “Flat towing” in the “Technical
and consumer information” section of this
manual.

PUSH STARTING

TOWING YOUR VEHICLE

6-14

In case of emergency

TOWING RECOMMENDED BY
NISSAN

NISSAN recommends that your vehicle be
towed with the driving (front) wheels off the
ground or that the vehicle be placed on a
flatbed truck as illustrated.

CAUTION

• Never tow with the front wheels on

the ground or four wheels on the
ground (forward or backward), as
this may cause serious and expen-
sive damage to the motor.

• When towing this vehicle with the

rear wheels on the ground (if you do
not use towing dollies): Always re-
lease the parking brake.

NOTE:

If your vehicle cannot be moved because
the vehicle cannot be shifted to the N
(Neutral) position, please refer to the
LEAF Roadside Assistance Guide which is
located at www.NISSANUSA.com. If your
vehicle cannot be moved because the
parking brake cannot be released, refer
to “Parking brake” in the “Starting and
driving” section of this manual.

In case of emergency

6-15

VEHICLE RECOVERY (FREEING A
STUCK VEHICLE)

WARNING

To avoid vehicle damage, serious per-
sonal injury or death when recovering
a stuck vehicle:
• Contact a professional towing ser-

vice to recover the vehicle if you
have any questions regarding the
recovery procedure.

• Tow chains or cables must be at-

tached

only

to

main

structural

members of the vehicle.

• Do not use the vehicle tie-downs to

tow or free a stuck vehicle.

• Only use devices specifically de-

signed for vehicle recovery and fol-
low the manufacturer’s instructions.

• Always pull the recovery device

straight out from the front of the ve-
hicle. Never pull at an angle.

• Route recovery devices so they do

not touch any part of the vehicle ex-
cept the attachment point.

If your vehicle is stuck in sand, snow, mud,
etc., use a tow strap or other device de-
signed specifically for vehicle recovery. Al-
ways follow the manufacturer’s instruc-
tions for the recovery device.

Rocking a stuck vehicle

If the vehicle is stuck in sand, snow, mud,
etc., try to free it by following the procedure
below.

1. Turn off the Vehicle Dynamic Control

(VDC) system.

2. Make sure the area in front and behind

the vehicle is clear of obstructions.

3. Turn the steering wheel left and right to

clear an area around the front tires.

4. Slowly rock the vehicle forward and

backward.

• Shift back and forth between the R (Re-

verse) and D (Drive) positions.

• Apply the accelerator as little as pos-

sible to maintain the rocking motion.

• Release the accelerator pedal before

shifting between R (Reverse) and D
(Drive).

• Do not spin the tires above 35 mph

(55 km/h).

5. If the vehicle cannot be freed after a few

tries, contact a professional towing ser-
vice to remove the vehicle.

6-16

In case of emergency

7 Appearance and care

Cleaning exterior . . . . . . . . . . . . . . . . . . . . . .7-2

Washing . . . . . . . . . . . . . . . . . . . . . . . . . .7-2
Waxing . . . . . . . . . . . . . . . . . . . . . . . . . . .7-2
Removing spots. . . . . . . . . . . . . . . . . . . . .7-3
Underbody . . . . . . . . . . . . . . . . . . . . . . . .7-3
Glass . . . . . . . . . . . . . . . . . . . . . . . . . . . .7-3
Wheels . . . . . . . . . . . . . . . . . . . . . . . . . . .7-3
Chrome parts . . . . . . . . . . . . . . . . . . . . . .7-4
Tire dressing . . . . . . . . . . . . . . . . . . . . . . .7-4

Cleaning interior . . . . . . . . . . . . . . . . . . . . . .7-4

Air fresheners . . . . . . . . . . . . . . . . . . . . . .7-5
Floor mats . . . . . . . . . . . . . . . . . . . . . . . .7-5
Seat belts . . . . . . . . . . . . . . . . . . . . . . . . .7-7

Corrosion protection. . . . . . . . . . . . . . . . . . . .7-7

Most common factors contributing to vehicle
corrosion . . . . . . . . . . . . . . . . . . . . . . . . .7-7
Environmental factors influence the rate of
corrosion . . . . . . . . . . . . . . . . . . . . . . . . .7-7
Protect your vehicle from corrosion . . . . . . . .7-7

In order to maintain the appearance of
your vehicle, it is important to take proper
care of it.

To protect the paint surfaces, wash your
vehicle as soon as you can:

• After a rainfall to prevent possible dam-

age from acid rain.

• After driving on coastal roads.

• When contaminants such as soot, bird

droppings, tree sap, metal particles or
bugs get on the paint surface.

• When dust or mud builds up on the

surface.

Whenever possible, store or park your ve-
hicle inside a garage or in a covered area.

When it is necessary to park outside, park in
a shady area or protect the vehicle with a
body cover.

Be careful not to scratch the paint sur-
face when putting on or removing the
body cover.

WASHING

Wash dirt off the vehicle with a wet sponge
and plenty of water. Clean the vehicle thor-
oughly using a mild soap, a special vehicle

soap or general purpose dishwashing liq-
uid mixed with clean, lukewarm (never hot)
water.

CAUTION

• Do not use car washes that use acid

in the detergent. Some car washes,
especially brushless ones, use some
acid for cleaning. The acid may react
with some plastic vehicle compo-
nents, causing them to crack. This
could affect their appearance, and
also could cause them not to func-
tion properly. Always check with
your car wash to confirm that acid is
not used.

• Do not wash the vehicle with strong

household soap, strong chemical
detergents, gasoline or solvents.

• Do not wash the vehicle in direct

sunlight or while the vehicle body is
hot, as the surface may become
water-spotted.

• Avoid using tight-napped or rough

cloths, such as washing mitts. Care
must

be

taken

when

removing

caked-on dirt or other foreign sub-
stances so the paint surface is not
scratched or damaged.

Rinse the vehicle thoroughly with plenty of
clean water.

Inside flanges, seams and folds on the
doors, hatches and hood are particularly
vulnerable to the effects of road salt. There-
fore,

these

areas

must

be

regularly

cleaned. Make sure that the drain holes in
the lower edge of the door are open. Spray
water under the body and in the wheel
wells to loosen the dirt and wash away
road salt.

Avoid leaving water spots on the paint sur-
face by using a damp chamois to dry the
vehicle.

WAXING

Regular waxing protects the paint surface
and helps retain new vehicle appearance.
Polishing is recommended to remove
built-up wax residue and to avoid a weath-
ered appearance before reapplying wax.

A NISSAN certified LEAF dealer can assist
you in choosing the proper product.

• Wax your vehicle only after a thorough

washing. Follow the instructions supplied
with the wax.

CLEANING EXTERIOR

7-2

Appearance and care

• Do not use a wax containing any abra-

sives, cutting compounds or cleaners that
may damage the vehicle finish.

Machine compound or aggressive polish-
ing on a base coat/clear coat paint finish
may dull the finish or leave swirl marks.

REMOVING SPOTS

Remove tar and oil spots, industrial dust,
insects, and tree sap as quickly as possible
from the paint surface to avoid lasting
damage or staining. Special cleaning prod-
ucts are available at a NISSAN certified
LEAF dealer or any automotive accessory
stores.

UNDERBODY

In areas where road salt is used in winter,
the underbody must be cleaned regularly.
This will prevent dirt and salt from building
up and causing the acceleration of corro-
sion on the underbody and suspension.
Before the winter period and again in the
spring, the underseal must be checked
and, if necessary, re-treated.

GLASS

Use glass cleaner to remove smoke and
dust film from the glass surfaces. It is nor-
mal for glass to become coated with a film
after the vehicle is parked in the hot sun.
Glass cleaner and a soft cloth will easily
remove this film.

CAUTION

When cleaning the inside of the win-
dows, do not use sharp-edged tools,
abrasive cleaners or chlorine-based
disinfectant cleaners. They could dam-
age the electrical conductors, radio
antenna elements or rear window de-
froster elements.

WHEELS

Wash the wheels when washing the vehicle
to maintain their appearance.

• Clean the inner side of the wheels when

the wheel is changed or the underside of
the vehicle is washed.

• Inspect wheel rims regularly for dents or

corrosion. Such damage may cause loss
of pressure or poor seal at the tire bead.

• NISSAN

recommends

that

the

road

wheels be waxed to protect against road
salt in areas where it is used during winter.

CAUTION

Do not use abrasive cleaners when
washing the wheels.

Aluminum alloy wheels (if so
equipped)

Wash regularly with a sponge dampened in a
mild soap solution, especially during winter
months in areas where road salt is used. Salt
could discolor the wheels if not removed.

CAUTION

Follow the directions below to avoid
staining or discoloring the wheels:
• Do not use a cleaner that uses

strong acid or alkali contents to
clean the wheels.

• Do not apply wheel cleaners to the

wheels when they are hot. The wheel
temperature should be the same as
ambient temperature.

• Rinse the wheel to completely re-

move the cleaner within 15 minutes
after the cleaner is applied.

Appearance and care

7-3

CHROME PARTS

Clean chrome parts regularly with a non-
abrasive chrome polish to maintain the fin-
ish.

TIRE DRESSING

NISSAN does not recommend the use of
tire dressings. Tire manufacturers apply a
coating to the tires to help reduce discolor-
ation of the rubber. If a tire dressing is ap-
plied to the tires, it may react with the coat-
ing and form a compound. This compound
may come off the tire while driving and
stain the vehicle paint.

If you choose to use a tire dressing, take the
following precautions:

• Use a water-based tire dressing. The coat-

ing on the tire dissolves more easily with
an oil-based tire dressing.

• Apply a light coat of tire dressing to help

prevent it from entering the tire tread/
grooves (where it would be difficult to
remove).

• Wipe off excess tire dressing using a dry

towel. Make sure the tire dressing is
completely

removed

from

the

tire

tread/grooves.

• Allow the tire dressing to dry as recom-

mended by the tire dressing manufacturer.

Occasionally remove loose dust from the
interior trim, plastic parts and seats using
a vacuum cleaner or soft bristled brush.
Wipe the vinyl and leather surfaces (if so
equipped) with a clean, soft cloth damp-
ened in mild soap solution, then wipe clean
with a dry soft cloth.

Regular care and cleaning is required in
order to maintain the appearance of the
leather (if so equipped).

Before using any fabric protector, read the
manufacturer’s recommendations. Some
fabric protectors contain chemicals that
may stain or bleach the seat material.

Use a cloth dampened only with water to
clean the meter and gauge lens.

WARNING

Do not use water or acidic cleaners (hot
steam cleaners) on the seat. This can
damage the seat or occupant classifi-
cation sensor (weight sensor). This can
also affect the operation of the air bag
system and result in serious personal
injury.

CLEANING INTERIOR

7-4

Appearance and care

CAUTION

• Never use benzine, thinner, or any

similar material.

• Small dirt particles can be abrasive

and damaging to the leather sur-
faces (if so equipped) and should be
removed

promptly.

Do

not

use

saddle soap, car waxes, polishes,
oils, cleaning fluids, solvents, deter-
gents or ammonia-based cleaners
as they may damage the leather’s
natural finish.

• Never use fabric protectors unless

recommended by the manufacturer.

• Do not use glass or plastic cleaner

on meter or gauge lens covers. It
may damage the lens cover.

AIR FRESHENERS

Most air fresheners use a solvent that
could affect the vehicle interior. If you use
an air freshener, take the following precau-
tions:

• Hanging-type air fresheners can cause

permanent discoloration when they con-
tact vehicle interior surfaces. Place the air
freshener in a location that allows it to

hang free and not contact an interior
surface.

• Liquid-type air fresheners typically clip on

the vents. These products can cause im-
mediate damage and discoloration when
spilled on interior surfaces.

Carefully read and follow the manufacturer’s
instructions before using air fresheners.

FLOOR MATS

WARNING

To avoid potential pedal interference
that may result in a collision, injury or
death:
• NEVER place a floor mat on top of

another floor mat in the driver front
position or install them upside down
or backwards.

• Use only Genuine NISSAN floor mats,

or equivalent floor mats, that are
specifically designed for use in your
vehicle model and model year.

Appearance and care

7-5


Content   ..  29  30  31  32   ..