Nissan Xterra. Instruction - part 572


  Index      Nissan     Nissan Xterra (2014 year) - Service and Repair Instruction


Search            copyright infringement  


Content   ..  570  571  572  573   ..


Nissan Xterra. Instruction - part 572


AXLE SHAFT

RAX-21

< UNIT REMOVAL AND INSTALLATION >

[M226]

C

E

F

G

H

I

J

K

L

M

A

B

RAX

N

O

P

Before removing the axle shaft, remove the wheel sensor to reposition the wheel sensor out of the

way. Failure to do so may result in damage to the wheel sensor and cause the wheel sensor to become

inoperative.

REMOVAL

1. Remove the wheel and tire from the vehicle using power tool. Refer to 

WT-48, "Adjustment"

.

2. Remove the wheel sensor and position out of the way. Refer to 

BRC-111, "Removal and Installation"

(TYPE 1)

BRC-232, "Removal and Installation"

 (TYPE 2).

3. Without disassembling the hydraulic lines, remove the brake caliper using power tool. Position it aside

with wire. Refer to 

BR-39, "Removal and Installation of Brake Caliper and Disc Rotor"

.

4. Put alignment marks on the disc rotor and wheel hub and bearing assembly, then remove the rotor.
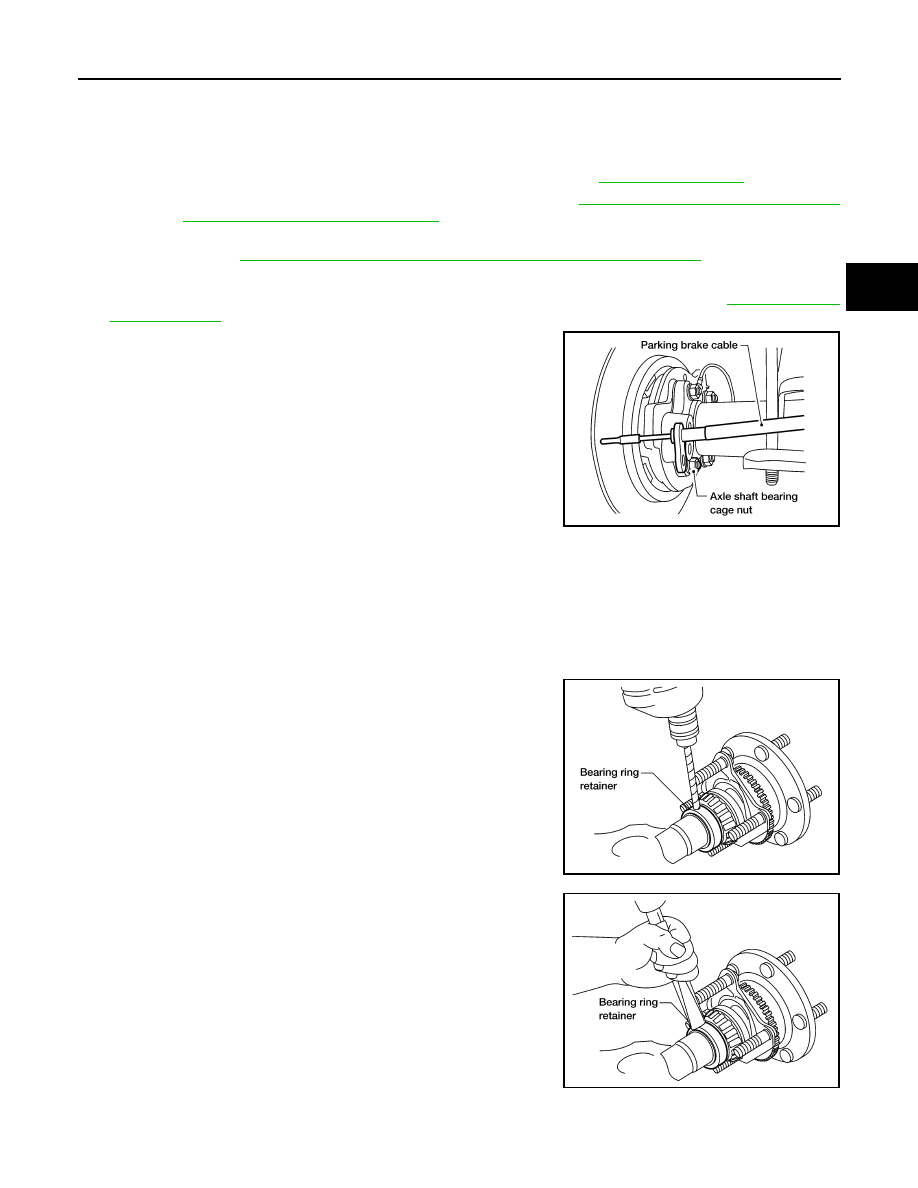
5. Remove the parking brake assembly from the back plate and torque member. Refer to 

PB-7, "Removal

and Installation"

.

6. Remove the four axle shaft bearing cage nuts and lock washers.

7. Remove the axle shaft assembly using a suitable tool.

CAUTION:

• The axle shaft bearing cup may stay in place in the axle shaft housing. Remove the cup carefully

so as not to damage the inner surface of the axle shaft housing. 

• Do not reuse the axle oil seal. 

8. Remove the back plate and torque member.
9. Remove the snap ring from the axle shaft using suitable snap ring pliers.
10. Secure the axle shaft in a suitable vise, then use a 1/4 in size

drill bit to drill a hole approximately 3/4 into the thickness of the

bearing ring retainer [3/4 thickness is approximately 6.3 mm

(0.25 in) deep].

CAUTION:

• Mount the axle shaft using a soft jaw vise to avoid damag-

ing the axle shaft.

• Do not drill all the way through the bearing ring retainer,

the drill may damage the axle shaft surface.

11. Strike the bearing ring retainer using a suitable chisel and ham-

mer, with the chisel positioned across the drilled hole. Break the

bearing ring retainer to remove it.

CAUTION:

Do not heat or cut the axle shaft bearing or bearing ring

retainer with a torch during removal, doing so will damage

the axle shaft. 

12. Remove the axle shaft bearing cage studs using a suitable hammer or press.
13. Pull the axle shaft bearing off of the axle shaft using Tool and a suitable press.

LDIA0112E

LDIA0148E

LDIA0149E

RAX-22

< UNIT REMOVAL AND INSTALLATION >

[M226]

AXLE SHAFT

CAUTION:

• Do not tighten the Tool against the axle shaft.

• Do not heat or cut the axle shaft bearing or bearing ring retainer with a torch during removal,

doing so will damage the axle shaft. 

14. Remove the axle oil seal and discard.

CAUTION:

Do not reuse the axle oil seal. 

15. Remove the wheel bearing cage.

NOTE:

• If reinstalling the old axle shaft, it may not be necessary to remove the wheel sensor rotor. Inspect the

wheel sensor rotor and replace as necessary. Refer to 

BRC-112, "Removal and Installation"

 (TYPE 1),

BRC-233, "Removal and Installation"

 (TYPE 2).

• The wheel sensor rotor cannot be reused after it is removed. If replacing the axle shaft, install a new

wheel sensor rotor on to the new axle shaft. Refer to 

BRC-112, "Removal and Installation"

 (TYPE 1),

BRC-233, "Removal and Installation"

 (TYPE 2).

INSPECTION AFTER REMOVAL

Axle Shaft

• Clean and remove all nicks and burrs. 

• Check for straightness and distortion. Replace if necessary.

• Inspect machined surfaces for evidence of overheating, damage and wear. Replace if necessary.

• Measure the bearing ring retainer axle journal diameter. Replace if necessary.

Axle Shaft Bearing and Cup

• Check that the axle shaft bearing and cup roll freely and are free from noise, cracks, pitting and wear.

Replace if necessary. 

Axle Shaft Bearing Cage

• Check for deformation and cracks. Replace if necessary.

Axle Shaft Housing

• Check the exterior and inner machined surfaces for deformation and cracks. Replace if necessary.

INSTALLATION

1. If installing a new axle shaft, install a new wheel sensor rotor onto the new axle shaft. Refer to 

BRC-112,

"Removal and Installation"

 (TYPE 1), 

BRC-233, "Removal and Installation"

 (TYPE 2).

CAUTION:

Do not reuse wheel sensor rotor.

2. Install the studs in the axle shaft bearing cage using a suitable hammer or press.
3. Install the axle shaft bearing cage.
4. Install a new axle oil seal.

CAUTION:

Do not reuse the axle oil seal. 

5. Install the axle shaft bearing and cup on the axle shaft.

• Prepare an installer tool from a steel tube measuring 762 mm

(30 in) long with an outside diameter of 53.98 mm (2.125 in)

and an inside diameter of 41.28 mm (1.625 in).

• Press the axle shaft bearing and cup onto the axle shaft using

a suitable press and the installer tool, until a 0.038 mm

(0.0015 in) feeler gauge does not fit in between the axle shaft

bearing cup and seat.

CAUTION:

Make sure the axle shaft bearing and cup, axle oil seal, and

axle shaft bearing cage are installed facing in the correct

direction.

Tool number

: 205-D002 ( — )

Bearing ring retainer axle journal diameter (minimum)

: Refer to 

RAX-26, "Axle Bearing"

.

LDIA0150E

AXLE SHAFT

RAX-23

< UNIT REMOVAL AND INSTALLATION >

[M226]

C

E

F

G

H

I

J

K

L

M

A

B

RAX

N

O

P

6. Install the bearing ring retainer onto the axle shaft.

• Press the bearing ring retainer onto the axle shaft with a minimum force of 31,100 N (3172 kg, 6992 lb)

until a 0.038 mm (.0015 in) feeler gauge does not fit between the bearing inner race and the bearing ring

retainer in at least one point.

7. Install the snap ring so it is fully seated into the groove on the axle shaft, using suitable snap ring pliers.
8. Install the back plate and torque member.
9. Install the axle shaft assembly into the axle shaft housing.
10. Install the axle shaft bearing cage lock washers and nuts. Tighten the axle shaft bearing cage nuts to

specification.

CAUTION:

Do not reuse axle shaft bearing cage nuts.

11. Install the parking brake assembly onto the back plate and torque member. Refer to 

PB-7, "Removal and

Installation"

.

12. Install the rear brake rotor. Refer to 

BR-39, "Removal and Installation of Brake Caliper and Disc Rotor"

.

13. Install the wheel sensor. Refer to 

BRC-111, "Removal and Installation"

 (TYPE 1), 

BRC-232, "Removal and

Installation"

 (TYPE 2).

14. Install the wheel and tire. Refer to 

WT-48, "Adjustment"

.

RAX-24

< UNIT REMOVAL AND INSTALLATION >

[M226]

AXLE BEARING

AXLE BEARING

Removal and Installation

INFOID:0000000009484517

The axle bearing must be replaced every time the axle shaft is removed and installed. Refer to 

RAX-20,

"Removal and Installation"

.

CAUTION:

Do not reuse the axle bearing. 


Content   ..  570  571  572  573   ..