Nissan Armada (2019 year). Manual - part 9


  Index      Nissan     Nissan Armada - service manual 2019 year in english


Search            copyright infringement  


Content   ..  7  8  9  10   ..


Nissan Armada (2019 year). Manual - part 9


SIC2770

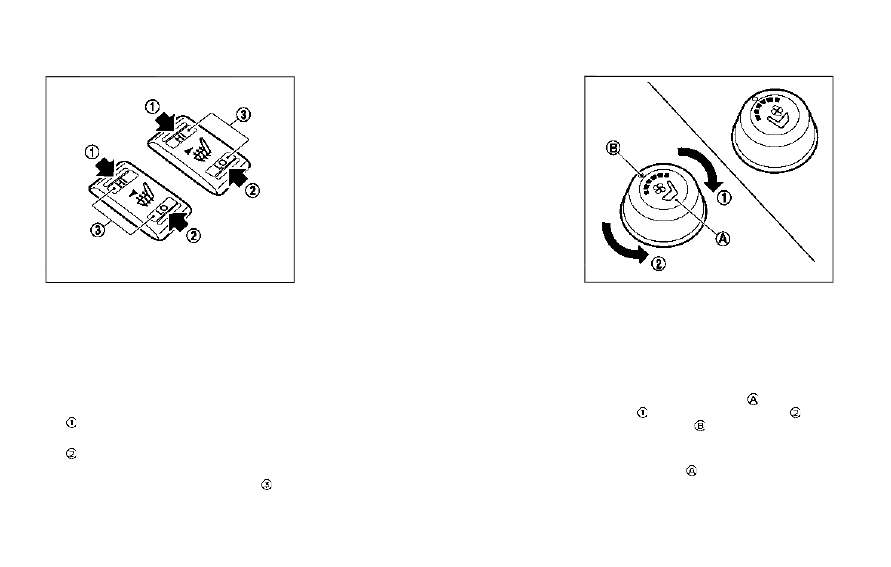
REAR (if so equipped)

The 2nd row outboard seats are warmed
by built-in heaters. The switches located
on the back side of the center console
can be operated independently of each
other.

1.

Start the engine.

2.

Select heat range.

For high heat, push the HI (High)

side of the switch.

For low heat, push the LO (Low) side

of the switch.

The indicator light in the switch

will

illuminate when the heater is on.

3. To turn off the heater, return the

switch to the level position. Make sure
the indicator light turns off.

The heater is controlled by a thermo-
stat, automatically turning the heater
on and off. The indicator light will
remain on as long as the switch is on.

When the vehicle’s interior is warmed,
or before you leave the vehicle, be
sure to turn off the switch.

SIC4334

The climate controlled seat warms up or
cools down the front seats by built-in
heaters or blowing cool air from the
surface of the seat. The switches located
on the instrument panel can be operated
independently of each other.

1.

Start the engine.

2.

Turn the control knob

to the heat

side

or to the cool side

. The

indicator light

on the control knob

will illuminate.

3. Adjust the temperature using the

control knob

.

4. When the vehicle’s interior is warmed

or cooled, and/or before you leave the
vehicle, be sure to turn the control

Instruments and controls

2-45

CLIMATE CONTROLLED SEATS (if
so equipped)

2-46

Instruments and controls

knob to the OFF position (center). The
indicator light

on the control knob

goes off at the OFF position.

The climate controlled seat has air
filters. If the climate controlled seat is
not functioning properly, it may indi-
cate the air filters may be clogged. To
check the air filters for the climate
controlled seat, it is recommended
you visit a NISSAN dealer.

WARNING

Do not use or allow occupants to use
the climate controlled seats if you or
the occupants cannot monitor seat
temperatures or have an inability to
feel pain in those body parts in
contact with the seat. Use of the
climate controlled seats by such
people could result in serious injury.

CAUTION

The battery could run down if the

climate controlled seat is oper-
ated while the engine is not run-
ning.

Do not use the climate controlled

seat for extended periods or
when no one is using the seat.

Do not put anything on the seat

which insulates heat, such as a
blanket, cushion, seat cover, etc.
Otherwise, the seat may become
overheated.

Do not place anything hard or

heavy on the seat or pierce it with
a pin or similar object. This may
result in damage to the climate
controlled seat.

Any liquid spilled on the seat

should be removed immediately
with a dry cloth.

The climate controlled seat has

an air filter. Do not operate cli-
mate controlled seat without an
air filter. This may result in da-
mage to the system.

When cleaning the seat, never use

gasoline, thinner, or any similar
materials.

If any malfunctions are found or

the climate controlled seat does
not operate, turn the switch off
and have the system checked. It
is recommended you visit a
NISSAN dealer for this service.

SSD0956

The warning systems switch is used to
turn on and off the warning systems
(Lane Departure Warning (LDW) and Blind
Spot Warning (BSW) systems) that are
activated using the settings menu on
the center display.

When the warning systems switch is
turned off, the indicator

on the switch

is off. The indicator will also be off if all of
the warning systems are deactivated
using the settings menu.

The LDW system will sound a warning
chime and blink the Lane Departure
Warning (LDW) indicator light (orange) to
alert the driver if the vehicle is traveling
close to either the left or the right of a

WARNING SYSTEMS SWITCH (if so
equipped)

traveling lane with detectable lane mar-
kers. (See “Lane Departure Warning
(LDW)/Intelligent Lane Intervention (I-LI)”
(P.5-23).)

The BSW system will turn on the side
indicator lights, located next to the out-
side mirrors, if the radar sensors detect a
vehicle in the detection zone. If the turn
signal is activated in the direction of the
detected vehicle, a chime sounds twice
and the side indicator light will flash. (See
“Blind Spot Warning (BSW)” (P.5-33).)

SIC4454

For driving or starting the vehicle on
snowy roads or slippery areas, push on
the SNOW mode switch. The SNOW mode
indicator light will illuminate. When the
SNOW mode is activated, engine output is
controlled to avoid wheel spin.

Push off the SNOW mode for normal
driving.

SIC4474

TOW MODE should be used when pulling
a heavy trailer or hauling a heavy load.
Driving the vehicle in TOW MODE with no
trailer/load or light trailer/light load will
not cause any damage. However, fuel
economy may be reduced, and the trans-
mission/engine driving characteristics
may feel unusual.

Push the TOW MODE switch to activate
TOW MODE. The indicator light on the
TOW MODE switch illuminates when TOW
MODE is selected. Push the TOW MODE
switch again to turn TOW MODE OFF.

TOW MODE is automatically canceled
when the ignition switch is placed in the
OFF position.

Instruments and controls

2-47

SNOW MODE SWITCH

TOW MODE SWITCH

2-48

Instruments and controls

SIC4455

The vehicle should be driven with the
Vehicle Dynamic Control (VDC) system on
for most driving conditions.

If the vehicle is stuck in mud or snow, the
VDC system reduces the engine output to
reduce wheel spin. The engine speed will
be reduced even if the accelerator is
depressed to the floor. If maximum en-
gine power is needed to free a stuck
vehicle, turn the VDC system off.

To turn off the VDC system, push the VDC
OFF switch. The

indicator will illumi-

nate.

Push the VDC OFF switch again or restart
the engine to turn on the system. (See
“Vehicle Dynamic Control (VDC) system”

(P.5-138).)

VEHICLE DYNAMIC CONTROL (VDC)
OFF SWITCH

The rear door alert system functions
under certain conditions to indicate there
may be an object or passenger in the rear
seat(s). Check the seat(s) before exiting
the vehicle. The rear door alert system is
initially disabled. The driver can enable
the system using the rear door alert
switch. (See “Turning the rear door alert
system ON/OFF” (P.2-50).)

JVP0649X

Rear door alert switch

Rear door alert switch indicator light

switch

switch

Instruments and controls

2-49

REAR DOOR ALERT

2-50

Instruments and controls

TURNING THE REAR DOOR ALERT
SYSTEM ON/OFF

To turn on the rear door alert system,
push the rear door alert switch

. The

rear door alert switch indicator light

will

illuminate.

To turn off the system, push the rear door
alert switch again. The rear door alert
switch indicator light will go off.

When the system is turned ON:
. The system is activated when a rear

door is opened and closed approxi-
mately 10 minutes before the vehicle
is started. For additional information,
refer to “System operation” (P.2-50).

. If a rear door is opened and closed but

the vehicle is not started within ap-
proximately 10 minutes, the system
will not be activated. A rear door must
be opened and closed and the vehicle
started within 10 minutes for the
system to be activated.

NOTE:

When turning on or off the system,

the system will retain current set-
tings even if the engine is restarted.

If the battery terminal is discon-

nected and connected after the sys-
tem is turned on, the system will be
turned off and initialized. To use the
rear door alert system after the

battery terminal is disconnected
and connected for servicing by the
customer or a NISSAN dealer, push
the rear door alert switch to turn on
the system.

SYSTEM OPERATION

When the rear door alert system is
activated and the driver exits the vehicle
after arriving at a destination:
. When the driver places the vehicle in

the P (Park) position, a message ap-
pears in the vehicle information dis-
play for a driver to select “DISMISS
MESSAGE” or “DISABLE ALERT” if de-
sired.

. With the system enabled, when the

driver exits the vehicle, an audible alert
(horn sound) will occur unless a rear
door is opened and closed within a
short time to deactivate the alert.

. If the doors are locked before the alert

is deactivated by opening a rear door,
the horn will sound.

. If the system is activated but the

liftgate is opened before opening a
rear door, the audible horn alert will be
delayed until after the liftgate is
closed.

. If the audible horn alert occurs, a

message will also appear in the vehi-
cle information display that states,

“CHECK BACK SEAT FOR All ARTICLES”.

SIC4420

HOW TO TEMPORARILY DISABLE
THE REAR DOOR ALERT SYSTEM

Perform the following steps to tempora-
rily disable the rear door alert system.

1.

When the driver places the vehicle in
the P (Park) position, a message ap-
pears in the vehicle information dis-
play for a driver to select “DISMISS
MESSAGE” or “DISABLE ALERT” if de-
sired.

2.

Push the

switch

to toggle

between “DISMISS MESSAGE” and “DIS-
ABLE ALERT”.

3. Push the

switch

to enter.

.

Using

switch

, a driver can

select “DISMISS MESSAGE” to clear
the display for a period of time. If no
selection is made, this message
automatically turns off after a per-
iod of time.

.

Using

switch

, a driver can

select “DISABLE ALERT” to disable
the horn alert for the remainder of
the current trip.

WARNING

There may be times when there is

an object or passenger in the rear
seat(s) but the audible alert does
not sound. For example, this may
occur if the engine is turned off
and then on again in a short
period of time during a trip, or if
rear seat passengers enter or exit
the vehicle during a trip.

The system does not directly

detect objects or passengers in
the rear seat(s). Instead, it can
detect when a rear door is
opened and closed, indicating
that there may be something in
the rear seat(s).

NOTE:

There may be times when the horn
sounds but there are no objects or
passengers in the rear seat(s).

Instruments and controls

2-51

2-52

Instruments and controls

CAUTION

Use power outlet with the engine

running to avoid discharging the
vehicle battery.

Avoid using power outlet when

the air conditioner, headlights or
rear window defroster is on.

Before inserting or disconnecting

a plug, be sure the electrical
accessory being used is turned
OFF.

When not in use, be sure to close

the cap. Do not allow water or any
liquid to contact the outlet.

SIC4389

Instrument panel

SIC4456

Back side of front console

SIC4391

Luggage room

Type A (if so equipped)

The power outlet is used for powering
electrical accessories such as cellular
telephones.

CAUTION

The outlet and plug may be hot

during or immediately after use.

Do not use with accessories that

exceed a combined power draw
of 12 volts, 120W (10A) for all the
power outlets. Do not use double
adapters or more than one elec-
trical accessory.

POWER OUTLET

This power outlet is not designed

for use with a cigarette lighter
unit.

Push the plug in as far as it will

go. If good contact is not made,
the plug may overheat or the
internal temperature fuse may
blow.

SIC2648

Main switch

Type B (if so equipped)

The power outlet (plug type) is located on
the back side of the front console. It can
operate when the ignition switch in the
ON position and the main switch (located
in the console box) is ON.

The specification of this power outlet is
for use of a 120 volt, 150W (1.25A) power
draw.

To turn on or off the power supply to the
outlet, push the ON

or OFF

side of the

main switch. When the switch is turned to
the ON position, the indicator light

will

illuminate.

JVI1638X

Power outlet

Pull up the cover and plug in.

After using the power outlet, be sure to
turn off the main switch.

CAUTION

Do not use with accessories that

exceed a 120 volt, 150W (1.25A)
power draw.

Use this power outlet with the

engine running. (If the engine is
stopped, this could result in a
discharged battery.)

Instruments and controls

2-53

2-54

Instruments and controls

JVI1604X

USB (Universal Serial Bus) CHAR-
GING CONNECTOR

The USB connector

can be used only

for charging an external device.

Open the cover to access the USB con-
nector.

Connect a USB device into the connector.
Charging will start automatically (max-
imum output up to 5 volt, 12W, 2.4A).

The external device will be charged con-
tinuously while the ignition switch is in
the ACC or ON position.

Some mobile devices cannot be charged
depending on their specifications.

CAUTION

Do not force a USB device into the

connector. Inserting the USB de-
vice tilted or up-side-down into
the connector may damage the
connector. Make sure that the
USB device is connected correctly
into the connector.

Do not use a reversible USB cable.

Using the reversible USB cable
may damage the connector.

Do not grab the USB connector

cover when pulling the USB de-
vice out of the connector. This
could damage the connector and
the cover.

CUP HOLDERS

CAUTION

Avoid abrupt starting and braking

when the cup holder is being
used to prevent spilling the drink.
If the liquid is hot, it can scald you
or your passenger.

Use only soft cups in the cup

holder. Hard objects can injure
you in an accident.

Do not recline the rear seatback

when you use the cup holders on
the rear armrest. Doing so may
cause the beverages to spill over,
and if they are hot, they may
scald the passengers.

STORAGE

JVI1688X

Front

To open the cup holder, push the lid

.

To close, lower the cup holder lid and
push it down lightly.

The cup holder is not designed to store
personal items.

SIC3118

2nd row seat

Type A (if so equipped):

To open the cup holder, push the lid

.

The flap will be folded down when insert-
ing a large container.

To close, lower the cup holder lid and
push it down lightly.

To clean the front cup holder, pull up the
inside tray

and remove it.

The cup holder is not designed to store
personal items.

SIC2915

Type B (if so equipped):

To open the cup holder, pull the lid.

Instruments and controls

2-55

2-56

Instruments and controls

SIC4419

3rd row seat

SIC4501

Soft bottle holder

CAUTION

Do not use bottle holder for any

other objects that could be
thrown about in the vehicle and
possibly injure people during
sudden braking or an accident.

Do not use bottle holder for open

liquid containers.

JVI0619X

SUNGLASSES HOLDER

To open the sunglasses holder, push and
release. Only store one pair of sunglasses
in the holder.

WARNING

Keep the sunglasses holder closed
while driving to avoid obstructing
the driver’s view and to help prevent
an accident.

CAUTION

Do not use for anything other

than glasses.

Do not leave glasses in the sun-

glasses holder while parking in
direct sunlight. The heat may
damage the glasses.

SIC4393

GLOVE BOX

WARNING

Keep glove box lid closed while driv-
ing to help prevent injury in an
accident or a sudden stop.

To open the glove box, pull the handle

.

To close, push the lid in until the lock
latches.

To lock

/unlock

the glove box, use the

mechanical key. For the mechanical key
usage, see “Keys” (P.3-2).

JVI1711X

CONSOLE BOX

Front

Type A (if so equipped):

To open the console box lid, push up the
knob

and pull up the lid.

To close, push the lid down until the lock
latches.

Instruments and controls

2-57

2-58

Instruments and controls

JVI1509X

Type B (if so equipped):

To open the console box lid from the
front seat, push up the knob

and pull

up the lid.

To open the console box lid from the 2nd
row seat, push the knob

.

To close, push the lid down until the lock
latches.

SIC4422

Rear (if so equipped)

To open the lid, push the knob up

and

pull up the lid.

To close, push the lid down until the lock
latches.

SIC4423

Pocket:

To open the pocket, pull the knob

.

To close, push the lid until the lock
latches.

JVI1687X

TRAY

To open the tray, push the lid

. To close,

push the lid down.

JVI1690X

To open the tray, push the lid

. To close,

push the lid down.

Instruments and controls

2-59

2-60

Instruments and controls

SIC3505

COAT HOOKS

The coat hooks are equipped at the rear
assist grips.

CAUTION

Do not place items which are more
than 2 lb (1 kg) on the hook.

SIC4446

LUGGAGE HOOKS

WARNING

Always make sure that the cargo

is properly secured. Use the sui-
table ropes and hooks.

Unsecured cargo can become

dangerous in an accident or sud-
den stop.

Never allow anyone to ride in the

luggage area. It is extremely dan-
gerous to ride in a cargo area
inside of a vehicle. In a collision,
people riding in these areas are

more likely to be seriously injured
or killed.

Do not allow people to ride in any

area of your vehicle that is not
equipped with seats and seat
belts.

The child restraint top tether

strap may be damaged by con-
tact with items in the cargo area.
Secure any items in the cargo
area. Your child could be seriously
injured or killed in a collision if the
top tether strap is damaged.

Be sure everyone in your vehicle

is in a seat and using a seat belt
properly.

CAUTION

Do not apply a total load of more
than 22 lb (10 kg)

or 7 lb (3 kg)

to

the hook.


Content   ..  7  8  9  10   ..