Nissan Altima Hybrid (2010 year). Manual - part 11


  Index      Nissan     Nissan Altima Hybrid - service manual 2010 year in english


Search            copyright infringement  


Content   ..  9  10  11  12   ..


Nissan Altima Hybrid (2010 year). Manual - part 11


HOW TO SELECT MENUS ON THE
SCREEN

Vehicle functions are viewed on the center dis-
play screen in menus. Whenever a menu selec-
tion is made or menu item is highlighted, different
areas on the screen provide you with important
information. See the following for details.
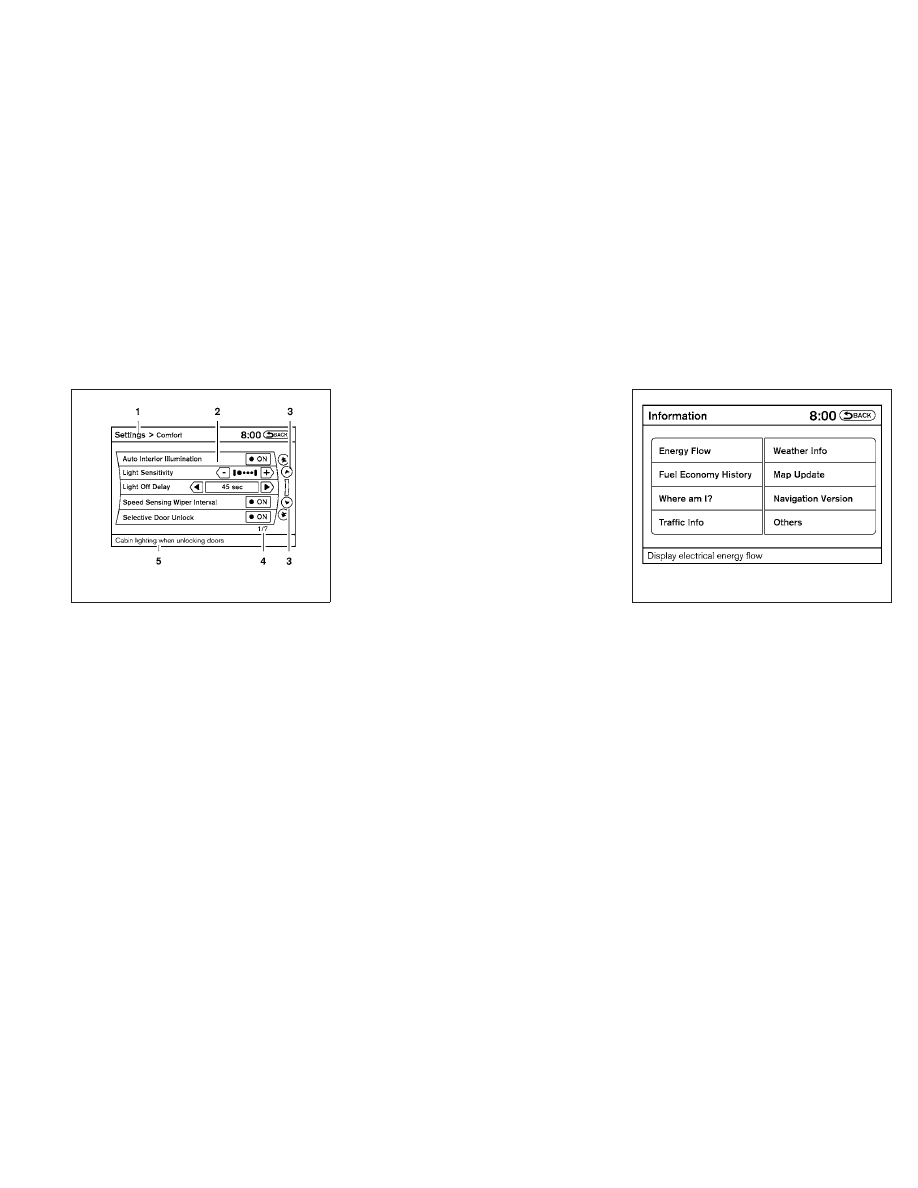
1. Header:

Shows the path used to get to the current
screen (for example, press the SETTING
button > then select the “Comfort” key).

2. Menu Selections:

Shows the options to choose within that
menu screen (for example, Auto Interior Illu-
mination, etc.).

3. Up/Down Movement Indicator:

Shows that the arrows on the touch screen
may be used to move up or down on the
screen and select more options.

4. Screen Count:

Shows the number of menu selections avail-
able for the current menu, even if they are on
multiple pages (for example, 1/7).

5. Footer/Information Line:

Provides more information (if available)
about the menu selection currently high-
lighted (for example, Cabin lighting when
unlocking doors).

HOW TO USE THE INFO BUTTON

Press the INFO button; the display screen shows
vehicle and navigation information for your con-
venience.

Energy Flow

For information about Energy Flow, refer to “En-
ergy flow” in the “HEV Overview” section.

Fuel Economy History

For information about Fuel Economy History, re-
fer to “Fuel Economy History” in the “HEV Over-
view” section.

WHA1401

LHA1416

Monitor, climate, audio, phone and voice recognition systems

4-5

Where am I?

Refer to the separate Navigation System Own-
er’s Manual for information regarding this item.

Traffic Info

Refer to the separate Navigation System Own-
er’s Manual for information regarding this item.

Weather Info

Refer to the separate Navigation System Own-
er’s Manual for information regarding this item.

Map Update

Refer to the separate Navigation System Own-
er’s Manual for information regarding this item.

Navigation Version

Refer to the separate Navigation System Own-
er’s Manual for information regarding this item.

Other options

For Voice Recognition settings, refer to “NISSAN
Voice Recognition system” in this section.

For GPS position, refer to the separate Naviga-
tion System Owner’s Manual.

HOW TO USE THE SETTING
BUTTON

When the SETTING button is pressed, the Set-
tings screen will appear on the display. You can
select and/or adjust several functions, features
and modes that are available for your vehicle.

LHA1236

LHA1237

4-6

Monitor, climate, audio, phone and voice recognition systems

Display settings

Select the “Display” key. On the screen above,
select the “Display Adjustment” key. The Display
Adjustment screen will appear.

Brightness/contrast:

Select the “Brightness” key or the “Contrast” key
to adjust the brightness or contrast of the display
background. Touch the “+” or “-” key to adjust the
brightness to darker or brighter and the contrast
to lower or higher.

The new settings are automatically saved when
you exit the setting screen by selecting the
“Back” key or any other mode button.

Display off:

Select the “Display ON” key. The indicator of the
“Display ON” turns off and the message above
will be displayed briefly. When the audio, HVAC
(Heater and air conditioner), or any mode button
on the control panel is operated, the display turns
on for that operation. If one of the control panel
buttons is pressed, the display will not automati-
cally turn off until that operation is finished. Oth-
erwise, the screen turns off automatically after 5
seconds.

WHA1502

WHA1503

LHA1242

Monitor, climate, audio, phone and voice recognition systems

4-7

To turn the screen on:

● Press the SETTING button and select the

“Display” key and then select the “Display
ON” key, or

● Press the

button and the message

“resuming display” will appear and the “Dis-
play ON” key will be automatically turned on
(no amber indicator).

Background color:

Select the “Background Color” key; the display
color changes between day and night.

The new settings are automatically saved when
you exit the setting screen by selecting the
“Back” key or any other mode button.

Color theme:

Select the “Display” key, then select the “Color
Theme” key. The Color Theme select screen will
appear.

Select the key for the desired color. The appear-
ance of the background, arrows and bars will
change for all screens accordingly. You can
choose a black, blue or red color theme.

Clock

The following display will appear after pressing
the SETTING button, then selecting the “Clock”
key.

On-screen Clock:

When this item is enabled (indicator light illumi-
nated), a clock is always displayed in the upper
right corner of the screen.

This clock will indicate the time almost exactly
because it is always adjusted by the GPS system.

LHA1240

LHA1241

4-8

Monitor, climate, audio, phone and voice recognition systems

Clock Format (24h):

When this item is enabled (indicator light illumi-
nated), the clock format will change from the
default 12-hour display to a 24-hour display.

Offset (hour):

Adjust the time by increasing or decreasing the
hours.

Offset (minute):

Adjust the time by increasing or decreasing the
minutes.

Daylight Savings Time:

When this item is enabled (indicator light illumi-
nated), daylight savings time is on. To turn off the
daylight savings time, touch the “ON” key; the
amber indicator light will go out.

Time Zone:

Select the “Time Zone” key; the Time Zone
screen will appear.

Select one of the following zones, depending on
the current location, by selecting the correct time
zone key to enable that time zone (indicator light
will illuminate for that location).

● Pacific
● Mountain
● Central
● Eastern
● Atlantic

● Newfoundland
● Hawaii
● Alaska

After selection/settings, select the “Back” key or
any other mode button to accept the changes.

LHA1243

Monitor, climate, audio, phone and voice recognition systems

4-9

Others settings

Select the “Others” key. Comfort settings, lan-
guage and units and Voice Recognition settings
will be displayed.

Comfort settings

Select the “Others” key, then select the “Com-
fort” key. The Comfort settings screen will be
displayed.

You can set the following operating conditions by
selecting the key for the desired item. The indica-
tor light (box at the right of the selected item)
alternately turns on and off each time the item is
touched.

Indicator light is illuminated — ON

Indicator light is not illuminated — OFF

Auto Interior Illumination: Select to turn on or
turn off the illumination of the interior lights when
any door is unlocked.

Light Sensitivity: Select to adjust the sensitivity
of the automatic headlights higher (right) or lower
(left). After selecting the item, touch the “+” or “-”
key to change the setting.

LHA1403

WHA1404

LHA1405

4-10

Monitor, climate, audio, phone and voice recognition systems

Light Off Delay: Select to change the duration
of the automatic headlight off timer. After select-
ing the item, touch the “+” or “-” key to change
the setting. The available delays are 0, 30, 45, 60,
90, 120, 150 and 180 seconds.

Speed Sensing Wiper Interval: Select to turn
on or turn off the wiper interval adjusted automati-
cally according to the vehicle speed.

Selective Door Unlock: When this item is
turned on, only the driver’s door is unlocked first
after the door unlock operation. When the door
handle request switch on the driver’s or front
passenger’s side door is pushed to be unlocked,
only the corresponding door is unlocked first. All
the doors can be unlocked if the door unlock
operation is performed again within one minute.

When this item is turned to off, all the doors will
be unlocked after the door unlock operation is
performed once.

Intelligent Key Lock / Unlock: Select to turn
on or turn off the door lock/unlock function by
pushing the door handle request switch.

Return All Settings to Default: Select to
change all the comfort and convenience systems
to their default settings.

Language & Units:

Select the “Language & Units” key. Select the key
of the setting you wish to change.

Select Language:

Select the “English” key or the “Français” key to
change the language shown on the display.

If you select the “Français” key, French language
will be displayed, so please use the French Own-
er’s Manual. To obtain a French Owner’s Manual,
please see “Owner’s Manual/Service Manual Or-
der Information” in the “Technical and consumer
information” section.

LHA1250

LHA1251

Monitor, climate, audio, phone and voice recognition systems

4-11

Select Units:

Select the “US” (mi, °F, MPG) key or the “Metric”
(km, °C, L/100 km) key to change the units
shown on the display.

Voice Recognition:

For Voice Recognition settings, refer to “NISSAN
Voice Recognition system” in this section.

Navigation settings

Refer to the separate Navigation System Own-
er’s Manual for information regarding these set-
tings.

Audio settings

For audio settings, refer to “Audio System” in this
section.

Phone settings

For phone settings refer to “Bluetooth

姞 Hands-

Free Phone System with Navigation System” in
this section.

Bluetooth

姞 settings

For

Bluetooth

姞 phone settings, refer to

“Bluetooth

姞 Hands-Free Phone System with

Navigation System” in this section.

For

Bluetooth

姞 audio settings, refer to

“Bluetooth

姞 Audio” in this section.

Volume & beeps settings

Navigation volume

For navigation volume settings, refer to the sepa-
rate Navigation System Owner’s Manual for infor-
mation regarding these settings.

Phone volume

For phone volume settings refer to “Bluetooth

Hands-Free Phone System with Navigation Sys-
tem” in this section.

Switch beeps

With this option on (indicator light illuminated), a
beep will sound if any control panel button is
pressed.

BUTTON

To

change

the

display

brightness,

press

the

button. Pressing the button again will

change the display to the day

or the

night

display.

If no operation is performed within 5 seconds, the
display will return to the previous display.

LHA1252

LHA1253

4-12

Monitor, climate, audio, phone and voice recognition systems

Press and hold the

button for more than

two seconds to turn the display off. Press the
button again to turn the display on.

When the shift selector is shifted into the R
(Reverse) position, the monitor display shows the
view directly to the rear of the vehicle.

WARNING

● The system is designed as an aid to the

driver in detecting large stationary ob-
jects to help avoid damaging the ve-
hicle. The system will not detect small
objects below the bumper, and may not
detect objects close to the bumper or
on the ground.

● The RearView Monitor is a convenience

but it is not a substitute for proper back-
ing. Always turn and check that it is safe
to do so before backing up. Always
back up slowly.

● Objects viewed in the RearView Moni-

tor differ from actual distance because
a wide-angle lens is used.

● Make sure that the trunk is securely

closed when backing up.

● Do not put anything on the rearview

camera. The rearview camera is in-
stalled beside the license plate light.

● When washing the vehicle with high-

pressure water, be sure not to spray it
around the camera. Otherwise, water
may enter the camera unit causing wa-
ter condensation on the lens, a mal-
function, fire or an electric shock.

● Do not strike the camera. It is a preci-

sion instrument. Otherwise, it may mal-
function or cause damage resulting in a
fire or an electric shock.

CAUTION

There is a plastic cover over the camera.
Do not scratch the cover when cleaning
dirt or snow from the cover.

HOW TO READ THE DISPLAYED
LINES

Lines which indicate the vehicle clearance and
distances to objects with reference to the
bumper line

A

are displayed on the monitor.

LHA1254

REARVIEW MONITOR (if so
equipped)

Monitor, climate, audio, phone and voice recognition systems

4-13

They are indicated as reference distances to
objects. The lines and colors in the display indi-
cate distances from the back bumper line

A

in

the illustration.

1

1.5 ft (0.5 m) red

2

3 ft (1 m) yellow

3

7 ft (2 m) green

4

10 ft (3 m) green

The vehicle clearance lines are wider than
the actual clearance.

DIFFERENCE BETWEEN
PREDICTED AND ACTUAL
DISTANCES

The distance guide line and the vehicle width
guide line should be used as a reference only
when the vehicle is on a level, paved surface. The
distance viewed on the monitor is for reference
only and may be different than the actual distance
between the vehicle and displayed objects.

Backing up on a steep uphill

When backing up the vehicle up a hill, the dis-
tance guide lines and the vehicle width guide
lines are shown closer than the actual distance.
For example, the display shows 3 ft (1.0 m) to the
place

A

, but the actual 3 ft (1.0 m) distance on

LHA0437

WHA1504

4-14

Monitor, climate, audio, phone and voice recognition systems

the hill is the place

B

. Note that any object on

the hill is viewed in the monitor farther than it
appears.

Backing up on a steep downhill

When backing up the vehicle down a hill, the
distance guide lines and the vehicle width guide
lines are shown farther than the actual distance.
For example, the display shows 3 ft (1.0 m) to the
place

A

, but the actual 3 ft (1.0 m) distance on

the hill is the place

B

. Note that any object on

the hill is viewed in the monitor closer than it
appears.

WHA1505

Monitor, climate, audio, phone and voice recognition systems

4-15

Backing up behind a projecting object

The position

C

is shown farther than the position

B

in the display. However, the position

C

is

actually at the same distance as the position

A

.

The vehicle may hit the object when backing up to

the position

A

if the object projects over the

actual backing up course.

WHA1506

Type A

LHA1272

4-16

Monitor, climate, audio, phone and voice recognition systems

ADJUSTING THE SCREEN

The procedure for adjusting the quality of the
screen differs depending on the type of screen
present on the vehicle.

For vehicles without a touch screen (Type A):

● To adjust the Brightness and Contrast,

press the ENTER button on the audio sys-
tem repeatedly until the desired setting is
displayed. Use the TUNE/SCROLL knob to
adjust the display to the desired level.

● Do not adjust the Brightness or Contrast of

the RearView Monitor while the vehicle is
moving.

For vehicles with a touch screen (Type B):

● To adjust the Brightness, Contrast, Display

ON/OFF and Color of the RearView Moni-
tor, press the SETTING button and then
select the “Display” key with the RearView
Monitor on. When the display adjustment
screen appears, touch the “–” or “+” key on
the desired item and adjust the level.

● Do not adjust the Brightness, Contrast, and

Color of the RearView Monitor while the
vehicle is moving.

OPERATING TIPS

● When the shift selector is shifted to R (Re-

verse), the monitor screen automatically
changes to the RearView Monitor mode.
However, the radio can be heard.

● It may take some time until the RearView

Monitor is displayed after the shift selector
has been shifted to R (Reverse). Objects
may be distorted momentarily until the Rear-
View Monitor screen is displayed com-
pletely. When the shift selector is returned to
a position other than R (Reverse), it may take
some time until the screen changes. Objects
on the screen may be distorted until they are
completely displayed.

● When the temperature is extremely high or

low, the screen may not clearly display ob-
jects. This is not a malfunction.

● When strong light directly enters the cam-

era, objects may not be displayed clearly.

● Vertical lines may be seen in objects on the

screen. This is due to strong reflected light
from the bumper. This is not a malfunction.

● The screen may flicker under fluorescent

light. This is not a malfunction.

● The colors of objects on the RearView Moni-

tor may differ somewhat from those of the
actual object.

● When the contrast of objects is low at night,

pressing the SETTING button or ENTER
button may not change the brightness.

Type B

LHA1238

Monitor, climate, audio, phone and voice recognition systems

4-17

● Objects on the monitor may not be clear in a

dark place or at night.

● If dirt, rain or snow attaches to the camera,

the RearView Monitor may not display ob-
jects. Clean the camera.

● Do not use alcohol, benzine or thinner to

clean the camera. This will cause discolora-
tion. To clean the camera, wipe with a cloth
dampened with a diluted mild cleaning agent
and then wipe with a dry cloth.

● Do not damage the camera as the monitor

screen may be adversely affected.

● Do not use body wax on the camera window.

If body wax does get on the camera window,
wipe off the wax with a clean cloth damp-
ened with mild detergent diluted with water.

Adjust air flow direction by moving the vent
slides.

Open or close the vents by using the dial. Move
the dial toward the

to open the vents or

toward the

to close them.

Right and Left

WHA0736

Center

WHA0737

VENTS

4-18

Monitor, climate, audio, phone and voice recognition systems

1.

Driver temperature control dial

2.

Air flow control buttons

3.

Passenger temperature control dial

4.

DUAL button

5.

Rear defrost button

6.

Front windshield defrost button

7.

Fan speed dial/system OFF button

8.

Air recirculation button

9.

A/C ON/OFF button

10. AUTO button

WARNING

● The air conditioner cooling function op-

erates only when the Hybrid System is
in the READY mode. Even if the Hybrid
System is in the READY mode, the cool-
ing function will not operate if the high
voltage battery becomes discharged.

Rear (if so equipped)

WHA0688

WHA1171

HEATER AND AIR CONDITIONER
(automatic)

Monitor, climate, audio, phone and voice recognition systems

4-19

● Do not leave children or adults who

would normally require the assistance
of others alone in your vehicle. Pets
should also not be left alone. They
could accidentally injure themselves or
others through inadvertent operation of
the vehicle. Also, on hot, sunny days,
temperatures in a closed vehicle could
quickly become high enough to cause
severe or possibly fatal injuries to
people or animals.

● Do not use the recirculation mode for

long periods as it may cause the interior
air to become stale and the windows to
fog up.

Push the ignition switch to the ON position and
wait for the READY light to illuminate, then oper-
ate the controls to activate the air conditioner.

AUTOMATIC OPERATION

Cooling or heating (auto)

This mode may be normally used all year round as
the system automatically works to keep a con-
stant temperature. Air flow distribution and fan
speed are also controlled automatically.

1. Push the AUTO button on.

2. Turn the driver’s side temperature control

dial to the left or right to set the desired
temperature. Driver and passenger tem-
peratures can be set independently. Press
DUAL or turn the passenger temperature
control dial to the left or right to activate dual
climate control functions. Turn the passen-
ger’s side temperature control dial to the left
or right to set the desired passenger’s tem-
perature.

● Adjust the temperature dial to about 75°F

(24°C) for normal operation.

● The temperature of the passenger compart-

ment will be maintained automatically. Air
flow distribution, fan speed and A/C on/off
are also controlled automatically.

● A visible mist may be seen coming from the

vents in hot, humid conditions as the air is
cooled rapidly. This does not indicate a mal-
function.

Dehumidified defrosting or defogging

1. Push the defroster control button

to

turn the system on. The indicator light in the
button will illuminate.

2. Turn the temperature dial to the left or right

to set the desired temperature.

● To quickly remove ice from the outside of the

windows, turn the manual fan control to HI.

● As soon as possible after the windshield is

clean, push the AUTO button to return to the
auto mode.

● When the

control is activated, the air

conditioner will automatically be turned on at
outside temperatures above 36°F (2°C).
This dehumidifies the air which helps defog
the windshield. The air recirculation mode
automatically turns off, allowing outside air
to be drawn into the passenger compart-
ment to further improve the defogging per-
formance.

Rear window defroster switch

For more information about the rear window de-
froster switch, see “Rear window and outside
mirror defroster switch” in the “Instruments and
controls” section of this manual.

MANUAL OPERATION

Fan speed control

Turn the fan control dial

left or right to

manually control the fan speed.

Press the

/OFF button to turn the system

off.

4-20

Monitor, climate, audio, phone and voice recognition systems


Content   ..  9  10  11  12   ..