Nissan Altima Coupe (2013 year). Manual - part 22


  Index      Nissan     Nissan Altima Coupe - service manual 2013 year in english


Search            copyright infringement  


Content   ..  20  21  22  23   ..


Nissan Altima Coupe (2013 year). Manual - part 22


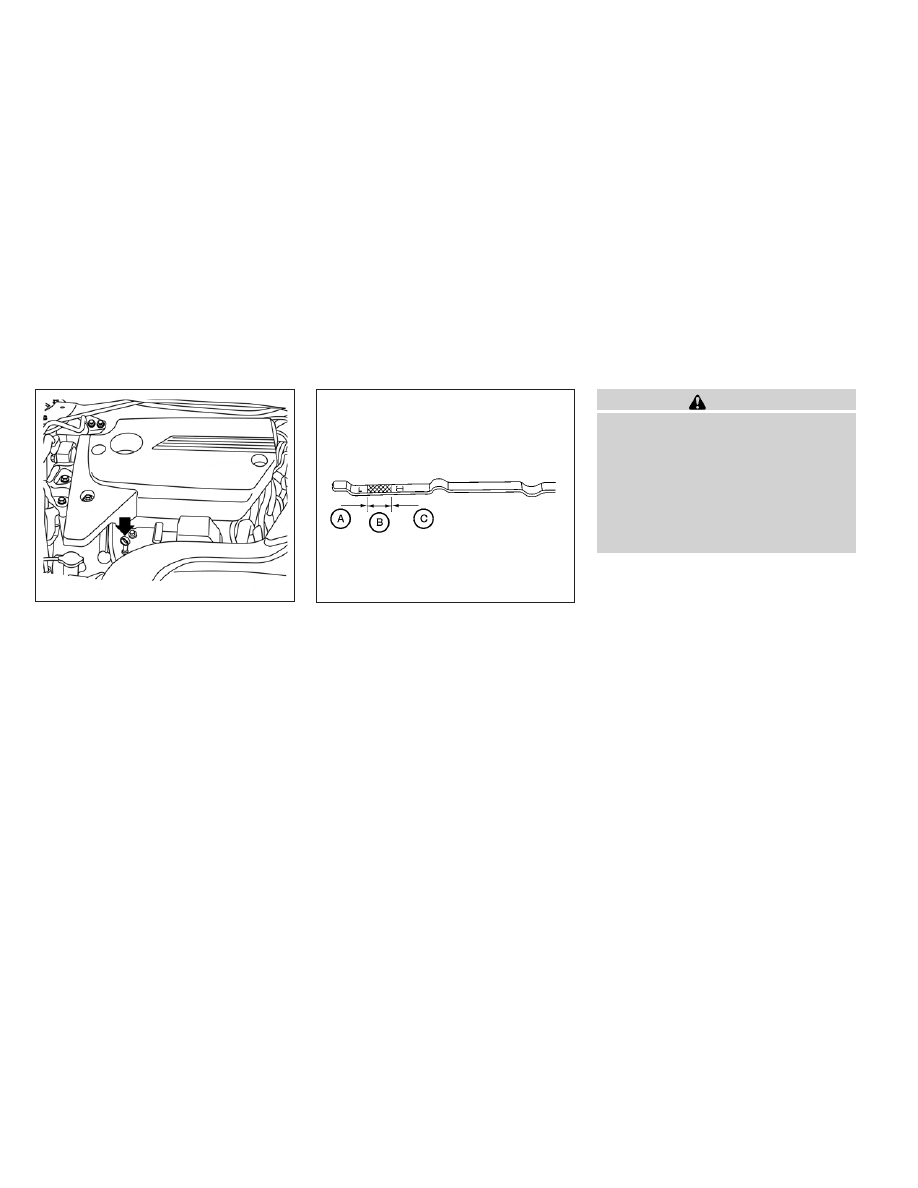
CHECKING ENGINE OIL LEVEL

1. Park the vehicle on a level surface and apply

the parking brake.

2. Start the engine and let it idle until it reaches

operating temperature.

3. Turn off the engine. Wait more than 10

minutes for the oil to drain back into
the oil pan.

4. Remove the dipstick and wipe it clean. Re-

insert it all the way.

5. Remove the dipstick again and check the oil

level. It should be between the H (High) and
L (Low) marks

B

. This is the normal oper-

ating oil level range. If the oil level is below
the L (Low) mark

A

, remove the oil filler cap

and pour recommended oil through the
opening. Do not overfill

C

.

6. Recheck oil level with the dipstick.

It is normal to add some oil between oil
maintenance

intervals

or

during

the

break-in period, depending on the severity
of operating conditions.

CAUTION

● Oil level should be checked regularly.

Operating the engine with an insuffi-
cient amount of oil can damage the
engine, and such damage is not cov-
ered by warranty.

● It is normal to add some oil between oil

maintenance intervals or during the
break-in period, depending on the se-
verity of operating conditions.

CHANGING ENGINE OIL

1. Park the vehicle on a level surface and apply

the parking brake.

2. Start the engine and let it idle until it reaches

operating temperature, then turn it off.

3. Remove the oil filler

A

cap by turning it

counterclockwise.

4. Place a large drain pan under the drain plug

B

.

QR25DE engine

LDI2120

WDI0214

ENGINE OIL

Maintenance and do-it-yourself

8-9

5. Remove the drain plug

B

with a wrench by

turning it counterclockwise and completely
drain the oil.

If the oil filter is to be changed, remove and
replace it at this time. See “Changing engine
oil filter” in this section.

● Waste oil must be disposed of prop-

erly.

● Check your local regulations.

WARNING

● Prolonged and repeated contact with

used engine oil may cause skin cancer.

● Try to avoid direct skin contact with

used oil. If skin contact is made, wash
thoroughly with soap or hand cleaner
as soon as possible.

● Keep used engine oil out of reach of

children.

CAUTION

Be careful not to burn yourself. The engine
oil may be hot.

6. Clean and reinstall the drain plug and a new

washer. Securely tighten the drain plug with
a wrench. Do not use excessive force.

Drain plug tightening torque:

22 - 29 ft-lb (29 - 39 N·m)

7. Refill engine with recommended oil through

the oil filler opening, then install the oil filler
cap securely.

See

“Capacities

and

recommended

fuel/lubricants” in the “Technical and con-
sumer information” section of this manual for
drain and refill capacity.

The drain and refill capacity depends on the
oil temperature and drain time. Use these
specifications for reference only. Always use
the dipstick to determine when the proper
amount of oil is in the engine.

8. Start the engine. Check for leakage around

the drain plug and oil filter. Correct as re-
quired.

9. Turn the engine off and wait more than 10

minutes. Check the oil level with the dipstick.
Add engine oil if necessary.

CHANGING ENGINE OIL FILTER

1. Park the vehicle on a level surface and apply

the parking brake.

2. Turn the engine off.

3. Place a large drain pan under the oil filter

A

.

4. Loosen the oil filter

A

with an oil filter

wrench by turning it counterclockwise. Then
remove the oil filter by turning it by hand.

QR25DE engine

WDI0497

8-10

Maintenance and do-it-yourself

CAUTION

Be careful not to burn yourself. The engine
oil may be hot.

5. Wipe the engine oil filter sealing surface with

a clean rag.

CAUTION

Be sure to remove any old gasket material
remaining on the sealing surface of the
engine. Failure to do so could lead to
engine damage.

6. Coat the gasket on the new filter with clean

engine oil.

7. Screw on the oil filter until a slight resistance

is felt, then tighten an additional 2/3 turn.

8. Start the engine and check for leakage

around the oil filter. Correct as required.

9. Turn the engine off and wait more than 10

minutes. Check the oil level. Add engine oil if
necessary.

CAUTION

● Use only Genuine NISSAN CVT Fluid

NS-2. Do not mix with other fluids.

● Using transmission fluid other than

Genuine NISSAN CVT Fluid NS-2 will
damage the CVT, which is not covered
by the warranty.

When checking or replacement of CVT fluid is
required, we recommend your NISSAN dealer for
servicing.

QR25DE engine

WDI0499

CONTINUOUSLY VARIABLE
TRANSMISSION (CVT) FLUID

Maintenance and do-it-yourself

8-11

The fluid level should be checked using the HOT
MAX range on the power steering fluid reservoir
at fluid temperatures of 122° - 176°F (50° -
80°C) or using the COLD MAX range on the
power steering fluid reservoir at fluid tempera-
tures of 32° - 86°F (0° - 30°C).

If the fluid is at or below the MIN line, add Genu-
ine NISSAN PSF to HOT MAX or COLD MAX
depending on system fluid temperature. Remove
the cap and fill through the opening.

CAUTION

● DO NOT OVERFILL.
● Recommended

fluid

is

Genuine

NISSAN PSF or equivalent.

For further brake fluid specification information,
refer

to

“Capacities

and

recommended

fuel/lubricants” in the “Technical and consumer
information” section of this manual.

WARNING

● Use only new fluid from a sealed con-

tainer. Old, inferior or contaminated
fluid may damage the brake systems.
The use of improper fluids can damage
the brake system and affect the vehi-
cle’s stopping ability.

● Clean the filler cap before removing.
● Brake fluid is poisonous and should be

stored carefully in marked containers
out of reach of children.

CAUTION

Do not spill the fluid on any painted sur-
faces. This will damage the paint. If fluid is
spilled, immediately wash the surface
with water.

LDI0557

POWER STEERING FLUID

BRAKE FLUID

8-12

Maintenance and do-it-yourself

BRAKE FLUID

Check the brake fluid level in the reservoir. If the
fluid level is below the MIN line or the brake
warning light comes on, add Genuine NISSAN
Super Heavy Duty Brake Fluid or equivalent DOT
fluid up to the MAX line. If fluid must be added
frequently, the system should be checked by a
NISSAN dealer.

WINDSHIELD-WASHER FLUID
RESERVOIR

Fill the windshield-washer fluid reservoir periodi-
cally. Add windshield-washer fluid when the low
windshield-washer fluid warning light comes on.

To fill the windshield-washer fluid reservoir, lift
the cap off the reservoir and pour the windshield-
washer fluid into the reservoir opening.

Add a washer solvent to the washer for better
cleaning. In the winter season, add a windshield
washer antifreeze. Follow the manufacturer’s in-
structions for the mixture ratio.

Refill the reservoir more frequently when driving
conditions require an increased amount of
windshield-washer fluid.

Recommended fluid is Genuine NISSAN Wind-
shield Washer Concentrate Cleaner & Anti-
freeze or equivalent.

WARNING

Anti-freeze is is poisonous and should be
stored carefully in marked containers out
of the reach of children.

CAUTION

● Do not substitute engine anti-freeze

coolant for windshield-washer fluid.
This may result in damage to the paint.

● Do not fill the windshield-washer fluid

reservoir with washer fluid concen-
trates at full strength. Some methyl al-
cohol based washer fluid concentrates
may permanently stain the grille if
spilled while filling the windshield-
washer fluid reservoir.

LDI0558

LDI2116

WINDSHIELD-WASHER FLUID

Maintenance and do-it-yourself

8-13

● Pre-mix washer fluid concentrates with

water to the manufacturer’s recom-
mended levels before pouring the fluid
into the windshield-washer fluid reser-
voir. Do not use the windshield-washer
fluid reservoir to mix the washer fluid
concentrate and water.

● Keep the battery surface clean and dry.

Clean the battery with a solution of baking
soda and water.

● Make certain the terminal connections are

clean and securely tightened.

● If the vehicle is not to be used for 30 days or

longer, disconnect the negative (-) battery
terminal cable to prevent discharge.

NOTE:

Care should be taken to avoid situations
that can lead to potential battery discharge
and potential no-start conditions such as:
1. Installation or extended use of electronic
accessories that consume battery power
when the engine is not running (Phone
chargers, GPS, DVD players, etc.) 2. Vehicle
is not driven regularly and/or only driven
short distances. In these cases, the battery
may need to be charged to maintain battery
health.

WARNING

● Do not expose the battery to flames, an

electrical spark or a cigarette. Hydro-
gen gas generated by the battery is ex-
plosive. Explosive gases can cause
blindness or injury. Do not allow battery
fluid to contact your skin, eyes, fabrics
or painted surfaces. Sulfuric acid can
cause blindness or injury. After touch-
ing a battery or battery cap, do not
touch or rub your eyes. Thoroughly
wash your hands. If the acid contacts
your eyes, skin or clothing, immediately
flush with water for at least 15 minutes
and seek medical attention.

● Do not operate the vehicle if the fluid in

the battery is low. Low battery fluid can
cause a higher load on the battery
which can generate heat, reduce bat-
tery life, and in some cases lead to an
explosion.

● When working on or near a battery, al-

ways wear suitable eye protection and
remove all jewelry.

● Battery posts, terminals and related ac-

cessories contain lead and lead com-
pounds. Wash hands after handling.

BATTERY

8-14

Maintenance and do-it-yourself

● Keep battery out of the reach of

children.

● Do not tip the battery. Keep the vent

caps tight and the battery level.

1. Remove the vent caps with a screwdriver as

shown. Use a cloth to protect the battery
case.

2. Check the fluid level in each cell. If it is

necessary to add fluid, add only distilled
water to bring the level up to the bottom of
the filler opening. Do not overfill. Reinstall
the vent caps.

WDI0224

LDI0302

Maintenance and do-it-yourself

8-15

Vehicles operated in high temperatures or under
severe conditions require frequent checks of the
battery fluid level.

JUMP STARTING

If jump starting is necessary, see “Jump starting”
in the “In case of emergency” section of this
manual. If the engine does not start by jump
starting, the battery may have to be replaced.
Contact a NISSAN dealer.

CAUTION

● Do not ground accessories directly to

the battery terminal. Doing so will by-
pass the variable voltage control sys-
tem and the vehicle battery may not
charge completely.

● Use electrical accessories with the en-

gine running to avoid discharging the
vehicle battery.

Your vehicle is equipped with a variable voltage
control system. This system measures the
amount of electrical discharge from the battery
and controls voltage generated by the generator.

The current sensor is located near the battery
along the negative battery cable. If you add elec-
trical accessories to your vehicle, be sure to
ground them to a suitable body ground such as
the frame or engine block area.

LDI0694

VARIABLE VOLTAGE CONTROL
SYSTEM

8-16

Maintenance and do-it-yourself

1.

Crankshaft pulley

2.

Drive belt Automatic tensioner

3.

Water pump pulley

4.

Alternator

5.

Air conditioner

WARNING

Be sure the ignition switch is placed in the
OFF or LOCK position before servicing
drive

belt.

The

engine

could

rotate

unexpectedly.

1. Visually inspect the belt for signs of unusual

wear, cuts, fraying or looseness. If the belt is
in poor condition or is loose, have it replaced
or adjusted by a NISSAN dealer.

2. Have the belt checked regularly for condi-

tion and tension in accordance with the
maintenance

schedule

found

in

the

“NISSAN Service and Maintenance Guide”.

REPLACING SPARK PLUGS

Platinum-tipped spark plugs

It is not necessary to replace platinum-tipped

A

spark plugs as frequently as conventional type
spark plugs because they last much longer. Fol-
low the maintenance log shown in the “NISSAN
Service and Maintenance Guide”. Do not service
platinum-tipped spark plugs by cleaning or re-
gapping.

● Always replace spark plugs with rec-

ommended or equivalent ones.

QR25DE engine

LDI2130

SDI1895

DRIVE BELT

SPARK PLUGS

Maintenance and do-it-yourself

8-17

WARNING

Be sure the engine and ignition switch are
off and that the parking brake is engaged
securely.

CAUTION

Be sure to use the correct socket to re-
move the spark plugs. An incorrect socket
can damage the spark plugs.

NOTE:

The air cleaner filter should not be cleaned
and reused.

Replace the air cleaner filter according to the
maintenance log shown in the “Warranty Informa-
tion and Maintenance Booklet.”

To remove the air cleaner filter:

● Unlatch the clips and move the air cleaner

cover upward.

● Remove the air cleaner filter.
● Wipe the inside of the air cleaner filter hous-

ing and the cover with a damp cloth.

NOTE:

After installing a new air cleaner, make
sure the air cleaner cover is seated in the
housing and latch the clips.

WARNING

● Operating the engine with the air

cleaner removed can cause you or oth-
ers to be burned. The air cleaner not
only cleans the air, it stops the flame if
the engine backfires. If it isn’t there, and
the engine backfires, you could be
burned. Do not drive with the air cleaner
removed, and be careful when working
on the engine with the air cleaner
removed.

● Never pour fuel into the throttle body or

attempt to start the engine with the air
cleaner removed. Doing so could result
in serious injury.

QR25DE

LDI0563

AIR CLEANER

8-18

Maintenance and do-it-yourself

IN-CABIN MICROFILTER

The in-cabin microfilter restricts the entry of air-
borne dust and pollen particles and reduces
some objectionable outside odors. The filter is
located behind the glove box. Refer to the
“NISSAN Service and Maintenance Guide” for
change intervals.

If replacement is required, see your NISSAN
dealer.

CLEANING

If your windshield is not clear after using the
windshield washer or if a wiper blade chatters
when running, wax or other material may be on
the blade or windshield.

Clean the outside of the windshield with a washer
fluid or a mild detergent. Your windshield is clean
if beads do not form when rinsing with clear
water.

Clean each blade by wiping it with a cloth soaked
in a washer fluid or a mild detergent. Then rinse
the blades with clear water. If your windshield is
still not clear after cleaning the blades and using
the wiper, install new windshield wiper blades.

CAUTION

Worn windshield wiper blades can dam-
age the windshield and impair driver
vision.

REPLACING

Replace the wiper blades if they are worn.

1. Lift the wiper arm away from the windshield.

2

Push the release tab, then move the wiper
blade down the wiper arm to remove.

3

Remove the wiper blade.

4. Insert the new wiper blade onto the wiper

arm until it clicks into place.

5. Rotate the wiper blade so the dimple is in the

groove.

6. Return the wiper to its original position and

release it until it has made contact with the
windshield.

WDI0594

WINDSHIELD WIPER BLADES

Maintenance and do-it-yourself

8-19

CAUTION

● After wiper blade replacement, return

the wiper arm to its original position;
otherwise it may be damaged when the
hood is opened.

● Make sure the wiper blades contact the

glass; otherwise the arms may be dam-
aged from wind pressure.

If you wax the surface of the hood, be careful not
to let wax get into the windshield washer nozzle

A

. This may cause clogging or improper wind-

shield washer operation. If wax gets into the
nozzle, remove it with a needle or small pin

B

.

If the brakes do not operate properly, have the
brakes checked by a NISSAN dealer.

SELF-ADJUSTING BRAKES

Your vehicle is equipped with self-adjusting
brakes.

The front and rear disc-type brakes self-adjust
every time the brake pedal is applied.

WARNING

See a NISSAN dealer for a brake system
check if the brake pedal height does not
return to normal.

BRAKE PAD WEAR INDICATORS

The disc brake pads on your vehicle have audible
wear indicators. When a brake pad requires re-
placement, a high pitched scraping or screech-
ing sound will be heard when the vehicle is in
motion. The noise will be heard whether or not the
brake pedal is depressed. Have the brakes
checked as soon as possible if the wear indicator
sound is heard.

Under some driving or climate conditions, occa-
sional brake squeak, squeal or other noise may
be heard. Occasional brake noise during light to
moderate stops is normal and does not affect the
function or performance of the brake system.

WDI0570

BRAKES

8-20

Maintenance and do-it-yourself

Proper brake inspection intervals should
be followed. 
For more information regarding
brake inspections, see the appropriate mainte-
nance schedule information in the “NISSAN Ser-
vice and Maintenance Guide”.

Two types of fuses are used. Type

A

is used in

the fuse boxes in the engine compartment. Type

B

is used in the passenger compartment fuse

box.

Type A fuses are provided as spare fuses. They
are stored in the passenger compartment fuse
box.

Type A fuses can be installed in the engine com-
partment and passenger compartment fuse
boxes.

If a type A fuse is used to replace a type B fuse,
the type A fuse will not be level with the fuse
pocket as shown in the illustration. This will not
affect the performance of the fuse. Make sure the
fuse is installed in the fuse box securely.

Type B fuses cannot be installed in the under-
hood fuse boxes. Only use type A fuses in the
underhood fuse boxes.

LDI0455

LDI0457

FUSES

Maintenance and do-it-yourself

8-21

ENGINE COMPARTMENT

CAUTION

Never use a fuse of a higher or lower
amperage rating than specified on the
fuse box cover. This could damage the
electrical system or cause a fire.

If any electrical equipment does not come on,
check for an open fuse.

1. Be sure the ignition switch and the headlight

switch are OFF.

2. Open the engine hood.

3. Remove the fuse box cover by pushing the

tab and lifting the cover up.

4. Remove the fuse with the fuse puller. The

fuse puller is located in the center of the fuse
block in the passenger compartment.

5. If the fuse is open

A

, replace it with a new

fuse

B

.

6. If a new fuse also opens, have the electrical

system checked and repaired by a NISSAN
dealer.

LDI0560

WDI0452

8-22

Maintenance and do-it-yourself

Fusible links

If the electrical equipment does not operate and
fuses are in good condition, check the fusible
links. If any of these fusible links are melted,
replace with only Genuine NISSAN parts.

PASSENGER COMPARTMENT

CAUTION

Never use a fuse of a higher or lower
amperage rating than specified on the
fuse box cover. This could damage the
electrical system or cause a fire.

If any electrical equipment does not operate,
check for an open fuse.

1. Be sure the ignition switch and the headlight

switch are OFF.

2. Pull the fuse box cover to remove.

3. Remove the fuse with the fuse puller.

4. If the fuse is open

A

, replace it with an

equivalent good fuse

B

.

5. Push the fuse box cover to install.

6. If a new fuse also opens, have the electrical

system checked and repaired by a NISSAN
dealer.

WDI0402

Type A

WDI0452

Maintenance and do-it-yourself

8-23

Extended storage switch

If any electrical equipment does not operate,
remove the extended storage switch and check
for an open fuse.

NOTE:

The extended storage switch is used for
long term vehicle storage. Even if the ex-
tended storage switch is broken it is not
necessary to replace it. Replace only the
open fuse in the switch with a new fuse.

How to replace the extended storage switch:

1. To remove the extended storage switch, be

sure the ignition switch is in the OFF or
LOCK position.

2. Be sure the headlight switch is in the OFF

position.

3. Remove the fuse box cover.

4. Pinch the locking tabs

1

found on each

side of the storage switch.

5. Pull the storage switch straight out from the

fuse box

2

.

Type B

LDI0456

LDI2035

8-24

Maintenance and do-it-yourself


Content   ..  20  21  22  23   ..