Nissan Altima Coupe (2013 year). Manual - part 18


  Index      Nissan     Nissan Altima Coupe - service manual 2013 year in english


Search            copyright infringement  


Content   ..  16  17  18  19   ..


Nissan Altima Coupe (2013 year). Manual - part 18


Before starting

To get the best performance from NISSAN Voice
Recognition, observe the following:

● Keep the interior of the vehicle as quiet as

possible. Close the windows to eliminate the
surrounding noises (traffic noises, vibration
sounds, etc.), which may prevent the system
from recognizing the voice commands cor-
rectly.

● When the climate control is in the AUTO

mode, the fan speed decreases automati-
cally for easy recognition.

● Wait until a tone sounds before speaking a

command.

● Speak in a natural voice without pausing

between words.

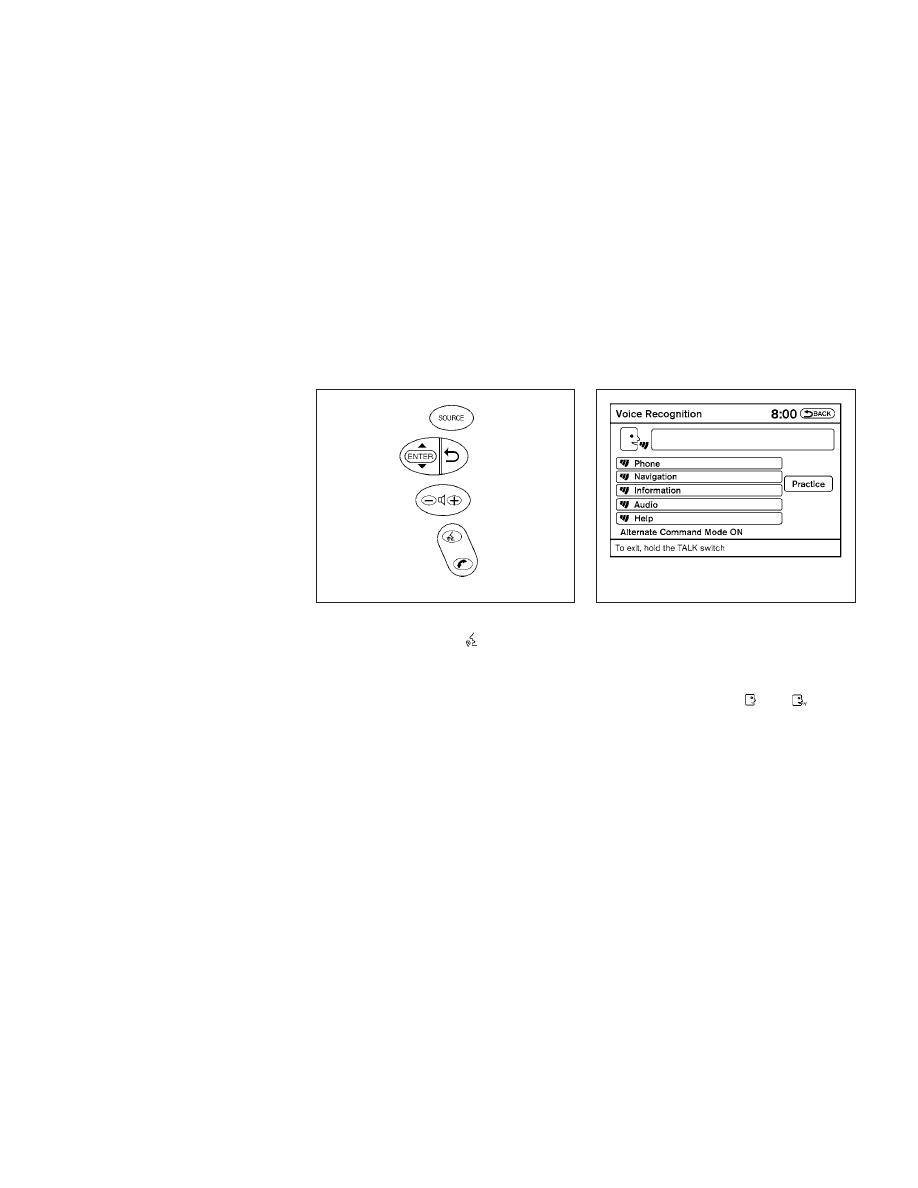
Giving voice commands

1. Press and release the

switch located

on the steering wheel.

2. A list of commands appears on the screen,

and the system announces, “Please say a
command from the displayed list or say Help
to show all commands.”

3. After the tone sounds and the icon on the

screen changes from

to

, speak

a command.

4. Once a command is recognized, the system

will announce the recognized command and
perform the requested action.

If the command is not recognized, the sys-
tem repeats the announcement. Repeat the
command in a clear voice after the tone.

LHA0768

LHA1345

Monitor, climate, audio, phone and voice recognition systems

4-127

Operating tips

● Say a command after the tone. Voice com-

mands cannot be accepted when the icon
is

.

● If the command is not recognized, the sys-

tem repeats the announcement. Repeat the
command in a clear voice.

● Press the

switch on the steering

wheel to return to the previous screen.

● If you want to cancel the command, press

and hold the

switch. The message,

“Voice cancelled” will be announced.

● If you want to adjust the volume of the sys-

tem feedback, push the volume control
switch on the steering wheel or use the
audio system volume knob while the system
is making an announcement.

● To minimize the amount of prompts spoken

by the system in Alternate Command Mode,
use the Minimize Voice Feedback function.
To access the Minimize Voice Feedback
function press the SETTING button, then
select the “Others” key. Then select the
“Voice Recognition” key.

How to speak numbers

Voice Recognition requires a certain way to
speak numbers when giving voice commands.
Refer to the following examples.

General rule:

● Only single digits 0 (zero) to 9 can be used.
● When saying the phone number 800-662-

6200, the system will accept “eight-
hundred” in addition to “eight zero zero” or
“eight oh oh”. 500, 700, and 900 are also
supported.

Examples:

● 1-800-662-6200

– “One eight zero zero six six two six two

zero zero”

– “One eight hundred six six two six two

zero zero”

Improving Recognition of Phone numbers:

You can improve the recognition of phone num-
bers by saying the phone number in three groups
of numbers. For example, when you try to call
800-662-6200, say “eight zero zero” first, and
the system will then ask you for the next three
digits. Then, say “six six two”. After recognition,
the system will then ask for the last four digits.

Say, “six two zero zero”. Using this method of
phone digit entry can improve recognition perfor-
mance.

NOTE:

When speaking a house number, speak the
number “0” as “zero” or “oh”. If the letter
“O” is included in the house number, it will
not be recognized as “0” even if you speak
“oh” instead of “zero”.

Settings menu

The content of the Settings Menu differs when
the system is in the Alternate Command Mode.

Command List:

Displays the command list for Alternate Com-
mand Mode.

User Guide:

The user guide provides basic instructions for
using Voice Recognition and accessing some
voice commands.

NOTE:

The user guide can also be accessed from
within the INFO menu after pressing the
INFO button.

4-128

Monitor, climate, audio, phone and voice recognition systems

Speaker Adaptation:

Starts a system training procedure to learn the
specific sounds of your voice. See “Speaker ad-
aptation function” in this section.

Alternate Command Mode:

For advanced operation, an Alternate Command
Mode is provided. This setting enables control of
the Audio and Climate Control systems in addi-
tion to additional commands for the Phone and
Navigation systems. With this setting active, the
system does not announce or display the avail-
able commands at each step. When this mode is
activated, the Voice Recognition Settings will
change to show more options.

Minimize Voice Feedback:

Reduces the amount of the information spoken
for each voice instruction.

SPEAKER ADAPTATION FUNCTION

The Voice Recognition system has a function to
learn the user’s voice for better voice recognition
performance. The system can memorize the
voices of up to three persons.

Having the system learn the user’s
voice

1. Press the SETTING button on the instru-

ment panel, select the “Others” key on the
display.

2. Select the “Voice Recognition” key.

3. Select the “Speaker Adaptation” key.

4. Select the user whose voice is to be memo-

rized by the system.

LHA1341

LHA1346

Monitor, climate, audio, phone and voice recognition systems

4-129

5. Select a category to be learned by the sys-

tem from the following list:

● Phone
● Navigation
● Information
● Audio
● Help

The voice commands in the category are
displayed.

6. Select a voice command to train.

The Voice Recognition system starts.

7. The system requests that you repeat a com-

mand after a tone. This command is also
displayed on the screen.

8. After the tone sounds and the icon on the

screen changes from

to

, speak

the command that the system requested.

9. When the system has recognized the voice

command, the voice of the user is learned.

Press the

switch or select the “Back” key

to return to the previous screen.

If the system has learned the command correctly,
the voice command indicator on the screen turns
on.

Speaker Adaptation function settings

Edit Name:

Edit the user name using the keypad displayed on
the screen.

Reset Result:

Resets the user’s voice that the Voice Recogni-
tion system has learned.

Continuous Learning:

When this item is turned to ON, you can have the
system learn the voice commands in succession,
without selecting commands one by one.

LHA1347

LHA1349

4-130

Monitor, climate, audio, phone and voice recognition systems

TROUBLESHOOTING GUIDE

The system should respond correctly to all voice
commands without difficulty. If problems are en-
countered, follow the solutions given in this guide
for the appropriate error.

Where the solutions are listed by number, try
each solution in turn, starting with number one,
until the problem is resolved.

Symptom/error message

Solution

Displays “COMMAND NOT RECOG-
NIZED” or the system fails to interpret
the command correctly.

1. Ensure that the command format is valid, see “Standard Mode command list” or “Alternate Command Mode command list” in this

section.

2. Speak clearly using your normal speech pattern and at a level appropriate to the ambient noise level.
3. Ensure that the ambient noise level is not excessive, for example, windows open or defrost on.

NOTE:

If it is too noisy to use the phone, it is likely that voice commands will not be recognized.

The system consistently selects the
wrong voicetag in the phonebook.

1. Ensure that the voicetag requested matches what was originally stored. See “Bluetooth

姞 Hands-Free Phone System with Navigation

System” in this section.

2. Replace one of the voicetags being confused with a different voicetag.

Monitor, climate, audio, phone and voice recognition systems

4-131

MEMO

4-132

Monitor, climate, audio, phone and voice recognition systems

5 Starting and driving

Precautions when starting and driving. . . . . . . . . . . . . . . . 5-2

Exhaust gas (carbon monoxide) . . . . . . . . . . . . . . . . . . 5-2
Three-way catalyst. . . . . . . . . . . . . . . . . . . . . . . . . . . . . . 5-2
Tire Pressure Monitoring System (TPMS). . . . . . . . . . 5-3
Avoiding collision and rollover . . . . . . . . . . . . . . . . . . . . 5-5
Off-road recovery. . . . . . . . . . . . . . . . . . . . . . . . . . . . . . . 5-6
Rapid air pressure loss . . . . . . . . . . . . . . . . . . . . . . . . . . 5-6
Drinking alcohol/drugs and driving. . . . . . . . . . . . . . . . 5-7

Push-Button Ignition Switch . . . . . . . . . . . . . . . . . . . . . . . . 5-7

Push-button ignition switch positions . . . . . . . . . . . . . 5-8
Emergency engine shut off . . . . . . . . . . . . . . . . . . . . . . 5-9
NISSAN Intelligent Key

姞 battery discharge . . . . . . . . 5-9

NISSAN vehicle immobilizer system . . . . . . . . . . . . . 5-10

Before starting the engine . . . . . . . . . . . . . . . . . . . . . . . . . 5-10
Starting the engine . . . . . . . . . . . . . . . . . . . . . . . . . . . . . . . 5-11
Driving the vehicle . . . . . . . . . . . . . . . . . . . . . . . . . . . . . . . . 5-12

Continuously Variable Transmission (CVT) . . . . . . . . 5-12

Parking brake . . . . . . . . . . . . . . . . . . . . . . . . . . . . . . . . . . . . 5-17
Cruise control . . . . . . . . . . . . . . . . . . . . . . . . . . . . . . . . . . . . 5-18

Precautions on cruise control . . . . . . . . . . . . . . . . . . . 5-18
Cruise control operations. . . . . . . . . . . . . . . . . . . . . . . 5-18

Break-in schedule . . . . . . . . . . . . . . . . . . . . . . . . . . . . . . . . 5-19
Increasing fuel economy. . . . . . . . . . . . . . . . . . . . . . . . . . . 5-20
Parking/parking on hills. . . . . . . . . . . . . . . . . . . . . . . . . . . . 5-21
Power steering . . . . . . . . . . . . . . . . . . . . . . . . . . . . . . . . . . . 5-22
Brake system . . . . . . . . . . . . . . . . . . . . . . . . . . . . . . . . . . . . 5-22

Brake precautions . . . . . . . . . . . . . . . . . . . . . . . . . . . . . 5-22
Anti-lock Braking System (ABS). . . . . . . . . . . . . . . . . 5-23

Vehicle Dynamic Control (VDC) system . . . . . . . . . . . . . 5-24
Cold weather driving . . . . . . . . . . . . . . . . . . . . . . . . . . . . . . 5-26

Freeing a frozen door lock . . . . . . . . . . . . . . . . . . . . . . 5-26
Anti-freeze . . . . . . . . . . . . . . . . . . . . . . . . . . . . . . . . . . . . 5-26
Battery . . . . . . . . . . . . . . . . . . . . . . . . . . . . . . . . . . . . . . . 5-26
Draining of coolant water . . . . . . . . . . . . . . . . . . . . . . . 5-26
Tire equipment . . . . . . . . . . . . . . . . . . . . . . . . . . . . . . . . 5-26
Special winter equipment. . . . . . . . . . . . . . . . . . . . . . . 5-26
Driving on snow or ice . . . . . . . . . . . . . . . . . . . . . . . . . 5-26
Engine block heater (if so equipped) . . . . . . . . . . . . . 5-27

WARNING

● Do not leave children or adults who

would normally require the assistance
of others alone in your vehicle. Pets
should also not be left alone. They
could accidentally injure themselves or
others through inadvertent operation of
the vehicle. Also, on hot, sunny days,
temperatures in a closed vehicle could
quickly become high enough to cause
severe or possibly fatal injuries to
people or animals.

● Closely supervise children when they

are around cars to prevent them from
playing and becoming locked in the
trunk where they could be seriously in-
jured. Keep the car locked, with the rear
seatback and trunk lid securely latched
when not in use, and prevent children’s
access to car keys.

EXHAUST GAS (carbon monoxide)

WARNING

● Do not breathe exhaust gases; they

contain colorless and odorless carbon
monoxide. Carbon monoxide is danger-
ous. It can cause unconsciousness or
death.

● If you suspect that exhaust fumes are

entering the vehicle, drive with all win-
dows fully open, and have the vehicle
inspected immediately.

● Do not run the engine in closed spaces

such as a garage.

● Do not park the vehicle with the engine

running for any extended length of time.

● Keep the rear vent windows, lift gates,

doors and trunk lids (if so equipped)
closed while driving, otherwise exhaust
gases could be drawn into the passen-
ger compartment. If you must drive with
one

of

these

open,

follow

these

precautions:

1. Open all the windows.

2. Set the

air recirculation but-

ton to off and the fan control dial to
high to circulate the air.

● If electrical wiring or other cable con-

nections must pass to a trailer through
the seal on the trunk lid or the body,
follow the manufacturer’s recommen-
dation to prevent carbon monoxide en-
try into the vehicle.

● The exhaust system and body should be

inspected

by

a

qualified

mechanic

whenever:

a. The vehicle is raised for service.

b. You suspect that exhaust fumes are

entering

into

the

passenger

compartment.

c. You notice a change in the sound of

the exhaust system.

d. You have had an accident involving

damage to the exhaust system, un-
derbody, or rear of the vehicle.

THREE-WAY CATALYST

The three-way catalyst is an emission control
device installed in the exhaust system. Exhaust
gases in the three-way catalyst are burned at
high temperatures to help reduce pollutants.

WARNING

● The exhaust gas and the exhaust sys-

tem are very hot. Keep people, animals
or flammable materials away from the
exhaust system components.

● Do not stop or park the vehicle over

flammable materials such as dry grass,
waste paper or rags. They may ignite
and cause a fire.

PRECAUTIONS WHEN STARTING
AND DRIVING

5-2

Starting and driving

CAUTION

● Do not use leaded gasoline. Deposits

from leaded gasoline will seriously re-
duce the three-way catalyst’s ability to
help reduce exhaust pollutants.

● Keep your engine tuned up. Malfunc-

tions in the ignition, fuel injection, or
electrical systems can cause overrich
fuel flow into the three-way catalyst,
causing it to overheat. Do not keep driv-
ing if the engine misfires, or if notice-
able loss of performance or other un-
usual

operating

conditions

are

detected. Have the vehicle inspected
promptly by a NISSAN dealer.

● Avoid driving with an extremely low fuel

level. Running out of fuel could cause
the engine to misfire, damaging the
three-way catalyst.

● Do not race the engine while warming it

up.

● Do not push or tow your vehicle to start

the engine.

TIRE PRESSURE MONITORING
SYSTEM (TPMS)

Each tire, including the spare (if provided),
should be checked monthly when cold and in-
flated to the inflation pressure recommended by
the vehicle manufacturer on the vehicle placard
or tire inflation pressure label. (If your vehicle has
tires of a different size than the size indicated on
the vehicle placard or tire inflation pressure label,
you should determine the proper tire inflation
pressure for those tires.)

As an added safety feature, your vehicle has been
equipped with a tire pressure monitoring system
(TPMS) that illuminates a low tire pressure telltale
when one or more of your tires is significantly
under-inflated. Accordingly, when the low tire
pressure telltale illuminates, you should stop and
check your tires as soon as possible, and inflate
them to the proper pressure. Driving on a signifi-
cantly under-inflated tire causes the tire to over-
heat and can lead to tire failure. Under-inflation
also reduces fuel efficiency and tire tread life, and
may affect the vehicle’s handling and stopping
ability.

Please note that the TPMS is not a substitute for
proper tire maintenance, and it is the driver’s
responsibility to maintain correct tire pressure,
even if under-inflation has not reached the level to
trigger illumination of the TPMS low tire pressure
telltale.

Your vehicle has also been equipped with a
TPMS malfunction indicator to indicate when the
system is not operating properly. The TPMS mal-
function indicator is combined with the low tire
pressure telltale. When the system detects a
malfunction, the telltale will flash for approxi-
mately one minute and then remain continuously
illuminated. This sequence will continue upon
subsequent vehicle start-ups as long as the mal-
function exists. When the malfunction indicator is
illuminated, the system may not be able to detect
or signal low tire pressure as intended. TPMS
malfunctions may occur for a variety of reasons,
including the installation of replacement or alter-
nate tires or wheels on the vehicle that prevent
the TPMS from functioning properly. Always
check the TPMS malfunction telltale after replac-
ing one or more tires or wheels on your vehicle to
ensure that the replacement or alternate tires and
wheels allow the TPMS to continue to function
properly.

Starting and driving

5-3

Additional information:

● The TPMS does not monitor the tire

pressure of the spare tire.

● The TPMS will activate only when the vehicle

is driven at speeds above 16 MPH (25
km/h). Also, this system may not detect a
sudden drop in tire pressure (for example a
flat tire while driving).

● The low tire pressure warning light does not

automatically turn off when the tire pressure
is adjusted. After all 4 tires are inflated to the
recommended pressure, the vehicle must be
driven at speeds above 16 MPH (25 km/h)
to activate the TPMS and turn off the low tire
pressure warning light. Use a tire pressure
gauge to check the tire pressure.

● The CHECK TIRE PRESSURE warning ap-

pears in the vehicle information display when
the low tire pressure warning light is illumi-
nated and low tire pressure is detected. The
CHECK TIRE PRESSURE warning turns off
when the low tire pressure warning light
turns off.

● The CHECK TIRE PRESSURE warning

does not appear if the low tire pressure
warning light illuminates to indicate a TPMS
malfunction.

● Tire pressure rises and falls depending on

the heat caused by the vehicle’s operation
and the outside temperature. Low outside
temperature can lower the temperature of
the air inside the tire which can cause a
lower tire inflation pressure. This may cause
the low tire pressure warning light to illumi-
nate. If the warning light illuminates in low
ambient temperature, check the tire pres-
sure for all four tires.

● The Tire and Loading Information label (also

referred to as the vehicle placard or tire
inflation pressure label) is located in the
driver’s door opening.

For additional information, see “Low tire pressure
warning light” in the “Instruments and controls”
section and “Tire Pressure Monitoring System
(TPMS)” in the “In case of emergency” section.

WARNING

● If the low tire pressure warning light

illuminates while driving, avoid sudden
steering maneuvers or abrupt braking,
reduce vehicle speed, pull off the road
to a safe location and stop the vehicle
as soon as possible. Driving with under-
inflated tires may permanently damage
the tires and increase the likelihood of
tire failure. Serious vehicle damage
could occur and may lead to an acci-
dent and could result in serious per-
sonal injury. Check the tire pressure for
all four tires. Adjust the tire pressure to
the recommended COLD tire pressure
shown on the Tire and Loading Informa-
tion label to turn the low tire pressure
warning light OFF. If you have a flat tire,
replace it with a spare tire as soon as
possible. (See “Flat tire” in the “In case
of emergency” section for changing a
flat tire.)

5-4

Starting and driving

● When a spare tire is mounted or a wheel

is replaced, tire pressure will not be
indicated, the TPMS will not function
and the low tire pressure warning light
will flash for approximately 1 minute.
The light will remain on after 1 minute.
Contact your NISSAN dealer as soon as
possible for tire replacement and/or
system resetting.

● Replacing tires with those not originally

specified by NISSAN could affect the
proper operation of the TPMS.

● Do not inject any tire liquid or aerosol

tire sealant into the tires, as this may
cause a malfunction of the tire pressure
sensors.

CAUTION

Do not place metalized film or any metal
parts (antenna, etc.) on the windows. This
may cause poor reception of the signals
from the tire pressure sensors, and the
TPMS will not function properly.

Some devices and transmitters may temporarily
interfere with the operation of the TPMS and
cause the low tire pressure warning light to illu-
minate.

Some examples are:

– Facilities or electric devices using similar radio

frequencies are near the vehicle.

– If a transmitter set to similar frequencies is

being used in or near the vehicle.

– If a computer (or similar equipment) or a

DC/AC converter is being used in or near the
vehicle.

FCC Notice:

For USA:

This device complies with Part 15 of the
FCC Rules. Operation is subject to the fol-
lowing two conditions:

1. This device may not cause harmful in-

terference, and

2. This device must accept any interfer-

ence received, including interference
that may cause undesired operation.
Note: Changes or modification not ex-
pressly approved by the party respon-
sible for compliance could void the us-
er’s

authority

to

operate

the

equipment.

For Canada:

This device complies with RSS-210 of In-
dustry Canada. Operation is subject to the
following two conditions:

1. This device may not cause interfer-

ence, and

2.

This device must accept any interfer-

ence, include interference that may
cause undesired operation of the de-
vice.

AVOIDING COLLISION AND
ROLLOVER

WARNING

Failure to operate this vehicle in a safe
and prudent manner may result in loss of
control or an accident.

Be alert and drive defensively at all times. Obey
all traffic regulations. Avoid excessive speed,
high speed cornering, or sudden steering ma-
neuvers, because these driving practices could
cause you to lose control of your vehicle. As with
any vehicle, loss of control could result in a
collision with other vehicles or objects or
cause the vehicle to roll over, particularly if
the loss of control causes the vehicle to
slide sideways. 
Be attentive at all times, and

Starting and driving

5-5

avoid driving when tired. Never drive when under
the influence of alcohol or drugs (including pre-
scription or over-the-counter drugs which may
cause drowsiness). Always wear your seat belt
as outlined in the “Safety – Seats, seat belts and
supplemental restraint system” section of this
manual, and also instruct your passengers to do
so.

Seat belts help reduce the risk of injury in colli-
sions and rollovers. In a rollover crash, an
unbelted or improperly belted person is
significantly more likely to be injured or
killed than a person properly wearing a
seat belt.

OFF-ROAD RECOVERY

If the right side or left side wheels unintentionally
leave the road surface, maintain control of the
vehicle by following the procedure below. Please
note that this procedure is only a general guide.
The vehicle must be driven as appropriate based
on the conditions of the vehicle, road and traffic.

1. Remain calm and do not overreact.

2. Do not apply the brakes.

3. Maintain a firm grip on the steering wheel

with both hands and try to hold a straight
course.

4. When appropriate, slowly release the accel-

erator pedal to gradually slow the vehicle.

5. If there is nothing in the way, steer the ve-

hicle to follow the road while vehicle speed
is reduced. Do not attempt to drive the ve-
hicle back onto the road surface until vehicle
speed is reduced.

6. When it is safe to do so, gradually turn the

steering wheel until both tires return to the
road surface. When all tires are on the road
surface, steer the vehicle to stay in the ap-
propriate driving lane.

● If you decide that it is not safe to return the

vehicle to the road surface based on vehicle,
road or traffic conditions, gradually slow the
vehicle to a stop in a safe place off the road.

RAPID AIR PRESSURE LOSS

Rapid air pressure loss or a “blow-out” can occur
if the tire is punctured or is damaged due to
hitting a curb or pothole. Rapid air pressure loss
can also be caused by driving on under-inflated
tires.

Rapid air pressure loss can affect the handling
and stability of the vehicle, especially at highway
speeds.

Help prevent rapid air pressure loss by maintain-
ing the correct air pressure and visually inspect

the tires for wear and damage. See “Wheels and
tires” in the “Maintenance and do-it-yourself”
section of this manual. If a tire rapidly loses air
pressure or “blows-out” while driving, maintain
control of the vehicle by following the procedure
below. Please note that this procedure is only a
general guide. The vehicle must be driven as
appropriate based on the conditions of the ve-
hicle, road and traffic.

WARNING

The following actions can increase the
chance of losing control of the vehicle if
there is a sudden loss of tire air pressure.
Losing control of the vehicle may cause a
collision and result in personal injury.

● The vehicle generally moves or pulls in

the direction of the flat tire.

● Do not rapidly apply the brakes.
● Do not rapidly release the accelerator

pedal.

● Do not rapidly turn the steering wheel.

1. Remain calm and do not over react.

2. Maintain a firm grip on the steering wheel

with both hands and try to hold a straight
course.

5-6

Starting and driving

3. When appropriate, slowly release the accel-

erator pedal to gradually slow the vehicle.

4. Gradually steer the vehicle to a safe location

off the road and away from traffic if possible.

5. Lightly apply the brake pedal to gradually

stop the vehicle.

6. Turn on the hazard warning flashers and

either contact a roadside emergency service
to change the tire or see “Changing a flat
tire” in the “In case of emergency” section of
this manual.

DRINKING ALCOHOL/DRUGS AND
DRIVING

WARNING

Never drive under the influence of alcohol
or drugs. Alcohol in the bloodstream re-
duces coordination, delays reaction time
and

impairs

judgement.

Driving

after

drinking alcohol increases the likelihood
of being involved in an accident injuring
yourself and others. Additionally, if you
are injured in an accident, alcohol can
increase the severity of the injury.

NISSAN is committed to safe driving. However,
you must choose not to drive under the influence
of alcohol. Every year thousands of people are
injured or killed in alcohol-related accidents. Al-
though the local laws vary on what is considered
to be legally intoxicated, the fact is that alcohol
affects all people differently and most people
underestimate the effects of alcohol.

Remember, drinking and driving don’t mix! And
that is true for drugs, too (over-the-counter, pre-
scription, and illegal drugs). Don’t drive if your
ability to operate your vehicle is impaired by alco-
hol, drugs, or some other physical condition.

WARNING

Do not operate the push-button ignition
switch while driving the vehicle except in
an emergency. (The engine will stop when
the ignition switch is pushed 3 consecu-
tive times in quick succession or the igni-
tion switch is pushed and held for more
than 2 seconds.) If the engine stops while
the vehicle is being driven, this could lead
to a crash and serious injury.

PUSH-BUTTON IGNITION SWITCH

Starting and driving

5-7

When the ignition switch is pushed without de-
pressing the brake pedal, the ignition switch po-
sition will illuminate as follows:

Push the ignition switch center:

● once to change to ACC.
● two times to change to ON.
● three times to return to OFF.

The ignition switch will automatically return to the
LOCK position when any door is either opened or
closed with the switch in the OFF position.

The ignition lock is designed so that the ignition
switch position cannot be switched to OFF until
the shift selector is moved to the P (Park) posi-
tion.

When the ignition switch cannot be pushed to-
ward the OFF position, proceed as follows:

1. Move the shift selector into the P (Park)

position.

2. Push the ignition switch. The ignition switch

position will change to the ON position.

3. Push the ignition switch again to the OFF

position.

The shift selector can be moved from the P
(Park) position if the ignition switch is in
the ON position and the brake pedal is
depressed.

If the battery of the vehicle is discharged,
the push-button ignition switch cannot be
moved from the LOCK position.

Some indicators and warnings for operation are
displayed on the vehicle information display. See
“Vehicle information display” in the “Instruments
and controls” section of this manual.

PUSH-BUTTON IGNITION SWITCH
POSITIONS

LOCK (Normal parking position):

The ignition switch can only be locked in this
position.

The ignition switch will be unlocked when it is
pushed to the ACC position while carrying the
Intelligent Key or with the Intelligent Key inserted
in the port.

The ignition switch will lock when any door is
opened or closed with the ignition switched off.

OFF:

The ignition switch is in the OFF position when
the engine is turned off using the ignition switch.
No lights will illuminate on the ignition switch.

ACC (Accessories):

This position activates electrical accessories,
such as the radio, when the engine is not running.

ACC has a battery saver feature that will turn the
ignition switch to the OFF position after 30 min-
utes under the following conditions:

● all doors are closed.
● shift selector is in P (Park).

LSD2000

5-8

Starting and driving

The battery saver feature will be cancelled if any
of the following occur:

● any door is opened.
● shift selector is moved out of the P (Park).
● ignition switch changes position.

ON (Normal operating position):

This position turns on the ignition system and
electrical accessories.

CAUTION

Do not leave the vehicle with the ignition
switch in ACC or ON positions when the
engine is not running for an extended pe-
riod. This can discharge the battery.

EMERGENCY ENGINE SHUT OFF

To shut off the engine in an emergency situation
while driving, perform the following procedure:

– Rapidly push the push-button ignition switch 3

consecutive times in less than 1.5 seconds, or

– Push and hold the push-button ignition switch

for more than 2 seconds.

NISSAN INTELLIGENT KEY

BATTERY DISCHARGE

If the battery of the Intelligent Key is almost dis-
charged, the guide light

A

of the Intelligent Key

port blinks and the indicator appears on the ve-
hicle information display. See “Vehicle informa-
tion display” in the “Instruments and controls”
section.

In this case, inserting the Intelligent Key into the
port

B

allows you to start the engine. Make sure

the Intelligent Key is placed in the correct direc-
tion: The front side faces upward and the key ring
side faces downward as illustrated.

To remove the Intelligent Key from the port, push
the ignition switch to the LOCK position and pull
the Intelligent Key out of the port

C

.

NOTE:

The Intelligent Key port does not charge
the Intelligent Key battery. If you see the
low battery indicator, replace the battery as
soon as possible. See “Battery replace-
ment” in the “Maintenance and do-it-
yourself” section.

WSD0232

WSD0233

Starting and driving

5-9

CAUTION

● Never place anything except the Intelli-

gent Key in the Intelligent Key port. Do-
ing so may cause damage to the
equipment.

● Make sure the Intelligent Key is in the

correct direction when inserting it to
the Intelligent Key port. The engine may
not start if it is in the wrong direction.

● Remove the Intelligent Key from the

Intelligent Key port after the ignition
switch is pushed to the LOCK position.

NISSAN VEHICLE IMMOBILIZER
SYSTEM

The NISSAN Vehicle Immobilizer system will not
allow the engine to start without the use of the
registered key.

If the engine fails to start using a registered key
(for example, when interference is caused by
another registered key, an automated toll road
device or automatic payment device on the key
ring), restart the engine using the following pro-
cedure:

1. Leave the ignition switch in the ON position

for approximately 5 seconds.

2. Place the ignition switch in the OFF or

LOCK position, and wait approximately 10
seconds.

3. Repeat steps 1 and 2.

4. Restart the engine while holding the device

(which may have caused the interference)
separate from the registered key.

If the no start condition re-occurs, NISSAN rec-
ommends placing the registered key on a sepa-
rate key ring to avoid interference from other
devices.

● Make sure the area around the vehicle is

clear.

● Check fluid levels such as engine oil, cool-

ant, brake fluid, and windshield-washer fluid
as frequently as possible, or at least when-
ever you refuel.

● Check that all windows and lights are clean.
● Visually inspect tires for their appearance

and condition. Also check tires for proper
inflation.

● Lock all doors.
● Position seat and adjust head restraints.
● Adjust inside and outside mirrors.
● Fasten seat belts and ask all passengers to

do likewise.

● Check the operation of warning lights when

the ignition switch is pushed to the ON
position. See “Warning/indicator lights and
audible reminders” in the “Instruments and
controls” section of this manual.

BEFORE STARTING THE ENGINE

5-10

Starting and driving


Content   ..  16  17  18  19   ..