Nissan Pathfinder (2011 year). Instruction - part 484
 

  Index      Instructions     Nissan Pathfinder (2011 year) - Service and Repair Instruction


Search            copyright infringement  


Content      ..     482      483      484      485     ..


Nissan Pathfinder (2011 year). Instruction - part 484


LAN

STRG BRANCH LINE CIRCUIT

LAN-85

< DTC/CIRCUIT DIAGNOSIS >

[CAN]

C

D

E

F

G

H

I

J

K

L

B

A

O

P

N

STRG BRANCH LINE CIRCUIT

Diagnosis Procedure

INFOID:0000000006247806

1.

CHECK CONNECTOR

1. Turn the ignition switch OFF.

2. Disconnect the battery cable from the negative terminal.

3. Check the terminals and connectors of the steering angle sensor for damage, bend and loose connection

(unit side and connector side).

Is the inspection result normal?

YES

>> GO TO 2.

NO

>> Repair the terminal and connector.

2.

CHECK HARNESS FOR OPEN CIRCUIT

1. Disconnect the connector of steering angle sensor.

2. Check the resistance between the steering angle sensor harness connector terminals.

Is the measurement value within the specification?

YES

>> GO TO 3.

NO

>> Repair the steering angle sensor branch line.

3.

CHECK POWER SUPPLY AND GROUND CIRCUIT

Check the power supply and the ground circuit of the steering angle sensor. Refer to the following.

• VQ40DE: 

BRC-88, "Wiring Diagram - With VQ40DE"

• VK56DE: 

BRC-207, "Wiring Diagram - With VK56DE"

Is the inspection result normal?

YES (Present error)>>Replace the steering angle sensor. Refer to 

BRC-233, "Removal and Installation"

.

YES (Past error)>>Error was detected in the steering angle sensor branch line.

NO

>> Repair the power supply and the ground circuit.

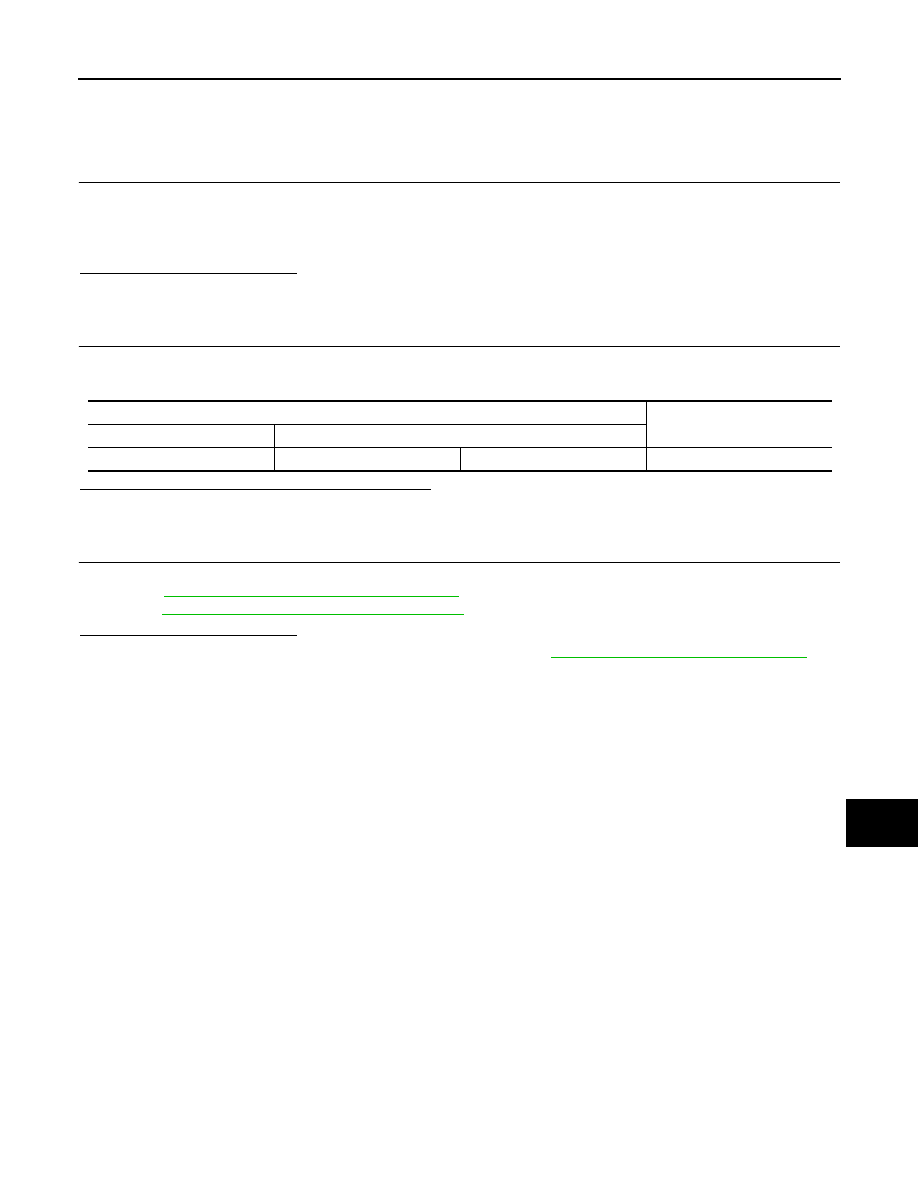
Steering angle sensor harness connector

Resistance (

)

Connector No.

Terminal No.

M47

4

5

Approx. 54 – 66

2011 Pathfinder

LAN-86

< DTC/CIRCUIT DIAGNOSIS >

[CAN]

ABS BRANCH LINE CIRCUIT

ABS BRANCH LINE CIRCUIT

Diagnosis Procedure

INFOID:0000000006247807

1.

CHECK CONNECTOR

1. Turn the ignition switch OFF.

2. Disconnect the battery cable from the negative terminal.

3. Check the terminals and connectors of the ABS actuator and electric unit (control unit) for damage, bend

and loose connection (unit side and connector side).

Is the inspection result normal?

YES

>> GO TO 2.

NO

>> Repair the terminal and connector.

2.

CHECK HARNESS FOR OPEN CIRCUIT

1. Disconnect the connector of ABS actuator and electric unit (control unit).

2. Check the resistance between the ABS actuator and electric unit (control unit) harness connector termi-

nals.

-

VQ engine models

-

VK engine models

Is the measurement value within the specification?

YES

>> GO TO 3.

NO

>> Repair the ABS actuator and electric unit (control unit) branch line.

3.

CHECK POWER SUPPLY AND GROUND CIRCUIT

Check the power supply and the ground circuit of the ABS actuator and electric unit (control unit). Refer to the

following.

• VQ40DE: 

BRC-40, "Diagnosis Procedure"

• VK56DE: 

BRC-150, "Diagnosis Procedure"

Is the inspection result normal?

YES (Present error)>>Replace the ABS actuator and electric unit (control unit). Refer to 

BRC-231, "Removal

and Installation"

.

YES (Past error)>>Error was detected in the ABS actuator and electric unit (control unit) branch line.

NO

>> Repair the power supply and the ground circuit.

ABS actuator and electric unit (control unit) harness connector

Resistance (

)

Connector No.

Terminal No.

E125

12

13

Approx. 54 – 66

ABS actuator and electric unit (control unit) harness connector

Resistance (

)

Connector No.

Terminal No.

E127

11

15

Approx. 54 – 66

2011 Pathfinder

LAN

IPDM-E BRANCH LINE CIRCUIT

LAN-87

< DTC/CIRCUIT DIAGNOSIS >

[CAN]

C

D

E

F

G

H

I

J

K

L

B

A

O

P

N

IPDM-E BRANCH LINE CIRCUIT

Diagnosis Procedure

INFOID:0000000006247808

1.

CHECK CONNECTOR

1. Turn the ignition switch OFF.

2. Disconnect the battery cable from the negative terminal.

3. Check the terminals and connectors of the IPDM E/R for damage, bend and loose connection (unit side

and connector side).

Is the inspection result normal?

YES

>> GO TO 2.

NO

>> Repair the terminal and connector.

2.

CHECK HARNESS FOR OPEN CIRCUIT

1. Disconnect the connector of IPDM E/R.

2. Check the resistance between the IPDM E/R harness connector terminals.

Is the measurement value within the specification?

YES

>> GO TO 3.

NO

>> Repair the IPDM E/R branch line.

3.

CHECK POWER SUPPLY AND GROUND CIRCUIT

Check the power supply and the ground circuit of the IPDM E/R. Refer to 

PCS-14, "Diagnosis Procedure"

.

Is the inspection result normal?

YES (Present error)>>Replace the IPDM E/R. Refer to 

PCS-29, "Removal and Installation of IPDM E/R"

.

YES (Past error)>>Error was detected in the IPDM E/R branch line.

NO

>> Repair the power supply and the ground circuit.

IPDM E/R harness connector

Resistance (

)

Connector No.

Terminal No.

E122

39

40

Approx. 108 – 132

2011 Pathfinder

LAN-88

< DTC/CIRCUIT DIAGNOSIS >

[CAN]

CAN COMMUNICATION CIRCUIT

CAN COMMUNICATION CIRCUIT

Diagnosis Procedure

INFOID:0000000006247809

1.

CONNECTOR INSPECTION

1. Turn the ignition switch OFF.

2. Disconnect the battery cable from the negative terminal.

3. Disconnect all the unit connectors on CAN communication system.

4. Check terminals and connectors for damage, bend and loose connection.
Is the inspection result normal?

YES

>> GO TO 2.

NO

>> Repair the terminal and connector.

2.

CHECK HARNESS CONTINUITY (SHORT CIRCUIT)

Check the continuity between the data link connector terminals.

Is the inspection result normal?

YES

>> GO TO 3.

NO

>> Check the harness and repair the root cause.

3.

CHECK HARNESS CONTINUITY (SHORT CIRCUIT)

Check the continuity between the data link connector and the ground.

Is the inspection result normal?

YES

>> GO TO 4.

NO

>> Check the harness and repair the root cause.

4.

CHECK ECM AND IPDM E/R TERMINATION CIRCUIT

1. Remove the ECM and the IPDM E/R.

2. Check the resistance between the ECM terminals.

3. Check the resistance between the IPDM E/R terminals.

Is the measurement value within the specification?

YES

>> GO TO 5.

NO

>> Replace the ECM and/or the IPDM E/R.

5.

CHECK SYMPTOM

Connect all the connectors. Check if the symptoms described in the “Symptom (Results from interview with

customer)” are reproduced. 

Data link connector

Continuity

Connector No.

Terminal No.

M22

6

14

Not existed

Data link connector

Ground

Continuity

Connector No.

Terminal No.

M22

6

Not existed

14

Not existed

ECM

Resistance (

)

Terminal No.

94

86

Approx. 108 – 132

IPDM E/R

Resistance (

)

Terminal No.

39

40

Approx. 108 – 132

LKIA0037E

2011 Pathfinder

LAN

CAN COMMUNICATION CIRCUIT

LAN-89

< DTC/CIRCUIT DIAGNOSIS >

[CAN]

C

D

E

F

G

H

I

J

K

L

B

A

O

P

N

Inspection result

Reproduced>>GO TO 6.

Non-reproduced>>Start the diagnosis again. Follow the trouble diagnosis procedure when past error is

detected.

6.

CHECK UNIT REPRODUCTION

Perform the reproduction test as per the following procedure for each unit.

1. Turn the ignition switch OFF.

2. Disconnect the battery cable from the negative terminal.

3. Disconnect one of the unit connectors of CAN communication system.

NOTE:

ECM and IPDM E/R have a termination circuit. Check other units first.

4. Connect the battery cable to the negative terminal. Check if the symptoms described in the “Symptom

(Results from interview with customer)” are reproduced. 

NOTE:

Although unit-related error symptoms occur, do not confuse them with other symptoms. 

Inspection result

Reproduced>>Connect the connector. Check other units as per the above procedure.

Non-reproduced>>Replace the unit whose connector was disconnected.

2011 Pathfinder

MA-1

MAINTENANCE

C

D

E

F

G

H

I

J

K

L

M

B

MA

SECTION 

MA

N

O

A

CONTENTS

MAINTENANCE

PRECAUTION ...............................................

4

PRECAUTIONS ...................................................

4

Precaution for Supplemental Restraint System 
(SRS) "AIR BAG" and "SEAT BELT PRE-TEN-
SIONER" .................................................................
..

4

Precaution Necessary for Steering Wheel Rota-
tion After Battery Disconnect ...................................
..

4

PREPARATION ............................................

6

PREPARATION ...................................................

6

Special Service Tool  .................................................

6

Commercial Service Tool  ..........................................

6

PERIODIC MAINTENANCE ..........................

7

GENERAL MAINTENANCE ................................

7

FOR USA AND CANADA ............................................

7

FOR USA AND CANADA : General Maintenance ......

7

FOR MEXICO  ..............................................................

9

FOR MEXICO : General Maintenance  ......................

9

PERIODIC MAINTENANCE  ...............................

11

FOR USA AND CANADA ..........................................

11

FOR USA AND CANADA : Introduction to Periodic 
Maintenance ............................................................

11

FOR USA AND CANADA : Periodic Maintenance 
Schedule 1  ..............................................................

11

FOR USA AND CANADA : Periodic Maintenance 
Schedule 2  ..............................................................

14

FOR MEXICO  ............................................................

15

FOR MEXICO : Periodic Maintenance Schedule ....

15

RECOMMENDED FLUIDS AND LUBRI-
CANTS ................................................................

18

FOR USA AND CANADA ..........................................

18

FOR USA AND CANADA : Fluids and Lubricants ....

18

FOR USA AND CANADA : SAE Viscosity Number 

....

19

FOR USA AND CANADA : Anti-Freeze Coolant 
Mixture Ratio  ...........................................................

19

FOR MEXICO .............................................................

20

FOR MEXICO : Fluids and Lubricants .....................

20

FOR MEXICO : SAE Viscosity Number ...................

20

FOR MEXICO : Engine Coolant Mixture Ratio  ........

21

ENGINE MAINTENANCE (VQ40DE) ................

23

DRIVE BELTS ............................................................

23

DRIVE BELTS : Exploded View  ..............................

23

DRIVE BELTS : Checking Drive Belts .....................

23

ENGINE COOLANT  ...................................................

23

ENGINE COOLANT : System Inspection  ................

23

ENGINE COOLANT : Changing Engine Coolant ....

24

FUEL LINES ...............................................................

27

FUEL LINES : Checking Fuel Line  ..........................

27

FUEL FILTER .............................................................

27

FUEL FILTER : Changing Fuel Filter .......................

27

AIR CLEANER FILTER  .............................................

27

AIR CLEANER FILTER : Exploded View  ................

28

AIR CLEANER FILTER : Removal and Installation 

....

28

ENGINE OIL ...............................................................

28

ENGINE OIL : Inspection .........................................

28

ENGINE OIL : Changing Engine Oil  ........................

28

OIL FILTER  ................................................................

29

OIL FILTER : Removal and Installation ...................

29

SPARK PLUG  ............................................................

30

SPARK PLUG : Exploded View ...............................

31

SPARK PLUG : Removal and Installation  ...............

31

EVAP VAPOR LINES  ................................................

32

2011 Pathfinder

MA-2

EVAP VAPOR LINES : Checking EVAP Vapor 
Line ........................................................................
.

32

ENGINE MAINTENANCE (VK56DE) .................

33

DRIVE BELTS  ...........................................................

33

DRIVE BELTS : Exploded View  .............................

33

DRIVE BELTS : Checking Drive Belts  ....................

33

ENGINE COOLANT  ..................................................

33

ENGINE COOLANT : System Inspection  ...............

33

ENGINE COOLANT : Changing Engine Coolant ...

34

FUEL LINES ..............................................................

37

FUEL LINES : Checking Fuel Line  .........................

37

FUEL FILTER ............................................................

37

FUEL FILTER : Changing Fuel Filter ......................

37

AIR CLEANER FILTER .............................................

37

AIR CLEANER FILTER : Exploded View  ...............

37

AIR CLEANER FILTER : Removal and Installation 

...

38

ENGINE OIL  ..............................................................

38

ENGINE OIL : Inspection ........................................

38

ENGINE OIL : Changing Engine Oil  .......................

38

OIL FILTER  ...............................................................

39

OIL FILTER : Removal and Installation  ..................

39

SPARK PLUG  ...........................................................

40

SPARK PLUG : Exploded View ..............................

40

SPARK PLUG : Removal and Installation ..............

40

EVAP VAPOR LINES ................................................

41

EVAP VAPOR LINES : Checking EVAP Vapor 
Line ........................................................................
.

41

CHASSIS AND BODY MAINTENANCE ............

42

IN-CABIN MICROFILTER  .........................................

42

IN-CABIN MICROFILTER : Removal and Installa-
tion .........................................................................
.

42

EXHAUST SYSTEM ..................................................

42

EXHAUST SYSTEM : Checking the Exhaust Sys-
tem .........................................................................
.

43

A/T FLUID  .................................................................

43

A/T FLUID : Checking the A/T Fluid (ATF)  .............

43

A/T FLUID : Changing the A/T Fluid (ATF) .............

45

TRANSFER FLUID ....................................................

46

TRANSFER FLUID : ATX14B  ................................

46

TRANSFER FLUID : Inspection  .............................

46

TRANSFER FLUID : Replacement .........................

46

TRANSFER FLUID : TX15B  ...................................

47

TRANSFER FLUID : Inspection  .............................

47

TRANSFER FLUID : Replacement .........................

47

PROPELLER SHAFT ................................................

48

PROPELLER SHAFT : Checking Propeller Shaft ...

48

DIFFERENTIAL GEAR OIL .......................................

48

DIFFERENTIAL GEAR OIL : Front Final Drive 
R180A .....................................................................

48

DIFFERENTIAL GEAR OIL : Checking Differential 
Gear Oil ...................................................................

48

DIFFERENTIAL GEAR OIL : Changing Differen-
tial Gear Oil  .............................................................

48

DIFFERENTIAL GEAR OIL : Front Final Drive 
M205 .......................................................................

49

DIFFERENTIAL GEAR OIL : Checking Differential 
Gear Oil ...................................................................

49

DIFFERENTIAL GEAR OIL : Changing Differen-
tial Gear Oil  .............................................................

49

DIFFERENTIAL GEAR OIL : Rear Final Drive 
R200 .......................................................................

50

DIFFERENTIAL GEAR OIL : Checking Differential 
Gear Oil ...................................................................

50

DIFFERENTIAL GEAR OIL : Changing Differen-
tial Gear Oil  .............................................................

50

DIFFERENTIAL GEAR OIL : Rear Final Drive 
R230 .......................................................................

51

DIFFERENTIAL GEAR OIL : Checking Differential 
Gear Oil ...................................................................

51

DIFFERENTIAL GEAR OIL : Changing Differen-
tial Gear Oil  .............................................................

51

WHEELS ....................................................................

52

WHEELS : Adjustment ............................................

52

BRAKE FLUID LEVEL AND LEAKS  ........................

54

BRAKE FLUID LEVEL AND LEAKS : Checking 
Brake Fluid Level and Leaks ...................................

54

BRAKE FLUID LEVEL AND LEAKS : Drain and 
Refill ........................................................................

54

BRAKE LINES AND CABLES  ..................................

54

BRAKE LINES AND CABLES : Checking Brake 
Line and Cables  ......................................................

55

DISC BRAKE .............................................................

55

DISC BRAKE : Checking Disc Brake ......................

55

STEERING GEAR AND LINKAGE  ...........................

55

STEERING GEAR AND LINKAGE : Checking 
Steering Gear and Linkage  .....................................

56

POWER STEERING FLUID AND LINES  ..................

56

POWER STEERING FLUID AND LINES : Check-
ing Fluid Level .........................................................

56

POWER STEERING FLUID AND LINES : Check-
ing Fluid Leakage ....................................................

56

AXLE AND SUSPENSION PARTS ...........................

56

AXLE AND SUSPENSION PARTS : Checking 
Axle and Suspension Parts .....................................

57

LOCKS, HINGES AND HOOD LATCH .....................

57

LOCKS, HINGES AND HOOD LATCH : Lubricat-
ing Locks, Hinges and Hood Latches  .....................

58

SEAT BELT, BUCKLES, RETRACTORS, AN-
CHORS AND ADJUSTERS  ......................................

58

2011 Pathfinder


Content      ..     482      483      484      485     ..