Nissan X-Trail 32. Instruction - part 1473


  Главная      Nissan     Nissan X-Trail 32 - Instruction


поиск по сайту           правообладателям


содержание   ..  1471  1472  1473  1474   ..


Nissan X-Trail 32. Instruction - part 1473


HEADLINING

INT-37

< REMOVAL AND INSTALLATION >

C

D

E

F

G

H

I

K

L

M

A

B

INT

N

O

P

*1

: With rain sensor without front camera unit

*2

: With front camera unit

Removal and Installation

INFOID:0000000010730560

CAUTION:

Never damage the roof panel.

REMOVAL

1.

Remove front body side welt (LH and RH) and rear body side welt (LH and RH). Refer to 

INT-27, "BODY

SIDE WELT : Removal and Installation"

.

2.

Remove front pillar garnish (LH and RH). Refer to 

INT-23, "FRONT PILLAR GARNISH : Removal and

Installation"

.

3.

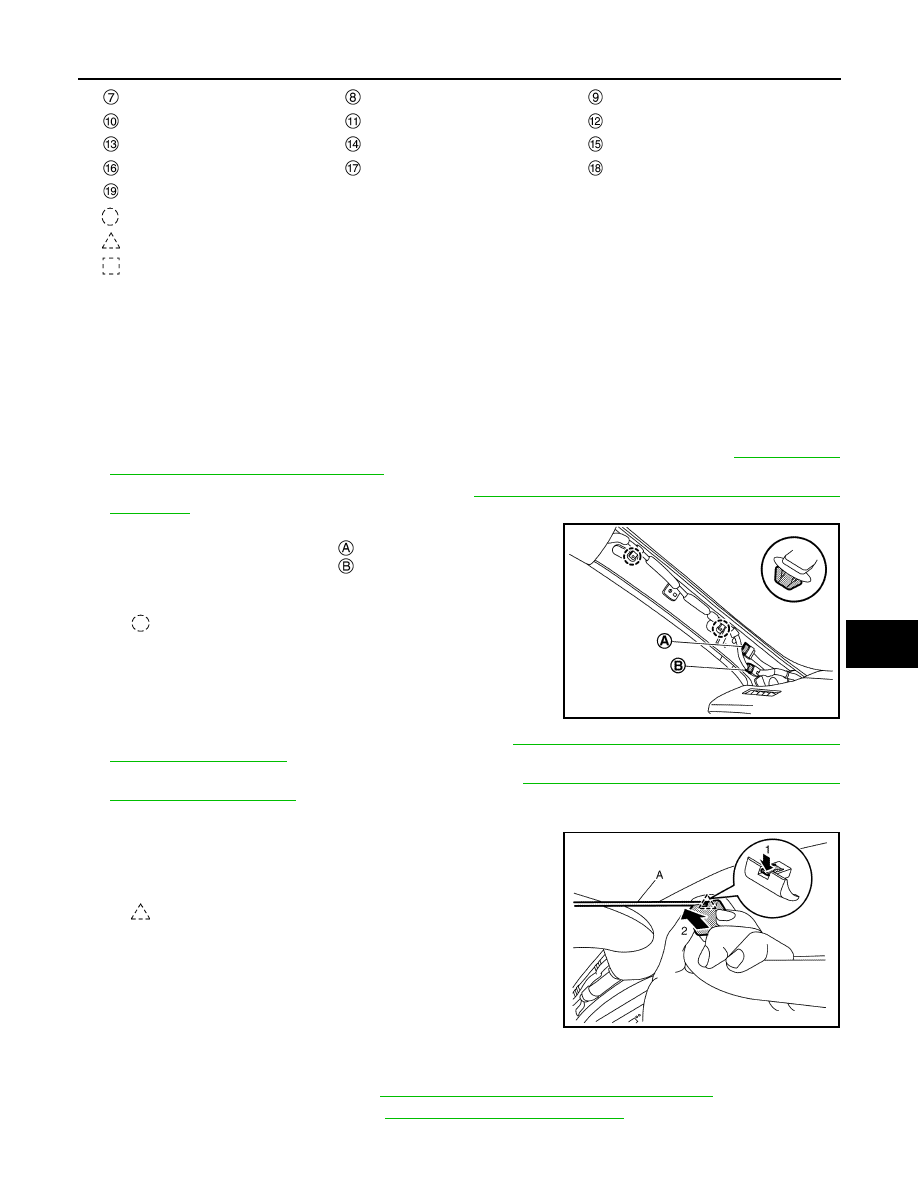
Remove the following parts of front pillar LH.
• Disconnect harness connector 

.

• Disconnect harness connector 

.

• Disengage harness fixing clips.

4.

Remove center pillar upper garnish (LH and RH). Refer to 

INT-28, "CENTER PILLAR UPPER GARNISH :

Removal and Installation"

.

5.

Remove luggage side upper finisher (LH and RH). Refer to 

INT-45, "LUGGAGE SIDE UPPER FINISHER

: Removal and Installation"

.

6.

Remove all assist grips.

a.

Disengage assist grip cap fixing pawl using a remover tool (A),
and then remove assist grip cap according to numerical order
1

2 indicated by arrows in the figure.

b.

Pull assist grip forward and remove it.

c.

Remove assist grip fixing metal clips remaining on the roof panel.

7.

Remove map lamp assembly. Refer to 

INL-76, "MAP LAMP : Removal and Installation"

.

8.

Remove room lamp assembly. Refer to 

INL-84, "Removal and Installation"

 (normal roof models).

Map lamp assembly

Rain sensor cover

*1

Sun visor assembly RH

Sun visor cover RH

Sun visor holder RH

Camera/sensor cover RH

*2

Camera/sensor cover LH

*2

Sun visor assembly LH

Sun visor holder LH

Sun visor cover LH

Rear assist grip LH

Assist grip cap

Metal clip

: Clip

: Pawl

: Metal clip

: Clip

JMJIA9637ZZ

: Pawl

JMJIA8937ZZ

INT-38

< REMOVAL AND INSTALLATION >

HEADLINING

9.

Remove rain sensor cover. Refer to 

WW-109, "Removal and Installation"

 (with rain sensor without front

camera).

10. Remove camera/sensor cover (LH and RH). Refer to 

DAS-149, "Removal and Installation"

 (with front

camera).

11. Remove sun visor assembly (LH and RH).
a.

Disengage sun visor cover fixing pawls using a remover tool (A),
and then remove sun visor cover (LH and RH).

b.

Remove sun visor assembly fixing screws.

c.

Disconnect vanity mirror lamp harness connector, and then remove sun visor assembly (LH and RH).

12. Remove sun visor holder (LH and RH) using a remover tool (A)

according to numerical order 1

2 indicated by arrows as shown

in the figure.

13. Remove headlining assembly rear end fixing clips 

.

14. Peel off dual-lock fasteners 

 between headlining assembly and roof panel (sunroof models).

CAUTION:

Never bend headlining when removing.
• Front side

: Pawl

JMJIA4399ZZ

JMJIA9251ZZ

JMJIA9638ZZ

: Vehicle front

JMJIA9639ZZ

HEADLINING

INT-39

< REMOVAL AND INSTALLATION >

C

D

E

F

G

H

I

K

L

M

A

B

INT

N

O

P

• Rear side

15. Remove headlining assembly from back door according to direc-

tion indicated by the arrow as shown in the figure.

CAUTION:

• Two workers are required for removal in order to prevent

damage.

• Apply protective tape to the portion where contact may

occur during work.

• Never bend headlining when removing.

16. Remove assist grip bracket mounting bolts 

, and then remove

assist grip bracket (sunroof models).

17. Remove personal lamp assembly after removing headlining assembly. Refer to 

INL-87, "Removal and

Installation"

.

INSTALLATION

Note the following items, and then install in the reverse order of removal.

CAUTION:

• Never bend headlining when installing.
• Be careful that the headlining surface is not wrinkled when installing.
• When installing assist grip, install metal clip 

 to assist grip

cap 

, and then install to the body panel.

: Vehicle front

JMJIA9640ZZ

JMJIA9641ZZ

JMJIA9610ZZ

JMJIA3623ZZ

INT-40

< REMOVAL AND INSTALLATION >

LUGGAGE TRIM

LUGGAGE TRIM

Exploded View

INFOID:0000000010730561

Tonneau cover assembly

Luggage side upper finisher LH

Luggage side lower finisher LH

Front luggage side finisher bracket 

LH

*1

Rear luggage side finisher bracket 

LH

*1

Luggage floor carpet

*2

Rear luggage floor board LH

*1

Rear luggage floor board center

*1

Luggage rear plate mask

Luggage rear plate

Rear luggage floor board RH

*1

Luggage side lower finisher RH

Rear luggage side finisher bracket 

RH

*1

Front luggage side finisher bracket 

RH

*1

Luggage side upper finisher RH

Rope hook

Front luggage floor board

*1

Luggage side finisher lid LH

Luggage trim cap

*1

Luggage room lamp

Rear luggage floor board RH

*3

Rear luggage floor board center

*3

Rear luggage floor board LH

*3

Luggage floor carpet

*3

Luggage floor carpet

*4

JMJIB0201ZZ


содержание   ..  1471  1472  1473  1474   ..