Content .. 1974 1975 1976 1977 ..
Nissan Qashqai J11. Instruction - part 1976
CHG
ALTERNATOR
CHG-51
< REMOVAL AND INSTALLATION >
[TYPE 2]
C
D
E
F
G
H
I
J
K
L
B
A
O
P
N
REMOVAL AND INSTALLATION
ALTERNATOR
HRA2DDT
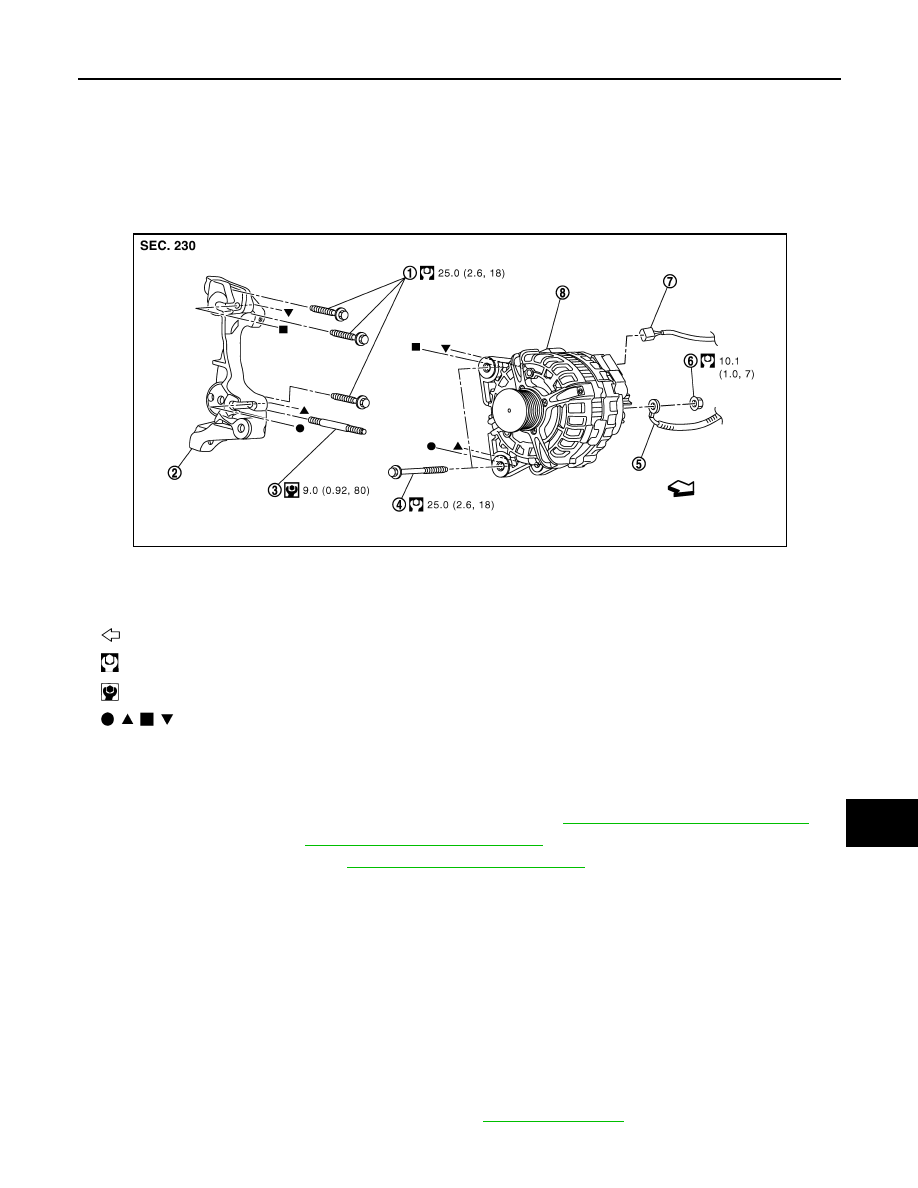
HRA2DDT : Exploded View
INFOID:0000000010671030
HRA2DDT : Removal and Installation
INFOID:0000000010671031
REMOVAL
1.
Disconnect the battery cable from the negative terminal. Refer to
PG-155, "Removal and Installation"
2.
Remove drive belt. Refer to
EM-16, "Removal and Installation"
.
3.
Remove intake manifold. Refer to
EM-25, "Removal and Installation"
4.
Disconnect alternator connector.
5.
Remove “B” terminal nut and disconnect “B” terminal harness.
6.
Remove upper alternator mounting bolt and alternator lower mounting bolt.
7.
Remove alternator upward from the vehicle.
INSTALLATION
Note the following items, and then install in the reverse order of removal.
CAUTION:
• Temporarily tighten the alternator bolts in order from the upper to the lower, and then tighten them in
order from the upper to the lower.
For the alternator, the front side (pulley side) surface is the reference surface. Fit the reference sur-
face to the alternator mounting part, and then tighten the bolts.
• Be careful to tighten “B” terminal nut to the specified torque.
• Install alternator, and check tension of belt. Refer to
NOTE:
1.
Alternator bracket mounting bolt
2.
Alternator bracket
3.
Stud bolt
4.
Alternator mounting bolt
5.
“B” terminal harness
6.
“B” terminal nut
7.
Alternator connector
8.
Alternator
: Vehicle front
: N·m (kg-m, ft-lb)
: N·m (kg-m, in-lb)
,
,
,
: Indicates that the part is connected at points with same symbol in actual vehicle.
JMMIA1619GB