Mazda CX-7 (2012 year). Manual - part 15


  Index      Mazda     Mazda CX-7 - service manual 2012 year in english


Search            


Content   ..  13  14  15  16   ..


Mazda CX-7 (2012 year). Manual - part 15


Black plate (232,1)

NOTE

l

Switching the auto-wiper lever from the
OFF to the AUTO position while driving at
a vehicle speed of 4 km/h (2 mph) or higher
(or after driving the vehicle) activates the
windshield wipers once, after which they
operate according to the rainfall amount.

l

The auto-wiper control may not operate
when the rain sensor temperature is about

_

10 °C (14 °F) or lower, or about 85 °C

(185 °F) or higher.

l

If the windshield is coated with water
repellent, the rain sensor may not be able to
sense the amount of rainfall correctly and
auto-wiper control may not operate
properly.

l

If dirt or foreign matter (Such as ice or
matter containing salt water) adheres to the
windshield above the rain sensor or if the
windshield is iced, it could cause the wipers
to move automatically. However, if the
wipers cannot remove this ice, dirt or
foreign matter, the auto-wiper control will
stop operation. In this case, set the wiper
lever to the low speed position or high
speed position for manual operation, or
remove the ice, dirt or foreign matter by
hand to restore the auto-wiper operation.

l

If the auto-wiper lever is left in the AUTO
position, the wipers could operate
automatically from the effect of strong light
sources, electromagnetic waves, or infrared
light because the rain sensor uses an
optical sensor. It is recommended that the
auto-wiper lever be switched to the OFF
position other than when driving the vehicle
under rainy conditions.
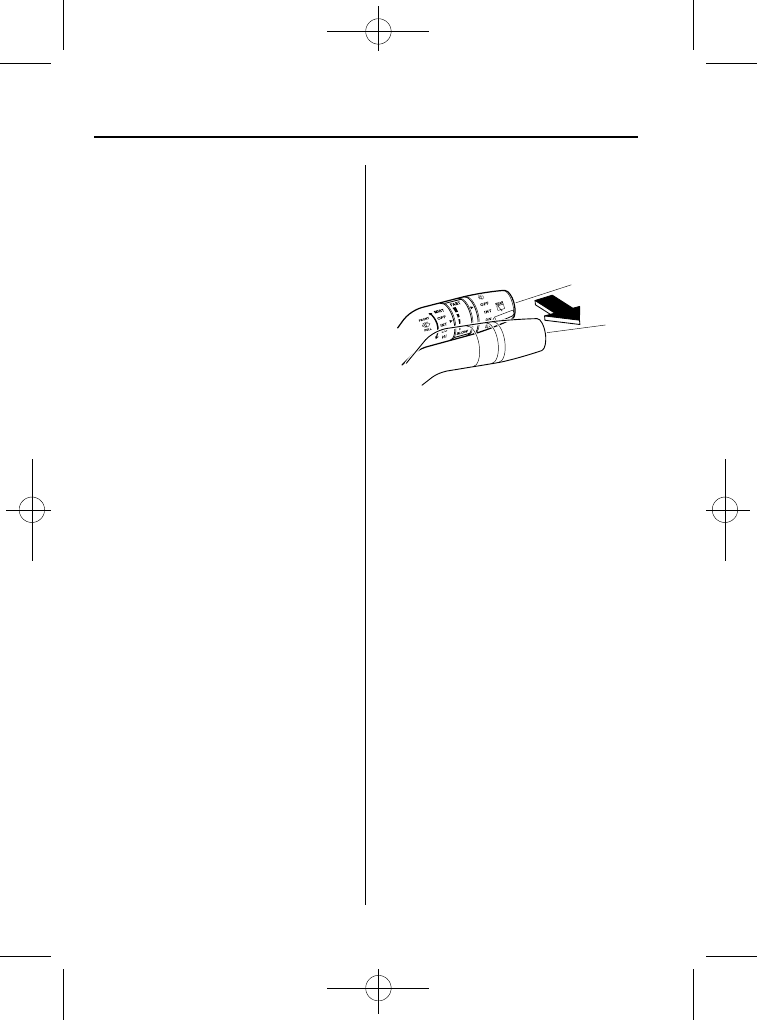
qWindshield Washer

Pull the lever toward you and hold it to
spray washer fluid.

Washer

OFF

NOTE

With the wiper lever in the OFF or INT (Type
A)/AUTO (Type B) position, the wipers will
operate continuously until the lever is
released.

If the washer does not work, inspect the
fluid level (page 8-29). If it's normal,
consult an Authorized Mazda Dealer.

5-72

Driving Your Mazda

Switches and Controls

CX-7_8CG3-EA-11J_Edition1 Page232
Saturday, September 24 2011 10:32 AM

Black plate (233,1)

Rear Window Wiper and
Washer

The ignition must be switched ON.

qRear Window Wiper

Turn the wiper on by turning the rear
wiper/washer switch.
ON

― Normal

INT

― Intermittent

qRear Window Washer

To spray washer fluid, turn the rear wiper/
washer switch to the

position. After

the switch is released, the washer will
stop.
If the washer does not work, inspect the
fluid level (page 8-29). If it's normal and
the washer still does not work, consult an
Authorized Mazda Dealer.

Rear Window Defroster

The rear window defroster clears frost,
fog, and thin ice from the rear window.

The ignition must be switched ON.

Press the switch to turn on the rear
window defroster. The rear window
defroster operates for about 15 minutes
and turns off automatically.
The indicator light illuminates during
operation.

To turn off the rear window defroster
before the 15 minutes has elapsed, press
the switch again.

Indicator light

CAUTION

Do not use sharp instruments or
window cleaners with abrasives to
clean the inside of the rear window
surface. They may damage the
defroster grid inside the window.

NOTE

This defroster is not designed for melting snow.
If there is an accumulation of snow on the rear
window, remove it before using the defroster.

Driving Your Mazda

Switches and Controls

5-73

CX-7_8CG3-EA-11J_Edition1 Page233
Saturday, September 24 2011 10:32 AM

Black plate (234,1)

qMirror Defroster

í

To turn on the mirror defrosters, switch
the ignition ON and press the rear window
defroster switch (page 5-73).

Horn

To sound the horn, press the

mark on

the steering wheel.

5-74

Driving Your Mazda

í

Some models.

Switches and Controls

CX-7_8CG3-EA-11J_Edition1 Page234
Saturday, September 24 2011 10:32 AM

Black plate (235,1)

Hazard Warning Flasher

The hazard warning lights should always
be used when you stop on or near a
roadway in an emergency.

The hazard warning lights warn other
drivers that your vehicle is a traffic hazard
and that they must take extreme caution
when near it.

Depress the hazard warning flasher and all
the turn signals will flash.

NOTE

l

The turn signals do not work when the
hazard warning lights are on.

l

Check local regulations about the use of
hazard warning lights while the vehicle is
being towed to verify that it is not in
violation of the law.

HomeLink Wireless
Control System

í

NOTE

HomeLink and HomeLink house are registered
trademarks of Johnson Controls.

The HomeLink system replaces up to 3
hand-held transmitters with a single built-
in component in the auto-dimming mirror.
Pressing the HomeLink button on the
auto-dimming mirror activates garage
doors, gates and other devices
surrounding your home.

HomeLink button

Indicator light

Driving Your Mazda

Switches and Controls

5-75

í

Some models.

CX-7_8CG3-EA-11J_Edition1 Page235
Saturday, September 24 2011 10:32 AM

Black plate (236,1)

WARNING

Do not use the HomeLink system with
any garage door opener that lacks the
safety stop and reverse feature:

Using the HomeLink system with any
garage door opener that lacks the
safety stop and reverse feature as
required by federal safety standards
is dangerous. (This includes garage
doors manufactured before April 1,
1982.)
Using these garage door openers can
increase the risk of serious injury or
death. For further information,
contact HomeLink at 1-800-355-3515
or www.homelink.com or your
Authorized Mazda Dealer.

Always check the areas surrounding
garage doors and gates for people or
obstructions before programming or
during operation of the HomeLink
system:

Programming or operating the
HomeLink system without verifying
the safety of areas surrounding
garage doors and gates is dangerous
and could result in an unexpected
accident and serious injury if
someone were to be hit.

CAUTION

HomeLink has been tested and
complies with FCC and Industry
Canada rules. Changes or
modifications not expressly approved
by the party responsible for
compliance could void the user's
authority to operate the device.

NOTE

FCC ID: NZLOBIHL3
CANADA:4112A-OBIHL3
This device complies with FCC rules part 15.
Operation is subject to the following
conditions:
1- This device may not cause any harmful
interference and
2- This device must accept any interference
that may be received including interference
that may cause undesired operation.

NOTE

The programming will not be erased even if
the battery is disconnected.

qPre-programming the HomeLink

System

NOTE

It is recommended that a new battery be
placed in the hand-held transmitter of the
device being programmed to HomeLink for
quicker training and accurate transmission of
the radio-frequency signal.

l

Verify that there is a remote control
transmitter available for the device you
would like to program.

l

Disconnect the power to the device.

qProgramming the HomeLink System

CAUTION

When programming a garage door
opener or a gate, disconnect the
power to these devices before
performing programming, as
continuous operation of the devices
could damage the motor.

5-76

Driving Your Mazda

Switches and Controls

CX-7_8CG3-EA-11J_Edition1 Page236
Saturday, September 24 2011 10:32 AM

Black plate (237,1)

The HomeLink system provides 3 buttons
which can be individually selected and
programmed using the transmitters for
current, on-market devices as follows:

1. Press and hold the two outer

HomeLink buttons (buttons one and
three)

― releasing only when the

indicator light begins to flash (after 20
seconds). Do not hold the buttons for
longer than 30 seconds and do not
repeat step 1 to program a second and/
or third hand-held transmitter to the
remaining two HomeLink buttons.

2. Position the end of your hand-held

transmitter 2.5

―7.5 cm (1―3 inches)

away from the HomeLink button you
wish to program while keeping the
indicator light in view.

3. Simultaneously press and hold both the

chosen HomeLink and hand-held
transmitter buttons. Do not release the
buttons until step 4 has been
completed.

NOTE

Some gate operators and garage door openers
may require you to replace this Programming
Step 3 with procedures noted in the

“Gate

Operator/Canadian Programming

” section.

4. After the HomeLink indicator light

changes from a slow to a rapidly
blinking light, release both the
HomeLink and hand-held transmitter
buttons.

NOTE

If the HomeLink indicator light does not
change to a rapidly blinking light, contact
HomeLink at www.homelink.com or call 1-
800-355-3515 for assistance.

5. Press and hold the just-trained

HomeLink button and observe the
indicator light.

If the indicator light stays on constantly,
programming is complete and your
device should activate when the
HomeLink button is pressed and released.

NOTE

To program the remaining two HomeLink
buttons, begin with

“Programming” ― step 2.

Do not repeat step 1.

If the indicator light blinks rapidly for
two seconds and then turns to a
constant light, continue with

“Programming” steps 6―8 to complete
the programming of a rolling code
equipped device (most commonly a
garage door opener).

6. At the garage door opener receiver

(motor-head unit) in the garage, locate
the

“learn” or “smart” button. This can

usually be found where the hanging
antenna wire is attached to the motor-
head unit.

7. Firmly press and release the

“learn” or

“smart” button. (The name and color of
the button may vary by manufacturer.)

NOTE

There are 30 seconds in which to initiate step
8.

8. Return to the vehicle and firmly press,

hold for two seconds and release the
programmed HomeLink button. Repeat
the

“press/hold/release” sequence a

second time, and, depending on the
brand of the garage door opener (or
other rolling code equipped device),
repeat this sequence a third time to
complete the programming process.

Driving Your Mazda

Switches and Controls

5-77

CX-7_8CG3-EA-11J_Edition1 Page237
Saturday, September 24 2011 10:32 AM

Black plate (238,1)

HomeLink should now activate your
rolling code equipped device.

NOTE

To program the remaining two HomeLink
buttons, begin with

“Programming” ― step 2.

Do not repeat step 1.

For questions or comments, please contact
HomeLink at www.homelink.com or 1-
800-355-3515.

qGate operator/Canadian

Programming

Canadian radio-frequency laws require
transmitter signals to

“time-out” (or quit)

after several seconds of transmission

which may not be long enough for
HomeLink to pick up the signal during
programming. Similar to this Canadian
law, some U.S. gate operators are
designed to

“time-out” in the same

manner.

If you live in Canada or you are having
difficulties programming a gate operator
by using the

“Programming” procedures

(regardless of where you live), replace

“Programming HomeLink” step 3 with
the following:

NOTE

If programming a garage door opener or gate
operator, it is advised to unplug the device
during the

“cycling” process to prevent

possible overheating.

Continue to press and hold the HomeLink
button while you press and release

every two seconds (

“cycle”) your hand-

held transmitter until the frequency signal
has successfully been accepted by
HomeLink. (The indicator light will flash
slowly and then rapidly.)
Proceed with

“Programming” step 4 to

complete.

qOperating the HomeLink System

Press the programmed HomeLink button
to operate a programmed device. The
code will continue being transmitted for a
maximum of 20 seconds.

qReprogramming the HomeLink

system

To program a device to HomeLink using a
HomeLink button previously trained,
follow these steps:

1. Press and hold the desired HomeLink

button. DO NOT release the button.

2. The indicator light will begin to flash

after 20 seconds. Without releasing the
HomeLink button, proceed with

“Programming” - step 2.

qErasing Programmed HomeLink

Buttons

To erase the existing programming from
all three operating channels, press and
hold the two outside buttons (

,

)

on the auto-dimming mirror until the
HomeLink indicator light begins to flash
after approximately 20 seconds.
Verify that the programming has been
erased when you resell the vehicle.

5-78

Driving Your Mazda

Switches and Controls

CX-7_8CG3-EA-11J_Edition1 Page238
Saturday, September 24 2011 10:32 AM

Black plate (239,1)

6

Interior Comfort

Use of various features for drive comfort, including air-conditioning and audio
system.

Climate Control System .......................... 6-2

Operating Tips .................................... 6-2
Vent Operation .................................... 6-3
Types of the Climate Control
System ................................................. 6-5
Manual Type ....................................... 6-6
Fully Automatic Type ....................... 6-10

Audio System ......................................... 6-14

Antenna ............................................. 6-14
Operating Tips for Audio System ..... 6-15
Audio Set .......................................... 6-25
Audio Control Switch Operation ...... 6-54
AUX Mode (Auxiliary input) ........... 6-57
Safety Certification ........................... 6-60

Bluetooth® Audio .................................. 6-61

Bluetooth® Audio

í

.......................... 6-61

Bluetooth® Hands-Free ........................ 6-72

Bluetooth® Hands-Free

í

................. 6-72

Basic Bluetooth® Hands-Free
Operation .......................................... 6-77
Convenient Use of the Hands-Free
System ............................................... 6-83
Hands-Free Setting ............................ 6-92
When Bluetooth® Hands-Free Cannot be
Used ................................................ 6-101
Safety Certification ......................... 6-102
Mazda Bluetooth® Hands-Free Customer
Service ............................................ 6-102

Interior Equipment ............................. 6-103

Sunvisors ......................................... 6-103
Interior Lights ................................. 6-104
Information Display ........................ 6-106
Multi Information Display .............. 6-108
Cup Holder ...................................... 6-125
Bottle Holder ................................... 6-126
Storage Compartments .................... 6-126
Accessory Sockets .......................... 6-128

6-1

í

Some models.

CX-7_8CG3-EA-11J_Edition1 Page239
Saturday, September 24 2011 10:32 AM

Black plate (240,1)

Operating Tips

qOperating the Climate Control

System

Operate the climate control system with
the engine running.

NOTE

To prevent the battery from being discharged,
do not leave the fan control dial on for a long
period of time with the ignition switched ON
when the engine is not running.

qClearing the Air Inlet

Clear all obstructions such as leaves,
snow and ice from the hood and the air
inlet in the cowl grille to improve the
system efficiency.

qFoggy Windows

The windows may fog up easily in humid
weather. Use the climate control system to
defog the windows.

To help defog the windows, operate the
air conditioner to dehumidify the air.

NOTE

The air conditioner may be used along with the
heater to dehumidify the air.

qParking in Direct Sunlight

If the vehicle has been parked in direct
sunlight during hot weather, open the
windows to let warm air escape, then run
the climate control system.

qNot Using for a Long Period

Run the air conditioner about 10 minutes
at least once a month to keep internal
parts lubricated.

qCheck the Refrigerant before the

Weather Gets Hot

Have the air conditioner checked before
the weather gets hot. Lack of refrigerant
may make the air conditioner less
efficient. Consult an Authorized Mazda
Dealer for refrigerant inspection.

The air conditioner is filled with
HFC134a (R134a), a refrigerant that will
not damage the ozone layer.
If the air conditioner is low on refrigerant
or has a malfunction, consult an
Authorized Mazda Dealer.

6-2

Interior Comfort

Climate Control System

CX-7_8CG3-EA-11J_Edition1 Page240
Saturday, September 24 2011 10:32 AM

Black plate (241,1)

Vent Operation

Push

qAdjusting the Vents

Directing airflow

You can direct air flow by rotating the vent.

Opening/closing vents

These vents can be opened and closed with wheel.

NOTE

When using the air conditioner, mist may come out from the vents. This is not a sign of trouble but a
result of humid air being suddenly cooled.

Interior Comfort

Climate Control System

6-3

CX-7_8CG3-EA-11J_Edition1 Page241
Saturday, September 24 2011 10:32 AM

Black plate (242,1)

qSelecting the Airflow Mode

Dashboard and Floor Vents

Defroster Vents

Floor Vents

Dashboard Vents

Defroster and Floor Vents

6-4

Interior Comfort

Climate Control System

CX-7_8CG3-EA-11J_Edition1 Page242
Saturday, September 24 2011 10:32 AM

Black plate (243,1)

Types of the Climate Control System

Manual type and fully automatic type climate control systems are explained separately.
Check your vehicle's climate control type and read the appropriate pages.
Manual Type ............................................................................................................ page 6-6

Fully Automatic Type ............................................................................................ page 6-10

Interior Comfort

Climate Control System

6-5

CX-7_8CG3-EA-11J_Edition1 Page243
Saturday, September 24 2011 10:32 AM

Black plate (244,1)

Manual Type

Air intake selector

A/C switch

Rear window defroster switch

Temperature control dial

Fan control dial

Mode selector dial

qControl Switches

Temperature control dial

Cold

Hot

This dial controls temperature. Turn it
clockwise for hot and counterclockwise
for cold.

NOTE

When the mode is set to

or

with the fan

control dial in a position other than 0 and the
temperature control dial in the maximum cold
position, the air intake selector switches to the
recirculated air mode and the A/C turns on
automatically.
If A/C is not desired, press the A/C switch to
turn it off.

Fan control dial

6-6

Interior Comfort

Climate Control System

CX-7_8CG3-EA-11J_Edition1 Page244
Saturday, September 24 2011 10:32 AM

Black plate (245,1)

This dial allows variable fan speeds.
0

―Fan off

1

―Low speed

2

―Medium low speed

3

―Medium high speed

4

―High speed

Mode selector dial

Turn the mode selector dial to select
airflow mode (page 6-4).

NOTE

l

The mode selector dial can be set at the
intermediate positions (

) between each

mode. Set the dial to an intermediate
position if you want to slightly adjust the
airflow amount.

l

For example, when the mode selector dial is
at the

position between the

and

positions, airflow from the floor vent is less
than that of the

position.

A/C switch

Press the A/C switch to turn the air
conditioner on. The indicator light on the
switch will illuminate when the fan
control dial is set at position 1, 2, 3, or 4.

Press the switch once again to turn the air
conditioner off.

NOTE

The air conditioner may not function when the
outside temperature approaches 0 °C (32 °F).

Air intake selector

This switch controls the source of air
entering the vehicle.

Press the

switch to alternate

between the outside air and recirculated
air modes.

It is recommended that under normal
conditions the switch be kept in the
outside air mode.

Outside air mode (indicator light
turned off)

Outside air is taken into the vehicle. Use
this mode for normal ventilation and
heating.

Recirculated air mode (indicator light
illuminated)

Outside air is shut off. Air within the
vehicle is recirculated.

This mode can be used when driving on a
dusty road or in similar conditions. It also
helps to provide quicker cooling of the
interior.

Interior Comfort

Climate Control System

6-7

CX-7_8CG3-EA-11J_Edition1 Page245
Saturday, September 24 2011 10:32 AM

Black plate (246,1)

WARNING

Do not use the recirculated air mode in
cold or rainy weather:

Using the recirculated air mode in
cold or rainy weather is dangerous as
it will cause the windows to fog up.
Your vision will be hampered, which
could lead to a serious accident.

qHeating

1. Set the mode selector dial to the

position.

2. Set the temperature control dial to the

hot position.

3. Set the fan control dial to the desired

speed.

NOTE

l

If the windshield fogs up easily, set the
mode selector dial to the

position.

l

If cooler air is desired at face level, set the
mode selector dial at the

position and

adjust the temperature control dial to
maintain maximum comfort.

l

The air to the floor is warmer than air to
the face (except when the temperature
control dial is set at the extreme hot or cold
position).

l

In the

or

position, the air

conditioner is automatically turned on
(however, the indicator light does not
illuminate) and the outside air mode is
automatically selected to defrost the
windshield.
In the

or

position, the outside air

mode cannot be changed to the recirculated
air mode.

qCooling (With Air Conditioner)

1. Set the mode selector dial to the

position.

2. Set the temperature control dial to the

cold position.

3. Set the fan control dial to the desired

speed.

4. Turn on the air conditioner by pressing

the A/C switch.

5. Adjust the fan control dial and

temperature control dial to maintain
maximum comfort.

CAUTION

When using the air conditioner while
driving up long hills or in heavy
traffic, closely monitor the
temperature gauge (page 5-42).
The air conditioner may cause engine
overheating. If the gauge indicates
overheating, turn the air conditioner
off (page 7-12).

NOTE

l

When maximum cooling is desired, set the
temperature control dial to the extreme cold
position and set the air intake selector to
the recirculated air mode, then set the fan
control dial to position 4.

l

If warmer air is desired at floor level, set
the mode selector dial at the

position

and adjust the temperature control dial to
maintain maximum comfort.

l

The air to the floor is warmer than air to
the face (except when the temperature
control dial is set at the extreme hot or cold
position).

6-8

Interior Comfort

Climate Control System

CX-7_8CG3-EA-11J_Edition1 Page246
Saturday, September 24 2011 10:32 AM

Black plate (247,1)

qVentilation

1. Set the mode selector dial to the

position.

2. Set the air intake selector to the outside

air mode.

3. Set the temperature control dial to the

desired position.

4. Set the fan control dial to the desired

speed.

qWindshield Defrosting and Defogging

1. Set the mode selector dial to the

position.

2. Set the temperature control dial to the

desired position.

3. Set the fan control dial to the desired

speed.

WARNING

Do not defog the windshield using the

position with the temperature

control set to the cold position:

Using the

position with the

temperature control set to the cold
position is dangerous as it will cause
the outside of the windshield to fog
up. Your vision will be hampered,
which could lead to a serious
accident. Set the temperature control
to the hot or warm position when
using the

position.

NOTE

l

For maximum defrosting, set the
temperature control dial to the extreme hot
position and the fan control dial to position
4.

l

If warm air is desired at the floor, set the
mode selector dial to the

position.

l

In the

, or

position, the air

conditioner is automatically turned on
(however, the indicator light does not
illuminate) and the outside air mode is
automatically selected to defrost the
windshield.
In the

or

position, the outside air

mode cannot be changed to the recirculated
air mode.

qDehumidifying (With Air

Conditioner)

Operate the air conditioner in cool or cold
weather to help defog the windshield and
side windows.

1. Set the mode selector dial to the

desired position.

2. Set the air intake selector to the outside

air mode.

3. Set the temperature control dial to the

desired position.

4. Set the fan control dial to the desired

speed.

5. Turn on the air conditioner by pressing

the A/C switch.

NOTE

One of the functions of the air conditioner is
dehumidifying the air and, to use this function,
the temperature does not have to be set to cold.
Therefore, set the temperature control dial to
the desired position (hot or cold) and turn on
the air conditioner when you want to
dehumidify the cabin air.

Interior Comfort

Climate Control System

6-9

CX-7_8CG3-EA-11J_Edition1 Page247
Saturday, September 24 2011 10:32 AM


Content   ..  13  14  15  16   ..