Mazda CX-5 (2019 year). Manual - part 13


  Index      Mazda     Mazda CX-5 - service manual 2019 year in english


Search            


Content   ..  11  12  13  14   ..


Mazda CX-5 (2019 year). Manual - part 13


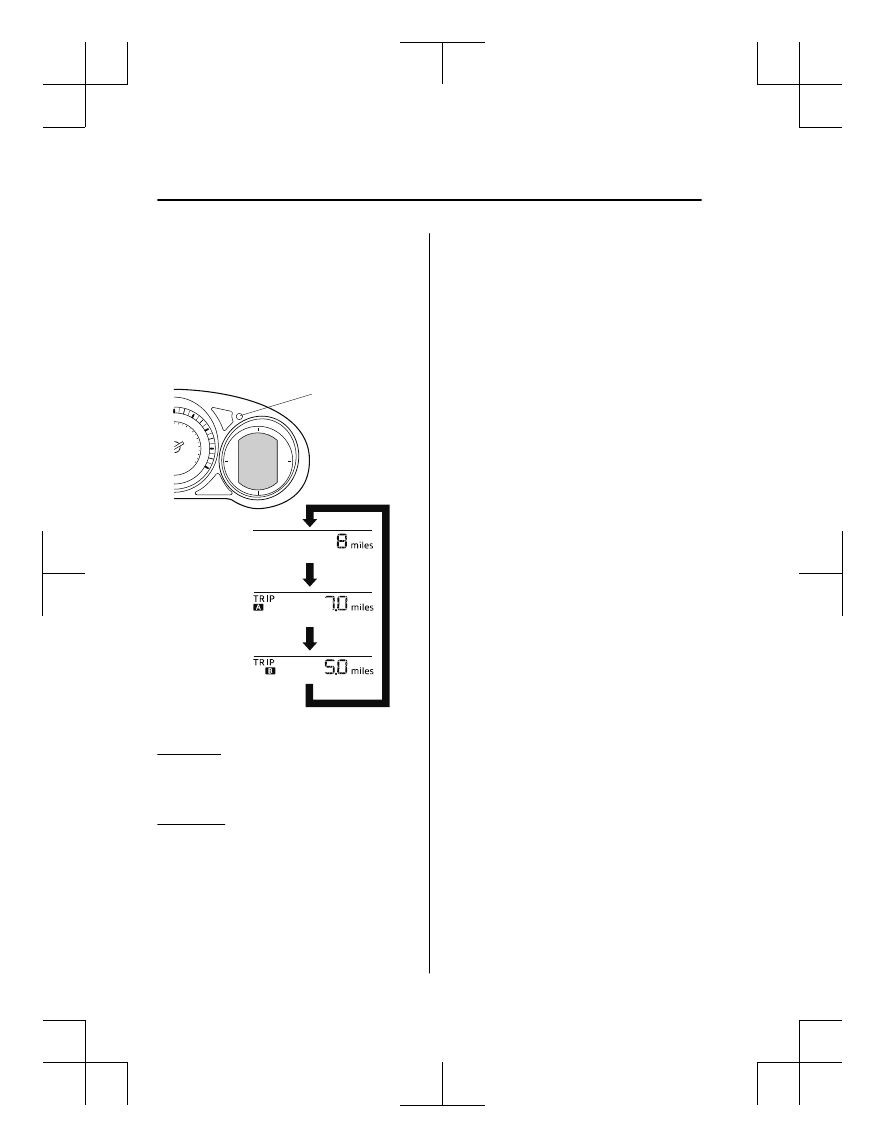
▼ Odometer, Trip Meter and Trip

Meter Selector

The display mode can be changed from
odometer to trip meter A to trip meter B
and then back to odometer by pressing the
selector while one of them is displayed.
The selected mode will be displayed.
 

Selector knob

Press the selector knob

Press the selector knob

Press the selector knob

Odometer

Trip meter A

Trip meter B


Odometer

The odometer records the total distance
the vehicle has been driven.

Trip meter

The trip meter can record the total distance
of two trips. One is recorded in trip meter
A, and the other is recorded in trip meter
B.
 

For instance, trip meter A can record the
distance from the point of origin, and trip
meter B can record the distance from
where the fuel tank is filled.
 
When trip meter A is selected, pressing the
selector again within 1 second will change
to trip meter B mode.
 
When trip meter A is selected, TRIP A
will be displayed. When trip meter B is
selected, TRIP B will be displayed.
 
The trip meter records the total distance
the vehicle is driven until the meter is
again reset. Return it to “0.0” by
depressing and holding the selector for 1
second or more. Use this meter to measure
trip distances and to compute fuel
consumption.

NOTE

If TRIP A is reset using the trip meter
when the function which synchronizes
(resets) the fuel economy monitor and
the trip meter (TRIP A) is on, the fuel
economy data resets in conjunction with
TRIP A.
Refer to Fuel Economy Monitor on page
4-108.

Only the trip meters record tenths of
kilometers (miles).

The trip record will be erased when:

The power supply is interrupted
(blown fuse or the battery is
disconnected).

The vehicle is driven over 9999.9 km
(mile).

When Driving

Instrument Cluster and Display

4-46

CX-5_8HE3-EA-18I_Edition1

2018-6-29 13:44:47

▼ Engine Coolant Temperature Gauge

Displays the engine coolant temperature.
The white gauge indicates that the engine
coolant temperature is low, and the red
gauge indicates that the engine coolant
temperature is high and overheating.
 

CAUTION

If the engine coolant temperature gauge
needle (white) flashes, there is a possibility
of overheating. Drive slowly to reduce
engine load until you can find a safe place
to stop the vehicle and wait for the engine
to cool down.
Refer to Overheating on page 7-18
.

NOTE

(SKYACTIV-G 2.5T)

If the engine coolant temperature is high
or the engine is hot, the engine output
may be limited.

The temperature unit (Centigrade/
Fahrenheit) of the engine coolant gauge
display changes in conjunction with the
temperature unit of the outside
temperature display.
Refer to Personalization Features on
page 9-12.

During normal driving, the engine
coolant temperature stabilizes at 100 °C
(210 °F) or less, and the gauge indicates
a range lower than 100 °C (210 °F).

▼ Fuel Gauge

The fuel gauge shows approximately how
much fuel is remaining in the tank when
the ignition is switched ON. We
recommend keeping the tank over 1/4 full.
 

Full

1/4 Full

Empty

If the low fuel warning light illuminates or
the fuel level is very low, refuel as soon as
possible.
Refer to Taking Action on page 7-32.

NOTE

After refueling, it may require some time
for the indicator to stabilize. In addition,
the indicator may deviate while driving
on a slope or curve since the fuel moves
in the tank.

The display indicating a quarter or less
remaining fuel has more segments to
show the remaining fuel level in greater
detail.

When Driving

Instrument Cluster and Display

4-47

CX-5_8HE3-EA-18I_Edition1

2018-6-29 13:44:47

The direction of the arrow ( ) indicates
that the fuel-filler lid is on the left side
of the vehicle.

▼ Dashboard Illumination

(Without auto-light control)
When the lights are turned on with the
ignition switched ON, the brightness of
the dashboard illumination is dimmed.
(With auto-light control)
When the lights are turned on with the
ignition switched ON, the brightness of
the dashboard illumination is dimmed.
However, when the light sensor detects
that the surrounding area is bright such as
when the lights are turned on in the
daytime, the dashboard illumination does
not dim.

NOTE

(With auto-light control)
When the ignition is switched ON in the
early evening or at dusk, the dashboard
illumination is dimmed for several
seconds until the light sensor detects the
brightness of the surrounding area,
however, the dimming may cancel after
the brightness is detected.

When the lights are turned on, the
lights-on indicator light in the
instrument cluster turns on.
Refer to Headlights on page 4-71
.

The brightness of the instrument cluster
and dashboard illuminations can be
adjusted by rotating the knob.

The brightness decreases by rotating the
knob to the left. A beep sound will be
heard when the knob has been rotated to
the maximum dim position.

The brightness increases by rotating the
knob to the right.

Dim

Bright

Function for canceling illumination
dimmer

The illumination dimmer can be canceled
by rotating the dashboard illumination
knob to the right until a beep sound is
heard while the instrument cluster is
dimmed with the ignition switched ON. If
the instrument cluster's visibility is
reduced due to glare from surrounding
brightness, cancel the illumination
dimmer.

NOTE

When the illumination dimmer is
canceled, the instrument cluster cannot
be dimmed even if the lights are turned
on.

When the illumination dimmer is
canceled, the screen in the center
display switches to constant display of
the daytime screen.

▼ Outside Temperature Display

When the ignition is switched ON, the
outside temperature is displayed.
 

When Driving

Instrument Cluster and Display

4-48

CX-5_8HE3-EA-18I_Edition1

2018-6-29 13:44:47

NOTE

Under the following conditions, the
outside temperature display may differ
from the actual outside temperature
depending on the surroundings and
vehicle conditions:

Significantly cold or hot temperatures.

Sudden changes in outside
temperature.

The vehicle is parked.

The vehicle is driven at low speeds.

Changing the Temperature Unit of the
Outside Temperature Display

The outside temperature unit can be
switched between Celsius and Fahrenheit.
Settings can be changed by operating the
center display screen.
Refer to Personalization Features on page
9-12.

NOTE
When the temperature unit indicated in the
outside temperature display is changed,
the temperature unit indicated in the
engine coolant gauge display changes in
conjunction with it.

▼ Trip Computer

The following information can be selected
by pressing the INFO switch with the
ignition switched ON.

Distance-to-empty mode

Average fuel economy mode

Current fuel economy mode

Compass mode

If you have any problems with your trip
computer, consult an Authorized Mazda
Dealer.

Distance-to-empty mode

This mode displays the approximate
distance you can travel on the remaining
fuel based on the fuel economy.
 
The distance-to-empty will be calculated
and displayed every second.
 

NOTE

Even though the distance-to-empty
display may indicate a sufficient amount
of remaining driving distance before
refueling is required, refuel as soon as
possible if the fuel level is very low or
the low fuel warning light illuminates.

The display may not change unless you
add more than approximately 9 L (2.3
US gal, 1.9 Imp gal) of fuel.

The distance-to-empty is the
approximate remaining distance the
vehicle can be driven until all the
graduation marks in the fuel gauge
(indicating the remaining fuel supply)
disappear.

If there is no past fuel economy
information such as after first
purchasing your vehicle or the
information is deleted when the battery
cables are disconnected, the actual
distance-to empty/range may differ from
the amount indicated.

When Driving

Instrument Cluster and Display

4-49

CX-5_8HE3-EA-18I_Edition1

2018-6-29 13:44:47

Average fuel economy mode

This mode displays the average fuel
economy by calculating the total traveled
distance and the total fuel consumption
since the vehicle was purchased or the past
data was reset. The average fuel economy
is calculated and displayed every minute.
 

To reset the displayed past data, press the
INFO switch for 1.5 seconds or longer.
After resetting the data, - - - L/100 km
(- - - mpg) is displayed for one minute
before the fuel economy is recalculated
and displayed.

NOTE
If TRIP A is reset using the trip meter
when the function which synchronizes
(resets) the fuel economy monitor and the
trip meter (TRIP A) is on, the displayed
past data is reset.

Current fuel economy mode

This mode displays the current fuel
economy by calculating the amount of fuel
consumption and the distance traveled.
 
Current fuel economy will be calculated
and displayed every 2 seconds.
 

When you've slowed to about 5 km/h (3
mph), - - - L/100 km (- - - mpg) will be
displayed.

Compass mode

The direction the vehicle is moving is
displayed in one of eight directions while
the vehicle is being driven.
 

Display

Direction

N

North

S

South

E

East

W

West

NE

Northeast

NW

Northwest

SE

Southeast

SW

Southwest

▼ Cruise Control Set Vehicle Speed

Display

The vehicle speed preset using the cruise
control is displayed.
 

Refer to Cruise Control on page 4-214.

When Driving

Instrument Cluster and Display

4-50

CX-5_8HE3-EA-18I_Edition1

2018-6-29 13:44:47

▼ Warning/Indicator Lights

Instrument Cluster varies depending on model and specifications.

Instrument Cluster

Center of Dashboard

Warning lights will appear in any of the highlighted areas

▼ Warning Indication/Warning Lights

These lights turn on or flash to notify the user of the system operation status or a system
malfunction.

Signal

Warning

Page

Brake System Warning Light

*1*2

7-24

ABS Warning Light

*1

Electronic Brake

Force Distribu‐

tion System

Warning

7-24

ABS warning

7-26

Charging System Warning Light

*1

7-24

Engine Oil Warning Light

*1

7-24

Power Steering Malfunction Indicator Light

*1

7-24

Master Warning Light

*1

7-26

Electric Parking Brake (EPB) Warning Light

*1

7-26

When Driving

Instrument Cluster and Display

4-51

CX-5_8HE3-EA-18I_Edition1

2018-6-29 13:44:47

Signal

Warning

Page

(Red)

Brake Pedal Operation Demand Warning Light

*1

Flashing

4-98

Buzzer & Flash‐

ing

7-26

Check Engine Light

*1

7-26

*

Automatic Transaxle Warning Light

*1

7-26

*

AWD Warning Light

7-26

Air Bag/Front Seat Belt Pretensioner System Warning Light

*1

7-26

*

Tire Pressure Monitoring System Warning Light

*1

Flashing

7-26

Turns on

7-32

(Red)

KEY Warning Light

*1

Turns on

7-26

Flashing

7-32

LED Headlight Warning Light

*1

7-26

(Amber)

*

Smart City Brake Support (SCBS) Warning Light

*1

7-32

Low Fuel Warning Light

7-32

Check Fuel Cap Warning Light

*1

7-32

Engine Oil Level Warning Light

*1

7-32

Seat Belt Warning Light (Front seat)

7-32

(Red)

Seat Belt Warning Light (Rear seat)

7-32

*

Low Washer Fluid Level Warning Light

7-32

Door-Ajar Warning Light

7-32

When Driving

Instrument Cluster and Display

4-52

*Some models.

CX-5_8HE3-EA-18I_Edition1

2018-6-29 13:44:47

*

1 The light turns on when the ignition is switched on for an operation check, and turns off a few seconds later or

when the engine is started. If the light does not turn on or remains turned on, have the vehicle inspected at an
Authorized Mazda Dealer.

*

2 The light turns on continuously when the parking brake is applied.

▼ Indication/Indicator Lights

These lights turn on or flash to notify the user of the system operation status or a system
malfunction.

Signal

Indicator

Page

(Green)

Seat Belt Indicator Light (Rear seat)

2-71

*

Front Passenger Air Bag Deactivation Indicator Light

*1

2-71

(Green)

KEY Indicator Light

4-5

Security Indicator Light

*1

3-44

Wrench Indication/Indicator Light

*1

4-54

Shift Position Indication

4-64

Lights-On Indication/Indicator Light

4-71

Headlight High-Beam Indicator Light

Headlight

High-Low Beam

4-74

Flashing the

Headlights

4-74

Turn Signal/Hazard Warning Indicator Lights

Turn and

Lane-Change

Signals

4-77

Hazard Warning

Flasher

4-84

(Green)

Brake Pedal Operation demand Indicator Light

4-94

AUTOHOLD Active Indicator Light

*1

4-100

When Driving

Instrument Cluster and Display

*Some models.

4-53

CX-5_8HE3-EA-18I_Edition1

2018-6-29 13:44:47

Signal

Indicator

Page

TCS/DSC Indicator Light

*1

Traction Control

System (TCS)

4-105

Dynamic Stabil‐

ity Control

(DSC)

4-107

Turns on

7-26

TCS OFF Indicator Light

*1

4-106

*

Select Mode Indication

4-111

*

Blind Spot Monitoring (BSM) OFF Indicator Light

*1

Malfunction

7-26

Except malfunc‐

tion

4-127

(Red)

*

Smart City Brake Support (SCBS) Indicator Light

4-172

*

Smart City Brake Support (SCBS) OFF Indicator Light

*1

4-172

(White)

Cruise Main Indication

4-215

(Green)

Cruise Set Indication

4-215

*

1 The light turns on when the ignition is switched on for an operation check, and turns off

a few seconds later or when the engine is started. If the light does not turn on or remains
turned on, have the vehicle inspected at an Authorized Mazda Dealer.

▼ Wrench Indicator Light

When the ignition is switched ON, the
wrench indicator light turns on and then
turns off after a few seconds.
 

The wrench indicator light turns on under
the following conditions:

When the preset maintenance period has
arrived.

When it’s time to replace the engine oil.

Refer to Maintenance Monitor on page
6-16.

When Driving

Instrument Cluster and Display

4-54

*Some models.

CX-5_8HE3-EA-18I_Edition1

2018-6-29 13:44:47

NOTE

The wrench indicator light turns on
earlier than the preset period depending
on vehicle usage conditions.

Whenever the engine oil is replaced, a
reset of the vehicle engine control unit is
necessary.
Refer to Maintenance Monitor on page
6-16
.

When Driving

Instrument Cluster and Display

4-55

CX-5_8HE3-EA-18I_Edition1

2018-6-29 13:44:47

Active Driving Display

*

Dust-proof sheet

Display

Optical 
receiver

WARNING

Always adjust the display brightness and position with the vehicle stopped:
Adjusting the display brightness and position while driving the vehicle is dangerous as doing
so could distract your attention from the road ahead and lead to an accident.

CAUTION

Do not place beverages near the active driving display. If water or other liquids are splashed

on the active driving display, it could cause damage.

Do not place objects above the active driving display or apply stickers to the dust-proof

sheet/optical receiver as they will cause interference.

A sensor is integrated to control the display's luminosity. If the optical receiver is covered,

the display's luminosity will lower making the display difficult to view.

Do not allow intense light to hit the optical receiver. Otherwise, it could cause damage.

NOTE

Wearing polarized sunglasses will reduce the visibility of the active driving display due to
the characteristics of the display.

If the battery has been removed and re-installed or the battery voltage is low, the adjusted
position may deviate.

The display may be difficult to view or temporarily affected by weather conditions such as
rain, snow, light, and temperature.

If the audio system is removed, the active driving display cannot be operated.

When Driving

Instrument Cluster and Display

4-56

*Some models.

CX-5_8HE3-EA-18I_Edition1

2018-6-29 13:44:47

The active driving display indicates the following information:

Blind Spot Monitoring (BSM) Operation Conditions and Warnings
Refer to Blind Spot Monitoring (BSM) on page 4-123.

Distance Recognition Support System (DRSS) Operation Conditions and Warnings
Refer to Distance Recognition Support System (DRSS) on page 4-134.

Traffic Sign Recognition System (TSR) traffic signs and Warnings
Refer to Traffic Sign Recognition System (TSR) on page 4-128.

Mazda Radar Cruise Control with Stop & Go function (MRCC with Stop & Go function)
Operation Conditions and Warnings
Refer to Mazda Radar Cruise Control with Stop & Go function (MRCC with Stop & Go
function) on page 4-142.

Lane-keep Assist System (LAS) & Lane Departure Warning System (LDWS) Operation
Conditions and Warnings
Refer to Lane-keep Assist System (LAS) & Lane Departure Warning System (LDWS) on
page 4-156.

Advanced Smart City Brake Support (Advanced SCBS) Warnings
Refer to Advanced Smart City Brake Support (Advanced SCBS) on page 4-167.

Smart City Brake Support (SCBS) Warnings
Refer to Smart City Brake Support (SCBS) on page 4-170.

Smart Brake Support (SBS) Operation Conditions and Warnings
Refer to Smart Brake Support (SBS) on page 4-173.

Cruise Control Operation Conditions
Refer to Cruise Control on page 4-214.

Navigation Guidance (vehicles with navigation system)

Speed limit indicator (vehicles with navigation system)

Vehicle Speed

Each setting/adjustment for the active driving display can be performed on the center
display.
1. Select the 

 icon on the home screen and display the Settings screen.

2. Select the AD-Disp tab.
3. Select the desired item and perform the setting/adjustment.

Method for adjusting screen brightness (automatically/manually)

Screen brightness initial settings (automatic adjustment is selected)

Screen brightness adjustment (manual adjustment is selected)

Display position of active driving display (display height)

When Driving

Instrument Cluster and Display

4-57

CX-5_8HE3-EA-18I_Edition1

2018-6-29 13:44:47

Active driving display angle adjustment (display angle correction)

Active driving display ON/OFF (indication)

Navigation guidance ON/OFF

Reset settings (reset)

NOTE

The desired driving position (display position, brightness level, display information) can
be called up after programming the position.
Refer to Driving Position Memory on page 2-11.

When Driving

Instrument Cluster and Display

4-58

CX-5_8HE3-EA-18I_Edition1

2018-6-29 13:44:47

Manual Transaxle Shift

Pattern

Neutral position

The shift pattern of the transaxle is
conventional, as shown.
 
Depress the clutch pedal all the way down
while shifting; then release it slowly.
 
Your vehicle is equipped with a device to
prevent shifting to R (reverse) by mistake.
Push the shift lever downward and shift to
R.
 

WARNING

Do not use sudden engine braking on
slippery road surfaces or at high speeds:
Shifting down while driving on wet, snowy,
or frozen roads, or while driving at high
speeds causes sudden engine braking,
which is dangerous. The sudden change in
tire speed could cause the tires to skid. This
could lead to loss of vehicle control and an
accident.

Always leave the shift lever in 1 or R
position and set the parking brake when
leaving the vehicle unattended:
Otherwise the vehicle could move and
cause an accident.

CAUTION

Keep your foot off the clutch pedal except

when shifting gears. Also, do not use the
clutch to hold the vehicle on an upgrade.
Riding the clutch will cause needless
clutch wear and damage.

Do not apply any excessive lateral force

to the shift lever when changing from
5th to 4th gear. This could lead to the
accidental selection of 2nd gear, which
could result in damage to the transaxle.

Make sure the vehicle comes to a

complete stop before shifting to R.
Shifting to R while the vehicle is still
moving may damage the transaxle.

NOTE

If shifting to R is difficult, shift back into
neutral, release the clutch pedal, and try
again.

When Driving

Manual Transaxle Operation

4-59

CX-5_8HE3-EA-18I_Edition1

2018-6-29 13:44:47

▼ Gear Shift Indicator (GSI)

The GSI supports you to obtain optimum
fuel economy and smooth driving. It
displays the selected gear position in the
instrument cluster as well as notifies the
driver to change to the most suitable gear
position corresponding to the actual
driving condition.
 

Selected gear position

Suitable gear position

Indication

Condition

Numeral

The selected gear position is dis‐
played.

 and numeral

Shift up or down to the indicated
gear position is recommended.

CAUTION

Do not rely solely on the shift-up/
shift-down recommendations by
indications. The actual driving situation
might require shift operations different
from indication. To avoid the risk of
accidents, the road and traffic conditions
have to be judged correctly by the driver
before shifting.

NOTE
The GSI turns off when the following
operations are performed.

The vehicle is stopped.

The vehicle is put in neutral.

The vehicle is driven in reverse.

The clutch is not fully engaged when
accelerating from a stop.

The clutch pedal remains depressed for
2 seconds or longer while driving.

When Driving

Manual Transaxle Operation

4-60

CX-5_8HE3-EA-18I_Edition1

2018-6-29 13:44:47

▼ Recommendations for Shifting

Upshifting

For normal acceleration, Mazda
recommends these shift points:

Gear

Vehicle speed

1 to 2

24 km/h (15 mph)

2 to 3

42 km/h (26 mph)

3 to 4

60 km/h (37 mph)

4 to 5

75 km/h (46 mph)

5 to 6

79 km/h (49 mph)

For cruising, Mazda recommends these
shift points:

Gear

Vehicle speed

1 to 2

13 km/h (8 mph)

2 to 3

29 km/h (18 mph)

3 to 4

49 km/h (30 mph)

4 to 5

63 km/h (39 mph)

5 to 6

70 km/h (43 mph)

Downshifting

When you must slow down in heavy
traffic or on a steep upgrade, downshift
before the engine starts to overwork. This
reduces the chance of stalling and gives
better acceleration when you need more
speed.
On a steep downgrade, downshifting
helps maintain safe speed and prolongs
brake life.

When Driving

Manual Transaxle Operation

4-61

CX-5_8HE3-EA-18I_Edition1

2018-6-29 13:44:47


Content   ..  11  12  13  14   ..