Mazda CX-3 (2019 year). Manual - part 9


  Index      Mazda     Mazda CX-3 - service manual 2019 year in english


Search            


Content   ..  7  8  9  10   ..


Mazda CX-3 (2019 year). Manual - part 9


After pressing the push button start
and before the engine starts, the
operation sound of the fuel pump
motor from near the fuel tank can be
heard, however, this does not
indicate a malfunction.

8. After starting the engine, let it idle for

about ten seconds.

NOTE

Whether the engine is cold or warm,
it should be started without the use
of the accelerator.

If the engine does not start the first
time, refer to Starting a Flooded
Engine under Emergency Starting. If
the engine still does not start, have
your vehicle inspected by an
Authorized Mazda Dealer (page 7-
21).

▼ Engine Start Function When Key

Battery is Dead

CAUTION

When starting the engine by holding the
transmitter over the push button start due
to a dead key battery or a malfunctioning
key, be careful not to allow the following,
otherwise the signal from the key will not
be received correctly and the engine may
not start.

Metal parts of other keys or metal objects

touch the key.

Spare keys or keys for other vehicles

equipped with an immobilizer system
touch or come near the key.

Devices for electronic purchases, or

security passage touch or come near the
key.

If the engine cannot be started due to a
dead key battery, the engine can be started
using the following procedure:
1. Continue to depress the brake pedal

firmly until the engine has completely
started.

2. (Manual transaxle)

Continue to depress the clutch pedal
firmly until the engine has completely
started.

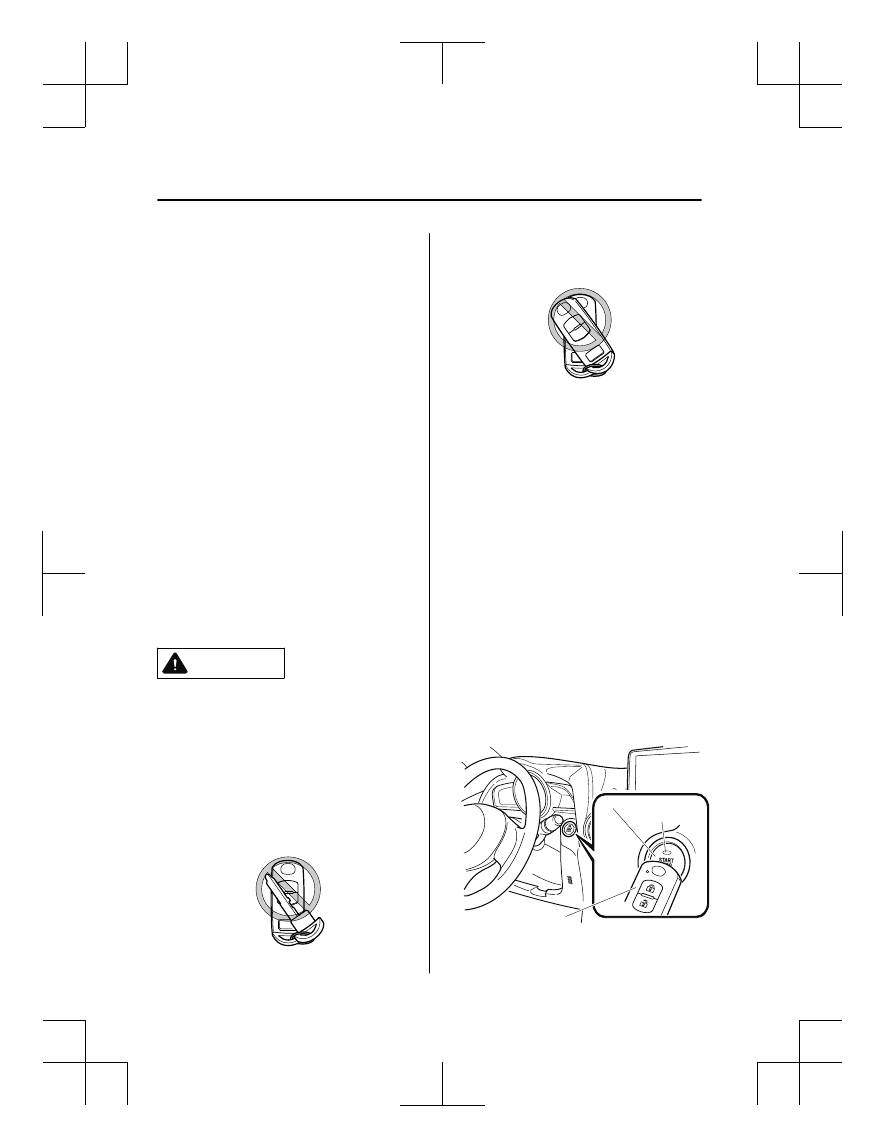
3. Make sure that the push button start

indication light (green) flashes.

4. Touch the push button start using the

backside of the key (as shown) while
the push button start indicator light
(green) flashes.
 

Push button start

Transmitter

Indicator light

When Driving

Start/Stop Engine

4-8

CX-3_8GR7-EA-18B_Edition1

2017-12-20 16:18:14

NOTE
When touching the push button start
using the backside of the key as shown
in the illustration, touch the push
button start with the lock switch side of
the key facing up.

5. Make sure that the push button start

indicator light (green) turns on.

6. Press the push button start to start the

engine.

NOTE

The engine cannot be started unless
the clutch pedal is fully depressed
(manual transaxle) or the brake
pedal is fully depressed (automatic
transaxle).

If there is a malfunction with the
push button start function, the push
button start indicator light (amber)
flashes. In this case, the engine may
start, however, have the vehicle
checked at an Authorized Mazda
Dealer as soon as possible.

If the push button start indicator
light (green) does not illuminate,
perform the operation from the
beginning again. If it does not
illuminate, have the vehicle checked
at an Authorized Mazda Dealer.

To switch the ignition position
without starting the engine, perform
the following operations after the
push button start indicator light
(green) turns on.
1. Release the clutch pedal (manual

transaxle) or brake pedal
(automatic transaxle).

2. Press the push button start to

switch the ignition position. The
ignition switches in the order of
ACC, ON, and off each time the
push button start is pressed. To
switch the ignition position
again, perform the operation
from the beginning.

▼ Emergency Operation for Starting

the Engine

If the KEY warning light (red) illuminates,
or the push button start indicator light
(amber) flashes, this could indicate that
the engine may not start using the usual
starting method. Have your vehicle
inspected at an Authorized Mazda Dealer
as soon as possible. If this occurs, the
engine can be force-started. Press and hold
the push button start until the engine starts.
Other procedures necessary for starting the
engine such as having the key in the cabin,
and depressing the clutch pedal (manual
transaxle) or the brake pedal (automatic
transaxle) are required.

When Driving

Start/Stop Engine

4-9

CX-3_8GR7-EA-18B_Edition1

2017-12-20 16:18:14

Turning the Engine Off

WARNING

Do not stop the engine while the vehicle is
moving:
Stopping the engine while the vehicle is
moving for any reason other than in an
emergency is dangerous. Stopping the
engine while the vehicle is moving will
result in reduced braking ability due to the
loss of power braking, which could cause
an accident and serious injury.

1. Stop the vehicle completely.
2. (Manual transaxle)

Shift into neutral and set the parking
brake.
(Automatic transaxle)
Shift the selector lever to the P
position and set the parking brake.

3. Press the push button start to turn off

the engine. The ignition position is off.

CAUTION

When leaving the vehicle, make sure the
push button start is off.

NOTE

The cooling fan in the engine
compartment could turn on for a few
minutes after the ignition is switched
from ON to OFF, whether or not the A/C
is on or off, to cool the engine
compartment quickly.

When the push button start is pressed
from ON to ACC or OFF, the KEY
indicator light (green) may flash for
approximately 30 seconds indicating
that the remaining battery power of the
key is low.
Replace with a new battery before the
key becomes unusable.
Refer to Key Battery Replacement on
page 6-34.

(Automatic transaxle)
If the engine is turned off while the
selector lever is in a position other than
P, the ignition switches to ACC.

▼ Emergency Engine Stop

Continuously pressing the push button
start or quickly pressing it any number of
times while the engine is running or the
vehicle is being driven will turn the engine
off immediately. The ignition switches to
ACC.

When Driving

Start/Stop Engine

4-10

CX-3_8GR7-EA-18B_Edition1

2017-12-20 16:18:14

Meters and Gauges


Some models.

Type A

Type B 

Type C 

Steering Switch

 (Digital Speed Meter Type)

 (Analog Speed Meter Type (With Tachometer))

 (Analog Speed Meter Type (Without Tachometer))

Instrument Cluster

Speedometer..........................................................................................................page 4-12

Odometer, Trip Meter and Trip Meter Selector.................................................... page 4-12

Tachometer............................................................................................................ page 4-16

Fuel Gauge............................................................................................................ page 4-16

Dashboard Illumination.........................................................................................page 4-17

Outside Temperature Display................................................................................page 4-18

Cruise Control Set Vehicle Speed Display............................................................page 4-18

When Driving

Instrument Cluster and Display

4-11

CX-3_8GR7-EA-18B_Edition1

2017-12-20 16:18:14

Active Driving Display......................................................................................... page 4-21

Trip Computer and INFO Switch..........................................................................page 4-18

Speed Unit Selector...............................................................................................page 4-12

Odometer, Trip Meter, Trip Computer and Trip Meter Selector...........................page 4-14

▼ Speedometer

The speedometer indicates the speed of the
vehicle.

NOTE
(Analog speedometer type)
If a few seconds have elapsed after
switching the ignition off, the needle may
deviate. However, this does not indicate a
problem.

▼ Speed Unit Selector (Digital

Speedometer)

*

In some countries, you may have to
change the speed units between km/h and
mph.
Press the speed unit selector for 1.5
seconds or more.
The speed units for the speedometer will
change between km/h and mph.
 

Speedometer

Speed unit selector

▼ Odometer, Trip Meter and Trip

Meter Selector

*

The display mode can be changed from
odometer to trip meter A to trip meter B
and then back to odometer by pressing the
selector while one of them is displayed.
The selected mode will be displayed.
 

Press the selector

Press the selector

Press the selector

Odometer

Trip meter A

Trip meter B

Selector


Odometer

The odometer records the total distance
the vehicle has been driven.

When Driving

Instrument Cluster and Display

4-12

*Some models.

CX-3_8GR7-EA-18B_Edition1

2017-12-20 16:18:14

Trip meter

The trip meter can record the total distance
of two trips. One is recorded in trip meter
A, and the other is recorded in trip meter
B.
 
For instance, trip meter A can record the
distance from the point of origin, and trip
meter B can record the distance from
where the fuel tank is filled.
 
When trip meter A is selected, pressing the
selector again within one second will
change to trip meter B mode.
 
When trip meter A is selected, TRIP A
will be displayed. When trip meter B is
selected, TRIP B will be displayed.
 
The trip meter records the total distance
the vehicle is driven until the meter is
again reset. Return it to “0.0” by
depressing and holding the selector for one
second or more. Use this meter to measure
trip distances and to compute fuel
consumption.

NOTE

(Vehicles with type B audio)
If the fuel economy data is reset using
the fuel economy monitor, or trip A is
reset using the trip meter when the
function which synchronizes the fuel
economy monitor and the trip meter is
on, the fuel economy data and trip A are
reset simultaneously.
Refer to Fuel Economy Monitor on page
4-71.

Only the trip meters record tenths of
kilometers (miles).

The trip record will be erased when:

The power supply is interrupted
(blown fuse or the battery is
disconnected).

The vehicle is driven over 9999.9 km
(mile).

When Driving

Instrument Cluster and Display

4-13

CX-3_8GR7-EA-18B_Edition1

2017-12-20 16:18:14

▼ Odometer, Trip Meter, Trip

Computer and Trip Meter Selector

*

The display mode can be changed between
trip meter A and trip meter B by pressing
the selector while one of them is
displayed. The selected mode will be
displayed.

Selector

Current fuel economy mode

Distance-to-empty mode

Trip meter B

Trip meter A

Odometer

NOTE
When the ignition is switched to ACC or
off, the odometer or trip meters cannot be
displayed, however, pressing the selector
can inadvertently switch the trip meters or
reset them during an approximate
ten-minute period in the following cases:

After the ignition is switched to off from
ON.

After the driver's door is opened.

Odometer

The odometer records the total distance
the vehicle has been driven.

Trip meter

The trip meter can record the total distance
of two trips. One is recorded in trip meter
A, and the other is recorded in trip meter B.
For instance, trip meter A can record the
distance from the point of origin, and trip
meter B can record the distance from where
the fuel tank is filled.
When trip meter A is selected, pressing the
selector again within one second will
change to trip meter B mode.
When trip meter A is selected, TRIP A
will be displayed. When trip meter B is
selected, TRIP B will be displayed.
The trip meter records the total distance the
vehicle is driven until the meter is again
reset. Return it to “0.0” by holding the
selector depressed for 1 second or more.
Use this meter to measure trip distances and
to compute fuel consumption.

NOTE

(Vehicles with type B audio)
If the fuel economy data is reset using
the fuel economy monitor, or trip A is
reset using the trip meter when the
function which synchronizes the fuel
economy monitor and the trip meter is
on, the fuel economy data and trip A are
reset simultaneously.
Refer to Fuel Economy Monitor on page
4-71.

Only the trip meters record tenths of
kilometers (miles).

The trip record will be erased when:

The power supply is interrupted
(blown fuse or the battery is
disconnected).

The vehicle is driven over 9999.9 km
(mile).

When Driving

Instrument Cluster and Display

4-14

*Some models.

CX-3_8GR7-EA-18B_Edition1

2017-12-20 16:18:14

Trip Computer

The following information can be selected
by pressing the selector with the ignition
switched ON.

Approximate distance you can travel on
the available fuel

Current fuel economy

If you have any problems with your trip
computer, consult an Authorized Mazda
Dealer.

Distance-to-empty mode

This mode displays the approximate
distance you can travel on the remaining
fuel based on the fuel economy.
The distance-to-empty will be calculated
and displayed every second.

NOTE

Even though the distance-to-empty
display may indicate a sufficient amount
of remaining driving distance before
refueling is required, refuel as soon as
possible if the fuel level is very low or
the low fuel warning light illuminates.

The display may not change unless you
add more than approximately 9 L (2.3
US gal, 1.9 Imp gal) of fuel.

The distance-to-empty is the
approximate remaining distance the
vehicle can be driven until all the
graduation marks in the fuel gauge
indicating the remaining fuel supply
disappear.

If there is no past fuel economy
information such as after first
purchasing your vehicle or the
information is deleted when the battery
cables are disconnected, the actual
distance-to empty/range may differ from
the amount indicated.

Current fuel economy mode

This mode displays the current fuel
economy by calculating the amount of fuel
consumption and the distance traveled.
Current fuel economy will be calculated
and displayed every 2 seconds.

When you've slowed to about 5 km/h (3
mph), - - - L/100 km (- - - mpg) will be
displayed.

When Driving

Instrument Cluster and Display

4-15

CX-3_8GR7-EA-18B_Edition1

2017-12-20 16:18:14

▼ Tachometer

*

The tachometer shows engine speed in
thousands of revolutions per minute (rpm).

CAUTION

Do not run the engine with the tachometer
needle in the RED ZONE.
This may cause severe engine damage.
Type A
 

Striped zone

Red zone

Type B
 

Striped zone

Red zone

NOTE
When the tachometer needle enters the
STRIPED ZONE, this indicates to the
driver that the gears should be shifted
before entering the RED ZONE.

▼ Fuel Gauge

The fuel gauge shows approximately how
much fuel is remaining in the tank when
the ignition is switched ON. We
recommend keeping the tank over 1/4 full.
 

Full

1/4 Full

Empty

If the low fuel warning light illuminates or
the fuel level is very low, refuel as soon as
possible.
Refer to Taking Action on page 7-34.

NOTE

After refueling, it may require some time
for the indicator to stabilize. In addition,
the indicator may deviate while driving
on a slope or curve since the fuel moves
in the tank.

The display indicating a quarter or less
remaining fuel has more segments to
show the remaining fuel level in greater
detail.

The direction of the arrow ( ) indicates
that the fuel-filler lid is on the left side
of the vehicle.

When Driving

Instrument Cluster and Display

4-16

*Some models.

CX-3_8GR7-EA-18B_Edition1

2017-12-20 16:18:14

▼ Dashboard Illumination

(Without auto-light control)
When the position lights are turned on
with the ignition switched ON, the
brightness of the dashboard illumination is
dimmed.
(With auto-light control)
When the position lights are turned on
with the ignition switched ON, the
brightness of the dashboard illumination is
dimmed. However, when the light sensor
detects that the surrounding area is bright
such as when the position lights are turned
on in the daytime, the dashboard
illumination does not dim.

NOTE

(With auto-light control)
When the ignition is switched ON in the
early evening or at dusk, the dashboard
illumination is dimmed for several
seconds until the light sensor detects the
brightness of the surrounding area,
however, the dimmer may cancel after
the brightness is detected.

When the position lights are turned on,
the position lights indicator light in the
instrument cluster turns on.
Refer to Headlights on page 4-43.

The brightness of the instrument cluster
and dashboard illuminations can be
adjusted by rotating the knob.

The brightness decreases by rotating the
knob to the left. A beep sound will be
heard when the knob has been rotated to
the maximum dim position.

The brightness increases by rotating the
knob to the right.

Dim

Bright

Function for cancelling illumination
dimmer

The illumination dimmer can be canceled
by rotating the dashboard illumination
knob to the right until a beep sound is
heard while the instrument cluster is
dimmed with the ignition switched ON. If
the instrument cluster's visibility is
reduced due to glare from surrounding
brightness, cancel the illumination
dimmer.

NOTE

When the illumination dimmer is
canceled, the instrument cluster cannot
be dimmed even if the position lights are
turned on.

When the illumination dimmer is
canceled, the screen in the center
display switches to constant display of
the daytime screen.

When Driving

Instrument Cluster and Display

4-17

CX-3_8GR7-EA-18B_Edition1

2017-12-20 16:18:14

▼ Outside Temperature Display

When the ignition is switched ON, the
outside temperature is displayed.
 

NOTE

Under the following conditions, the
outside temperature display may differ
from the actual outside temperature
depending on the surroundings and
vehicle conditions:

Significantly cold or hot temperatures.

Sudden changes in outside
temperature.

The vehicle is parked.

The vehicle is driven at low speeds.

Changing the Temperature Unit of the
Outside Temperature Display (Vehicles
with Type B audio)

The outside temperature unit can be
switched between Celsius and Fahrenheit.
Settings can be changed by operating the
center display screen.
Refer to Personalization Features on page
9-9.

NOTE
When the temperature unit indicated in the
outside temperature display is changed,
the temperature unit indicated in the
engine coolant gauge display changes in
conjunction with it.

▼ Cruise Control Set Vehicle Speed

Display

*

The vehicle speed preset using the cruise
control is displayed.
 

▼ Trip Computer and INFO Switch

*

The following information can be selected
by pressing the INFO switch with the
ignition switched ON.

Distance-to-empty mode

Average fuel economy mode

Current fuel economy mode

Average vehicle speed

If you have any problems with your trip
computer, consult an Authorized Mazda
Dealer.

When Driving

Instrument Cluster and Display

4-18

*Some models.

CX-3_8GR7-EA-18B_Edition1

2017-12-20 16:18:14

Distance-to-empty mode

This mode displays the approximate
distance you can travel on the remaining
fuel based on the fuel economy.
 
The distance-to-empty will be calculated
and displayed every second.
 

NOTE

Even though the distance-to-empty
display may indicate a sufficient amount
of remaining driving distance before
refueling is required, refuel as soon as
possible if the fuel level is very low or
the low fuel warning light illuminates.

The display may not change unless you
add more than approximately 9 L (2.3
US gal, 1.9 Imp gal) of fuel.

The distance-to-empty is the
approximate remaining distance the
vehicle can be driven until all the
graduation marks in the fuel gauge
(indicating the remaining fuel supply)
disappear.

If there is no past fuel economy
information such as after first
purchasing your vehicle or the
information is deleted when the battery
cables are disconnected, the actual
distance-to empty/range may differ from
the amount indicated.

Average fuel economy mode

This mode displays the average fuel
economy by calculating the total fuel
consumption and the total traveled
distance since purchasing the vehicle,
re-connecting the battery after
disconnection, or resetting the data. The
average fuel economy is calculated and
displayed every minute.
 

To clear the data being displayed, press the
INFO switch for more than 1.5 seconds.
After pressing the INFO switch, - - -
L/100 km (- - - mpg) will be displayed for
about 1 minute before the fuel economy is
recalculated and displayed.

Current fuel economy mode

This mode displays the current fuel
economy by calculating the amount of fuel
consumption and the distance traveled.
 
Current fuel economy will be calculated
and displayed every 2 seconds.
 

When you've slowed to about 5 km/h (3
mph), - - - L/100 km (- - - mpg) will be
displayed.

When Driving

Instrument Cluster and Display

4-19

CX-3_8GR7-EA-18B_Edition1

2017-12-20 16:18:14

Average vehicle speed mode

This mode displays the average vehicle
speed by calculating the distance and the
time traveled since connecting the battery
or resetting the data.
Average vehicle speed will be calculated
and displayed every 10 seconds.
 

To clear the data being displayed, press the
INFO switch for more than 1.5 seconds.
After pressing the INFO switch, - - - km/h
(- - - mph) will be displayed for about 1
minute before the vehicle speed is
recalculated and displayed.

When Driving

Instrument Cluster and Display

4-20

CX-3_8GR7-EA-18B_Edition1

2017-12-20 16:18:14

Active Driving Display

*

Optical receiver

Mirror

Combiner

WARNING

Always adjust the display brightness and position with the vehicle stopped:
Adjusting the display brightness and position while driving the vehicle is dangerous as doing
so could distract your attention from the road ahead and lead to an accident.

CAUTION

Do not try to adjust the angle or open/close the active driving display manually.

Fingerprints on the display will make it difficult to view and using excessive force when
operating it could cause damage.

Do not place objects in the vicinity of the active driving display. The active driving display

may not operate or any interference with its operation could cause damage.

Do not place beverages near the active driving display. If water or other liquids are splashed

on the active driving display, it could cause damage.

Do not place objects above the active driving display or apply stickers to the dust-proof

sheet/optical receiver as they will cause interference.

A sensor is integrated to control the display's luminosity. If the optical receiver is covered,

the display's luminosity will lower making the display difficult to view.

Do not allow intense light to hit the optical receiver. Otherwise, it could cause damage.

NOTE

Wearing polarized sunglasses will reduce the visibility of the active driving display due to
the characteristics of the display.

If the battery has been removed and re-installed or the battery voltage is low, the adjusted
position may deviate.

When Driving

Instrument Cluster and Display

*Some models.

4-21

CX-3_8GR7-EA-18B_Edition1

2017-12-20 16:18:14

The display may be difficult to view or temporarily affected by weather conditions such as
rain, snow, light, and temperature.

If the audio system is removed, the active driving display cannot be operated.

The active driving display indicates the following information:

Blind Spot Monitoring (BSM) Operation Conditions and Warnings
Refer to Blind Spot Monitoring (BSM) on page 4-90.

Distance Recognition Support System (DRSS) Warnings
Refer to Distance Recognition Support System (DRSS) on page 4-102.

Traffic Sign Recognition System (TSR) traffic signs and Warnings
Refer to Traffic Sign Recognition System (TSR) on page 4-96.

Mazda Radar Cruise Control with Stop & Go function (MRCC with Stop & Go function)
Operation Conditions and Warnings
Refer to Mazda Radar Cruise Control with Stop & Go function (MRCC with Stop & Go
function) on page 4-107.

Lane Departure Warning System (LDWS) Operation Conditions and Warnings
Refer to Lane Departure Warning System (LDWS) on page 4-84.

Advanced Smart City Brake Support (Advanced SCBS) Warnings
Refer to Advanced Smart City Brake Support (Advanced SCBS) on page 4-119.

Smart City Brake Support (SCBS) Warnings
Refer to Smart City Brake Support (SCBS) on page 4-123.

Smart Brake Support (SBS) Warnings
Refer to Smart Brake Support (SBS) on page 4-127.

Cruise Control Operation Conditions
Refer to Cruise Control on page 4-140.

Navigation Guidance (vehicles with navigation system)

Speed limit indicator (vehicles with navigation system)

Vehicle Speed

When Driving

Instrument Cluster and Display

4-22

CX-3_8GR7-EA-18B_Edition1

2017-12-20 16:18:14

Each setting/adjustment for the active driving display can be performed on the center
display.
1. Select the 

 icon on the home screen and display the Settings screen.

2. Select the AD-Disp tab.
3. Select the desired item and perform the setting/adjustment.

Method for adjusting screen brightness (automatically/manually)

Screen brightness initial settings (automatic adjustment is selected)

Screen brightness adjustment (manual adjustment is selected)

Display position of active driving display (display height)

Active driving display ON/OFF (indication)

Navigation guidance ON/OFF

Reset settings (reset)

NOTE

The desired driving position (display position, brightness level, display information) can
be called up after programming the position.
Refer to Driving Position Memory on page 2-7.

When Driving

Instrument Cluster and Display

4-23

CX-3_8GR7-EA-18B_Edition1

2017-12-20 16:18:14


Content   ..  7  8  9  10   ..