Mazda B-Series (2010 year). Manual - part 4


  Index      Mazda     Mazda B-Series - service manual 2010 year in english


Search            


Content   ..  2  3  4  5   ..


Mazda B-Series (2010 year). Manual - part 4


MULTI-FUNCTION LEVER
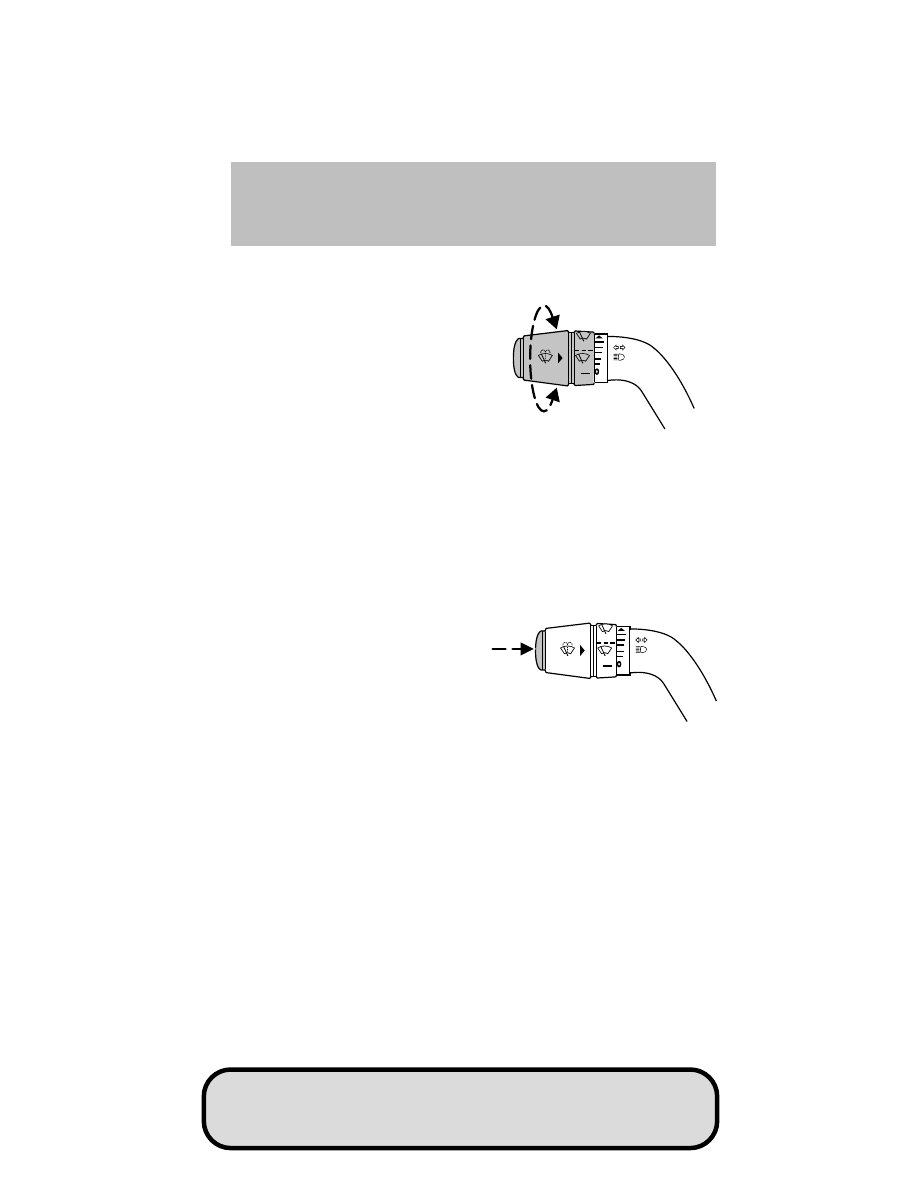
Windshield wiper:

Rotate the end

of the control away from you to
increase the speed of the wipers
(from desired interval to low or high
speed position); rotate towards you
to decrease the speed of the wipers.

Note:

Heavy ice and snow can jam the wiper blades and overheat the

wiper motor. If this happens, the motor will automatically stop the
operation of the blades for a short period of time. If this happens while
driving, turn off the wiper switch, park off the right-of-way, and remove
the snow and ice. After a short period of time, turn the switch on and
the blades should operate normally. If they don’t resume functioning,
consult an authorized Mazda dealer as soon as possible. Wait until the
weather clears before trying to drive with the wipers inoperative.

Windshield washer:

Press the end

of the stalk:
• briefly: causes a single swipe of

the wipers without washer fluid.

• a quick press and hold: the

wipers will swipe several times
with washer fluid.

• a long press and hold: the wipers

and washer fluid will be activated
for up to 10 seconds.

Courtesy wipe feature:

One extra wipe will occur a few seconds after

washing the front window to clear any excess washer fluid remaining on
the windshield.

Note:

Do not operate the washer when the washer reservoir is empty.

This may cause the washer pump to overheat. Check the washer fluid
level frequently. Do not operate the wipers when the windshield is dry.
This may scratch the glass, damage the wiper blades and cause the wiper
motor to burn out. Before operating the wiper on a dry windshield,
always use the windshield washer. In freezing weather, be sure the wiper
blades are not frozen to the windshield before operating the wipers.

Driver Controls

58

REVIEW COPY ——
2010 B-Series (mbs), Owners Guide (own2002), 1st Printing, Market:
Canadian_French (fr_can)

TILT STEERING WHEEL (IF EQUIPPED)

To adjust the steering wheel:

1. Pull and hold the steering wheel

release control toward you.

2. Move the steering wheel up or

down until you find the desired
location.

3. Release the steering wheel

release control. This will lock
the steering wheel in position.

WARNING:

Adjusting the steering wheel while the vehicle is

moving is dangerous. Moving it can very easily cause the driver

to abruptly turn to the left or right. This can lead to loss of control or
an accident. Never adjust the steering wheel while the vehicle is
moving.

CENTER CONSOLE (IF EQUIPPED)

Your vehicle may be equipped with a
variety of console features. These
include:
• Utility compartment with

cassette/compact disc storage

• Cupholders
• Flip up armrest

WARNING:

Use only soft

cups in the cupholder. Hard

objects can injure you in a
collision.

Driver Controls

59

REVIEW COPY ——
2010 B-Series (mbs), Owners Guide (own2002), 1st Printing, Market:
Canadian_French (fr_can)

AUXILIARY POWER POINT (12VDC)

Power outlets are designed for accessory plugs only. Do not insert
any other object in the power outlet as this will damage the
outlet and blow the fuse. Do not hang any type of accessory or
accessory bracket from the plug. Improper use of the power
outlet can cause damage not covered by your warranty.

The auxiliary power points are located on the instrument panel.

Do not use the power point for operating the cigarette lighter element (if
equipped).

To prevent the fuse from being blown, do not use the power point(s)
over the vehicle capacity of 12 VDC/180W. If the power point or cigar
lighter socket is not working, a fuse may have blown. Refer to Fuses and
relays 
in the Roadside Emergencies chapter for fuse ratings and
information on checking and replacing fuses.

To have full capacity usage of your power point, the engine is required to
be running to avoid unintentional discharge of the battery. To prevent
the battery from being discharged:
• do not use the power point longer than necessary when the engine is

not running,

• do not leave battery chargers, video game adapters, computers and

other devices plugged in overnight or when the vehicle is parked for
extended periods.

Always keep the power point caps closed when not being used.

POWER WINDOWS (IF EQUIPPED)

WARNING:

Do not leave children unattended in the vehicle and

do not let children play with the power windows. They may

seriously injure themselves.

WARNING:

When closing the power windows, you should verify

they are free of obstructions and ensure that children and/or

pets are not in the proximity of the window openings.

Driver Controls

60

REVIEW COPY ——
2010 B-Series (mbs), Owners Guide (own2002), 1st Printing, Market:
Canadian_French (fr_can)

Press and pull the window switches
to open and close windows.
• Press down (to the first detent)

and hold the switch to open.

• Pull up and hold the switch to

close.

One-touch down

Allows the driver’s window to open
fully without holding the control
down. Press the switch completely
down to the second detent and
release quickly. The window will
open fully. Momentarily press the
switch to any position to stop the
window operation.

INTERIOR MIRROR
The interior rear view mirror has two pivot points on the support arm
which lets you adjust the mirror up or down and from side to side.

WARNING:

Do not adjust the mirror while the vehicle is in

motion.

EXTERIOR MIRRORS

Power mirror control (if equipped)

WARNING:

Do not adjust the mirror while the vehicle is in

motion.

To adjust your mirrors:

1. Rotate the control clockwise to

adjust the right mirror and
rotate the control
counterclockwise to adjust the
left mirror.

2. Move the control in the

direction you wish to tilt the
mirror.

Driver Controls

61

REVIEW COPY ——
2010 B-Series (mbs), Owners Guide (own2002), 1st Printing, Market:
Canadian_French (fr_can)

3. Return to the center position to lock mirrors in place.

Fold-away mirrors

Pull the side mirrors in carefully
when driving through a narrow
space, like an automatic car wash.

CRUISE CONTROL (IF EQUIPPED)

With cruise control set, you can maintain a set speed without keeping
your foot on the accelerator pedal.

WARNING:

Do not use the cruise control in heavy traffic or on

roads that are winding, slippery, or unpaved. You may lose

control of the vehicle.

WARNING:

Do not shift the gearshift lever into N (Neutral)

with the cruise control on. You may lose control of the vehicle or

cause engine system damage.

Using cruise control

The cruise controls are located on the steering wheel. The following
buttons work with cruise control:

ON:

Press to turn system on.

OFF:

Press to turn system off.

RES (Resume):

Press to resume a

set speed.

SET+:

Press to set the speed or

increase the set speed.

CST- (Coast):

Press to decrease

the set speed.

Driver Controls

62

REVIEW COPY ——
2010 B-Series (mbs), Owners Guide (own2002), 1st Printing, Market:
Canadian_French (fr_can)

Setting cruise control

1. Press and release ON.

2. Accelerate to the desired speed.

3. Press and release SET+.

4. Take your foot off the accelerator pedal.

5. The indicator light

on the instrument cluster will turn on.

Note:
• Vehicle speed may vary momentarily when driving up and down a

steep hill.

• If the vehicle speed increases above the set speed on a downhill, you

may want to apply the brakes to reduce the speed.

• If the vehicle speed decreases more than 10 mph (16 km/h) below

your set speed on an uphill, your speed control will disengage.

Disengaging speed control

To disengage the speed control, press the brake pedal or the clutch
pedal (if equipped). Disengaging the speed control will not erase
previous set speed.

Note:

When you use the clutch pedal to disengage the speed control,

the engine speed may briefly increase, this is normal.

Resuming a set speed

Press and release RES. This will automatically return the vehicle to the
previously set speed.

Increasing speed while using speed control

To set a higher speed:
• Press and hold SET+ until you get to the desired speed, then release

the control. You can also use SET+ to operate the tap-up function.
Press and release SET+ to increase the set speed by 1 mph
(1.6 km/h) increments.

• Use the accelerator pedal to get to the desired speed. When the

vehicle reaches that speed press and release the SET + control.

Driver Controls

63

REVIEW COPY ——
2010 B-Series (mbs), Owners Guide (own2002), 1st Printing, Market:
Canadian_French (fr_can)

Reducing speed while using speed control

To reduce a set speed:
• Press and hold CST- until you get to the desired speed, then release

the control. You can also use CST- to operate the tap-down function.
Press and release the CST- to decrease the set speed in 1 mph
(1.6 km/h) increments.

• Press the brake pedal or the clutch pedal (if equipped) until the

desired vehicle speed is reached, press SET+.

Turning off speed control

To turn off the speed control, press OFF or turn off the ignition.

Note:

When you turn off the speed control or the ignition, your speed

control set speed memory is erased.

Note:

Fully pressing the clutch pedal may cause a flare in engine RPM

as the throttle is returned to idle. This is normal.

Driver Controls

64

REVIEW COPY ——
2010 B-Series (mbs), Owners Guide (own2002), 1st Printing, Market:
Canadian_French (fr_can)

KEYS

The key operates all locks on your vehicle. You should always carry a
second key with you in a safe place in case you require it in an
emergency.

If your vehicle is equipped with the SecuriLock

威 passive anti-theft

system, your keys are coded to your vehicle; using a non-coded key will
not permit your vehicle to start. If you lose your dealer supplied keys,
replacement keys are available through your authorized dealer.

POWER DOOR LOCKS (IF EQUIPPED)

Press the control to unlock or lock
all the doors.

REMOTE ENTRY SYSTEM (IF EQUIPPED)

This device complies with part 15 of the FCC rules and with RS-210 of
Industry Canada. Operation is subject to the following two conditions:
(1) This device may not cause harmful interference, and (2) This device
must accept any interference received, including interference that may
cause undesired operation.

Changes or modifications not expressly approved by the party
responsible for compliance could void the user’s authority to
operate the equipment.

The typical operating range for your remote entry transmitter is
approximately 33 feet (10 meters). A decrease in operating range could
be caused by:
• weather conditions,
• nearby radio towers,
• structures around the vehicle, or
• other vehicles parked next to your vehicle.

Locks and Security

65

REVIEW COPY ——
2010 B-Series (mbs), Owners Guide (own2002), 1st Printing, Market:
Canadian_French (fr_can)

Your vehicle is equipped with a remote entry system which allows you to:
• unlock the vehicle doors without

a key.

• lock all the vehicle doors without

a key.

• activate the personal alarm.
If there are problems with the
remote entry system, make sure to
take ALL remote entry
transmitters

with you to your

authorized dealer in order to aid in
troubleshooting the problem.

Unlocking the doors

1. Press

and release to unlock the driver’s door. Note: The interior

lamps will illuminate.

2. Press

and release again within three seconds to unlock all the

doors.

Vehicles with alarm system, when the doors are not opened after
45 seconds, the system will lock them again.

Locking the doors

1. Press

and release to lock all the doors. The external lights will

flash once to confirm lock; if any of the doors are not properly
closed, the lamps will not flash.

2. If

is pressed a second time within three seconds, the lamps will

flash again and the horn will chirp to confirm all doors are locked
and closed. If either door is ajar the lights will not flash and the horn
will chirp twice.

Car finder

Press

twice within three seconds. The horn will chirp and the turn

lamps will flash. It is recommended that this method be used to locate
your vehicle, rather than using the panic alarm.

Sounding a panic alarm
Press

to activate the alarm. The horn will sound and the parklamps

will flash for approximately three minutes. Press again or turn the
ignition to the on position to deactivate, or wait for the alarm to timeout
in three minutes.

Locks and Security

66

REVIEW COPY ——
2010 B-Series (mbs), Owners Guide (own2002), 1st Printing, Market:
Canadian_French (fr_can)

Note:

The panic alarm will only operate when the ignition is in the off

position.

Replacing the battery

The remote entry transmitter uses one coin type three-volt lithium
battery CR2032 or equivalent.

To replace the battery:

1. Twist a thin coin between the

two halves of the remote entry
transmitter near the key ring.
DO NOT TAKE THE RUBBER
COVER AND CIRCUIT BOARD
OFF THE FRONT HOUSING OF
THE REMOTE ENTRY
TRANSMITTER.

2. Do not wipe off any grease on

the battery terminals on the
back surface of the circuit
board.

3. Remove the old battery.

Note:

Please refer to local

regulations when disposing of
transmitter batteries.

4. Insert the new battery. Refer to

the diagram inside the remote
entry transmitter for the correct orientation of the battery. Press the
battery down to ensure that the battery is fully seated in the battery
housing cavity.

5. Snap the two halves back together.

Note:

Replacement of the battery will not cause the remote transmitter

to become deprogrammed from your vehicle. The remote transmitter
should operate normally after battery replacement.

Replacing lost remote entry transmitters

If you would like to have your remote entry transmitter reprogrammed
because you lost one, or would like to buy additional remote entry
transmitters, you can either reprogram them yourself, or take all remote
entry transmitters

to your authorized dealer for reprogramming.

Locks and Security

67

REVIEW COPY ——
2010 B-Series (mbs), Owners Guide (own2002), 1st Printing, Market:
Canadian_French (fr_can)

How to reprogram your remote entry transmitters

You must have all remote entry transmitters (maximum of four)
available before beginning this procedure.

Note:

Ensure the brake pedal is not

pressed during this sequence.

To reprogram the remote entry
transmitters:

1. Ensure the vehicle is

electronically unlocked.

2. Put the key in the ignition.

3. Turn the key from the 2 (lock)

position to 3 (off).

4. Cycle eight times rapidly (within 10 seconds) between the 3 (off)

position and 4 (on). Note: The eighth turn must end in the 4 (on)
position.

5. The doors will lock, then unlock, to confirm that the programming

mode has been activated.

6. Within 20 seconds press any button on the remote entry transmitter.

Note:

If more than 20 seconds have passed you will need to start

the procedure over again.

7. The doors will lock, then unlock, to confirm that this remote entry

transmitter has been programmed.

8. Repeat Step 6 to program each additional remote entry transmitter.

9. Turn the ignition to the 3 (off) position after you have finished

programming all of the remote entry transmitters. Note: After
20 seconds, you will automatically exit the programming mode.

10. The doors will lock, then unlock, to confirm that the programming

mode has been exited.

Illuminated entry

The interior lamps illuminate when the remote entry system is used to
unlock the door(s) or sound the personal alarm.

The illuminated entry system will turn off the interior lights if:
• the ignition switch is turned to the on position, or
• the remote transmitter lock control is pressed, or
• after 25 seconds of illumination.

3

2

1

5

4

Locks and Security

68

REVIEW COPY ——
2010 B-Series (mbs), Owners Guide (own2002), 1st Printing, Market:
Canadian_French (fr_can)

The inside lights will not turn off if:
• they have been turned on with the dimmer control, or
• any door is open.
The battery saver will shut off the interior lamps after several minutes if
they are left on accidentally.

SECURILOCK

姞 PASSIVE ANTI-THEFT SYSTEM (IF EQUIPPED)

SecuriLock

威 passive anti-theft system is an engine immobilization

system. This system is designed to help prevent the engine from being
started unless a coded key programmed to your vehicle is used. The
use of the wrong type of coded key may lead to a “no-start” condition.

Your vehicle comes with two coded keys; additional coded keys may be
purchased from your authorized dealer. The authorized dealer can
program your spare keys to your vehicle or you can program the keys
yourself. Refer to Programming spare keys for instructions on how to
program the coded key.

Note:

The SecuriLock

威 passive anti-theft system is not compatible with

non-Mazda aftermarket remote start systems. Use of these systems may
result in vehicle starting problems and a loss of security protection.

Note:

Large metallic objects, electronic devices that are used to

purchase gasoline or similar items, or a second coded key on the same
key chain may cause vehicle starting issues. You need to prevent these
objects from touching the coded key while starting the engine. These
objects will not cause damage to the coded key, but may cause a
momentary issue if they are too close to the key when starting the
engine. If a problem occurs, turn the ignition off, remove all objects on
the key chain away from the coded key and restart the engine.

Note: Do not leave a duplicate coded key in the vehicle. Always
take your keys and lock all doors when leaving the vehicle.

Locks and Security

69

REVIEW COPY ——
2010 B-Series (mbs), Owners Guide (own2002), 1st Printing, Market:
Canadian_French (fr_can)

Anti-theft indicator
The anti-theft indicator is located in the instrument cluster.

Vehicles equipped with the
SecuriLock

威 passive anti-theft

system behave as follows:
• When the ignition is in the off

position, the indicator will flash once every two seconds for a total of
10 seconds to indicate the SecuriLock

威 system is functioning as a

theft deterrent.

• When the ignition is in the on position, the indicator will glow for

three seconds to indicate a programmed key has been validated and
the SecuriLock

威 passive anti-theft system has enabled the engine.

Vehicles without the SecuriLock

威 passive anti-theft system behave as

follows:
• When the ignition is in the off position, the indicator will not flash.

• When the ignition is in the on position, the indicator will glow for

three seconds to indicate the engine is enabled.

Replacement keys
If your keys are lost or stolen and you don’t have an extra coded key,
you will need to have your vehicle towed to an authorized dealer. The
key codes need to be erased from your vehicle and new coded keys will
need to be programmed.

Replacing coded keys can be very costly. Store an extra programmed key
away from the vehicle in a safe place to help prevent any
inconveniences. Please visit an authorized dealer to purchase additional
spare or replacement keys.

Programming spare keys
You can program your own coded keys to your vehicle. Please read and
understand the entire procedure before you begin.
Tips:
• A maximum of eight keys can be coded to your vehicle.

• Only use SecuriLock威 keys.

• You must have two previously programmed coded keys (keys that

already operate your vehicle’s engine) and the new unprogrammed
key(s) readily accessible.

• If no previously programmed coded keys are available, you must take

your vehicle to your authorized dealer to have the spare key(s)
programmed.

Locks and Security

70

REVIEW COPY ——
2010 B-Series (mbs), Owners Guide (own2002), 1st Printing, Market:
Canadian_French (fr_can)

1. Insert a previously programmed

coded key into the ignition.

2. Turn the ignition from the 3

(off) position to the 4 (on)
position. Keep the ignition in
the 4 (on) position for at least
one second, but no more than
10 seconds.

3. Turn the ignition to the 3 (off)

position, and remove the coded
key from the ignition.

4. After three seconds but within 10 seconds of removing the

previously programmed coded key, insert the other previously
programmed coded key into the ignition.

5. Turn the ignition from the 3 (off) position to the 4 (on) position.

Keep the ignition in the 4 (on) position for at least one second but
not more than 10 seconds.

6. Turn the ignition to the 3 (off) position, and remove the second key

from the ignition.

7. After three seconds but within 20 seconds of removing the

previously programmed coded key, insert the unprogrammed key
(new/valet key) into the ignition.

8. Turn the ignition from the 3 (off) position to the 4 (on) position.

Keep the ignition in the 4 (on) position for at least one second.

9. Your new unprogrammed key is now programmed.

If the key has been successfully programmed it will start the vehicle’s
engine and the theft indicator light will illuminate for three seconds and
then go out. If the key was not successfully programmed, it will not start
your vehicle’s engine and the theft indicator light will flash on and off
rapidly. If failure repeats, bring your vehicle to your authorized dealer to
have the new key(s) programmed.

To program additional new unprogrammed key(s), repeat this procedure
from Step 1 for each additional key.

3

2

1

5

4

Locks and Security

71

REVIEW COPY ——
2010 B-Series (mbs), Owners Guide (own2002), 1st Printing, Market:
Canadian_French (fr_can)

SEATING

WARNING:

Reclining the seatback can cause an occupant to

slide under the seat’s seat belt, resulting in severe personal

injuries in the event of a collision.

WARNING:

Do not pile cargo higher than the seatbacks to

reduce the risk of injury in a collision or sudden stop.

WARNING:

Before returning the seatback to its original

position, make sure that cargo or any objects are not trapped

behind the seatback. After returning the seatback to its original
position, pull on the seatback to ensure that it has fully latched. An
unlatched seat may become dangerous in the event of a sudden stop or
collision.

Adjustable head restraints

Your vehicle is equipped with front row outboard head restraints that are
vertically adjustable.

WARNING:

To minimize the risk of neck injury in the event of a

crash, the driver and passenger occupants should not sit in

and/or operate the vehicle, until the head restraint is placed in its
proper position. The driver should never adjust the head restraint
while the vehicle is in motion.

The adjustable head restraints
consist of:
• a trimmed energy absorbing foam

and structure (1),

• two steel stems (2),
• a guide sleeve adjust/release

button (3),

• and a guide sleeve unlock/remove

button (4).

Seating and Safety Restraints

72

REVIEW COPY ——
2010 B-Series (mbs), Owners Guide (own2002), 1st Printing, Market:
Canadian_French (fr_can)

To adjust the head restraint, do the following:

1. Adjust the seatback to an upright driving/riding position.

2. Raise the head restraint by

pulling up on the head restraint.

3. Lower the head restraint by

pressing and holding the guide
sleeve adjust/release button and
pushing down on the head
restraint.

Properly adjust the head restraint so that the top of the head restraint is
even with the top of your head and positioned as close as possible to the
back of your head. For occupants of extremely tall stature, adjust the
head restraint to its full up position.

WARNING:

The adjustable head restraint is a safety device.

Whenever possible it should be installed and properly adjusted

when the seat is occupied.

Seating and Safety Restraints

73

REVIEW COPY ——
2010 B-Series (mbs), Owners Guide (own2002), 1st Printing, Market:
Canadian_French (fr_can)


Content   ..  2  3  4  5   ..