Mazda B4000 Truck (2007 year). Manual - part 7


  Index      Mazda     Mazda B4000 Truck - service manual 2007 year in english


Search            


Content   ..  5  6  7  8   ..


Mazda B4000 Truck (2007 year). Manual - part 7


Booster seats position a child so that safety belts fit better. They lift the
child up so that the lap belt rests low across the hips and the knees
bend comfortably. Booster seats also make the shoulder belt fit better
and more comfortably for growing children.

When children should use booster seats

Children need to use booster seats from the time they outgrow the
toddler seat until they are big enough for the vehicle seat and
lap/shoulder belt to fit properly. Generally this is when they weigh about
80 lb. (about 8 to 12 years old).

Booster seats should be used until you can answer YES to ALL of these
questions:
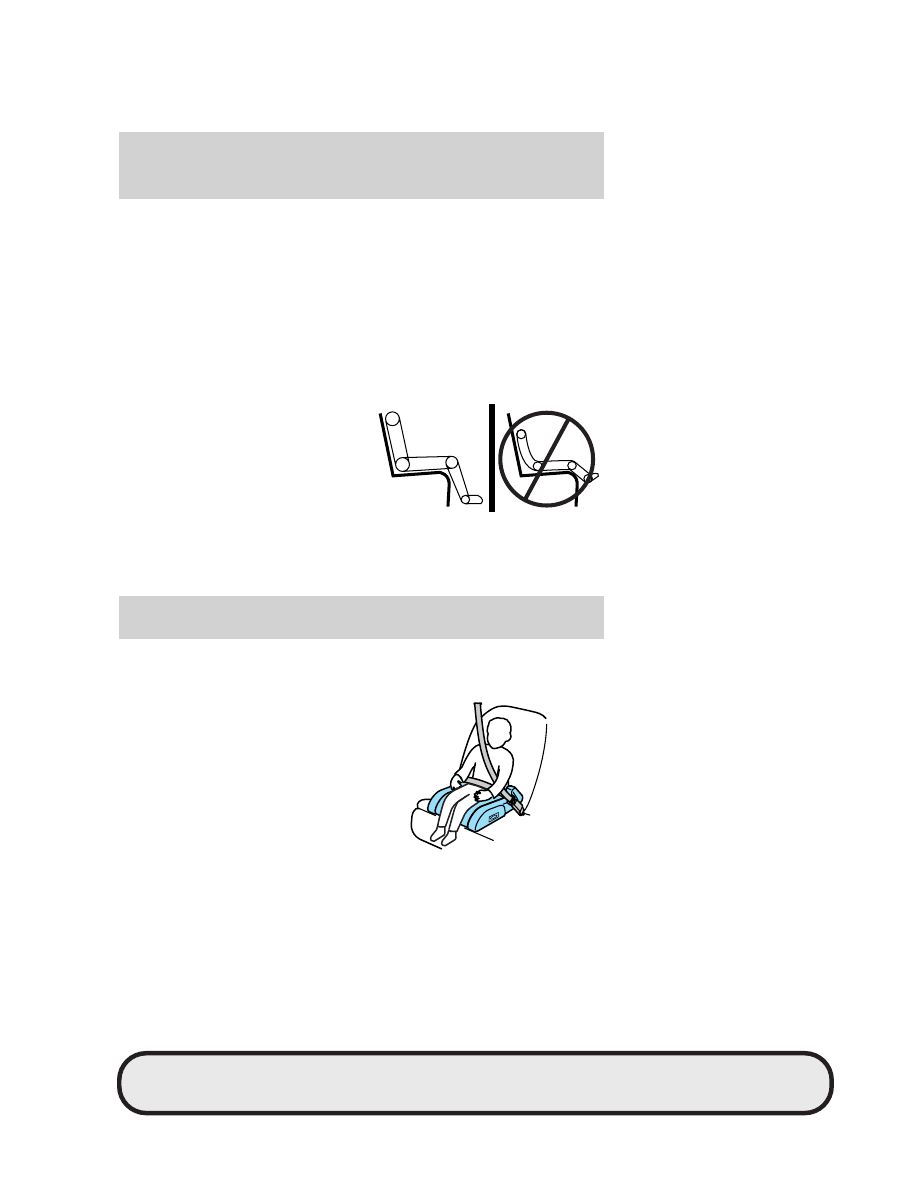
• Can the child sit all the way back

against the vehicle seat back with
knees bent comfortably at the
edge of the seat without
slouching?

• Does the lap belt rest low across the hips?
• Is the shoulder belt centered on the shoulder and chest?
• Can the child stay seated like this for the whole trip?

WARNING: Booster seats must be installed only in seating
positions equipped with a combination lap/shoulder belt.

Types of booster seats

There are two types of belt-positioning booster seats:
• Those that are backless.

If your backless booster seat has a
removable shield, remove the
shield and use the lap/shoulder
belt. If a seating position has a
low seat back and no head
restraint, a backless booster seat
may place your child’s head (top
of ear level) above the top of the
seat. In this case, use a
high-backed booster seat.

art=cgrss526_b

art=mbsss109_a

REVIEW COPY ——
2007 B-Series (mbs), Owners Guide (post-2002-fmt) (own2002)Market: USA (fus)

PAGE: 101 OP: root EDIT SESSION: DATE: AUG 3 2006 at 11:45 JOB: @ibm2/ford_pdm/CLS_ford/GRP_own2002/JOB_mbs/DIV_og

Seating and Safety Restraints

101

• Those with a high back.

If, with a backless booster seat,
you cannot find a seating position
that adequately supports your
child’s head, a high back booster
seat would be a better choice.

Both can be used in any vehicle in a seating position equipped with
lap/shoulder belts if your child is over 40 lb..
Children and booster seats vary widely in size and shape. Choose a
booster that keeps the lap belt low and snug across the hips, never up
across the stomach, and lets you adjust the shoulder belt to cross the
chest and rest snugly near the center of the shoulder. The drawings
below compare the ideal fit (center) to a shoulder belt uncomfortably
close to the neck and a shoulder belt that could slip off the shoulder.

If the booster seat slides on the vehicle seat, placing a rubberized mesh
sold as shelf or carpet liner under the booster seat may improve this
condition.
The importance of shoulder belts
Using a booster without a shoulder belt increases the risk of a child’s
head hitting a hard surface in a collision. For this reason, you should
never use a booster seat with a lap belt only. It is best to use a booster
seat with combination lap/shoulder belts.

WARNING: Follow all instructions provided by the
manufacturer of the booster seat.

art=mbsss110_a

art=251ss030_a

REVIEW COPY ——
2007 B-Series (mbs), Owners Guide (post-2002-fmt) (own2002)Market: USA (fus)

PAGE: 102 OP: root EDIT SESSION: DATE: AUG 3 2006 at 11:45 JOB: @ibm2/ford_pdm/CLS_ford/GRP_own2002/JOB_mbs/DIV_og

Seating and Safety Restraints

102

WARNING: Never put the shoulder belt under a child’s arm or
behind the back because it eliminates the protection for the
upper part of the body and may increase the risk of injury or
death in a collision.

WARNING: Never use pillows, books, or towels to boost a
child. They can slide around and increase the likelihood of
injury or death in a collision.

SAFETY SEATS FOR CHILDREN

Child and infant or child safety seats

Use a safety seat that is recommended for the size and weight of the
child. Carefully follow all of the manufacturer’s instructions with the
safety seat you put in your vehicle. If you do not install and use the
safety seat properly, the child may be injured in a sudden stop or
collision.

When installing a child safety seat:
• Review and follow the information

presented in the Airbag
Supplemental Restraint System
section in this chapter.

• Use the correct safety belt buckle

for that seating position (the
buckle closest to the direction the
tongue is coming from).

• Insert the belt tongue into the

proper buckle until you hear a
snap and feel it latch. Make sure the tongue is securely fastened in the
buckle.

WARNING: Do not install a child seat in a center facing jump
seat.

• Keep the buckle release button pointing up and away from the safety

seat, with the tongue between the child seat and the release button,
to prevent accidental unbuckling.

CIMS #52706

com_child-seat-title

itdseq=129

CIMS #1250809

com_child-safe-seats.mbs2

itdseq=130

art=comss006_a

REVIEW COPY ——
2007 B-Series (mbs), Owners Guide (post-2002-fmt) (own2002)Market: USA (fus)

PAGE: 103 OP: root EDIT SESSION: DATE: AUG 3 2006 at 11:45 JOB: @ibm2/ford_pdm/CLS_ford/GRP_own2002/JOB_mbs/DIV_og

Seating and Safety Restraints

103

• Place seat back in upright position.
• Put the safety belt in the automatic locking mode. Refer to Automatic

locking mode (passenger side front seat).

• Top tether anchors can be used for children up to 60 pounds (27 kg)

in a child restraint, and to provide upper torso restraint for children
up to 80 pounds (36 kg) using an upper torso harness and a
belt-positioning booster.

Mazda recommends the use of a child safety seat having a top tether
strap. Install the child safety seat in a seating position which is capable
of providing a tether anchorage. For more information on top tether
straps, refer to Attaching child safety seats with tether straps.

WARNING: Carefully follow all of the manufacturer’s
instructions included with the safety seat you put in your
vehicle. If you do not install and use the safety seat properly,
the child may be injured in a sudden stop or collision.

Installing child safety seats with combination lap and shoulder
belts (front outboard passenger seat only)

1. Position the child safety seat in

a seat with a combination lap
and shoulder belt.

WARNING: If there is a tether on the child safety seat, attach
it to the tether anchor point. Refer to Attaching child safety
seats with tether straps

in this chapter.

WARNING: Rear facing child seats should NEVER be placed in
front of an active airbag.

CIMS #1124877

com_install-seat_title.mazda

itdseq=131

CIMS #1062868

com_install-seat.mbs

itdseq=132

art=f12ss008_a

REVIEW COPY ——
2007 B-Series (mbs), Owners Guide (post-2002-fmt) (own2002)Market: USA (fus)

PAGE: 104 OP: root EDIT SESSION: DATE: AUG 3 2006 at 11:45 JOB: @ibm2/ford_pdm/CLS_ford/GRP_own2002/JOB_mbs/DIV_og

Seating and Safety Restraints

104

2. Pull down on the shoulder belt

and then grasp the shoulder
belt and lap belt together.

3. While holding the shoulder and

lap belt portions together, route
the tongue through the child
seat according to the child seat
manufacturer’s instructions. Be
sure the belt webbing is not
twisted.

4. Insert the belt tongue into the

proper buckle (the buckle
closest to the direction the
tongue is coming from) for that
seating position until you hear
and feel the latch engage. Make
sure the tongue is latched
securely by pulling on it.

art=f12ss009_a

art=f12ss010_a

art=exdss029_a

REVIEW COPY ——
2007 B-Series (mbs), Owners Guide (post-2002-fmt) (own2002)Market: USA (fus)

PAGE: 105 OP: root EDIT SESSION: DATE: AUG 3 2006 at 11:45 JOB: @ibm2/ford_pdm/CLS_ford/GRP_own2002/JOB_mbs/DIV_og

Seating and Safety Restraints

105

5. To put the retractor in the

automatic locking mode, grasp
the shoulder portion of the belt
and pull downward until all of
the belt is extracted and a click
is heard.

6. Allow the belt to retract. The belt will click as it retracts to indicate

it is in the automatic locking mode.

7. Pull the lap belt portion across

the child seat toward the buckle
and pull up on the shoulder belt
while pushing down with knee
on the child seat.

8. Allow the safety belt to retract

to remove any slack in the belt.

9. Before placing the child in the

seat, forcibly tilt the seat
forward and back to make sure
the seat is securely held in
place. To check this, grab the
seat at the belt path and
attempt to move it side to side
and forward. There should be
no more than one inch of
movement for proper installation.

10. Try to pull the belt out of the retractor to make sure the retractor is

in the automatic locking mode (you should not be able to pull more
belt out). If the retractor is not locked, unbuckle the belt and repeat
Steps two through nine.

11. See Attaching child safety seats with tether straps in this chapter.

art=f12ss012_a

art=f12ss013_a

art=musss552_b

REVIEW COPY ——
2007 B-Series (mbs), Owners Guide (post-2002-fmt) (own2002)Market: USA (fus)

PAGE: 106 OP: root EDIT SESSION: DATE: AUG 3 2006 at 11:45 JOB: @ibm2/ford_pdm/CLS_ford/GRP_own2002/JOB_mbs/DIV_og

Seating and Safety Restraints

106

Check to make sure the child seat is properly secured before each use.

Attaching child safety seats with tether straps

Most new forward-facing child safety seats include a tether strap which
goes over the back of the seat and hooks to an anchoring point. Tether
straps are available as an accessory for many older safety seats. Contact
the manufacturer of your child seat for information about ordering a
tether strap.

The tether anchors in your vehicle are located on the back of the front
seat cushion.

The tether strap anchors in your vehicle are in the following positions
(shown from top view):
• Bucket seats

• 60/40 seats

WARNING: Attach the tether strap only to the appropriate
tether anchor as shown. The tether strap may not work
properly if attached somewhere other than the correct tether
anchor.

CIMS #1062869

com_built-in_anchors.mbs

itdseq=133

art=ranss564_a

art=mbsss100_a

REVIEW COPY ——
2007 B-Series (mbs), Owners Guide (post-2002-fmt) (own2002)Market: USA (fus)

PAGE: 107 OP: root EDIT SESSION: DATE: AUG 3 2006 at 11:45 JOB: @ibm2/ford_pdm/CLS_ford/GRP_own2002/JOB_mbs/DIV_og

Seating and Safety Restraints

107

WARNING: Never attach two child safety seat tethers to a
single tether anchor. In a crash, on anchor may not be strong
enough to hold two child safety seat attachments and may
break, causing serious injury or death.

1. Position the child safety seat on the front seat cushion.

2. Route the child safety seat tether strap over the back of the seat.

3. Locate the correct anchor for the selected seating position.

The tether anchor is located on the
rear lower portion of the passenger
seat.

art=ranss573_a

art=ranss574_a

REVIEW COPY ——
2007 B-Series (mbs), Owners Guide (post-2002-fmt) (own2002)Market: USA (fus)

PAGE: 108 OP: root EDIT SESSION: DATE: AUG 3 2006 at 11:45 JOB: @ibm2/ford_pdm/CLS_ford/GRP_own2002/JOB_mbs/DIV_og

Seating and Safety Restraints

108

4. Clip the tether strap to the

anchor.

WARNING: If the tether strap
is clipped incorrectly, the child
safety seat may not be
retained properly in the event
of a collision.

Center seating location 60/40
seats with folding armrest

When installing a child safety seat in the center position, route the tether
strap over the center arm rest and clip it to the center anchor.

art=ranss575_a

art=ranss576_a

art=ranss577_a

REVIEW COPY ——
2007 B-Series (mbs), Owners Guide (post-2002-fmt) (own2002)Market: USA (fus)

PAGE: 109 OP: root EDIT SESSION: DATE: AUG 3 2006 at 11:45 JOB: @ibm2/ford_pdm/CLS_ford/GRP_own2002/JOB_mbs/DIV_og

Seating and Safety Restraints

109

WARNING: If the tether strap is clipped incorrectly, the child
safety seat may not be retained properly in the event of a
collision.

5. Refer to the Installing child safety seats in combination lap and

shoulder belt seating positions section of this chapter for further
instructions to secure the child safety seat.

6. Tighten the child safety seat tether strap according to the

manufacturer’s instructions.

WARNING: If the safety seat is not anchored properly, the risk
of a child being injured in a collision greatly increases.

REVIEW COPY ——
2007 B-Series (mbs), Owners Guide (post-2002-fmt) (own2002)Market: USA (fus)

PAGE: 110 OP: root EDIT SESSION: DATE: AUG 3 2006 at 11:45 JOB: @ibm2/ford_pdm/CLS_ford/GRP_own2002/JOB_mbs/DIV_og

Seating and Safety Restraints

110

NOTICE TO UTILITY VEHICLE AND TRUCK OWNERS

Utility vehicles and trucks handle
differently than passenger cars in
the various driving conditions that
are encountered on streets,
highways and off-road. Utility
vehicles and trucks are not designed
for cornering at speeds as high as
passenger cars any more than
low-slung sports cars are designed
to perform satisfactorily under
off-road conditions.

WARNING: Utility vehicles have a significantly higher rollover
rate than other types of vehicles. To reduce the risk of serious
injury or death from a rollover or other crash you must:

• Avoid sharp turns and abrupt maneuvers;
• Drive at safe speeds for the conditions;
• Keep tires properly inflated;
• Never overload or improperly load your vehicle; and
• Make sure every passenger is properly restrained.

WARNING: In a rollover crash, an unbelted person is
significantly more likely to die than a person wearing a seat
belt. All occupants must wear seat belts and children/infants
must use appropriate restraints to minimize the risk of injury
or ejection.

Study your Owner’s Guide and any supplements for specific information
about equipment features, instructions for safe driving and additional
precautions to reduce the risk of an accident or serious injury.

VEHICLE CHARACTERISTICS

4WD and AWD Systems (if equipped)

A vehicle equipped with AWD or 4WD (when selected) has the ability to
use all four wheels to power itself. This increases traction which may
enable you to safely drive over terrain and road conditions that a
conventional two-wheel drive vehicle cannot.

CIMS #1434023

com_drive-veh-utility

itdseq=134

CIMS #1434024

com_veh-handle-title

itdseq=135

CIMS #1434025

com_veh-system

itdseq=136

art=j14gf003_a

REVIEW COPY ——
2007 B-Series (mbs), Owners Guide (post-2002-fmt) (own2002)Market: USA (fus)

PAGE: 111 OP: root EDIT SESSION: DATE: AUG 3 2006 at 11:45 JOB: @ibm2/ford_pdm/CLS_ford/GRP_own2002/JOB_mbs/DIV_og

Tires, Wheels and Loading

111

Power is supplied to all four wheels
through a transfer case or power
transfer unit. 4WD vehicles allow
you to select different drive modes
as necessary. Information on
transfer case operation and shifting
procedures can be found in the
Driving chapter. Information on
transfer case maintenance can be found in the Maintenance and
Specifications 
chapter. You should become thoroughly familiar with this
information before you operate your vehicle.
On some 4WD models, the initial shift from two-wheel drive to 4WD
while the vehicle is moving can cause a momentary clunk and ratcheting
sound. These sounds are normal as the front drivetrain comes up to
speed and is not cause for concern.

WARNING: Do not become overconfident in the ability of 4WD
and AWD vehicles. Although a 4WD or AWD vehicle may
accelerate better than two-wheel drive vehicle in low traction
situations, it won’t stop any faster than two-wheel drive
vehicles. Always drive at a safe speed.

How your vehicle differs from other vehicles

SUV and trucks can differ from
some other vehicles in a few
noticeable ways. Your vehicle may
be:
• Higher – to allow higher load

carrying capacity and to allow it
to travel over rough terrain
without getting hung up or
damaging underbody components.

• Shorter – to give it the capability

to approach inclines and drive
over the crest of a hill without
getting hung up or damaging
underbody components. All other
things held equal, a shorter
wheelbase may make your vehicle
quicker to respond to steering inputs than a vehicle with a longer
wheelbase.

CIMS #1434026

com_veh-dr-differs

itdseq=137

art=supfw001_a

art=supfw011_a

REVIEW COPY ——
2007 B-Series (mbs), Owners Guide (post-2002-fmt) (own2002)Market: USA (fus)

PAGE: 112 OP: root EDIT SESSION: DATE: AUG 3 2006 at 11:45 JOB: @ibm2/ford_pdm/CLS_ford/GRP_own2002/JOB_mbs/DIV_og

Tires, Wheels and Loading

112

• Narrower — to provide greater

maneuverability in tight spaces,
particularly in off-road use.

As a result of the above dimensional
differences, SUV’s and trucks often
will have a higher center of gravity
and a greater difference in center of
gravity between the loaded and
unloaded condition.

These differences that make your
vehicle so versatile also make it
handle differently than an ordinary
passenger car.

INFORMATION ABOUT UNIFORM TIRE QUALITY GRADING

New vehicles are fitted with tires
that have a rating on them called
Tire Quality Grades. The Quality
grades can be found where
applicable on the tire sidewall
between tread shoulder and
maximum section width. For
example:
• Treadwear 200 Traction AA Temperature A
These Tire Quality Grades are determined by standards that the United
States Department of Transportation has set.
Tire Quality Grades apply to new pneumatic tires for use on passenger
cars. They do not apply to deep tread, winter-type snow tires,
space-saver or temporary use spare tires, tires with nominal rim
diameters of 10 to 12 inches or limited production tires as defined in
Title 49 Code of Federal Regulations Part 575.104(c)(2).
U.S. Department of Transportation-Tire quality grades: The U.S.
Department of Transportation requires Mazda to give you the following
information about tire grades exactly as the government has written it.

Treadwear

The treadwear grade is a comparative rating based on the wear rate of
the tire when tested under controlled conditions on a specified

CIMS #599889

com_tire_grade_info.j14

itdseq=138

CIMS #54583

com_treads.01

itdseq=139

art=supfw012_a

art=f12mc027_b

REVIEW COPY ——
2007 B-Series (mbs), Owners Guide (post-2002-fmt) (own2002)Market: USA (fus)

PAGE: 113 OP: root EDIT SESSION: DATE: AUG 3 2006 at 11:45 JOB: @ibm2/ford_pdm/CLS_ford/GRP_own2002/JOB_mbs/DIV_og

Tires, Wheels and Loading

113

government test course. For example, a tire graded 150 would wear one
and one-half (1 1/2) times as well on the government course as a tire
graded 100. The relative performance of tires depends upon the actual
conditions of their use, however, and may depart significantly from the
norm due to variations in driving habits, service practices, and
differences in road characteristics and climate.

Traction AA A B C

The traction grades, from highest to lowest are AA, A, B, and C. The
grades represent the tire’s ability to stop on wet pavement as measured
under controlled conditions on specified government test surfaces of
asphalt and concrete. A tire marked C may have poor traction
performance.
NOTE: The traction grade assigned to this tire is based on
straight-ahead braking traction tests, and does not include acceleration,
cornering, hydroplaning or peak traction characteristics.

Temperature A B C

The temperature grades are A (the highest), B, and C, representing the
tire’s resistance to the generation of heat and its ability to dissipate heat
when tested under controlled conditions on a specified indoor laboratory
test wheel. Sustained high temperature can cause the material of the tire
to degenerate and reduce tire life, and excessive temperature can lead to
sudden tire failure. The grade C corresponds to a level of performance
which all passenger car tires must meet under the Federal Motor Vehicle
Safety Standard No. 109. Grades B and A represent higher levels of
performance on the laboratory test wheel than the minimum required by
law.

WARNING: The temperature grade for this tire is established
for a tire that is properly inflated and not overloaded.
Excessive speed, underinflation, or excessive loading, either
separately or in combination, can cause heat buildup and
possible tire failure.

TIRES

Tires are designed to give many thousands of miles of service, but they
must be maintained in order to get the maximum benefit from them.

Glossary of tire terminology

• Tire label: A label showing the OE (Original Equipment) tire sizes,

recommended inflation pressure and the maximum weight the vehicle
can carry.

CIMS #599890

com_traction_a-b-c.j14

itdseq=140

CIMS #600046

com_temp_a-b-c.j14

itdseq=141

CIMS #1272072

com_tire-intro

itdseq=142

CIMS #1272100

com_glossary-of-tire-terms

itdseq=143

REVIEW COPY ——
2007 B-Series (mbs), Owners Guide (post-2002-fmt) (own2002)Market: USA (fus)

PAGE: 114 OP: root EDIT SESSION: DATE: AUG 3 2006 at 11:45 JOB: @ibm2/ford_pdm/CLS_ford/GRP_own2002/JOB_mbs/DIV_og

Tires, Wheels and Loading

114

• Tire Identification Number (TIN): A number on the sidewall of

each tire providing information about the tire brand and
manufacturing plant, tire size and date of manufacture. Also referred
to as DOT code.

• Inflation pressure: A measure of the amount of air in a tire.
• Standard load: A class of P-metric or Metric tires designed to carry a

maximum load at 35 psi [37 psi (2.5 bar) for Metric tires]. Increasing
the inflation pressure beyond this pressure will not increase the tire’s
load carrying capability.

• Extra load: A class of P-metric or Metric tires designed to carry a

heavier maximum load at 41 psi [43 psi (2.9 bar) for Metric tires].
Increasing the inflation pressure beyond this pressure will not increase
the tire’s load carrying capability.

• kPa: Kilopascal, a metric unit of air pressure.
• PSI: Pounds per square inch, a standard unit of air pressure.
• Cold inflation pressure: The tire pressure when the vehicle has

been stationary and out of direct sunlight for an hour or more and
prior to the vehicle being driven for 1 mile (1.6 km).

• Recommended inflation pressure: The cold inflation pressure found

on the Safety Compliance Certification Label or Tire Label located on
the B-Pillar or the edge of the driver’s door.

• B-pillar: The structural member at the side of the vehicle behind the

front door.

• Bead area of the tire: Area of the tire next to the rim.
• Sidewall of the tire: Area between the bead area and the tread.
• Tread area of the tire: Area of the perimeter of the tire that

contacts the road when mounted on the vehicle.

• Rim: The metal support (wheel) for a tire or a tire and tube assembly

upon which the tire beads are seated.

INFLATING YOUR TIRES

Safe operation of your vehicle requires that your tires are properly
inflated. Remember that a tire can lose up to half of its air pressure
without appearing flat.

Every day before you drive, check your tires. If one looks lower than the
others, use a tire gauge to check pressure of all tires and adjust if
required.

CIMS #1513806

com_gen-tire-in.tpms.mazda

itdseq=144

REVIEW COPY ——
2007 B-Series (mbs), Owners Guide (post-2002-fmt) (own2002)Market: USA (fus)

PAGE: 115 OP: root EDIT SESSION: DATE: AUG 3 2006 at 11:45 JOB: @ibm2/ford_pdm/CLS_ford/GRP_own2002/JOB_mbs/DIV_og

Tires, Wheels and Loading

115

At least once a month and before long trips, inspect each tire and check
the tire pressure with a tire gauge (including spare, if equipped). Inflate
all tires to the inflation pressure recommended by Mazda.

Use a tire gauge to check the tire inflation pressure, including the spare
(if equipped), at least monthly and before long trips. You are strongly
urged to buy a reliable tire pressure gauge, as automatic service station
gauges may be inaccurate. Mazda recommends the use of a digital or dial
type tire pressure gauge rather than a stick type tire pressure gauge.

Use the recommended cold inflation pressure for optimum tire
performance and wear. Under-inflation or over-inflation may cause
uneven treadwear patterns.

NOTE: If you are driving the vehicle at its maximum weight load, make
sure the tire inflation pressure is correct for the weight load on the tires.

WARNING: Under-inflation is the most common cause of tire
failures and may result in severe tire cracking, tread separation
or

(blowout(, with unexpected loss of vehicle control and

increased risk of injury. Under-inflation increases sidewall
flexing and rolling resistance, resulting in heat buildup and
internal damage to the tire. It also may result in unnecessary
tire stress, irregular wear, loss of vehicle control and accidents.
A tire can lose up to half of its air pressure and not appear to
be flat!

Always inflate your tires to the Mazda recommended inflation pressure
even if it is less than the maximum inflation pressure information found
on the tire. The Mazda recommended tire inflation pressure is found on
the Safety Compliance Certification Label or Tire Label which is located
on the B-Pillar or the edge of the driver’s door. Failure to follow the tire
pressure recommendations can cause uneven treadwear patterns and
adversely affect the way your vehicle handles.

Maximum Permissible Inflation Pressure is the tire manufactures’
maximum permissible pressure and/or the pressure at which the
maximum load can be carried by the tire. This pressure is normally
higher than the manufacturer’s recommended cold inflation pressure
which can be found on either the Safety Compliance Certification Label
or Tire Label which is located on the B-Pillar or the edge of the driver’s
door. The cold inflation pressure should never be set lower than the
recommended pressure on the Safety Compliance Certification Label or
Tire Label.

When weather temperature changes occur, tire inflation pressures also
change. A 10° F (6° C) temperature drop can cause a corresponding

CIMS #1513866

com_tire-inf.tpms.mazda

itdseq=145

REVIEW COPY ——
2007 B-Series (mbs), Owners Guide (post-2002-fmt) (own2002)Market: USA (fus)

PAGE: 116 OP: root EDIT SESSION: DATE: AUG 3 2006 at 11:45 JOB: @ibm2/ford_pdm/CLS_ford/GRP_own2002/JOB_mbs/DIV_og

Tires, Wheels and Loading

116


Content   ..  5  6  7  8   ..