LEXUS GX 460 (2019 year). Manual - part 27


  Index      Lexus     LEXUS GX 460 - service manual 2019 year in english


Search            


Content   ..  25  26  27  28   ..


LEXUS GX 460 (2019 year). Manual - part 27


424

5-4. Using the other interior features

While the cool box is on
The front air conditioning system cannot be turned off.

Items unsuitable for the cool box

Drinks in unsealed containers

Fragile items, perishables or anything with strong odor

Owner’s manual, electronic devices, CDs, etc.

When the indicator light flashes
The cool box is not operated when any of the following conditions occurs.

When the air conditioning system is off

Turn the air conditioning system on also turns on the cool box.

When outside air temperature is about 32

F (0C) or below.

If the indicator light continues to flash, there may be a malfunction in the system. Turn the

air conditioning system off and have it inspected by your Lexus dealer.

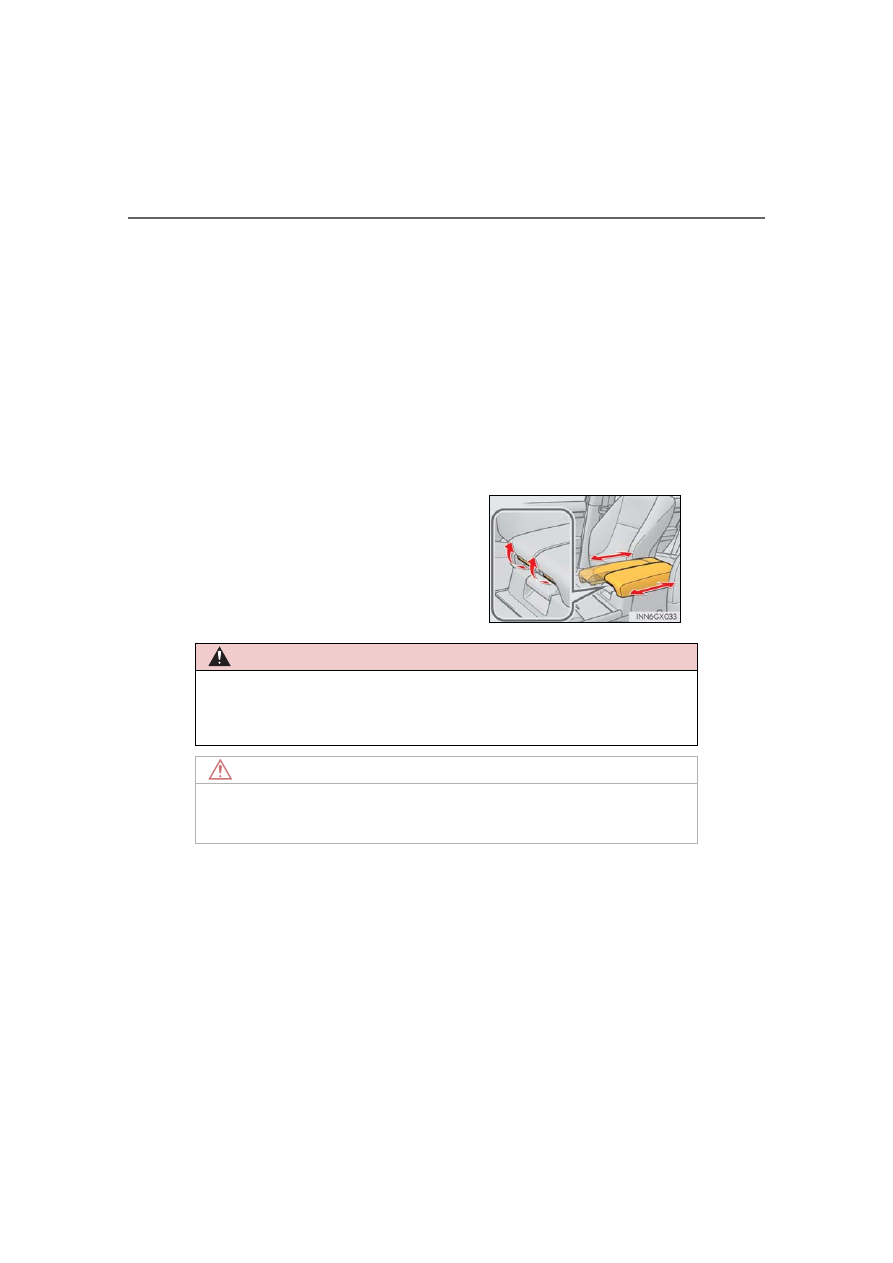
When using the cool box lid as an armrest
Slide the cool box lid forward or backward as

needed. Slide the lid while pulling up the upper

lever to release the lock.

CAUTION

Keep the cool box closed. In the event of sudden braking or sudden swerving, an acci-

dent may occur due to an occupant being struck by the open cool box or the items

stored inside.

NOTICE

To prevent battery discharge, do not leave the cool box on longer than necessary when

the engine is not running.

425

5-4. Using the other interior features

5

Inte
rior fe

ature

s

To set the visor in the forward posi-
tion, flip it down.
To set the visor in the side position,
flip down, unhook, and swing it to the
side.
To use the side extender, place the
visor in the side position, then slide it
backward.

Slide the cover to open.

The light turns on when the cover is

opened.

If the vanity lights remain on when the engine switch is turned off, the lights will go off

automatically after 20 minutes.

Sun visors

1

2

3

Vanity mirror

NOTICE

To prevent battery discharge, do not leave the vanity lights on for extended periods

when the engine is not running.

426

5-4. Using the other interior features

The conversation mirror can provide the driver and the front passenger with a
view of the rear seat area without the need to turn around.
Press in the button.

To use the overhead console when the conversation mirror is open, further extend the lid. 

(

P. 414)

Vehicles with a navigation system
Refer to the “NAVIGATION SYSTEM OWNER’S MANUAL”.

Vehicles without a navigation system
Adjusts the hours
Adjusts the minutes

The clock is displayed when
The engine switch is in IGNITION ON mode.

When disconnecting and reconnecting battery terminals
The clock data will be reset.

Conversation mirror

Clock

1

2

427

5-4. Using the other interior features

5

Inte
rior fe

ature

s

Center of console (12 V DC)
The power outlet can be used for 12 V accessories that run on less than 10 A.

Front

Slide the auxiliary box lid.

Rear (if equipped)

Power outlets

428

5-4. Using the other interior features

Luggage compartment (120 V AC)
The power outlet can be used for 120 V AC accessories that run on less than
100 W.

The power outlet can be used when
12 V DC: The engine switch is in ACCESSORY or IGNITION ON mode.
120 V AC: The engine switch is in IGNITION ON mode.

The protection circuit may be activated to cut the power supply if any of the following

conditions apply (120 V AC):

Use of electrical appliances exceeding 100 W is attempted.

A sound may be heard when the protection circuit is activated. This is normal and does

not indicate a malfunction.

The total power usage by all electrical features (headlights, air conditioning, etc.) has

exceeded the total vehicle maximum for an extended period of time.

If the protection circuit is activated and the power supply is cut, conduct the following

procedure (120 V AC):

Park the vehicle in a safe place, and then securely apply the parking brake.
Make sure that the power consumption of the electric appliance is within the maxi-

mum capacity of the power outlet and the appliance is not broken.
Turn the engine switch to IGNITION ON mode again.

When the cabin temperature is high, open the windows to cool the temperature down.

Once it reaches the normal temperature, turn the engine switch to IGNITION ON

mode again.
If the power supply does not resume even after the above procedure has been per-

formed, have the vehicle inspected by your Lexus dealer.

1

2

3

429

5-4. Using the other interior features

5

Inte
rior fe

ature

s

CAUTION

Using a power outlet (120 V AC)
Observe the following precautions to reduce the risk of injury.

Use of the power outlet when it is wet with water or snow may result in electrical

shocks and is extremely dangerous. The power outlet must be thoroughly dried

before use.

Do not allow children to use or play with the power outlet.

Be careful not to get any part of your body caught in the power outlet lid.

When using electrical appliances, strictly follow any cautions and notices written on

their labels and in the manufacturers’ instruction manuals.

Do not modify, disassemble or repair the power outlet or its inverter in any way. Doing

so may result in unexpected malfunctions or accidents, which could cause serious

damage or injuries. Contact your Lexus dealer for any necessary repairs.

To prevent injuries and accidents, secure all electric appliances before use and do not

use any appliances that may do any of the following (120 V AC):

Distract the driver while driving, or hamper safe driving.

Result in a fire or burn injuries due to the appliance rolling, falling or overheating while

driving.

Emit steam while the windows of the cabin are closed.

To prevent unexpected accidents, such as electric shocks, do not perform any of the

following actions (120 V AC):

Using the power outlet for electric heaters while sleeping.

Contaminating the power outlet with liquid substances or mud.

Handling electrical appliance plugs at the power outlet with wet hands or feet.

Inserting foreign objects into the power outlet.

Using malfunctioning electric appliances.

Inserting inappropriate or badly fitting plugs into the power outlet.

NOTICE

To avoid damaging the power outlet and the plug (120 V AC)

Close the power outlet lid when not in use.

Do not allow foreign objects or liquids to enter the power outlet, as this may cause a

short circuit.

Do not use plug adaptors to connect too many plugs to the power outlet. (120 V AC)

After removing a plug, gently close the power outlet lid. (120 V AC)

430

5-4. Using the other interior features

NOTICE

To prevent the fuse from being blown
12 V DC: Do not use an accessory that uses more than 12 V 10 A.
120 V AC: Do not use a 120 V AC appliance that requires more than 100 W. 

If a 120 V AC appliance that consumes more than 100 W is used, the protection circuit

will cut the power supply.

Appliances that may not operate properly (120 V AC)
The following 120 V AC appliances may not operate even if their power consumption

is under 100 W.

Appliances with high initial peak wattage

Measuring devices that process precise data.

Other appliances that require an extremely stable power supply

To prevent battery discharge
12 V DC: Do not use the power outlet longer than necessary when the engine is not

running.
120 V AC: Turn off all the vehicle’s electronic equipment and accessories, such as the

headlights and air conditioning, when electrical appliances that consume in excess of

100 W are used continuously for long periods of time.

To prevent any damage caused by heat (120 V AC)

Do not use any electrical appliances that give off intense heat, such as toasters, in any

locations including the internal or external trim, seats and deck.

Do not use any electrical appliances that are easily affected by vibration or heat inside

the vehicle. Vibration while driving, or the heat of the sun while parking, may result in

damage to those electrical appliances.

If any electrical appliances are to be used while driving (120 V AC)
Securely fasten both the appliances and their cables to prevent them from falling or

getting caught in any of the power train components.

If the power outlet is loose when an electrical appliance plug is connected (120 V

AC)
Replace the outlet. Contact your Lexus dealer for any necessary replacements.

If the power outlet gets dirty (120 V AC)
Turn the main switch off and use a soft, clean cloth to wipe it gently. Do not use any

cleansing materials, such as organic solvents, wax, or compound cleaners, as these

may damage the power outlet or cause it to malfunction.

431

5-4. Using the other interior features

5

Inte
rior fe

ature

s

7-passenger models

Fold down the armrest for use.

6-passenger models

To adjust the armrest angle, raise the
armrest to the highest position and then
lower the armrest to the lowest posi-
tion. Raise the armrest again to the
desired position and the armrest will be
locked at that position.

When the armrest is locked, the armrest

cannot be lowered. 
To lower the armrest, raise the armrest

to the highest position again.

Armrest

NOTICE

To prevent damage, do not apply too heavy a load on the armrest.

432

5-4. Using the other interior features

The coat hooks are provided with the
second rear assist grips.

An assist grip (type A) can be used to support your body while sitting on the seat.
An assist grip (type B) can be used when getting in or out of the vehicle and oth-
ers.

Assist grip (type A)
Assist grip (type B)

Coat hooks

CAUTION

Do not hang coat hangers or other hard or sharp objects on the hook. If the SRS cur-

tain shield airbags deploy, these items may become projectiles, causing death or seri-

ous injury.

Assist grips

1

2

CAUTION

Do not use the assist grip (type A) when getting in or out of the vehicle or rising from

your seat.

NOTICE

To prevent damage, do not hang heavy objects or put a heavy load on the assist grip.

433

5-4. Using the other interior features

5

Inte
rior fe

ature

s

The compass on the inside rear view mirror indicates the direction in which the
vehicle is heading.

Operation
To turn the compass on or off, push
the switch.

Displays and directions

Compass (if equipped)

Display

Direction

“N”

North

“NE”

Northeast

“E”

East

“SE”

Southeast

“S”

South

“SW”

Southwest

“W”

West

“NW”

Northwest

434

5-4. Using the other interior features

Calibrating the compass

The direction display deviates from the true direction determined by the earth’s
magnetic field. The amount of deviation varies according to the geographic posi-
tion of the vehicle.

If you cross over one of the map boundaries shown in illustration, the compass will

deviate.

To obtain higher precision or perfect calibration, refer to “Deviation calibration”.

435

5-4. Using the other interior features

5

Inte
rior fe

ature

s

Deviation calibration

Stop the vehicle in a place where it is safe to drive in a circle.
Press the switch until a number (1
to 15) appears on the compass
display.

Press the switch and referring to the map above, select the number of the
zone where you are.

If the direction is displayed several seconds after adjustment, the calibration is

complete.

Circling calibration

When “C” appears on the display,
drive the vehicle at 5 mph (8 km/h)
or less in a circle until a direction is
displayed.

If there is not enough space to drive

in a circle, drive around the block

until the direction is displayed.

1

2

3

436

5-4. Using the other interior features

Conditions unfavorable to correct operation
The compass may not show the correct direction in the following conditions:

The vehicle is stopped immediately after turning.

The vehicle is on an inclined surface.

The vehicle is in a place where the earth’s magnetic field is subject to interference by

artificial magnetic fields (underground car park/parking lot, under a steel tower,

between buildings, roof car park/parking lot, near an intersection, near a large vehicle,

etc.).

The vehicle has become magnetized.

(There is a magnet or metal object near the inside rear view mirror.)

The battery has been disconnected.

A door is open.

CAUTION

While driving the vehicle
Do not adjust the display. Adjust the display only when the vehicle is stopped.

When doing the circling calibration
Secure a wide space, and watch out for people and vehicles in the vicinity. Do not vio-

late any local traffic rules while performing circling calibration.

NOTICE

To avoid the compass malfunctions
Do not place magnets or any metal objects near the inside rear view mirror. 

Doing this may cause the compass sensor to malfunction.

To ensure normal operation of the compass

Do not perform a circling calibration of the compass in a place where the earth’s

magnetic field is subject to interference by artificial magnetic fields.

During calibration, do not operate electric systems (moon roof, power windows, etc.)

as they may interfere with the calibration.

437

5-4. Using the other interior features

5

Inte
rior fe

ature

s

Garage door opener

The garage door opener (HomeLink

®

 Universal Transceiver) is manufactured

under license from HomeLink

®

.

The HomeLink

®

 compatible transceiver in your vehicle has 3 buttons which can

be programmed to operate 3 different devices. Refer to the programming
method below appropriate for the device.

Indicator light
Buttons

Before programming HomeLink

®

During programming, it is possible that garage doors, gates, or other devices
may operate. For this reason, make sure that people and objects are clear of
the garage door or other devices to prevent injury or other potential harm.

It is recommended that a new battery be placed in the remote control trans-
mitter for more accurate programming.

Garage door openers manufactured after 1995 may be equipped with rolling
code protection. If this is the case, you will need a stepladder or other sturdy,
safe device to reach the “Learn” or “Smart” button on the garage door opener
motor.

The garage door opener can be programmed to operate garage doors, gates,
entry doors, door locks, home lighting systems, security systems, and other
devices.

Programming the HomeLink

®

1

2

438

5-4. Using the other interior features

Programming HomeLink

®

Point the remote control transmit-
ter for the device 1 to 3 in. (25 to
75 mm) from the HomeLink

®

buttons.

Keep the HomeLink

®

 indicator light

in view while programming.

For U.S.A. owner’s

Press and hold the HomeLink

®

button you want to program and
the remote control transmitter
button simultaneously. When the
HomeLink

®

 indicator light

changes from a slow to a rapid
flash, you can release both but-
tons.

Programming has completed when the indicator light changes to a rapid flash.

Programming an entry gate (for U.S.A. owners)/Programming a device in the
Canadian market

With one hand, press and hold the HomeLink

®

 button you want to pro-

gram. With your other hand, press and release the remote control transmit-
ter every 2 seconds and repeat this cycle until the HomeLink

®

 indicator

light starts to flash rapidly. Then, release the buttons.

1

2

2

439

5-4. Using the other interior features

5

Inte
rior fe

ature

s

Test the HomeLink

®

 operation by

pressing the newly programmed
button and observing the indica-
tor light:

If the indicator light is solid/
continuous, programming has
been completed and your
device should activate when
the HomeLink

®

 button is

pressed and released.

If the indicator light blinks rapidly for 2 seconds and then turns into a
solid/continuous light, proceed with the following instructions   for
programming a rolling code system.

Programming a rolling code system

Locate the “Learn” or “Smart”
button on the garage door
opener motor in the garage.

This button can usually be found

where the hanging antenna wire is

attached to the unit. The name and

color of the button may vary by man-

ufacturer. Please refer to the opera-

tor’s manual supplied with the garage

door opener motor for details.

Press and release the “Learn” or
“Smart” button. 
Perform   within 30 seconds
after performing  .

3

4

4

5

6

5


Content   ..  25  26  27  28   ..