Lexus ES300 (2002 year). Service manual - part 441


  Index      Lexus     Lexus ES300 - service and repair manual 2002 year


Search            


Content   ..  439  440  441  442   ..


Lexus ES300 (2002 year). Service manual - part 441


2002 ES 300 Front Brake Tube (Left Hand)
                                                                                                                                            

20

6.

WORK PROCEDURE

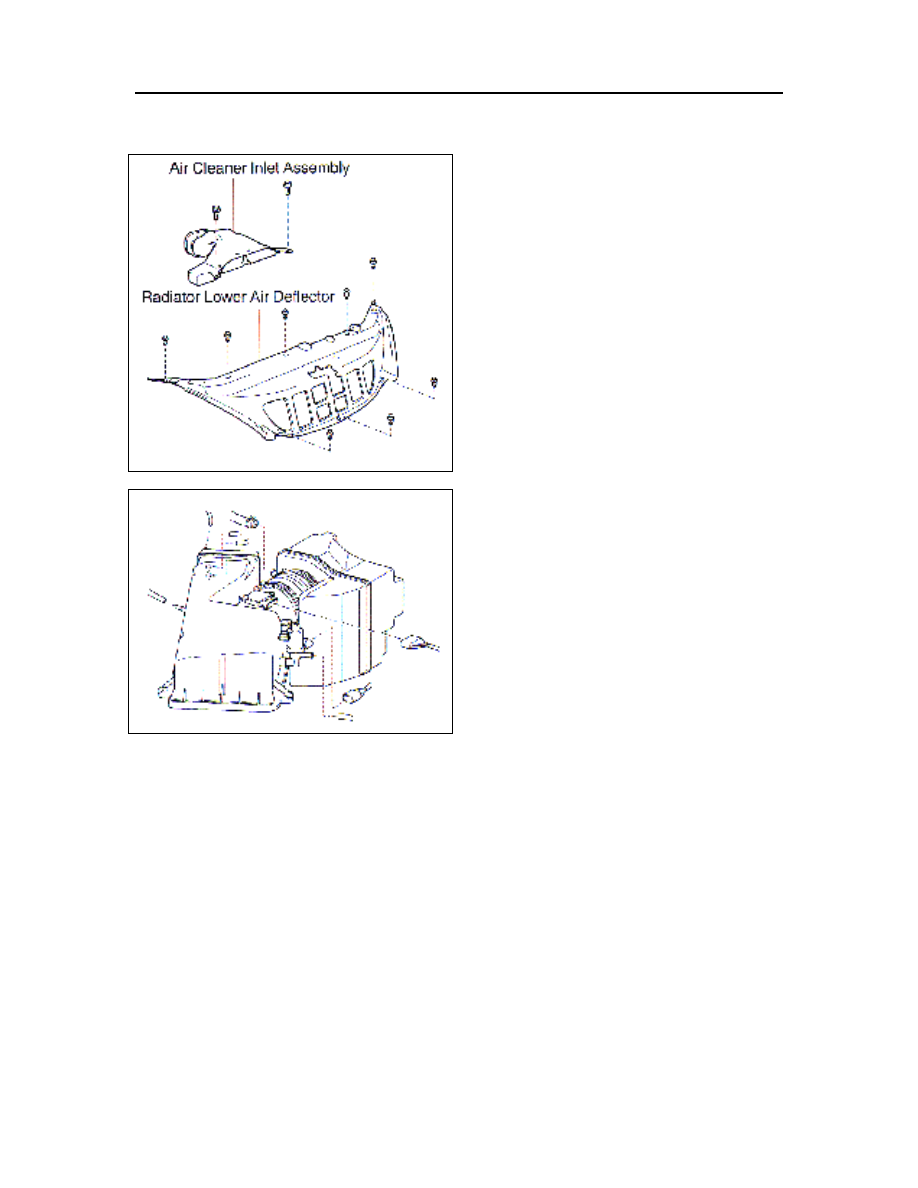
1.  REMOVE LOWER RADIATOR AIR DEFLECTOR
(a)  Open the hood and remove the 8 plastic clips that

retain the lower radiator air deflector.

(b)  Remove the lower radiator air deflector.
(c)  Remove the wire harness clip and 2 vacuum lines

that are secured to the air cleaner inlet assembly.

(d)  Remove the 2 bolts that secure the air cleaner inlet

assembly and slide the assembly out of the air
cleaner housing.

2.  REMOVE AIR CLEANER ASSEMBLY
(a)  Mark all vacuum lines prior to removal to assure

correct reconnection.

(b)  Remove the vacuum lines and electrical connectors

on top of the air cleaner assembly.

(c)  Remove the 2 bolts that secure the top of the air

cleaner housing assembly.

(d)  Remove the top of the air cleaner housing assembly.
(e)  Remove the air filter.
(f)  Remove the vacuum lines and electrical connectors

from the bottom half of the air cleaner housing.
Take note of where these vacuum lines are routed to
ensure proper re−assembly.

NOTE:
Some ES 300 models may have a strut support bar
that could interfere with intake air hose removal.
The intake air hose and plastic air box can be
removed with the strut support bar installed in the
vehicle.

Lexus Special Service Campaign 1LF
                                                                                                                                              

21

NOTE:
To avoid wire harness damage, release the wire and
hose retainers on the back of the air cleaner housing
prior to air cleaner housing removal.

(g) Remove the 3 bolts in the bottom of the air cleaner

assembly.

(h) Remove the bottom of the air cleaner housing.
(i)  Disconnect the intake hose from the throttle body.

3.   FRONT LEFT BRAKE LINE NO. 5

REPLACEMENT

(a)  Attach a drain hose to the left front caliper bleeder

valve.

(b)  Open the bleeder valve.
(c)  Loosen front brake line No. 5 from the flexible hose

in the wheel well using a line wrench or SST.

SST: 09023−00100 (or equivalent)

NOTE:
Upon loosening the flare nut on the brake line brake
fluid will begin to drain.

NOTE:
Wash brake fluid off vehicle immediately.  If brake
fluid comes into contact with any painted surface it
may be permanently damaged.

(d)  Drain brake fluid.
(e)  Disconnect the No. 5 brake line from the flexible

hose.

2002 ES 300 Front Brake Tube (Left Hand)
                                                                                                                                            

22

4.  REMOVE BRAKE LINE FROM 2−WAY

CONNECTOR

(a)  Using a line wrench disconnect the other end of the

No. 5 brake line from the 2−way connector.

(b)  Carefully remove the No. 5 brake line from the

vehicle.  To prevent brake fluid from dripping on the
vehicle, cover the ends during removal.

(c) Carefully remove any brake fluid from the brake line

unions with brake cleaner.

5.  INSTALLING NEW NO. 5 BRAKE LINE
(a)  Install the new No. 5 brake line.

NOTE:
Ensure that the new No 5 brake line is correctly
routed, spaced, and secured.

(b)  Using the SST connect the No. 5 brake line to the

2 way connector.

SST:  09023−00100
TORQUE:  15 N

m (155 kgf

cm, 11 ft

lbf)

(c)  Using SST connect brake line No. 5 to the flexible

line.

SST:  09023−00100
TORQUE:  15

N m (155 kgf

cm, 11 ft

lbf)

Lexus Special Service Campaign 1LF
                                                                                                                                              

23

6.   BLEED THE BRAKE SYSTEM

(a)  Check and correct the brake fluid level in the brake

master cylinder reservoir.

NOTE:
Immediately clean off any brake fluid spilled on
painted surfaces.  Brake fluid will damage the
vehicle s finish.  Do not let the brake fluid reservoir
go empty.

(b)  Bleed the brake system in the following sequence to

remove any air from the system.

1. Right 

Rear

2. Left 

Rear

3. Right 

Front

4. Left 

Front

(c)  Tighten bleeder plug once bleeding is complete.

TORQUE: 8.3 N

M (85 kgf

cm, 74 in

lbf)

(d)

Reinstall the bleeder plug cover (black rubber
cover)

7.  CHECK FLUID LEVEL IN RESERVOIR
(a)  Check the brake fluid level and add fluid if

necessary.

(b)  Clean off any excess fluid residue.
(c)  Check for leaks on each end of the new brake line

unions and at the bleeder plug.

FLUID:
SAE J1703 or FMVSS No. 116 DOT3

NOTE:
Wash brake fluid off vehicle immediately.  If brake
fluid comes into contact with any painted surface is
may be permanently damaged.


Content   ..  439  440  441  442   ..