Isuzu N-Series. Service manual - part 830


  Index      Isuzu     Isuzu N-Series - service and repair manual


Search            


Content   ..  828  829  830  831   ..


Isuzu N-Series. Service manual - part 830


GENERAL INFORMATION 0A-5

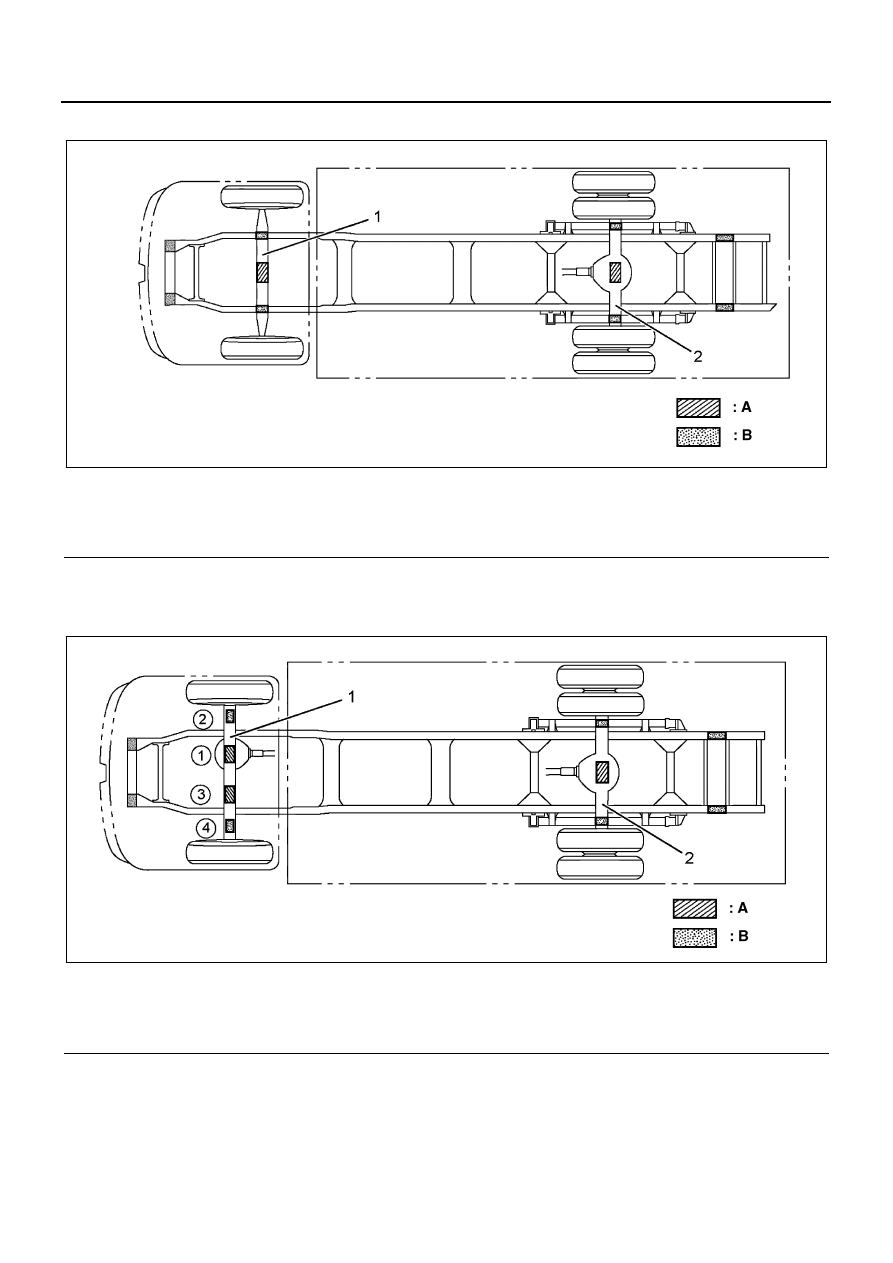
Front wheel leaf spring type (NHR, NKR, NPR, NQR)

Front wheel leaf spring type (NPS)

• Follow the numbers in circle when jacking up the

front wheel side.

Legend

A: Floor jack point

1. Front axle

B: Chassis stand lifting position

2. Rear axle

N7A0246E

Legend

A. Floor jack point

1. Front axle

B. Chassis stand lifting position

2. Rear axle

N7A0247E

0A-6 GENERAL INFORMATION

CAB TILTING

Notes for Tilting of the Cab

Make sure to observe the precautions below when re-
moving the cab tilt stay assembly to tilt the cab in order
to carry out service operations.

• When lifting the cab by tilting, use shop cloth to

prevent damage to the cab.

• When tilting, the maximum tilt angle of the cab is 50

degrees. If the cab is tilted at an angle of more than
50 degrees, the torsion bar supporting the cab may
be damaged.

• When tilting the cab, pay special attention not to let

the cab come into contact with peripheral parts.

• The nut securing the cab tilt stay assembly is tight-

ened with its thread deformed. Do not reuse the nut
because the specified fixing torque is not obtained
when reused.

• Strictly observe the specified fixing torques when

tightening the nut.

Tighten:
Nut to 22

±5 N⋅m (2.2±0.5 kg·m / 16±3.7 lb·ft)

Legend

1. Cab tilt stay pin

4. Washer

2. Cab side bracket

5. Cab tilt stay

3. Nut

6. Cab tilt stay pin

N7A0248E

GENERAL INFORMATION 0A-7

NOTES FOR WORKING ON ELECTRIC EQUIPMENT

Battery Cable

Disconnecting The Battery Cable

1. Turn all the switches to “OFF” positions.
2. Disconnect the battery ground cable (1).
3. Disconnect the battery positive cable (2).
4. Disconnect the battery cable (3) (Only 24V model).

Caution:
It is important that the battery ground cable should be
disconnected first.
Disconnecting the battery positive cable first may result
in a short circuit.

• For 12V model

• For 24V model

Connecting The Battery Cable
Connect in the reverse order of removal.

Caution:
Clean the battery terminal and apply a light coat of
grease to prevent terminal corrosion.

Connector Handling

Disconnecting The Connectors
Most of the connectors have a tang lock to hold the con-
nectors together.
Some tang locks are released by pulling them up (1).
Other tang locks are released by pressing them forward
(2).
Determine which type of tang lock is adopted on the
connector when disconnecting.

Firmly grasp both sides (male and female) of the con-
nector.
Release the tang lock and carefully pull the two halves
of the connector apart.
Never pull on the harness to separate the connectors.
This will result in wire breakage.

N7A0249E

N7A0250E

N7A0251E

N7A0252E

0A-8 GENERAL INFORMATION

Connecting The Connector
Firmly grasp both sides (male and female) of the con-
nector. 
Firmly but carefully push the two sides of the connector
together until a distinct click is heard.

Connector Inspection
Use a circuit tester to check the connector for continuity.
Insert the test probes (1) from the connector harness
side.

Never insert the circuit tester test probes (1) into the
connector open end to test the continuity. Broken con-
nector terminals will result.

Waterproof Connector Inspection
It is not possible to insert the test probes into the con-
nector wire side of a waterproof connector. Use a previ-
ously made connector (1) with its wires cut to carry out
the test. Connect the test connector (2) to the connector
to be tested. Connect the test probes (3) to the cut wires
to check the connector continuity.

Connector Pin Removal
Connector Housing Tang Lock Type

1. Insert a thin flat-tip screwdriver or equivalent (1)

into the connector housing open end (5).

2. Push the tang lock (2) up (in the direction of the ar-

row in the figure). Pull the wire (3) with pin (4) free
from the wire side of the connector.

N7A0253E

N7A0254E

N7A0255E

N7A0256E


Content   ..  828  829  830  831   ..