Isuzu N-Series. Service manual - part 581


  Index      Isuzu     Isuzu N-Series - service and repair manual


Search            


Content   ..  579  580  581  582   ..


Isuzu N-Series. Service manual - part 581


6A1-12 4JB1/4JB1-TC/4JG2/4JH1-TC - ENGINE

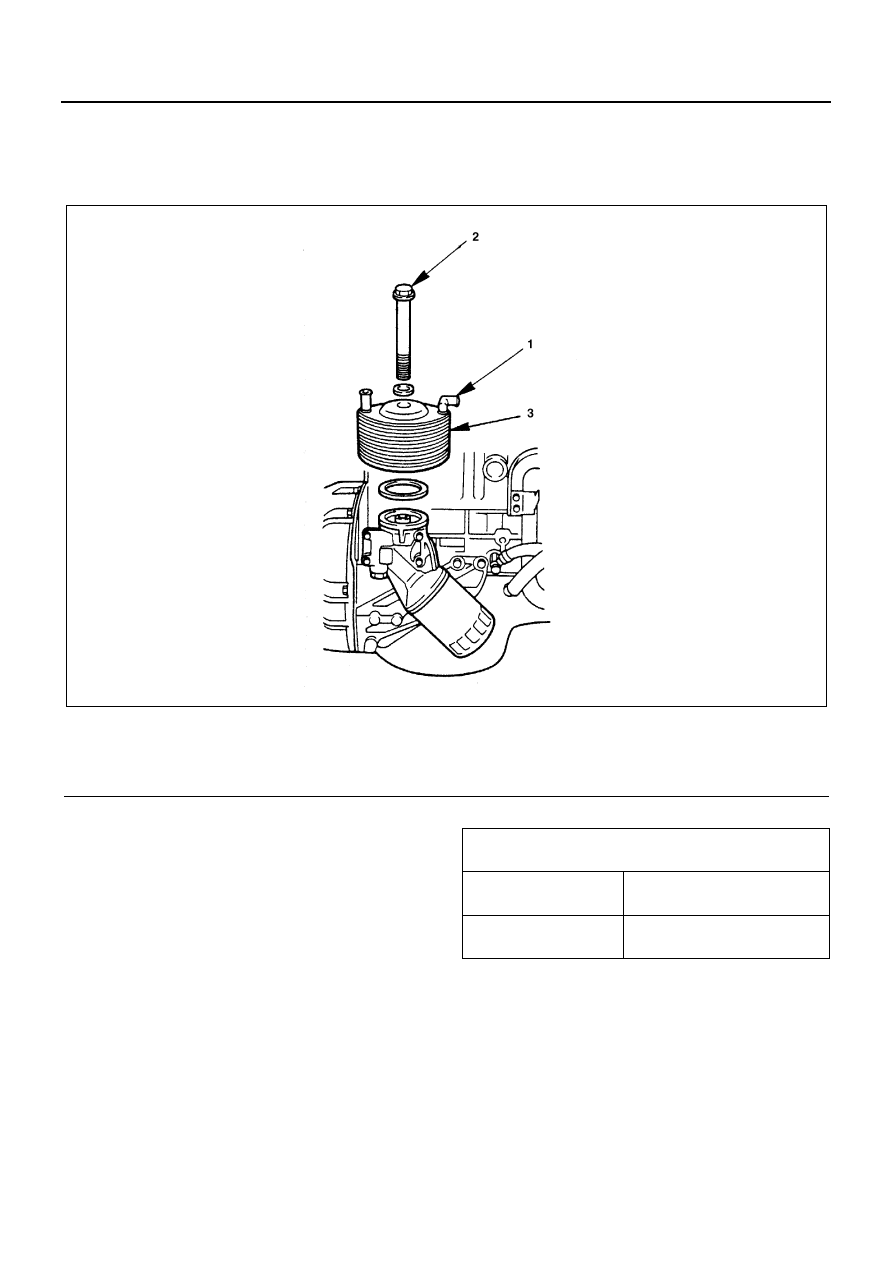
OIL COOLER (Oil Cooler Model)

Component

4JG2, 4JB1, 4JB1-TC, 4JH1-TC

Removal

Preparation

• Disconnect battery ground cable
• Drain coolant
• Put rag to beneath side of oil cooler to prevent oil

leaking.

1. Water Hose

• Disconnect water inlet and outlet hose.

2. Oil Cooler Fixing Bolt
3. Oil Cooler

Inspection

Relief Valve

1. Attach an oil pressure gauge to the oil gallery near

the oil filter.

2. Start the engine to check the relief valve opening

pressure.

Legend

1. Water hose

3. Oil cooler

2. Oil cooler fixing bolt

N6A3237E

Relief Valve Opening 
Pressure

kPa (kg/cm

2

/psi)

Type1

559 — 618 (5.7 — 6.3/81.0 
— 89.6)

Type2

422 — 461 (4.3 — 4.7/61.1 
— 66.8)

4JB1/4JB1-TC/4JG2/4JH1-TC - ENGINE 6A1-13

Oil Cooler
Check for water leakage at the water passage.

1. Plug one side of the oil cooler water passage.
2. Submerge the oil cooler in water.
3. Apply compressed air (2 kg/cm

2

 (28.5 psi / 196.0

kPa)) to the other side of the oil cooler water pas-
sage.
If air bubbles rise to the surface, there is water
leakage.

Installation

1. Oil Cooler

• Install the O-ring to oil filter body and set the oil

cooler.

2. Oil Cooler Fixing Bolt

Tighten:

• Oil cooler bolt to 29 N

⋅m (3.0 kg⋅m / 22 lb⋅ft)

3. Water Hose

• Connect water hose.

N6A3238E

N6A3239E

N6A3240E

6A1-14 4JB1/4JB1-TC/4JG2/4JH1-TC - ENGINE

OIL FILTER CARTRIDGE

Component

4JG2, 4JB1, 4JB1-TC, 4JH1-TC

Removal

• Place a receptacle beneath the oil filter to contain

the drained oil.

• Remove the oil filter cartridge using filter wrench.

Filter wrench: 5-8840-0200-0

Installation

• Lightly oil the O-ring of oil filter cartridge.
• Turn in the new oil filter cartridge by hand until the

sealing face is fitted against the O-ring.

• Use the filter wrench to turn in the oil filter and ad-

ditional one and 1.1/8 turns.

• Start the engine and check for oil leakage from oil

filter.

N6A3241E

N6A3242E

4JB1/4JB1-TC/4JG2/4JH1-TC - ENGINE 6A1-15

CYLINDER HEAD COVER

Component

Removal

Preparation

• Disconnect battery ground cable.

1. PCV Hose

• Disconnect the PCV hose from intake pipe side.

2. Cylinder Head Cover

Installation

1. Cylinder Head Cover

• Apply engine oil to the rocker arms and the valve

springs.

• Install the cylinder head cover gasket to the cylin-

der head cover.

• The gasket must be perfectly smooth with no loose

areas.

• Tighten the cylinder head cover nuts to the speci-

fied torque.

Tighten:

• 13  N

⋅m (1.3 kg⋅m / 9 lb⋅ft)

2. PCV Hose

• Connect the PCV hose to the intake pipe.
• Connect battery ground cable.

Legend

1. PCV hose

2. Cylinder head cover

N6A3243E

N6A3244E


Content   ..  579  580  581  582   ..