Isuzu N-Series. Service manual - part 1293


  Index      Isuzu     Isuzu N-Series - service and repair manual


Search            


Content   ..  1291  1292  1293  1294   ..


Isuzu N-Series. Service manual - part 1293


3. The door can be locked outside
without the key. First press down the
lock button (figure in the above
page) at the inner side of the door to

the fixed position, then pull the out鄄
side door handle outwards and at
the same time close the door.
4. Pull out the inside door handle,
and the door can be open. After
closing the door, the door can be
locked if the lock button is pressed
down.

Cab seat

Cab seat can be classified as driver
seat尧 assistant driver seat and rear
row seat. Driver back seat adopts
upright seat. The angle of backrest
and the fore-and-aft position of seat
can be adjusted. The maximum ad鄄
justable angle of the backrest is 56毅.
The maximum adjustable distance of
the seat is 160 mm. The seat adjust
system is shown in the right figure.

seat adjuster system

When vehicle is in the progress of
maintenance, please clean the track
assembly of the driver seat, recoat
the lithium base grease, and tighten
all joint nuts again. If find that the
cab track slide seat is shaking or
block because of the distortion, it
should be repaired or replaced with
components.
High quality safety belts have been
equipped to the seat in this series
truck, please tie the belt without fail

lock button

three-step opening door

8

seat adjuster system

HFC1020

series trucks

when you are driving or riding the ve鄄
hicle.

Cab tilt lock mechanism

Brief description of the structure
This series truck has two configura鄄
tions: tilting cab and make it cannot
tilt. According to the latter configura鄄
tion, the cab cannot tilt, so it does
not have cab tilt lock mechanism. In
order to improve the riding comfort,
the linkage between cab and vehicle
frame is flexible.
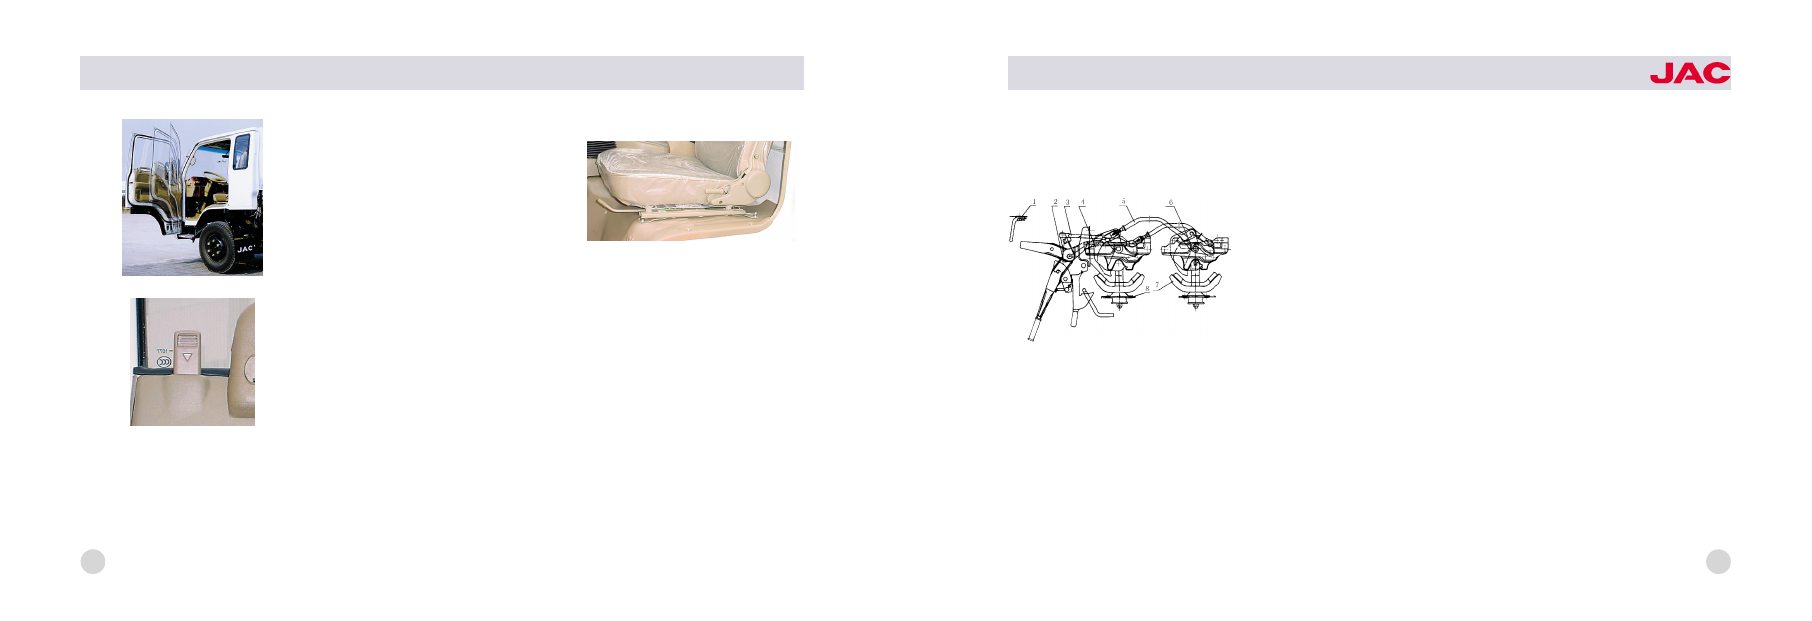
To the tilt cab, there are tilt and
locking mechanisms. Tilt mechanism
is composed of torsion bar尧support
axle tube assembly尧left and right
brackets in the foreside and rear
support rod assembly in the cab.
The tilting of cab is achieved with
torsion. The locking mechanism is
composed of left and right locking
mechanism assemblies尧 tilt locking

mechanism assembly尧 short pull
rod尧 long pull rod尧 rear support
bracket assembly in the cab and
rubber pad assembly of rear bracket.
It has triplication locking function
which are self locking of left尧 right
locking mechanism尧 lock of tilt lock鄄
ing mechanism assembly and lock of
safety lock hook. Its purpose is lock鄄
ing the cab reliably and make sure
that the cab can not tilt automatically
when the vehicle is running. The tilt
lock mechanism is shown in the fig鄄
ure on the above page.
Please read the tilting notes on the
left door of the cab and on the upper
flange of the wheel seriously before
tilting the cab. The notes are shown
in the below figure.

1尧handle; 2尧tilt locking mechanism;
3尧short pull rod;4尧left locking mec-hanism;
5尧long pull rod;
6尧right locking mechanism;
7尧cab rear support;
8尧rubber pad of cab rear support

schematic diagram of

cab tilt locking device

9

Use and maintenance
In order to tilting the cab reliably and
running the vehicle safely, please
pay attention to the following con鄄
tents.
1. Cab tilting method and relative at鄄
tentive notices.
1) When the vehicle is stopped on
the horizontal road, you should make
sure that there has enough space
around the cab before tilting. Or else,
the cab may be damaged while tilt鄄
ing.
2) Pull up the parking brake; push
the shifting lever into the neutral posi鄄

tion to avoid the self -sliding of the
vehicle.
3) The cab door must be fastened
up. You should take all goods on the
instrument panel尧 seat and floor
away to avoid the damage of the
door and the front windshield.
4) First disengaged the locking func鄄
tion of the cab locking mechanism
when tilting the cab.
5) After the locking function disen鄄
gaged, hold the tilting rod with hand
and pull up the safety lock hook at
the same time to avoid the sudden
uplift of the cab.
6) Raise the cab slowly until it is tilt鄄
ed to the maximum position, then
lock it reliably with lock arm on the
rear bracket. It is shown in the right

figure.
7) When lowering the cab down, first
hold the tilting rod and disengage
the locking function of lock arm on
the rear bracket, then lower the cab
down slowly. After the safety lock
locked, fasten the locking mecha鄄
nism.
2. Inspection and maintenance
1) Check periodically the rubber pad
assemblies which are used to
strengthen the front尧rear support, if
find damaged, it should be replaced
instantly.

tilting notes

10

HFC1020

series trucks

2) Check periodically the locking
situation of the locking mechanism, if
invalidation of locking function found,
it should be repaired or replaced
immediately.
3) If feel arduous when tilting up the
cab or heavy when dropping down
the cab, the torsion rod is invalid.
Replace the torsion rod.
4) When repairing the chassis,

before

removing

of

the

cab,

disengage the force of the torsion
rod and operate with following steps.
淤 Disengage the locking state, and
tilt up the cab to the utmost position.
于 Remove the shaft pin connected
the rear support rod and the base
board support of the cab.
盂 Push the cab forwards for some
angle until the bolt on the torsion rod
arm can be loosened.
榆 After the bolt removed, the torsion
rod cannot work. Now the cab can
be removed ( The torsion rod can not
be pulled out).
Note: The above -mentioned work
must be done by three persons at
least because two or three persons
cannot push the cab forward after

the force of the torsion rod is
disengaged.
5) Before reverting the cab to the
original position, return the force of
the torsion rod and operate with the
following steps:

Put the tooth part of the spline

which is cut at the bottom on one
end of the torsion rod in alignment
with '1' position on the support axle
tube and the spline tube, and insert
the torsion rod into the support axle
tube ( for the rod which is pulled
out).

After mounting the cab with

support axle tube and the left尧 the
right bracket together to the frame,
put the '1' of hub splines on the
torsion rod in alignment with the

support rod assembly

11

12

spline tooth which is cut at the
bottom on the other end of the
torsion rod, cover the hub splines on
the torsion rod and insert the spline
axle tube into the right bracket in the
cab.

Tilt the cab forwards until the bolt

hole on the torsion rod arm aimed at
the screwed hole on the right bracket
in the cab, screw the bolt and tighten
it.

Put the cab down slowly, and

check whether the cab is on the
state of suspending at the horizontal
direction after dropped down. If
normally, then lock the cab.
6) If find invalidation of the torsion
rod,

when

replacing,

operates

according to 4) 5).

Starting and running of the
vehicle

Starting of the vehicle

Inspection before starting
1. Check the volume of residual
water of the radiator; check the
lubricating oil quantity in the engine尧
gear box尧 rear axle尧steering gear,
check electrolyte quantity of the
battery, check the liquid level in the
oil tank, check the joint of pipe line
for leak.
2. Check the brake system院 Depress
the brake pedal and pull the parking
brake-operating lever and check the
braking effect.
3. Check the transmission system:
check the linkage of the transmission

system.
4. Check the steering mechanism:
check the free turning angle and free
play of the steering wheel, check the
bolt for looseness.
5. Check the electrical system: che-
ck electrical equipments尧 strip lam-
ps尧 instruments.
6. Check the gear and operating
mec -hanism of the transmission,
check the indicator of gear and
shifting.
7. Check the air pressure of the tire.
8. Check the driver tools and acce-
ssories.
9. Check the window glass for clea-
ning and clarity.
Starting of the engine
When starting the engine, put the

HFC1020

series trucks

shift bar on the neutral position, turn
on the ignition switch, check horns尧
instruments on the instrument panel尧
turning lamps尧 braking lamps尧 the
angle and position of the rear view
mirror.
1. Routine start
Turn the key to the START position
(shown in the right figure), the engine
can start. After starting, loosen the
accelerator pedal immediately and
keep the engine working in low
speed. Depressing the accelerator
pedal violently is forbidden.
2. Start in winter
When the weather is very cold, the
start of diesel engine can take fol鄄
lowing measures:

Cooling water use hot water, and

unclose the drain switch when
adding hot water. When the hot water
flowed out and the engine body be鄄
came warmer, close the drain switch.

Heat up the oil up to 80益耀90益,

and then add it into the oil pan.

The engine equipped with glow

plug starts by preheating of glow

plug. When using glow plug, the time
connected to the power supply
should be less than 30 seconds ev鄄
ery time.
After starting the engine, check the
operating state of the engine and in鄄
struments at different rotating speed.
Especially check the oil pressure.
Check if there have leakage of wa鄄
ter尧 oil and gas, check whether the
oil level is normal and the engine
have abnormal noise. Check whether
the color of exhaust is normal.
3. After starting the engine, do not
depress the accelerator pedal vio鄄
lently, loosen the accelerator pedal to
keep the engine operating on idle for
some time. After the temperature of
engine rises and the engine operates

starting switch

13

14

stably, uplift the clutch pedal slowly.
4. Generally after the temperature of
engine become more than 60益 and
the operating (sound) of the engine
components尧the reading of instru鄄
ments are normal, the vehicle can
run. Do not run the vehicle in low
temperature to avoid intense wear of
the engine.
Starting and shifting of the vehicle
After engine operates normally, de鄄
press the clutch pedal, shift into low
gear, loosen the parking brake, and
press the horn once. Making sure
that the vehicle can be operated
safely, loosen the clutch pedal slowly
and depress the accelerator pedal
properly at the same time to start the
vehicle. After starting the vehicle, the

foot should get away from the clutch
pedal. Do not keep the foot on the
pedal to avoid the burning out of the
clutch friction disc. Loosen the clutch
pedal rapidly or depress the accel鄄
erator pedal insufficiently, the engine
can stop.
Note: Do not let the vehicle running
in the first or the second gear posi鄄
tion for long time to prevent from in鄄
creasing the wear and the fuel con鄄
sumption.
When running the vehicle, shift the
gear position according to the
change of the road and landform. If
find that the engine power is in
abundance and the rotating speed
rises, it illustrates that the primary
gear position is not appropriate, the

vehicle should be shifted to the next
fast gear hositlon in time. After shift鄄
ing, if not finding shortage of power
and chattering of transmission, the
shifting operation can be considered
right. If find shortage of power or the
vehicle speed decreases, the vehicle
should be shifted to a low gear posi鄄
tion. If the vehicle runs normally after
shifting, the shifting into low gear is
right.
For safety, when swerving尧passing
bridge and meeting, the vehicle can
run in moderate speed. On better
running condition, the vehicle can op鄄
erate in fast gear, and at this time the
vehicle speed is high, the fuel con鄄
sumption is low, the economy of fuel
is good.

HFC1020

series trucks

When shifting, do not just see the
shifting lever. You should watch for鄄
wards, hold the steering wheel
steadily with your left hand, let the
center of the palm in your right hand
stick to the top part of the shifting
lever and push or pull it to the right
position with the force of your right
wrist.

Running尧 swerving尧 turnarou -
nd尧 backing and braking of the
vehicle

Running
Keep enough distance to the forego鄄
ing vehicle when running on flat
road. Select vehicle speed according
to the vehicle model尧mission and
concrete condition of road, generally
select the speed of 50耀70 km/h.

Let the vehicle running in the first or
the second gear position when start鄄
ing, upgrading under heavy load and
running on bumpy road or on the
road having obstacles. But the vehi鄄
cle can not running in the first or the
second gear too long in normal run鄄
ning. When upgrading with heavy
load, shift the shifting lever into low
gear to avoid overloading of the en鄄
gine.
When running, do not increase or de鄄
crease the vehicle speed abruptly
and not shake the steering wheel
without reason, listen whether there is
abnormal noise or not, check the
reading and indicator lamp of all in鄄
struments for normalization. If find
abnormal noise or abnormal events,

stop the vehicle immediately and
check it, take necessary adjustment
and repair.
When downgrad, do not stall the
engine. When downgrading steep
ramp, shift the shifting lever into low
gear and take braking operation at
intervals to avoid the over fast of the
vehicle speed.
When running across shallow river or
loblolly, prevent the water from enter鄄
ing into air intake lines of the engine尧
rear axles and transmission case.
Check rear axles and transmission
case for entering water after pad鄄
dling. If find water, drain it and add
gear oil with specified quantity. After
paddling, the vehicle can not run in
high speed. You should depress the

15


Content   ..  1291  1292  1293  1294   ..