Honda Crosstour (2015 year). Manual - part 8


  Index      Honda     Honda Crosstour - service manual 2015 year in english


Search            copyright infringement  


Content   ..  6  7  8  9   ..


Honda Crosstour (2015 year). Manual - part 8


112

uu

Opening and Closing the Windows

u

Opening/Closing the Power Windows

Co
ntrols

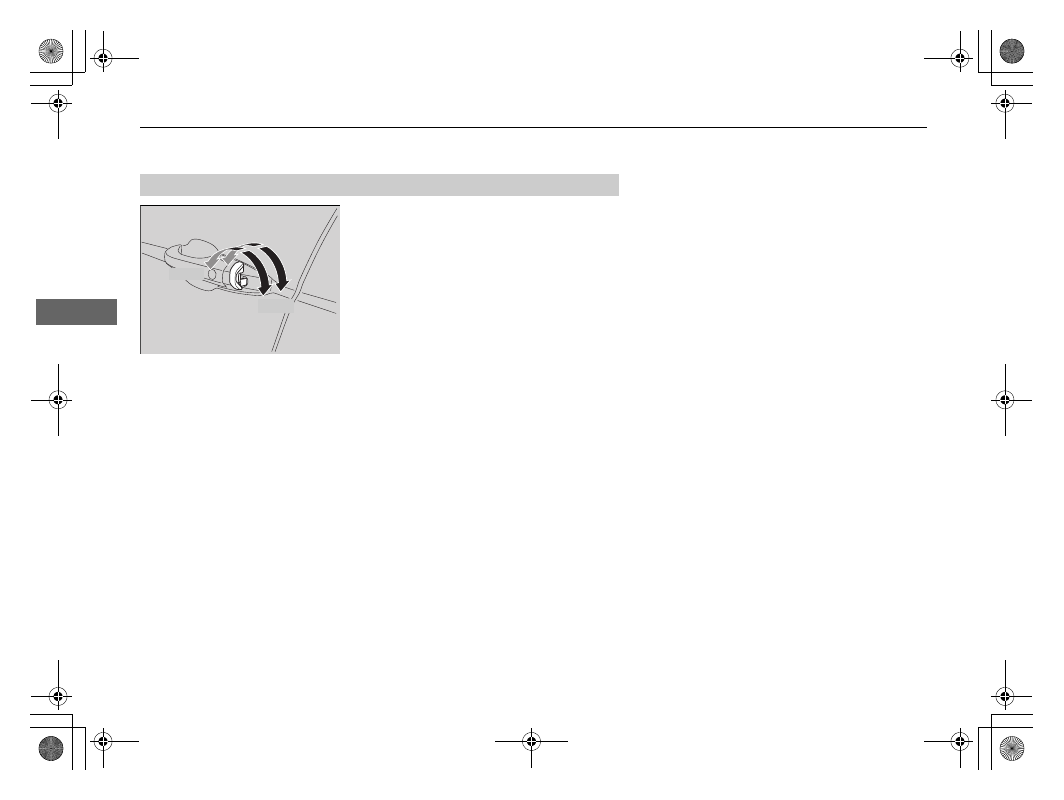
To open: Unlock the driver’s door with the 
key. Within 10 seconds of returning the key to 
the central position, turn the key in the unlock 
direction and hold it there.
To close: Lock the driver’s door with the key. 
Within 10 seconds of returning the key to the 
central position, turn the key in the lock 
direction and hold it there.

Release the key to stop the windows/
moonroof at the desired position. If you want 
further adjustment, repeat the same 
operation.

Opening/Closing the Windows and Moonroof with the Key

Close

Open

113

Co
ntrols

Opening and Closing the Moonroof

You can only operate the moonroof when the ignition switch is in ON 

(

w

*1

. Use the 

switch in the front of the ceiling to open and close the moonroof.

Automatic operation

To open: Pull the switch back firmly.
To close: Push the switch forward firmly.

The moonroof will automatically open or close 
all the way. To stop the moonroof midway, 
touch the switch briefly.

Manual operation

To open: Pull the switch back lightly, and 
hold it until the desired position is reached.
To close: Push the switch forward lightly, and 
hold it until the desired position is reached.

Tilting the moonroof up

To tilt: Push on the center of the moonroof 
switch.
To close: Push the switch forward firmly.

*1: Models with the smart entry system have an ENGINE START/STOP button instead of an 
ignition switch.

Opening/Closing the Moonroof

1

Opening/Closing the Moonroof

NOTICE

Opening the moonroof in below freezing 
temperature or when it is covered with snow or ice 
can damage the moonroof panel or motor.

The power moonroof can be operated for up to 10 
minutes after you turn the ignition switch off.
Opening either front door cancels this function.

When resistance is detected, the auto reverse 
function causes the moonroof to change directions, 
then stop. Auto reverse stops sensing when the 
moonroof is almost closed to ensure that it fully 
closes. Make sure that all objects, including fingers, 
are clear of the moonroof.

3

WARNING

Opening or closing the moonroof on 
someone’s hands or fingers can cause 
serious injury.

Make sure all hands and fingers are clear of 
the moonroof before opening or closing it.

Open

Close

Tilt

114

Co
ntrols

Operating the Switches Around the Steering Wheel

Ignition Switch

*

1

Ignition Switch

*

You cannot take the key out unless the shift lever is 
in 

(

P.

If you open the driver’s door when the key is in LOCK 

(

0 or ACCESSORY 

(

q, a warning buzzer will sound 

to remind you to take the key out.

If the key won’t turn from LOCK 

(

0 to ACCESSORY 

(

q, turn the key while moving the steering wheel left 

and right. The steering wheel will unlock, allowing 
the key to turn.

(

0 LOCK: Insert and remove the key in this 

position.

(

q ACCESSORY: Operate the audio system and 

other accessories in this position.

(

w ON: This is the position when driving.

(

e START: This position is for starting the engine. 

The switch returns to ON 

(

w when you let go of 

the key.

* Not available on all models

115

uu

Operating the Switches Around the Steering Wheel

u

ENGINE START/STOP Button

*

Continued

Co
ntrols

ENGINE START/STOP Button

*

Changing the Power Mode

1

ENGINE START/STOP Button

*

ENGINE START/STOP Button Operating Range

You can start the engine when the smart entry 
remote is inside the vehicle.
The engine may also run if the smart entry remote is 
close to the door or window, even if it is outside the 
vehicle.

ON mode:
Indicator in the button is off, if the engine is running.

If the smart entry remote battery is weak, beeper 
sounds and the TO START, HOLD REMOTE NEAR 
START BUTTON
 message appears on the 
information display.

If the Smart Entry Remote Battery is Weak 

P. 526

Do not leave the power mode in ACCESSORY or ON 
when you get out.

Operating Range

VEHICLE OFF (LOCK)
Indicator in the button is off.
The steering wheel is locked. The 
power to all electrical 
components is turned off.

Press the button without the shift lever in 

(

P.

Shift to 

(

P then press the button.

Press the button.

Without pressing the brake pedal

ACCESSORY
Indicator in the button is on.
Indicator in the button blinks 
(from ON to ACCESSORY). 
Operate the audio system and 
other accessories in this position.

ON
Indicator in the button is on.
All electrical components can be 
used.

Indicator

* Not available on all models

uu

Operating the Switches Around the Steering Wheel

u

ENGINE START/STOP Button

*

116

Co
ntrols

If you leave the vehicle for 30 to 60 minutes with the shift lever in 

(

P and the power 

mode in ACCESSORY, the vehicle automatically goes into the mode similar to 
VEHICLE OFF (LOCK) to avoid the battery drain. 

When in this mode:
The steering wheel does not lock. 
You cannot lock or unlock doors with the remote transmitter or the smart entry 
system.

Press the ENGINE START/STOP button to switch the mode to VEHICLE OFF (LOCK).

Automatic Power Off

1

ENGINE START/STOP Button

*

If the power mode does not change from VEHICLE 
OFF to ACCESSORY, press the ENGINE START/STOP 
button while moving the steering wheel left and 
right. The steering wheel will unlock, allowing the 
mode to change.

* Not available on all models

117

uu

Operating the Switches Around the Steering Wheel

u

ENGINE START/STOP Button

*

Co
ntrols

If you open the driver’s door when the power mode is set to ACCESSORY, a warning 
beep sounds.

Warning buzzers may sound from inside or/
and outside the vehicle to remind you that the 
smart entry remote is out of the vehicle. If the 
buzzer continues even after the remote is put 
back inside, place it to be within its 
operational range.

When the power mode is in ON

If the smart entry remote is taken out of the 
vehicle, and the driver’s door is closed, 
warning buzzers sound from both inside and 
outside the vehicle. A warning message on 
the information display notifies the driver 
inside that the remote is out.

When the power mode is in 
ACCESSORY

If the smart entry remote is taken out of the 
vehicle, and all the doors are closed, a 
warning buzzer sounds from outside the 
vehicle.

Power Mode Reminder

Smart Entry Remote Reminder

1

Smart Entry Remote Reminder

When the smart entry remote is within the system’s 
operational range, and the driver’s door is closed, the 
warning function cancels.

If the smart entry remote is taken out of the vehicle 
after the engine has been started, you can no longer 
change the ENGINE START/STOP button mode or 
restart the engine. Always make sure if the remote is 
in your vehicle when you operate the ENGINE 
START/STOP
 button.

Removing the smart entry remote from the vehicle 
through a window does not activate the warning 
buzzer.

Do not put the smart entry remote on the dashboard 
or in the glove box. It may cause the warning buzzer 
to go off. Under some other conditions that can 
prevent the vehicle from locating the remote, the 
warning buzzer may also go off even if the remote is 
within the system’s operational range.

118

uu

Operating the Switches Around the Steering Wheel

u

Ignition Switch and Power Mode Comparison

Co
ntrols

Ignition Switch and Power Mode Comparison

Ignition Switch 
Position

LOCK (0)
(with/without 
the key)

ACCESSORY (I)

ON (II)

START (III)

Without Smart Entry 
System

Engine is turned off and 
power is shut down.

The steering wheel is 
locked.

No electrical 
components can be 
used.

Engine is turned off.

Some electrical 
components such as the 
audio system and the 
accessory power socket 
can be operated.

Normal key position 
while driving.

All electrical components 
can be used.

Use this position to start 
the engine.

The ignition switch 
returns to the ON (II) 
position when you 
release the key.

Power Mode

VEHICLE OFF
(LOCK)

ACCESSORY

ON

START

With Smart Entry 
System and ENGINE 
START/STOP
 
Button

Indicator-Off

Engine is turned off and 
power is shut down.

The steering wheel is 
locked.

No electrical 
components can be 
used.

Indicator-On or blinking

Engine is turned off.

Some electrical 
components such as the 
audio system and the 
accessory power socket 
can be operated.

Indicator-
On (engine is turned off)
Off (engine is running)

All electrical components 
can be used.

Indicator-Off

The mode automatically 
returns to ON after the 
engine starts.

Indicator is: On

Off

119

uu

Operating the Switches Around the Steering Wheel

u

Turn Signals

Continued

Co
ntrols

Turn Signals

The turn signals can be used when the ignition 
switch is in ON 

(

w

*1

.

One-touch turn signal

When you lightly push up or down and release 
the turn signal lever, the exterior turn signals 
and turn signal indicator blink three times.

This feature can be used when signaling for a 
lane change.

Light Switches

Rotating the light switch turns the lights on 
and off, regardless of the position of the 
ignition switch

*1

.

High beams

Push the lever forward until you hear a click.

Low beams

When in high beams, pull the lever back to 
return to low beams.

Flashing the high beams

Pull the lever back, and release it.

*1: Models with the smart entry system have an ENGINE START/STOP button instead of an 
ignition switch.

Right Turn

Left Turn

Manual Operation

1

Light Switches

If you remove the key from the ignition switch or 
leave the power mode in VEHICLE OFF (LOCK) while 
the lights are on, a chime sounds when the driver’s 
door is opened.

When the lights are on, the lights on indicator in the 
instrument panel will be on.

Lights On Indicator P. 79

Do not leave the lights on when the engine is off 
because it will cause the battery to discharge.

If you sense that the level of the headlights is 
abnormal, have the vehicle inspected by a dealer.

High Beams

Flashing the high beams

Low Beams

Turns on parking, side marker, 
tail, and rear license plate lights

Turns on headlights, parking, 
side marker, tail, and rear 
license plate lights

uu

Operating the Switches Around the Steering Wheel

u

Light Switches

120

Co
ntrols

Automatic lighting control can be used when 
the ignition switch is in ON 

(

w

*1

.

When you turn the light switch to AUTO, the 
headlights and other exterior lights will switch 
on and off automatically depending on the 
ambient brightness.

u

You can change the auto light sensitivity 
setting.

Customized Features

*

 P. 280

*1: Models with the smart entry system have an ENGINE START/STOP button instead of an 
ignition switch.

Automatic Lighting Control

1

Automatic Lighting Control

We recommend that you turn on the lights manually 
when driving at night, in a dense fog, or in dark areas 
such as long tunnels or parking facilities.

The light sensor is in the location shown below.
Do not cover this light sensor with anything; 
otherwise, the automatic lighting system may not 
work properly.

Adjust the auto light sensitivity as follows:

Setting

The exterior lights come on 

when the ambient light is at

MAX

HIGH

MID

LOW

MIN

Light Sensor

Models with audio/information screen

Bright

Dark

Models with audio/information screen

* Not available on all models

121

uu

Operating the Switches Around the Steering Wheel

u

Light Switches

Co
ntrols

The headlights, all other exterior lights, and the instrument panel lights turn off 15 
seconds after you remove the key or set the power mode to VEHICLE OFF (LOCK), 
take the remote with you, and close the driver’s door.

If you turn the ignition switch to LOCK 

(

0

*1

 with the headlight switch on, but do 

not open the door, the lights turn off after 10 minutes (three minutes, if the switch 
is in the AUTO position).

The lights turn on again when you unlock or open the driver’s door. If you unlock 
the door, but do not open it within 15 seconds, the lights go off. If you open the 
driver’s door, you will hear a lights on reminder chime.

*1: Models with the smart entry system have an ENGINE START/STOP button instead of an 
ignition switch.

Automatic Lighting Off Feature

1

Automatic Lighting Off Feature

You can change the headlight auto off timer setting.

Customized Features

*

 P. 280

Models with smart entry system

* Not available on all models

122

uu

Operating the Switches Around the Steering Wheel

u

Fog Lights

Co
ntrols

Fog Lights

When the low beam headlights are on, turn 
the fog light switch on to use the fog lights.

Daytime Running Lights

The high beam headlights come on slightly dimmer than normal when the following 
conditions have been met:
• The ignition switch is in ON 

(

w

*1

.

• The headlight switch is off, or in 

.

• The parking brake is released.

The lights remain on even if you set the parking brake. Turning off the ignition 
switch or setting the power mode to VEHICLE OFF will turn off the daytime running 
lights.

The high beam headlights return to the original brightness once the headlight 
switch is turned on.

*1: Models with the smart entry system have an ENGINE START/STOP button instead of an 
ignition switch.

1

Fog Lights

When the fog lights are on, the indicator in the 
instrument panel will be on.
They go off when the headlights turn off, or when 
the daytime running lights are on.

Fog Light Indicator P. 79

Fog Light Switch

123

uu

Operating the Switches Around the Steering Wheel

u

Wipers and Washers

Continued

Co
ntrols

Wipers and Washers

The windshield wipers and washers can be 
used when the ignition switch is in ON 

(

w

*1

.

MIST

The wipers run at high speed until you release 
the lever.

Wiper switch (OFF, INT, LO, HI)

Change the wiper switch setting according to 
the amount of rain.

Adjusting the delay

Turn the adjustment ring to adjust the wiper 
delay.

Washer

Sprays while you pull the lever toward you.
When you release the lever, the wipers make 
two or three more sweeps before stopping.

*1: Models with the smart entry system have an ENGINE START/STOP button instead of an 
ignition switch.

Front Wiper/Washer

1

Wipers and Washers

NOTICE

Do not use the wipers when the windshield is dry.
The windshield will get scratched, or the rubber 
blades will get damaged.

NOTICE

In cold weather, the blades may freeze to the 
windshield, becoming stuck.
Operating the wipers in this condition may damage 
the wipers. Use the defroster to warm the 
windshield, then turn the wipers on.

Turn the washers off if no washer fluid comes out.
The pump may get damaged.

If the vehicle speeds up while the wipers are 
operating intermittently, the length of the wipe 
interval shortens. When the vehicle starts moving, the 
wipers make a single sweep.
When the vehicle speeds up, the wiper operation’s 
shortest delay setting ( ) and the LO setting become 
the same.

Intermittent Time 
Adjustment Ring

Pull to 
use 
washer.

MIST

INT: Low speed with
        intermittent

OFF

LO: Low speed wipe

HI: High speed wipe

Long delay

Short delay

uu

Operating the Switches Around the Steering Wheel

u

Wipers and Washers

124

Co
ntrols

The rear wiper and washer can be used when 
the ignition switch is in ON 

(

w

*1

.

Wiper switch (OFF, ON)

The wiper operates intermittently after 
completing a few sweeps.

Washer (

)

Sprays while you rotate the switch to this 
position.
Hold it to activate the wiper and to spray the 
washer. Once released, it stops operating 
after a few more sweeps.

Operating in reverse

When you shift the transmission to 

(

R with the front wiper activated, the rear wiper 

operates automatically as follows even if its switch is off.

*1: Models with the smart entry system have an ENGINE START/STOP button instead of an 
ignition switch.

Rear Wiper/Washer

1

Rear Wiper/Washer

If the wiper stops operating due to any obstacle such 
as the build-up of snow, park the vehicle in a safe 
place.

Rotate the wiper switch to OFF, and turn the ignition 
switch to ACCESSORY 

(

q or LOCK 

(

0

*1

, then 

remove the obstacle.

The wiper motor is equipped with a breaker that may 
stop motor operation temporarily to prevent an 
overload. Wiper operation will return to normal 
within a few minutes, once the circuit has returned to 
normal.

OFF

ON: Continuous wipe

Washer

Front Wiper Position

Rear Wiper Operation

INT (Intermittent)

Intermittent

LO (Low speed wipe)
HI (High speed wipe)

Continuous

125

uu

Operating the Switches Around the Steering Wheel

u

Brightness Control

Co
ntrols

Brightness Control

When the parking lights are turned on and the 
ignition switch is in ON 

(

w

*1

, you can use the 

brightness control knob to adjust instrument 
panel brightness.
Brighten: Turn the knob to the right.
Dim: Turn the knob to the left.

You will hear a beep when the brightness 
reaches minimum or maximum. The 
information display will return to its original 
state several seconds after you adjust the 
brightness.

Brightness level indicator

The brightness level is shown on the 
information display while you are adjusting it.

*1: Models with the smart entry system have an ENGINE START/STOP button instead of an 
ignition switch.

1

Brightness Control

Instrument panel brightness varies, depending on 
whether the exterior lights are on or off. The 
instrument panel dims to reduce glare when they are 
on.

Pressing the 

 (Select/Reset) knob changes to a 

different display.

If you turn the knob to the right until the brightness 
display is up to max, the beeper sounds. This cancels 
the reduced instrument panel brightness when the 
exterior lights are on.

Control Knob

126

uu

Operating the Switches Around the Steering Wheel

u

Rear Defogger/Heated Door Mirror Button

Co
ntrols

Rear Defogger/Heated Door Mirror Button

Press the rear defogger and heated door mirror button to defog the rear window 
and mirrors when the ignition switch is in ON 

(

w

*1

.

The rear defogger and heated door mirrors 
automatically switch off after 20 minutes. 
However, if the outside temperature is 18°F 
(−8°C) or below, they do not automatically 
switch off.

The rear defogger and heated door mirrors 
automatically switch off after 10-30 minutes 
depending on the outside temperature. 
However, if the outside temperature is 32°F 
(0°C) or below, they do not automatically 
switch off.

*1: Models with the smart entry system have an 
ENGINE START/STOP button instead of an ignition 
switch.

1

Rear Defogger/Heated Door Mirror Button

NOTICE

When cleaning the inside of the rear window, be 
careful not to damage the heating wires.
It is critical to wipe the window from side to side 
along the defogger heating wires.

This system consumes a lot of power, so turn it off 
when the window has been defogged.
Also, do not use the system for a long period when 
the engine is idling. This may weaken the battery, 
making it difficult to start the engine.

Models with heating and cooling system

Models with audio 
touch screen

Models with climate control system

Models without 
audio touch screen

127

uu

Operating the Switches Around the Steering Wheel

u

Driving Position Memory System

*

Continued

Co
ntrols

Driving Position Memory System

*

You can store two driver’s seat and door mirror positions with the driving position 
memory system.
When you unlock and open the driver’s door with a remote, the seat and door 
mirrors adjust automatically to one of the two preset positions. 

Select either remote you use to unlock the vehicle when you enter.
• DRIVER 1 transmitter is linked to memory button 1.
• DRIVER 2 transmitter is linked to memory button 2.

1

Driving Position Memory System

*

Using the audio/information screen, you can disable 
the automatic seat adjustment function.

Customized Features

*

 P. 280

Models with audio/information screen

DRIVER 1

DRIVER 2

Models with smart entry system

Models without smart entry system

* Not available on all models


Content   ..  6  7  8  9   ..