Honda Civic Hatchback (2018 year). Manual - part 37


  Index      Honda     Honda Civic Hatchback - service manual 2018 year in english


Search            


Content   ..  35  36  37  38   ..


Honda Civic Hatchback (2018 year). Manual - part 37


576

uu

Maintenance Under the Hood

u

Oil Check

Main

tenan

ce

Oil Check

We recommend that you check the engine oil level every time you refuel.
Park the vehicle on level ground.
Wait approximately three minutes after turning the engine off before you check the 
oil.

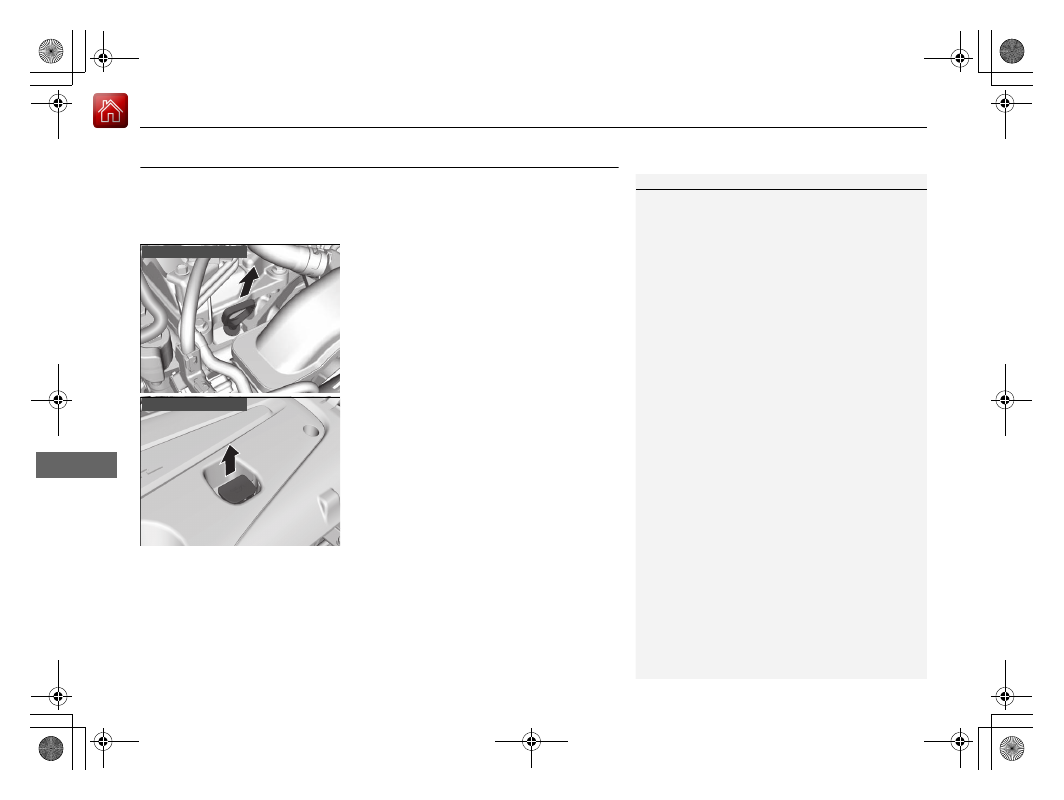
1. Remove the dipstick (orange or black).
2. Wipe the dipstick with a clean cloth or 

paper towel.

3. Insert the dipstick back all the way into its 

hole.

1

Oil Check

If the oil level is near or below the lower mark, slowly 
add oil, being careful not to overfill.

1.5 L engine models

2.0 L engine models

577

uu

Maintenance Under the Hood

u

Oil Check

Main

tenan

ce

4. Remove the dipstick again, and check the 

level. It should be between the upper and 
lower marks. Add oil if necessary.

Upper Mark

Lower Mark

1.5 L engine models

Upper Mark

Lower Mark

2.0 L engine models

578

uu

Maintenance Under the Hood

u

Adding Engine Oil

Main

tenan

ce

Adding Engine Oil

1. Unscrew and remove the engine oil fill cap.
2. Add oil slowly.
3. Reinstall the engine oil fill cap, and tighten 

it securely.

4. Wait for three minutes and recheck the 

engine oil dipstick.

1

Adding Engine Oil

NOTICE

Do not fill the engine oil above the upper mark. 
Overfilling the engine oil can result in leaks and 
engine damage.

If any oil spills, wipe it away immediately. Spilled oil 
may damage the engine compartment components.

Engine Oil 
Fill Cap

1.5 L engine models

2.0 L engine models

Engine Oil 
Fill Cap

579

uu

Maintenance Under the Hood

u

Changing the Engine Oil and Oil Filter

Continued

Main

tenan

ce

Changing the Engine Oil and Oil Filter

You must change the engine oil and oil filter regularly in order to maintain the 
engine’s lubrication. The engine may be damaged if they are not changed regularly.

Change the oil and filter in accordance with the maintenance message on the 
information display

*

/driver information interface

*

.

1. Run the engine until it reaches normal 

operating temperature, and then turn the 
engine off.

2. Open the hood and remove the engine oil 

fill cap.

3. Remove the phillips head screws and 

slotted head screws by turning 90° 
counterclockwise on the undercarriage 
and remove the under cover.

1

Changing the Engine Oil and Oil Filter

NOTICE

You may damage the environment if you do not 
dispose of the oil in a suitable way. If you are 
changing the oil by yourself, appropriately dispose of 
the used oil. Put the oil in a sealed container and take 
it to a recycling center. Do not throw the oil away 
into a garbage can or onto the ground.

Under Cover

Screw

1.5 L engine models

2.0 L engine models

Under Cover

Screw

* Not available on all models

580

uu

Maintenance Under the Hood

u

Changing the Engine Oil and Oil Filter

Main

tenan

ce

4. Remove the drain bolt and washer from 

the bottom of the engine, and drain the 
oil into a suitable container.

Drain Bolt

Washer

1.5 L engine models

2.0 L engine models

Drain Bolt

Washer

581

uu

Maintenance Under the Hood

u

Changing the Engine Oil and Oil Filter

Main

tenan

ce

5. Remove the oil filter and dispose of the 

remaining oil.

6. Check that the filter gasket is not stuck to 

the engine contact surface.

u

If it is stuck, you must detach it.

7. Wipe away dirt and dust adhering to the 

contact surface of the engine block, and 
install a new oil filter.

u

Apply a light coat of new engine oil to 
the filter gasket.

8. Put a new washer on the drain bolt, then 

reinstall the drain bolt.

u

Tightening torque: 
30 lbf∙ft (40 N∙m, 4.0 kgf∙m)

9. Pour the recommended engine oil into the 

engine.

u

Engine oil change capacity (including 
filter): 

3.7 US qt (3.5 L)

5.7 US qt (5.4 L)

10. Reinstall the engine oil fill cap securely and 

start the engine.

11. Run the engine for a few minutes, and 

then check that there is no leak from the 
drain bolt or oil filter.

12. Stop the engine, wait for three minutes, 

and then check the oil level on the dipstick.

u

If necessary, add more engine oil.

1

Changing the Engine Oil and Oil Filter

You will need a special wrench to replace the oil 
filter. You can buy this wrench from a dealer.

When installing the new oil filter, follow the 
instructions supplied with the oil filter.

Reinstall the engine oil fill cap. Start the engine. The 
low oil pressure indicator should go off within five 
seconds. If it does not, turn off the engine, and check 
your work.

Oil Filter

1.5 L engine models

2.0 L engine models

Oil Filter

1.5 L engine models

2.0 L engine models

582

uu

Maintenance Under the Hood

u

Engine Coolant

Main

tenan

ce

Engine Coolant

This coolant is premixed with 50% antifreeze and 50% water. Do not add any 
straight antifreeze or water.

We recommend you check the engine coolant level every time you refuel. Check the 
reserve tank. Add the engine coolant accordingly.

1. Make sure the engine and radiator are 

cool.

2. Check the amount of coolant in the reserve 

tank.

u

If the coolant level is below the MIN 
mark, add the specified coolant until it 
reaches the MAX mark.

3. Inspect the cooling system for leaks.

Specified coolant: Honda Long Life Antifreeze/Coolant Type 2

Checking the Coolant

1

Engine Coolant

NOTICE

Genuine Honda engine coolant is a 50/50 mixture of 
antifreeze and water that can withstand freezing at 
temperatures as low as about −31°F (−35°C). If your 
vehicle is consistently subjected to temperatures 
below this, the concentration of antifreeze in the 
coolant should be increased. Consult a dealer for 
details.

If Honda antifreeze/coolant is not available, you may 
use another major brand of non-silicate coolant as a 
temporary replacement. Check that it is a high quality 
coolant recommended for aluminum engines. 
Continued use of any non-Honda coolant can result 
in corrosion, causing the cooling system to 
malfunction or fail. Have the cooling system flushed 
and refilled with Honda antifreeze/coolant as soon as 
possible.

3

WARNING

Removing the reserve tank cap while the 
engine is hot can cause the coolant to spray 
out, seriously scalding you.

Always let the engine and radiator cool 
down before removing the reserve tank 
cap.

Reserve Tank

1.5 L engine models

2.0 L engine models

Reserve Tank

583

uu

Maintenance Under the Hood

u

Engine Coolant

Main

tenan

ce

1. Make sure the engine and radiator are 

cool.

2. Turn the reserve tank cap 1/8 turn counter-

clockwise and relieve any pressure in the 
coolant system.

3. Push down and turn the reserve tank cap 

counter-clockwise to remove it.

4. Pour coolant into the reserve tank until it 

reaches the MAX mark.

5. Put the reserve tank cap back on, and 

tighten it fully.

Adding the Coolant

1

Engine Coolant

Do not add rust inhibitors or other additives to your 
vehicle’s cooling system. They may not be compatible 
with the coolant or with the engine components.

1

Adding the Coolant

NOTICE

Pour the fluid slowly and carefully so you do not spill 
any. Clean up any spills immediately; they can 
damage components in the engine compartment.

Reserve Tank Cap

1.5 L engine models

2.0 L engine models

Reserve Tank Cap

584

uu

Maintenance Under the Hood

u

Transmission Fluid

Main

tenan

ce

Transmission Fluid

Have a dealer check the fluid level and replace if necessary.

Do not attempt to check or change the continuously variable transmission fluid 
yourself.

Have a dealer check the fluid level and replace if necessary.

Do not attempt to check or change the manual transmission fluid yourself.

Continuously Variable Transmission (CVT) Fluid

Specified fluid: Honda HCF-2 Transmission Fluid

Manual Transmission Fluid

Specified fluid: Honda Manual Transmission Fluid (MTF)

Continuously variable transmission models

1

Continuously Variable Transmission (CVT) Fluid

NOTICE

Do not mix Honda HCF-2 transmission fluid with 
other transmission fluids.
Using a transmission fluid other than Honda HCF-2 
transmission fluid may adversely affect the operation 
and durability of your vehicle’s transmission, and 
damage the transmission.
Any damage caused by using a transmission fluid that 
is not equivalent to Honda HCF-2 transmission fluid is 
not covered by Honda’s new vehicle limited warranty.

Manual transmission models

1

Manual Transmission Fluid

If Honda MTF is not available, you may use the API 
certificated SAE 0 W-20 or 5 W-20 viscosity motor oil 
as a temporary measure.
Replace with MTF as soon as possible. Motor oil does 
not contain the proper additives for the transmission 
and continued use can cause decreased shifting 
performance and lead to transmission damage.

585

uu

Maintenance Under the Hood

u

Brake/Clutch

*

 Fluid

Main

tenan

ce

Brake/Clutch

*

 Fluid

Use the same fluid for both the brakes and clutch

*

.

The fluid level should be between the MIN 
and MAX marks on the side of the reserve 
tank.

The brake fluid reserve tank is also used for 
your vehicle’s clutch fluid. As long as you keep 
the brake fluid level as instructed above, there 
is no need for checking the clutch fluid level.

Specified fluid: Honda Heavy Duty Brake Fluid DOT 3

Checking the Brake Fluid

1

Brake/Clutch

*

 Fluid

NOTICE

Brake fluid marked DOT 5 is not compatible with your 
vehicle’s braking system and can cause extensive 
damage.

If the specified brake fluid is not available, you should 
use only DOT 3 or DOT 4 fluid from a sealed 
container as a temporary replacement.

Using any non-Honda brake fluid can cause corrosion 
and decrease the longevity of the system. Have the 
brake system flushed and refilled with Honda Heavy 
Duty Brake Fluid DOT 3 as soon as possible.

If the brake fluid level is at or below the MIN mark, 
have a dealer inspect the vehicle for leaks or worn 
brake pads as soon as possible.

1.5 L engine models

Brake Reserve Tank

MIN

MAX

Manual transmission models

2.0 L engine models

MIN

MAX

Brake Reserve Tank

* Not available on all models

586

uu

Maintenance Under the Hood

u

Refilling Window Washer Fluid

Main

tenan

ce

Refilling Window Washer Fluid

Check the amount of window washer fluid 
using the washer fluid level gauge on the cap.

If the level is low, fill the washer reservoir.

Pour the washer fluid carefully. Do not 
overflow the reservoir.

Open the cap and check the amount of 
window washer fluid.

If the level is low, fill the washer reservoir.

If the washer fluid is low, a message appears 
on the driver information interface.

Pour the washer fluid carefully. Do not 
overflow the reservoir.

1

Refilling Window Washer Fluid

NOTICE

Do not use engine antifreeze or a vinegar/water 
solution in the windshield washer reservoir.
Antifreeze can damage your vehicle's paint. A 
vinegar/water solution can damage the windshield 
washer pump.
Use only commercially available windshield washer 
fluid.
Avoid prolonged use of hard water to prevent lime 
scale build up.

Models with level gauge

Level Gauge

Cap

Models without level gauge

2.0 L engine models

Canadian 1.5 L engine models

Cap

Cap

Canadian models

587

Continued

Main

tenan

ce

Replacing Light Bulbs

Headlight Bulbs

When replacing, use the following bulbs.

1. Push the tab to remove the coupler.
2. Rotate the old bulb counter-clockwise to 

remove.

3. Insert a new bulb into the headlight 

assembly and turn it clockwise.

4. Insert the coupler into the connector of the 

bulb.

High beam headlight: 60 W (HB3 for halogen bulb type)

*

High beam headlight: LED type

*

Low beam headlight: 55 W (H11 for halogen bulb type)

*

Low beam headlight: LED type

*

High Beam Headlight

1

Headlight Bulbs

NOTICE

Halogen bulbs get very hot when lit.
Oil, perspiration, or a scratch on the glass can cause 
the bulb to overheat and shatter.

The headlight aim is set by the factory, and does not 
need to be adjusted. However, if you regularly carry 
heavy items in the cargo area, have the aiming 
readjusted at a dealer or by a qualified technician.

When replacing a halogen bulb, handle it by its base, 
and protect the glass from contact with your skin or 
hard objects. If you touch the glass, clean it with 
denatured alcohol and a clean cloth.

Headlights are LED type. Have an authorized Honda 
dealer inspect and replace the light assembly.

Models with LED headlights

Models with halogen headlights

Tab

Coupler

Bulb

* Not available on all models

588

uu

Replacing Light Bulbs

u

Headlight Bulbs

Main

tenan

ce

1. Push the tab to remove the coupler.
2. Rotate the old bulb counter-clockwise to 

remove.

3. Insert a new bulb into the headlight 

assembly and turn it clockwise.

4. Insert the coupler into the connector of the 

bulb.

Low Beam Headlights

Models with halogen headlights

Tab

Coupler

Bulb

589

uu

Replacing Light Bulbs

u

Fog Light Bulbs

*

Continued

Main

tenan

ce

Fog Light Bulbs

*

When replacing, use the following bulbs.

1. Remove the clips using a flat-tip 

screwdriver, remove the bolt, and push up 
the under cover.

Fog Light: 35 W (H8 for halogen bulb type)

1

Fog Light Bulbs

*

Insert a flat-tip screwdriver, lift and remove the center 
pin to remove the clip.

Insert the clip with the center pin raised, and push 
until it is flat.

Push until the pin 
is flat.

Models with halogen fog lights

Clips

Bolt

1.5 L engine models

* Not available on all models

uu

Replacing Light Bulbs

u

Fog Light Bulbs

*

590

Main

tenan

ce

1. Remove the clips using a flat-tip 

screwdriver, remove the screw and the bolt, 
and pull down the under cover and the 
bumper lower.

2. Push the tab to remove the coupler.
3. Rotate the old bulb counter-clockwise to 

remove.

4. Insert a new bulb into the fog light 

assembly and turn it clockwise.

5. Insert the coupler into the connector of the 

bulb.

1

Fog Light Bulbs

*

NOTICE

Halogen bulbs get very hot when lit. Oil, perspiration, 
or a scratch on the glass can cause the bulb to 
overheat and shatter.

When replacing a halogen bulb, handle it by its 
plastic case, and protect the glass from contact with 
your skin or hard objects. If you touch the glass, clean 
it with denatured alcohol and a clean cloth.

Fog lights are LED type. Have an authorized Honda 
dealer inspect and replace the light assembly.

Models with LED fog lights

Screw

Bolt

Clips

2.0 L engine models

Bumper Lower

Under Cover

Tab

Coupler

Bulb

All models

* Not available on all models

591

uu

Replacing Light Bulbs

u

Front Turn Signal Light Bulbs

Main

tenan

ce

Front Turn Signal Light Bulbs

When replacing, use the following bulbs.

1. Turn the socket counter-clockwise and 

remove it.

2. Remove the old bulb and insert a new bulb.

Front Turn Signal Light: 21 W (Amber)

1

Front Turn Signal Light Bulbs

Front turn signal lights are LED type. Have an 
authorized Honda dealer inspect and replace the light 
assembly.

Models with LED headlights

Models with halogen headlights

Socket

Bulb


Content   ..  35  36  37  38   ..