Honda Accord Coupe (2017 year). Manual - part 12


  Index      Honda     Honda Accord Coupe - service manual 2017 year in english


Search            


Content   ..  10  11  12  13   ..


Honda Accord Coupe (2017 year). Manual - part 12


uu

Interior Lights/Interior Convenience Items

u

Interior Convenience Items

176

Co
ntrols

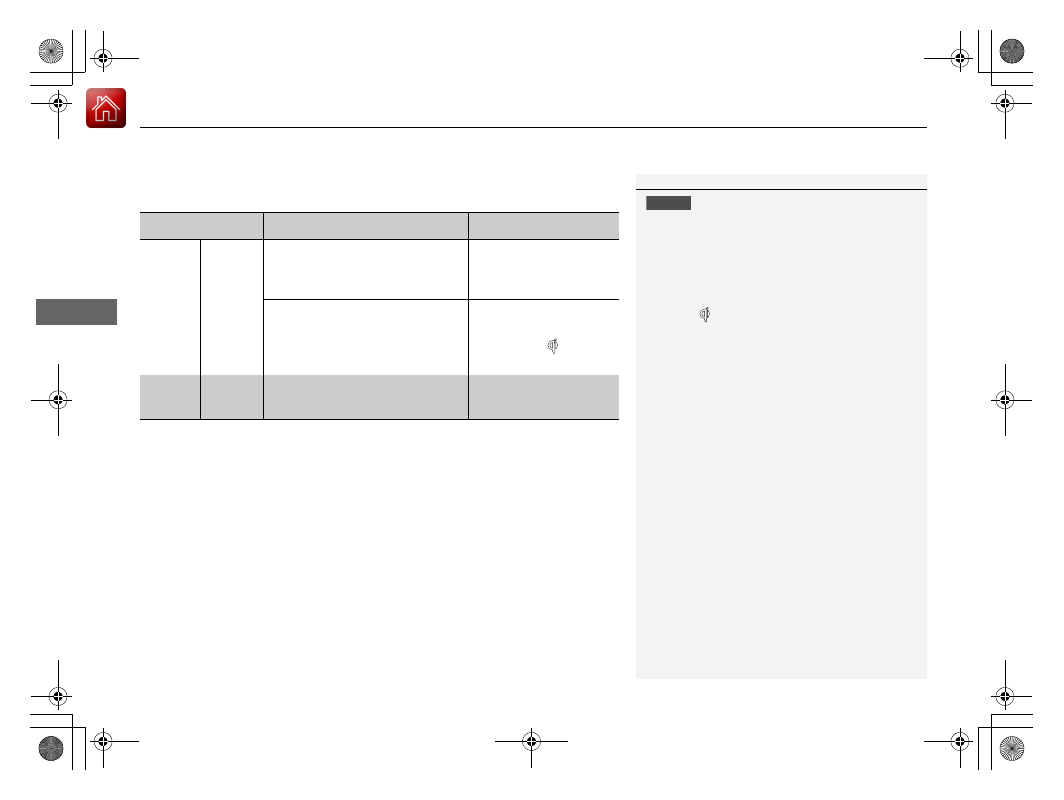
When charging does not start

Perform one of the solutions in the following table.

Indicator

Cause

Solution

Green 

Amber

Blinking 
simulta-

neously

There is an obstacle(s) between 
the charging area and the 
device.

Remove the 
obstacle(s).

The device is not within the 
charging area.

Move the device to the 
center of the charging 
area where 

 is 

located.

Amber

Blinking

The wireless charger is faulty.

Contact a dealer for 
repairs.

1

Wireless Charger

*

NOTICE

Do not place any magnetic recording media or 
precision machines within the charging area while 
charging.
The data on your cards such as credit cards can be 
lost because of the magnetic effect. Also precision 
machines such as watches can go wrong.

“Qi” and 

 marks are the registered trademarks 

owned by Wireless Power Consortium (WPC).

In the following cases, charging may stop or not start:

The device is already fully charged.

The temperature of the device is extremely high 
while charging.

You are at a place that emits strong 
electromagnetic wave or noises such as TV station, 
electric power plant, or gas station.

A device may not charge if the size or shape of its 
chargeable side is not appropriate for use with the 
charging area.

Not all devices are compatible with the system.

During the charging phase, it is normal for the 
charging area and device to heat up.

Charging may be briefly interrupted when:

Both doors or the trunk are closed
- to avoid interference with the proper functioning 
of the smart entry system.

The position of the device is altered.

Do not charge more than one device at a time on a 
charging area.

* Not available on all models

Continued

177

uu

Interior Lights/Interior Convenience Items

u

Interior Convenience Items

Co
ntrols

There are coat hooks behind the center pillar 
on both sides. Pull them down to use them.

The cargo hooks in the trunk can be used to 
install a net for securing items.

Coat Hooks

1

Coat Hooks

The coat hooks are not designed for large or heavy 
items.

Cargo Hooks

1

Cargo Hooks

Heavy objects may damage the hook.
Make sure any items put on this hook weigh less than 
6.6 lbs (3 kg).

Distribute cargo evenly on the floor of the trunk, 
placing the heaviest items on the bottom and as far 
forward as possible.

Maximum Load Limit P. 415

uu

Interior Lights/Interior Convenience Items

u

Interior Convenience Items

178

Co
ntrols

To open the sunglasses holder, push and 
release the indent. To close, push it again until 
it latches.

You can store eyeglasses and other small 
items in this holder.

Sunglasses Holder

1

Sunglasses Holder

Keep the holder closed while driving except when 
accessing stored items.

Push

179

uu

Interior Lights/Interior Convenience Items

u

Interior Convenience Items

Co
ntrols

The ignition switch must be in ON 

(

w

*1

 to use 

the seat heaters. The HI setting heats the seats 
faster than the LO setting.

While in HI, the heater cycles on and off.

u

The appropriate indicator will be on 
while the seat heater is on. Briefly press 
the switch on the opposite side to turn 
the heater off. The indicator will be off. 
When a comfortable temperature is 
reached, select LO to keep the seat 
warm.

*1: Models with the smart entry system have an ENGINE START/STOP button instead of an 
ignition switch.

Seat Heaters

*

1

Seat Heaters

*

Do not use the seat heaters even in LO when the 
engine is off. Under such conditions, the battery may 
be weakened, making the engine difficult to start.

In the LO setting, the heater runs continuously and 
does not automatically turn off.

3

WARNING

Heat induced burns are possible when 
using seat heaters.

Persons with a diminished ability to sense 
temperature (e.g., persons with diabetes, 
lower-limb nerve damage, or paralysis) or 
with sensitive skin should not use seat 
heaters.

* Not available on all models

180

Co
ntrols

Climate Control System

Using Automatic Climate Control

The automatic climate control system maintains the interior temperature you select. 
The system also selects the proper mix of heated or cooled air that raises or lowers 
the interior temperature to your preference as quickly as possible.

Use the system when the engine is running.
1. Press the AUTO button.
2. Adjust the interior temperature using the driver’s side or passenger’s side control 

buttons.

3. Press the 

 (on/off) button to cancel.

Switching between the recirculation and fresh air modes

Press the 

 (recirculation) button and switch the mode depending on 

environmental conditions.
Recirculation mode (indicator on): Recirculates air from the vehicle’s interior through 
the system.
Fresh air mode (indicator off): Maintains outside ventilation. Keep the system in 
fresh air mode in normal situations.

1

Using Automatic Climate Control

If any buttons are pressed while using the climate 
control system in auto, the function of the button 
that was pressed will take priority.
The AUTO indicator will go off, but functions 
unrelated to the button that was pressed will be 
controlled automatically.

To prevent cold air from blowing in from outside, the 
fan may not start immediately when the AUTO 
button is pressed.

If the interior is very warm, you can cool it down 
more rapidly by partially opening the windows, 
turning the system on auto, and setting the 
temperature to low. Change the fresh mode to 
recirculation mode until the temperature cools down.

When you set the temperature to the lower or upper 
limit, Lo or Hi is displayed.

Pressing the 

 button switches the climate 

control system between on and off. When turned on, 
the system returns to your last selection.

Floor and 
defroster 
vents

Floor vents

Dashboard and floor 
vents

Dashboard vents

AUTO Button

Driver’s Side 
Temperature 
Control Buttons

 (Recirculation) Button

/

 (Fan Control) Buttons

A/C (Air Conditioning) 
Button

Passenger’s Side 
Temperature 
Control Buttons

181

uu

Climate Control System

u

Using Automatic Climate Control

Co
ntrols

Pressing the 

 button turns the air 

conditioning system on and automatically 
switches the system to fresh air mode.

Press the 

 button again to turn off, the 

system returns to the previous settings.

To rapidly defrost the windows

1. Press the 

 button.

2. Press the 

 button.

Defrosting the Windshield and Windows

1

Defrosting the Windshield and Windows

For your safety, make sure you have a clear view 
through all the windows before driving.

Do not set the temperature near the upper or lower 
limit.
When cold air hits the windshield, the outside of the 
windshield may fog up.

If the side windows fog up, adjust the vents so that 
the air hits the side windows.

1

To rapidly defrost the windows

After defrosting the windows, switch over to fresh air 
mode. If you keep the system in recirculation mode, 
the windows may fog up from humidity. This 
impedes visibility.

182

uu

Climate Control System

u

Synchronized Mode

Co
ntrols

Synchronized Mode

You can set the temperature synchronously for the driver side and the passenger 
side in synchronized mode.

1. Press the SYNC button.

u

The system will switch to the synchronized mode.

2. Adjust the temperature using driver’s side temperature control buttons.

Press the SYNC button to return to dual mode.

1

Synchronized Mode

When you press the 

 button, the system changes 

to synchronized mode.

When the system is in dual mode, the driver side 
temperature and the passenger side temperature can 
be set separately.

The system adjusts each temperature based on the 
information of the sunlight sensor and the sun 
position updated by the navigation system.

Models with navigation system

183

uu

Climate Control System

u

Automatic Climate Control Sensors

Co
ntrols

Automatic Climate Control Sensors

The automatic climate control system is 
equipped with sensors. Do not cover or spill 
any liquid on them.

Sensor

Sensor

184

185

Features

This chapter describes how to operate technology features.

Audio System

About Your Audio System................ 186

USB Port(s

*

) ..................................... 187

Auxiliary Input Jack

*

........................ 188

Audio System Theft Protection

*

....... 189

Audio Remote Controls.................... 190

Audio System Basic Operation ........ 192

Audio/Information Screen ................ 193

Display Setup ................................... 198

Playing AM/FM Radio ....................... 199

Playing a CD .................................... 201

Playing an iPod ................................ 204

Playing Internet Radio ...................... 207

Playing a USB Flash Drive ................. 210

Playing Bluetooth® Audio................. 213

Models with one display

Audio System Basic Operation ........ 215

Audio/Information Screen ................ 216

Audio/Information Touch Screen...... 218

Adjusting the Sound ........................ 232

Display Setup ................................... 233

Voice Control Operation .................. 235

Playing AM/FM Radio....................... 239

Playing SiriusXM® Radio

*

................. 244

Playing a CD .................................... 252

Playing an iPod ................................ 255

Song By Voice

TM

 (SBV)...................... 258

Playing Pandora®

*

............................ 262

Playing Aha

TM

................................... 264

Playing a USB Flash Drive ................. 265

Playing Bluetooth® Audio................. 268

Models with two displays

HondaLink® ..................................... 270

Wi-Fi Connection............................. 275

Apple CarPlay .................................. 277

Android Auto .................................. 281

Siri® Eyes Free .................................. 285

Audio Error Messages ...................... 286

General Information on the Audio 

System ............................................. 291

Customized Features................ 298316

HomeLink® Universal Transceiver

*

... 340

Bluetooth® HandsFreeLink®..... 343374

Compass

*

.......................................... 409

* Not available on all models

186

Features

Audio System

About Your Audio System

The audio system features AM/FM radio and SiriusXM® Radio service

*

. It can also 

play audio CDs, WMA/MP3/AAC files, USB flash drives, and iPod, iPhone and 
Bluetooth® devices.

You can operate the audio system from the buttons and switches on the panel or 
the icons on the touchscreen interface

*

.

1

About Your Audio System

SiriusXM® Radio is available on a subscription basis 
only. For more information on SiriusXM® Radio, 
contact a dealer.

General Information on the Audio System 

P. 291

SiriusXM® Radio is available in the United States and 
Canada, except Hawaii, Alaska, and Puerto Rico.

SiriusXM® is a trademark of Sirius XM Radio, Inc.

Video CDs, DVDs, and 3-inch (8-cm) mini CDs are not 
supported.

iPod, iPhone and iTunes are trademarks of Apple Inc.

State or local laws may prohibit the operation of 
handheld electronic devices while operating a 
vehicle.

Remote Controls

iPod

USB 

Flash 

Drive

Models with one display

Remote Controls

iPod

USB 

Flash 

Drive

Models with two displays

* Not available on all models

187

uu

Audio System

u

USB Port(s

*

)

Features

USB Port(s

*

)

1. Open the cover.
2. Install the iPod dock connector or the USB 

flash drive to the USB port.

1

USB Port(s

*

)

Do not leave the iPod or USB flash drive in the 
vehicle. Direct sunlight and high temperatures may 
damage it.

We recommend using an extension cable with the 
USB port.

Do not connect the iPod or USB flash drive using a 
hub.

Do not use a device such as a card reader or hard 
disk drive, as the device or your files may be 
damaged.

We recommend backing up your data before using 
the device in your vehicle.

Displayed messages may vary depending on the 
device model and software version.

If the audio system does not recognize the iPod, try 
reconnecting it a few times or reboot the device. To 
reboot, follow the manufacturer’s instructions 
provided with the iPod or visit www.apple.com/ipod.

In Center Pocket

In Console Compartment

*

* Not available on all models

188

uu

Audio System

u

Auxiliary Input Jack

*

Features

Auxiliary Input Jack

*

Use the jack to connect standard audio devices.

1. Open the AUX cover.
2. Connect a standard audio device to the 

input jack using a 1/8 inch (3.5 mm) stereo 
miniplug.

u

The audio system automatically switches 
to the AUX mode.

1

Auxiliary Input Jack

*

You can return to AUX mode by pressing the AUX 
button.

Replacement of the audio system with other than a 
genuine Honda system may make the auxiliary jack 
inoperable.

* Not available on all models

189

uu

Audio System

u

Audio System Theft Protection

*

Features

Audio System Theft Protection

*

The audio system is disabled when it is disconnected from the power source, such as 
when the battery is disconnected or goes dead. In certain conditions, the system 
may display Enter code. If this occurs, reactivate the audio system.

Reactivating the audio system

1. Turn the ignition switch to ON 

(

w

*1

.

2. Turn on the audio system.
3. Press and hold the audio system power button for more than two seconds.

u

The audio system is reactivated when the audio control unit establishes a 
connection with the vehicle control unit. If the control unit fails to recognize 
the audio unit, you must go to a dealer and have the audio unit checked.

*1: Models with the smart entry system have an ENGINE START/STOP button instead of an 
ignition switch.

* Not available on all models

190

uu

Audio System

u

Audio Remote Controls

Features

Audio Remote Controls

Allow you to operate the audio system while driving.

SOURCE Button
Cycles through the audio modes as follows:

FMAMCDUSBiPod
Bluetooth® AudioPandora®

*

AUX

FMAMSiriusXM®

*

CDUSBiPod

Pandora®

*

Bluetooth® AudioAudio Apps

(

+ 

(

- (Volume) Buttons

Press 

(

+To increase the volume.

Press 

(

-To decrease the volume.


Buttons

• When listening to the radio

Press : 

To select the next preset radio station.

Press : 

To select the previous preset radio station.

Press and hold 

To select the next strong station.

Press and hold 

To select the previous strong station.

• When listening to a CD, iPod, USB flash drive, or Bluetooth® Audio

Press : 

To skip to the next song.

Press : 

To go back to the beginning of the current or previous song.

• When listening to a CD (MP3/WMA/AAC), USB flash drive, or Bluetooth® Audio

Press and hold 

To skip to the next folder.

Press and hold 

To go back to the previous folder.

1

Audio Remote Controls

Some modes appear only when an appropriate 
device or medium is used.

Depending on the Bluetooth® device you connect, 
some functions may not be operated.

 Button

SOURCE Button

 Button

(

+ Button

(

- Button

MENU 
Button

*

Models with one display

Models with two displays

* Not available on all models

191

uu

Audio System

u

Audio Remote Controls

Features

Steering Wheel MENU Button
To choose options for the current audio device, press MENUAudio Menu, and 
then SOURCE.
Options available to you for each audio device:
• Radio: You can select ScanAuto SelectSave PresetSeek Up, or Seek 

Down.

• HD Radio

TM *

: You can select ScanAuto SelectTag SongSave PresetSeek 

Up, or Seek Down.

• SiriusXM®

*

: You can select ScanTag SongSave PresetChannel Up

Channel DownCategory Up, or Category Down.

• CD or USB flash drive: You can select Scan FoldersScan TracksRepeat 

FolderRepeat TrackRandom in Folder, or Random All Tracks.

• iPod: You can select Play/PauseRepeat SongShuffle Albums, or Shuffle All 

Songs.

• Bluetooth® Audio: You can select Pause or Play.
• Pandora®

*

: You can select LikeDislikeBookmark, or Play/Pause.

To choose options for the navigation system while it is in operation, press MENU
select Navi Menu, and then SOURCE.

Refer to the Navigation System Manual

To choose options for HFL, press MENU, select Phone Menu, and then SOURCE.
You can select Speed DialCall History, or Redial.

To choose options for the display setting, press MENU, select Display Setting, and 
then SOURCE.
You can select BrightnessContrast, or Black Level.

1

Audio Remote Controls

The MENU button is available only when the audio 
mode is FM, AM, SiriusXM®

*

, CD, USB, iPod, 

Pandora®

*

, or Bluetooth® Audio.

Models with two displays

* Not available on all models


Content   ..  10  11  12  13   ..