Honda Accord Coupe L4 (2011 year). Manual - part 21


  Index      Honda     Honda Accord Coupe L4 - service manual 2011 year in english


Search            


Content   ..  19  20  21  22   ..


Honda Accord Coupe L4 (2011 year). Manual - part 21


CONTINUED

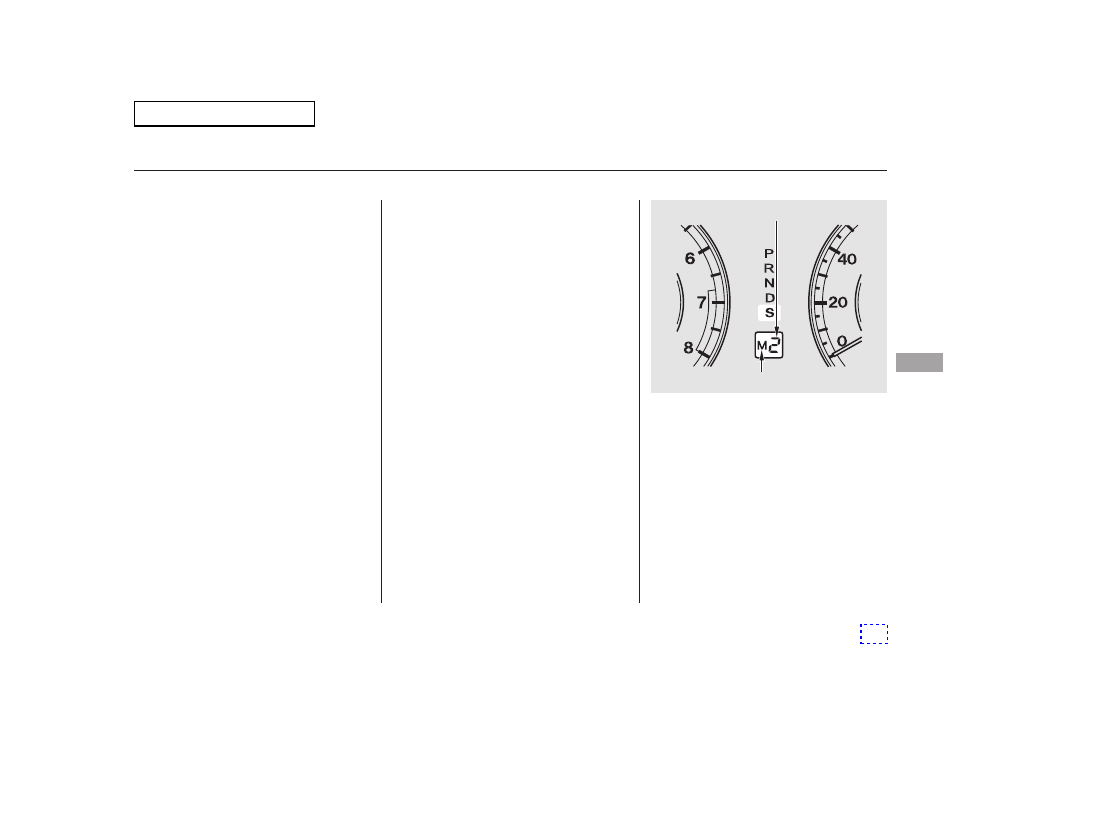
When you move the shift lever from
‘‘D’’ to ‘‘S’’ position and pull either
paddle shifter, the gear position
indicator displays ‘‘M’’ along with the
selected gear number.

To upshift, pull the

(right) paddle

shifter. To downshift, pull the
(left) paddle shifter.

The transmission downshifts to first
gear and returns to drive mode (D)
when the vehicle comes to a
complete stop or the vehicle speed is
about 6 mph (10 km/h).

If there is a problem in the
transmission while you are driving
with the paddle shifters, the D
indicator flashes, the D-paddle shift
mode is canceled, and the
transmission returns to drive mode
(D).

To enter the sequential shift mode,
press the release button on the front
of the shift lever, move the lever to
the S position, then pull either paddle
shifter. To return to drive mode (D),
move the shift lever to the D position.
While you are driving in the
sequential shift mode, the
transmission will not automatically
return to drive mode (D).

With the shift lever in the S position,
you can manually shift up or down
with the paddle shifters. The
transmission goes into the sequential
shift mode and holds the selected
gear.

V6 models only

Using the Paddle Shifters in the S
position (Sequential Shift Mode)

Driving with the Paddle Shifters (Automatic Transmission Only)

D

riv

ing

317

GEAR POSITION INDICATOR

‘‘M’’ INDICATOR

Main Menu

The automatic transmission will not
allow you to shift up or down if:

If you try to do this, the gear
position indicator will flash the
number of the lower gear several
times, then return to a higher gear.

If the vehicle speed decreases
below the redline of the selected
lower gear while the indicator is
flashing, the transmission
downshifts, and the indicator
displays the selected gear.

You pull both paddle shifters at
the same time.

Downshifting with the paddle shifter
allows you to increase the engine
braking when going down steep or
long hills, and provides more power
when climbing uphills. You can
upshift the transmission manually to
reduce the rpm.

The transmission also shifts
automatically as the vehicle comes to
a complete stop. It downshifts to first
gear when the vehicle speed reaches
6 mph (10 km/h) or less.

When you accelerate from a stop,
the transmission starts in first gear,
and you must manually upshift
between first and fifth gears. Make
sure you upshift before the engine
speed reaches the tachometer’s red
zone.

The transmission remains in the
selected gear (5, 4, 3, 2, or 1). There
is no automatic downshift when you
push the accelerator pedal to the
floor.

When you are driving in 4th or 5th
gear, the transmission downshifts to
the lower gear under the following
conditions:

The vehicle slows down to a
certain speed.

You press the brake pedal.

You downshift before the engine
speed reaches the highest
threshold of the lower gear.

You upshift before the engine
speed reaches the lowest
threshold of the higher gear.

Driving with the Paddle Shifters (Automatic Transmission Only)

318

Main Menu

When you are in sequential shift
mode, and the vehicle is stopped,
pull the

(right) paddle shifter to

shift to second gear. You will see
‘‘M2’’ in the display. Starting in
second gear helps to reduce
wheelspin in deep snow or on a
slippery surface.

Drive in the highest gear that lets
the engine run and accelerate
smoothly. This will give you good
fuel economy and effective
emissions control. The following
shift points are recommended:

Shift up

1st to 2nd

2nd to 3rd

3rd to 4th
4th to 5th

Normal acceleration

15 mph (24 km/h)
25 mph (40 km/h)
40 mph (64 km/h)
45 mph (72 km/h)

Driving with the Paddle Shifters (Automatic Transmission Only)

Starting in Second Gear

Recommended Shift Points

D

riv

ing

319

Main Menu

Always use the parking brake when
you park your vehicle. Make sure
the parking brake is set firmly, or
your vehicle may roll if it is parked
on an incline.

If your vehicle has an automatic
transmission, set the parking brake
before you put the transmission in
Park. This keeps the vehicle from
moving and putting pressure on the
parking mechanism in the
transmission.

Make sure the parking brake is
fully released before driving away.
Driving with the parking brake
partially set can overheat or
damage the rear brakes.

Make sure the moonroof (if
equipped) and the windows are
closed.

Turn off the lights.

Place any packages, valuables, etc.,
in the trunk or take them with you.

Lock the doors.

Check the indicator on the
instrument panel to verify that the
security system is set.

Never park over dry leaves, tall
grass, or other flammable
materials. The hot three way
catalytic converter could cause
these materials to catch on fire.

If the vehicle is facing uphill, turn
the front wheels away from the
curb. If your vehicle has a manual
transmission, put it in first gear.

If the vehicle is facing downhill,
turn the front wheels toward the
curb. If your vehicle has a manual
transmission, put it in reverse gear.

Parking Tips

Parking

320

Main Menu

The hydraulic system that operates
the brakes has two separate circuits.
Each circuit works diagonally across
the vehicle (the left-front brake is
connected with the right-rear brake,
etc.). If one circuit should develop a
problem, you will still have braking
at two wheels.

Your vehicle is equipped with disc
brakes at all four wheels. A power
assist helps reduce the effort needed
on the brake pedal. The emergency
brake assist system increases the
stopping force when you depress the
brake pedal hard in an emergency
situation. The anti-lock brake system
(ABS) helps you retain steering
control when braking very hard.

Resting your foot on the pedal keeps
the brakes applied lightly, builds up
heat, reduces their effectiveness and
reduces brake pad life. In addition,
fuel economy can be reduced. It also
keeps your brake lights on all the
time, confusing drivers behind you.

Check the brakes after driving
through deep water. Apply the
brakes moderately to see if they feel
normal. If not, apply them gently and
frequently until they do. Be extra
cautious in your driving.

Constant application of the brakes
when going down a long hill builds
up heat and reduces their effective-
ness. Use the engine to assist the
brakes by taking your foot off the
accelerator and downshifting to a
lower gear.

The front and rear disc brakes on all
models have audible brake pad wear
indicators.

If the brake pads need replacing, you
will hear a distinctive, metallic
screeching sound when you apply
the brake pedal. If you do not have
the brake pads replaced, they will
screech all the time. It is normal for
the brakes to occasionally squeal or
squeak when you apply them.

Braking System Design

Brake Pad Wear Indicators

Braking System

D

riv

ing

321

Main Menu

If this indicator comes on, the anti-
lock function of the braking system
has shut down. The brakes still work
like a conventional system, but
without anti-lock. You should have
your dealer inspect your vehicle as
soon as possible.

The anti-lock brake system (ABS)
helps prevent the wheels from
locking up, and helps you retain
steering control by pumping the
brakes rapidly, much faster than a
person can do it.

You will feel a pulsation in the brake
pedal when the ABS activates, and
you may hear some noise. This is
normal: it is the ABS rapidly
pumping the brakes. On dry
pavement, you will need to press on
the brake pedal very hard before the
ABS activates. However, you may
feel the ABS activate immediately if
you are trying to stop on snow or ice.

The electronic brake distribution
(EBD) system, which is part of the
ABS, also balances the front-to-rear
braking distribution according to
vehicle loading.

Let the ABS work for you by always
keeping firm, steady pressure on the
brake pedal. This is sometimes
referred to as ‘‘stomp and steer.’’

If the ABS indicator comes on while
driving, test the brakes as shown on
page

.

407

You should never pump the brake pedal.

ABS Indicator

Anti-lock Brakes (ABS)

322

Main Menu

If the ABS indicator and the brake
system indicator come on together,
and the parking brake is fully
released, the EBD system may also
be shut down.

It only helps with the

steering control during braking.

such as trying to take a

corner too fast or making a sudden
lane change. Always drive at a safe
speed for the road and weather
conditions.

Always steer moderately

when you are braking hard. Severe
or sharp steering wheel movement
can still cause your vehicle to veer
into oncoming traffic or off the road.

Test your brakes as instructed on
page

. If the brakes feel normal,

drive slowly and have your vehicle
repaired by your dealer as soon as
possible. Avoid sudden hard braking
which could cause the rear wheels to
lock up and possibly lead to a loss of
control.

on loose or

uneven surfaces, such as gravel or
snow, than a vehicle without anti-
lock.

407

Important Safety Reminders

ABS does not reduce the time or
distance it takes to stop the
vehicle.

ABS will not prevent a skid that
results from changing direction
abruptly,

ABS cannot prevent a loss of
stability.

A vehicle with ABS may require a
longer distance to stop

Anti-lock Brakes (ABS)

D

riv

ing

323

Main Menu

The VSA system cannot enhance the
vehicle’s driving stability in all
situations and does not control your
vehicle’s entire braking system. It is
still your responsibility to drive and
corner at reasonable speeds and to
leave a sufficient margin of safety.

The vehicle stability assist (VSA)
system helps to stabilize the vehicle
during cornering if the vehicle turns
more or less than desired. It also
assists you in maintaining traction
while accelerating on loose or
slippery road surfaces. It does this
by regulating the engine’s output and
by selectively applying the brakes.

The main function of the

VSA system is generally known as
Electronic Stability Control (ESC).
The system also includes a traction
control function.

If the low tire pressure indicator or
TPMS indicator comes on, the VSA
system automatically turns on even if
the VSA system is turned off by
pressing the VSA OFF switch (see
page

). If this happens, you

cannot turn the VSA system off by
pressing the VSA OFF switch again.

Without VSA, your vehicle will have
normal braking and cornering ability,
but it will not have VSA traction and
stability enhancement.

When VSA is off, the VSA OFF
indicator comes on as a reminder.

If this indicator comes on while
driving, pull to the side of the road
when it is safe, and turn off the
engine. Reset the system by
restarting the engine. If the VSA
system indicator stays on or comes
back on while driving, have the VSA
system inspected by your dealer.

When VSA activates, you will see the
VSA system indicator blink.

When VSA activates, you may notice
that the engine does not respond to
the accelerator in the same way it
does at other times. There may also
be some noise from the VSA
hydraulic system. You will also see
the VSA system indicator blink.

325

Vehicle Stability Assist
(VSA) System Indicator

VSA OFF Indicator

Vehicle Stability Assist (VSA ), aka Electronic Stability Control (ESC), System

324

NOTE:

Main Menu

Driving with varying tire or wheel
sizes may cause the VSA to
malfunction. When replacing tires,
make sure they are of the same size
and type as your original tires (see
page

).

VSA is turned on every time you
start the engine, even if you turned it
off the last time you drove the
vehicle.

If you install winter tires, make sure
they are the same size as those that
were originally supplied with your
vehicle. Exercise the same caution
during winter driving as you would if
your vehicle was not equipped with
VSA.

In certain unusual conditions when
your vehicle gets stuck in shallow
mud or fresh snow, it may be easier
to free it with the VSA temporarily
switched off. When the VSA system
is off, the traction control system is
also off. You should only attempt to
free your vehicle with the VSA off if
you are not able to free it when the
VSA is on.

Immediately after freeing your
vehicle, be sure to switch the VSA on
again. We do not recommend driving
your vehicle with the VSA and
traction control systems switched off.

This switch is under the driver’s side
vent. To turn the VSA system on and
off, press and hold it until you hear a
beep.

When VSA is off, the VSA OFF
indicator comes on as a reminder.
Press and hold the switch again. It
turns the system back on.

385

VSA and Tire Sizes

VSA OFF Switch

Vehicle Stability Assist (VSA ), aka Electronic Stability Control (ESC), System

D

riv

ing

325

VSA OFF SWITCH

Main Menu

Your vehicle is equipped with a tire
pressure monitoring system (TPMS)
that turns on every time you start the
engine and monitors the pressure in
your tires while driving.

When the low tire pressure indicator
is on, one or more of your tires is
significantly underinflated. You
should stop and check your tires as
soon as possible, and inflate them to
the proper pressure as indicated on
the vehicle’s tire information placard.

If you think you can safely drive a
short distance to a service station,
proceed slowly, and inflate the tire to
the recommended pressure shown
on the driver’s doorjamb.

If the tire is flat, or if the tire
pressure is too low to continue
driving, replace the tire with the
compact spare tire (see page

).

If you cannot make the low tire
pressure indicator go out after
inflating the tires to the specified
values, have your dealer check the
system as soon as possible.

Each tire has its own pressure
sensor (not including the spare tire).
If the air pressure of a tire becomes
significantly low while driving, the
sensor in that tire immediately sends
a signal that causes the low tire
pressure indicator to come on.

Driving on a significantly under
inflated tire causes the tire to
overheat and can lead to tire failure.
Underinflation also reduces fuel
efficiency and tire tread life, and may
affect the vehicle’s handling and
stopping ability.

Because tire pressure varies by
temperature and other conditions,
the low tire pressure indicator may
come on unexpectedly.

393

Low Tire Pressure
Indicator

Tire Pressure Monitoring System (TPMS)

326

Main Menu

For example, if you check and fill
your tires in a warm area, then drive
in extremely cold weather, the tire
pressure will be lower than
measured and could be underinflated
and cause the low tire pressure
indicator to come on. Or, if you
check and adjust your tire pressure
in cooler conditions, and drive into
extremely hot conditions, the tire
may become overinflated. However,
the low tire pressure indicator will
not come on if the tires are
overinflated.

Refer to page

for tire inflation

guidelines.

When you restart the vehicle with
the compact spare tire, the TPMS
indicator may also come on and stay
on after driving several miles
(kilometers).

Although your tire pressure is
monitored, you must manually check
the tire pressures monthly.

Each tire, including the spare, should
be checked monthly when cold, and
set to the recommended inflation
pressure as specified on the tire

information label and in the owner’s
manual (see page

).

This indicator comes on and stays on
if there is a problem with the tire
pressure monitoring system.

If this happens, the system will shut
off and no longer monitor tire
pressures. Have the system checked
by your dealer as soon as possible.

If the low tire pressure indicator or
TPMS indicator comes on, the VSA
system automatically turns on even if
the VSA system is turned off by
pressing the VSA OFF switch (see
page

). If this happens, you

cannot turn the VSA system off by
pressing the VSA OFF switch again.

379

325

380

Tire Pressure Monitoring
System (TPMS) Indicator

Tire Pressure Monitoring System (TPMS)

D

riv

ing

327

Main Menu

As required by the FCC:
This device complies with Part 15 of the
FCC rules. Operation is subject to the
following two conditions: (1) This device
may not cause harmful interference, and
(2) this device must accept any
interference received, including
interference that may cause undesired
operation.

Changes or modifications not expressly
approved by the party responsible for
compliance could void the user’s
authority to operate the equipment.

This device complies with Industry
Canada Standard RSS-210.
Operation is subject to the following two
conditions: (1) this device may not cause
interference, and (2) this device must
accept any interference that may cause
undesired operation of the device.

If you have a flat tire, the low tire
pressure indicator will come on.
Replace the flat tire with the
compact spare tire (see page

).

Each wheel (except the compact
spare tire wheel) is equipped with a
tire pressure sensor. You must use
TPMS specific wheels. It is
recommended that you always have
your tires serviced by your dealer or
qualified technician.

The low tire pressure indicator or
the TPMS indicator will go off, after
several miles (kilometers) driving,
when you replace the spare tire with
the specified regular tire equipped
with the tire pressure monitor sensor.

Never use a puncture-repairing agent
in a flat tire. If used, you will have to
replace the tire pressure sensor.
Have the flat tire repaired by your
dealer as soon as possible.

After you replace the flat tire with
the compact spare tire, the low tire
pressure indicator stays on. This is
normal; the system is not monitoring
the spare tire pressure. Manually
check the spare tire pressure to be
sure it is correct. After several miles
(kilometers) driving with the
compact spare tire, the TPMS
indicator comes on and the low tire
pressure indicator goes off.

393

Changing a Tire with TPMS

Tire Pressure Monitoring System (TPMS)

328

Main Menu

Your vehicle has been designed
primarily to carry passengers and
their cargo. You can also use it to
tow a trailer if you carefully observe
the load limits, use the proper
equipment, and follow the guidelines
in this section.

The

maximum allowable weight of the
trailer and everything in or on it
must not exceed 1,000 lbs (450 kg).
Towing a load that is too heavy
can seriously affect your vehicle’s
handling and performance. It can
also damage the engine and
drivetrain.

The weight that

the tongue of a fully-loaded trailer
puts on the hitch should be
approximately 10% of the total
trailer weight. Too much tongue
load reduces front-tire traction and
steering control. Too little tongue
load can make the trailer unstable
and cause it to sway.

Avoid towing a trailer during your
vehicle’s first 600 miles (1,000 km)
(see page

).

284

CONTINUED

Load Limits

Total Trailer Weight:

Tongue Load:

Towing a Trailer

Break-In Period

D

riv

ing

329

Exceeding any load limit or
improperly loading your vehicle
and trailer can cause a crash in
which you can be seriously hurt
or killed.

Check the loading of your
vehicle and trailer carefully
before starting to drive.

Main Menu

To achieve a proper tongue load,
start by loading 60% of the load
toward the front of the trailer and
40% toward the rear, then re-adjust
the load as needed.

The maximum allowable weight of
the vehicle, all occupants, all
accessories, all cargo, and the
tongue load is:

EX and EX-L:

EX and EX-L:

V6 models with manual transmission:

V6 models with automatic
transmission:

V6 models with manual transmission:

V6 models with automatic
transmission:

LX:

LX:

Gross Vehicle Weight Rating
(GVWR):

Canadian models

U.S. models

Towing a Trailer

330

4,299 lbs (1,950 kg)

4,409 lbs (2,000 kg)

4,541 lbs (2,060 kg)

4,475 lbs (2,030 kg)

1,970 kg

2,020 kg

2,075 kg

2,040 kg

Main Menu

The maximum allowable weight at
the vehicle axles is:

on the front axle

on the rear axle

on the front axle

on the rear axle

on the front axle

on the rear axle

on the front axle

on the rear axle

on the rear axle

on the front axle

on the rear axle

on the front axle

on the rear axle

on the front axle

on the rear axle

on the front axle

EX and EX-L:

EX and EX-L:

V6 models with automatic
transmission:

V6 models with manual transmission:

V6 models with automatic
transmission:

V6 models with manual transmission:

LX:

LX:

Gross Axle Weight Rating
(GAWR):

Canadian models

U.S. models

Towing a Trailer

D

riv

ing

331

2,006 lbs (910 kg)

2,337 lbs (1,060 kg)

2,414 lbs (1,095 kg)

2,039 lbs (925 kg)

910 kg

930 kg

950 kg

2,050 lbs (930 kg)

2,535 lbs (1,150 kg)

2,050 lbs (930 kg)

2,425 lbs (1,100 kg)

950 kg

1,065 kg

1,095 kg

1,160 kg

1,110 kg

Main Menu

Discuss your needs with your trailer
sales or rental agency, and follow the
guidelines in this section. Also make
sure that all equipment is properly
installed and maintained, and that it
meets federal, state, province,
territory, and local regulations.

Towing can require a variety of
equipment, depending on the size of
your trailer, how it will be used, how
much load you are towing, and
where you tow.

The best way to confirm that all
loads are within limits is to check
them at a public scale. For public
scales in your area, check your local
phone book, or contact your trailer
dealer or rental agency for
assistance.

If you cannot get to a public scale,
you can estimate the total trailer
weight by adding the weight of your
trailer (as quoted by the
manufacturer) with everything in or
on the trailer.

If you normally pull the same load
each time you tow a trailer, you can
use a suitable scale or a special
tongue load gauge to check the
tongue load the first time you set up
a towing combination (a fully loaded
vehicle and trailer), then recheck the
tongue load whenever the conditions
change.

Always use safety chains when you
tow a trailer. Make sure the chains
are secured to the trailer and hitch,
and that they cross under the tongue
and can catch the trailer if it
becomes unhitched. Leave enough
slack to allow the trailer to turn
corners easily, but do not let the
chains drag on the ground.

Any hitch used on your vehicle must
be properly bolted to the underbody.

Towing a Trailer

Towing Equipment and
Accessories

Checking Loads

Safety Chains

Hitches

332

Main Menu


Content   ..  19  20  21  22   ..