Honda Accord Coupe L4 (2011 year). Manual - part 6


  Index      Honda     Honda Accord Coupe L4 - service manual 2011 year in english


Search            


Content   ..  4  5  6  7   ..


Honda Accord Coupe L4 (2011 year). Manual - part 6


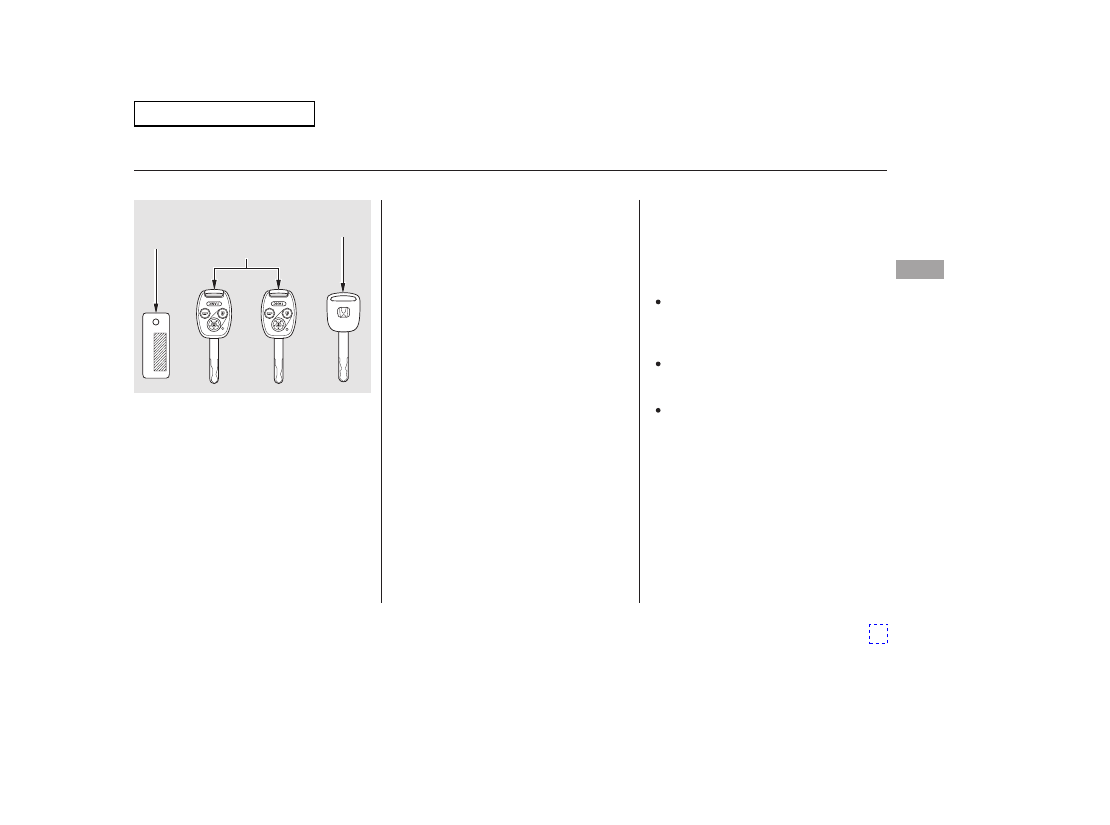
You should have received a key
number tag with your keys. You will
need this key number if you ever
have to get a lost key replaced. Use
only Honda-approved key blanks.

Protect the keys from direct
sunlight, high temperature, and
high humidity.

Do not drop the keys or set heavy
objects on them.

Keep the keys away from liquids.
If they get wet, dry them
immediately with a soft cloth.

These keys contain electronic
circuits that are activated by the
immobilizer system. They will not
work to start the engine if the
circuits are damaged.

The valet key does not contain a
battery. Do not try to take it apart.

The master key fits all the locks on
your vehicle. The valet key works
only in the ignition and the driver’s
door lock. You can keep the trunk
release handle, and glove box locked
when you leave your vehicle and the
valet key at a parking facility.

Keys and Locks

Inst

ru

m

e

nt

s

a

nd
Cont

ro

ls

77

MASTER
KEY WITH
REMOTE
TRANSMITTER

KEY
NUMBER
TAG

VALET KEY
(Light Grey)

Main Menu

If the system repeatedly does not
recognize the coding of your key,
contact your dealer.

Do not attempt to alter this system
or add other devices to it. Electrical
problems could result that may make
your vehicle inoperable.

If you lose your key and you cannot
start the engine, contact your dealer.

The immobilizer system protects
your vehicle from theft. If an
improperly coded key (or other
device) is used, the engine’s fuel
system is disabled.

When you turn the ignition switch to
the ON (II) position, the immobilizer
system indicator should come on
briefly, then go off. If the indicator
starts to blink, it means the system
does not recognize the coding of the
key. Turn the ignition switch to the
LOCK (0) position, remove the key,
reinsert it, and turn the ignition
switch to the ON (II) position again.

The system may not recognize your
key’s coding if another immobilizer
key or other metal object (i.e. key
chain) is near the ignition switch
when you insert the key.

As required by the FCC:
This device complies with Part 15 of the
FCC rules. Operation is subject to the
following two conditions: (1) This device
may not cause harmful interference, and
(2) this device must accept any
interference received, including
interference that may cause undesired
operation.

Changes or modifications not expressly
approved by the party responsible for
compliance could void the user’s
authority to operate the equipment.

This device complies with Industry
Canada Standard RSS-210.
Operation is subject to the following two
conditions: (1) this device may not cause
interference, and (2) this device must
accept any interference that may cause
undesired operation of the device.

Immobilizer System

78

Always take the ignition key with you
whenever you leave the vehicle alone.

Main Menu

The ignition switch has four
positions: LOCK (0), ACCESSORY
(I), ON (II), START (III)

You can insert or

remove the key only in this position.
To turn the key, push it in slightly. If
your vehicle has an automatic
transmission, the shift lever must
also be in Park.

You will hear a reminder beeper if
you leave the key in the ignition
switch in the LOCK (0) or the
ACCESSORY (I) position and open
the driver’s door. Remove the key to
turn off the beeper.

If your vehicle has an automatic
transmission, the shift lever must be
in Park before you can remove the
key from the ignition switch.

If the front wheels are turned, the
anti-theft lock may make it difficult
to turn the key. Firmly turn the
steering wheel to the left or right as
you turn the key.

Use this position

only to start the engine. The switch
returns to the ON (II) position when
you let go of the key.

This is the normal key

position when driving. Several of the
indicators on the instrument panel
come on as a test when you turn the
ignition switch from the
ACCESSORY (I) to the ON (II)
position.

You can

operate the audio system and the
accessory power sockets in this
position.

LOCK (0)

START (III)

ON (II)

ACCESSORY (I)

Ignition Switch

Inst

ru

m

e

nt

s

a

nd
Cont

ro

ls

79

Removing the key from the
ignition switch while driving
locks the steering. This can
cause you to lose control of the
vehicle.

Remove the key from the
ignition switch only when
parked.

Main Menu

When the door is unlocked, you can
see the red indicator on the lock tab
above the inner door handle.

You can open or close the windows
and the moonroof (if equipped) by
using the key in the driver’s door
(see page

).

To lock both doors, push the front of
the master door lock switch on
either door, pull the lock tab
rearward on the driver’s door, or use
the key on the outside lock on the
driver’s door.

Pushing forward the lock tab on the
driver’s door only unlocks that door.

Pushing the rear of either master
door lock switch will unlock both
doors.

The lock tab on the passenger’s door
locks and unlocks that door.

Both doors can be locked from the
outside by using the key in the
driver’s door. To unlock only the
driver’s door, insert the key, turn it
clockwise, and release it. The
passenger’s door unlocks when you
turn the key a second time within a
few seconds.

To lock the passenger’s door when
getting out of the vehicle, pull the
lock tab rearward and close the door.
To lock the driver’s door, remove the
key from the ignition switch, pull the
lock tab rearward or push the front
of the master switch, then close the
door.

110

Door Locks

80

POWER DOOR LOCK MASTER SWITCH

Lock

Unlock

Lock

Unlock

RED INDICATOR

LOCK TAB

Main Menu

The auto door locking feature has
three possible settings:

The auto door locking is
deactivated all the time.

The doors lock whenever you
move the shift lever out of the
Park (P) position (A/T vehicles).

The doors lock when the vehicle
speed reaches 10 mph (15 km/h).

Your vehicle has customizable
settings for the doors to
automatically lock and unlock. There
are default settings for each of these
features. You can turn off or change
the settings for these features as
described on the following pages.

This is the default setting.

When you customize the setting,
make sure your vehicle is parked
safely, the engine is off, and the
parking brake is applied. Make all
settings before you start driving.

If you forget and leave the key in the
ignition switch, lockout prevention
will not allow you to lock the driver’s
door. With either door open and the
key in the ignition switch, locking
with the master door lock switch is
disabled. If the driver’s door is
closed, the lock tab on the driver’s
door is not disabled. Pulling the
driver’s lock tab rearward will lock
both doors. If you try to lock an open
driver’s door by pulling the lock tab
rearward, the driver’s door lock tab
pops out and unlocks the driver’s
door.

CONTINUED

U.S. V6 models, and Canadian EX-L and
V6 models with navigation system

Lockout Prevention

Auto Door Locking

Auto Door Locking/Unlocking

Door Locks

Inst

ru

m

e

nt

s

a

nd
Cont

ro

ls

81

NOTE: When customizing a setting,
use the appropriate remote transmitter
(Driver 1 or Driver 2).
To customize, remove the master key
with the remote transmitter, and press
the UNLOCK button once.

Main Menu

Make sure the shift lever is in the
Park (P) position (A/T vehicles).

Turn the ignition switch to the ON
(II) position, and open the driver’s
door.

Push and hold the front of the
master door lock switch on the
driver’s door until you hear a click
(after about 5 seconds).

Make sure the shift lever is in the
Park (P) position.

Turn the ignition switch to the ON
(II) position, and make sure to
close the driver’s door.

Release the switch, and within 20
seconds, turn the ignition switch
to the LOCK (0) position.

1.

2.

1.

2.

3.

4.

Locks both doors when the shift lever is
moved out of the Park (P) position (A/T
vehicles only).

To program the Park Lock mode:

To turn off the Auto Door Lock
modes:

Door Locks

82

Main Menu

Push and hold the front of the
master door lock switch on the
driver’s door. You will hear a click.
Keep holding the switch until you
hear another click (after about 5
seconds).

Push and hold the front of the
master door lock switch on the
driver’s door. You will hear a click.
Keep holding the switch until you
hear another click (after about 5
seconds).

Make sure the shift lever is in the
Park (P) position (A/T vehicles).

Turn the ignition switch to the ON
(II) position, and make sure to
close the driver’s door.

push and hold the

brake pedal, and move the shift
lever out of the Park (P) position.

Turn the ignition switch to the
LOCK (0) position.

Release the switch, and within 20
seconds, turn the ignition switch
to the LOCK (0) position.

Release the switch, and within 20
seconds, turn the ignition switch
to the ACCESSORY (I) position.

move the shift

lever to the Park (P) position.

1.

2.

3.

4.

5.

6.

3.

4.

On A/T vehicles,

Locks both doors when the vehicle’s
speed reaches about 10 mph (15 km/h).

On A/T vehicles,

To program the Drive Lock mode:

Door Locks

Inst

ru

m

e

nt

s

a

nd
Cont

ro

ls

83

Main Menu

The auto door unlocking is
deactivated all the time.

The auto door unlocking feature
has five possible settings:

Make sure the shift lever is in the
Park (P) position (A/T vehicles).

Turn the ignition switch to the ON
(II) position, and open the driver’s
door.

Both doors unlock whenever you
turn the ignition switch to the
ACCESSORY (I) position.

the driver’s door

unlocks when you move the shift
lever to the Park (P) position with
the brake pedal depressed.
This is the default setting.

Both doors unlock when you move
the shift lever to the Park (P)
position with the brake pedal
depressed (A/T vehicles).

The driver’s door unlocks
whenever you turn the ignition
switch to the ACCESSORY (I)
position.
This is the default setting on M/T
vehicles.

1.

2.

On A/T vehicles,

Auto Door Unlocking

Door Locks

To turn off the Auto Door Unlock
modes:

84

Main Menu

CONTINUED

Push and hold the rear of the
master door lock switch on the
driver’s door. You will hear a click.
Continue to hold the switch:

Until you hear another click
(after about 5 seconds) to
activate

Or, until you hear two more
clicks (after about 10 seconds)
to activate

.

Make sure the shift lever is in the
Park (P) position.

Turn the ignition switch to the ON
(II) position, and make sure to
close the driver’s door.

Push and hold the rear of the
master door lock switch on the
driver’s door. You will hear a click,
and after about 5 seconds, you will
hear another click.

Release the switch, and within 20
seconds, turn the ignition switch
to the LOCK (0) position.

Release the switch, and within 20
seconds, turn the ignition switch
to the LOCK (0) position.

1.

2.

3.

4.

3.

4.

driver’s door unlock

feature.

both doors unlock

feature

Unlocks the driver’s door or both doors
when the shift lever is moved into the
Park (P) position with the brake pedal
depressed (A/T vehicles only).

Door Locks

To program the Park Unlock mode:

Inst

ru

m

e

nt

s

a

nd
Cont

ro

ls

85

Main Menu

Even if your vehicle’s battery is
removed or goes dead, the system
keeps the auto door lock/unlock
setting which you selected.

Turn the ignition switch to the
LOCK (0) position.

push and hold the

brake pedal, then move the shift
lever out of the Park (P) position.

Push and hold the rear of the
master door lock switch on the
driver’s door. You will hear a click.
Continue to hold the switch:

Until you hear another click
(after about 5 seconds) to
activate

Or, until you hear two more
clicks (after about 10 seconds)
to activate

.

Make sure the shift lever is in the
Park (P) position (A/T vehicles).

Turn the ignition switch to the ON
(II) position, and make sure to
close the driver’s door.

Release the switch, and within 20
seconds, turn the ignition switch
to the ACCESSORY (I) position.

move the shift

lever to the Park (P) position.

4.

5.

6.

3.

1.

2.

On A/T vehicles,

driver’s door unlock

feature.

both doors unlock

feature

Unlocks the driver’s door or both doors
when the ignition switch is moved out of
the ON (II) position.

On A/T vehicles,

Door Locks

To program the Ignition Switch
Unlock mode:

86

Main Menu

Press this button once

to unlock the driver’s door. Push it
twice to unlock the passenger’s door.
Some exterior lights will flash twice
each time you push the button.

The ceiling light and the door
activated spotlights (if equipped)
come on when you press the
UNLOCK button if the lights are in
the door activated position. If you do
not open either door within 30
seconds, the light(s) will fade out. If
you relock the doors with the remote
transmitter before 30 seconds have
elapsed, the light(s) will go off
immediately.

If you do not open either door within
30 seconds, the doors automatically
relock and the security system sets.

You can also open both power
windows and the moonroof (if
equipped) from outside the vehicle
with the remote transmitter (see
page

).

Press and hold this

button for about 2 seconds to attract
attention: the horn will sound and
the exterior lights will flash for about
30 seconds. To cancel panic mode,
press any other button on the remote
transmitter, or turn the ignition
switch to the ON (II) position.

Press and hold this

button for about 1 second to open
the trunk. You cannot open the trunk
if the key is in the ignition switch.

Press this button once to

lock both doors. Some exterior lights
will flash once. When you push
LOCK twice within 5 seconds, you
will hear a beep to verify that the
doors are locked and that the
security system has set. You cannot
lock the doors if either door is not
fully closed or the key is in the
ignition switch.

110

CONTINUED

Remote Transmitter

UNLOCK

PANIC

TRUNK

LOCK

Inst

ru

m

e

nt

s

a

nd
Cont

ro

ls

87

LOCK
BUTTON

UNLOCK
BUTTON

PANIC
BUTTON

TRUNK
RELEASE
BUTTON

LED

Main Menu

Battery type: CR1616

Avoid dropping or throwing the
transmitter.

Protect the transmitter from
extreme temperature.

Do not immerse the transmitter in
any liquid.

If you lose a transmitter, the
replacement needs to be
reprogrammed by your dealer.

To replace the battery:

Remove the screw at the base of
the transmitter with a small
Phillips-head screwdriver.

Separate the transmitter by prying
its middle seam with your
fingernail.

If it takes several pushes on the
button to lock or unlock the doors,
replace the battery as soon as
possible.

Be careful when removing

this screw as the head of the screw
can strip out.

1.

2.

Remote Transmitter

Replacing the Transmitter Battery

Remote Transmitter Care

88

NOTE:

SCREW

Main Menu

As required by the FCC:
This device complies with Part 15 of the
FCC rules. Operation is subject to the
following two conditions: (1) This device
may not cause harmful interference, and
(2) this device must accept any
interference received, including
interference that may cause undesired
operation.

Changes or modifications not expressly
approved by the party responsible for
compliance could void the user’s
authority to operate the equipment.

This device complies with Industry
Canada Standard RSS-210.
Operation is subject to the following two
conditions: (1) this device may not cause
interference, and (2) this device must
accept any interference that may cause
undesired operation of the device.

Inside the transmitter, separate
the inner cover from the keypad
by carefully prying on the edge
with a coin.

Remove the old battery, and insert
a new battery into the back of the
cover with the

side facing down.

An improperly disposed of battery
can hurt the environment.
Always confirm local regulations
for battery disposal.

Install the parts in reverse order.

4.

5.

3.

Remote Transmitter

Inst

ru

m

e

nt

s

a

nd
Cont

ro

ls

89

BATTERY

COIN

Main Menu

When you unlock the driver’s door
with your remote transmitter, each
remote transmitter activates the
customized settings related to that
remote.

When you unlock and open the
driver’s door with the remote
transmitter, the driver’s seat (except
the power lumbar feature) starts to
move to the positions stored in
memory. The indicator in the related
memory button comes on.

Auto Door Locking/Unlocking
(see page

).

Driving position memory
(see page

).

Here are the settings activated with
the remote:

The driving position memory
activated (Driver 1, Driver 2) is
shown on the back of each
transmitter. Make sure you store
your desired driving position in the
memory that is activated by the
transmitter you normally carry.

81

103

U.S. V6 models
Canadian EX-L and V6 models with
navigation system

Remote Transmitter

Recalling a Memorized Driving
Position

90

Main Menu

To protect items in the trunk when
you need to give the key to someone
else:

To close the trunk, press down on
the trunk lid.

You can open the trunk in two ways:

Pull up on the trunk release lever
to the left of the driver’s seat.

Press and hold the trunk release
button on the remote transmitter.

Keep the trunk lid closed at all times
while driving to avoid damaging the
lid, and to prevent exhaust gas from
getting into the interior. See

on page

.

Lock the trunk release lever with
the master key.

Give the person the valet key.

1.

2.

51

CONTINUED

Carbon

Monoxide Hazard

Trunk

Inst

ru

m

e

nt

s

a

nd
Cont

ro

ls

91

Pull

TRUNK RELEASE LEVER

MASTER KEY

Main Menu

As a safety feature, your vehicle has
a release lever on the trunk latch so
the trunk can be opened from the
inside.

Parents should decide if their
children should be shown how to use
this feature.

For more information about child
safety, see page

.

Even if the trunk release lever is
locked with the master key, you can
open the trunk with the remote
transmitter.

To open the trunk, push the release
lever in the direction indicated by the
arrow.

37

Emergency Trunk Opener

Trunk

92

Main Menu


Content   ..  4  5  6  7   ..