Harley Davidson 2019 Boom GTS. Manual - page 4


  Главная      Harley Davidson     Harley Davidson 2019 Boom GTS. Manual


Search            copyright infringement  


Content      ..     2      3      4      5     ..


Harley Davidson 2019 Boom GTS. Manual - page 4


2.

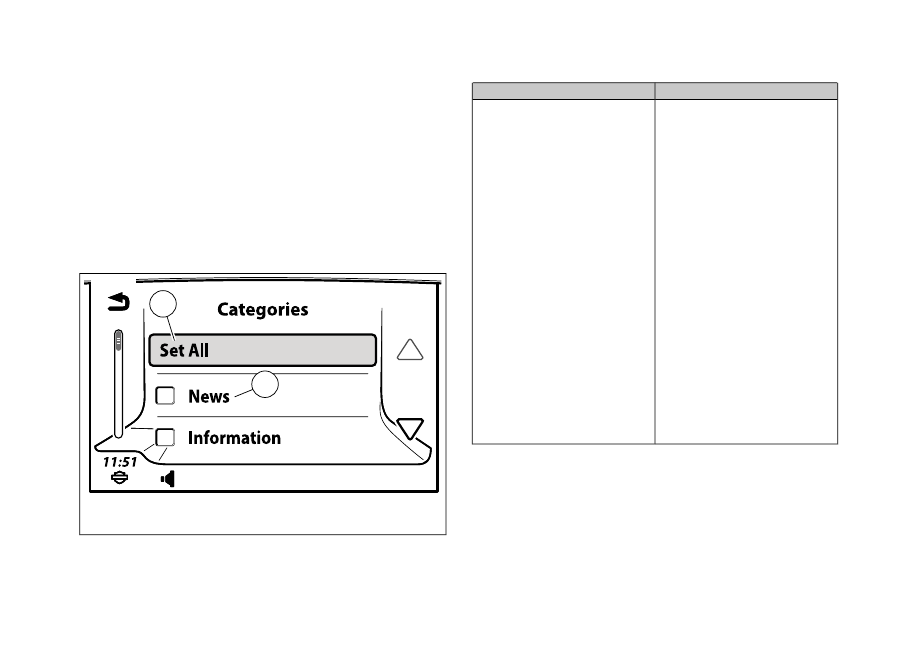
See Figure 50. Select categories (2) from list.

a.

Individual categories selected:

Radio scans only

stations from selected categories.

b.

Clear All (or no categories selected):

Radio scans

all stations.

c.

Set All:

Radio scans for stations that are

broadcasting any of the program types. The radio
does not stop on any station unless it is broadcasting
a program type code.

1

2

1170892

Set All or Clear All field

1.

Categories (see regional list)

2.

Figure 50. Categories Screen

Table 29. FM Categories: RBDS, North America

OPTION

OPTION

• Classical

• Rhythm & Blues

• Soft Rhythm & Blues

• Foreign Language

• Religious Music

• Religious Talk

• Personality

• Public

• College

• Spanish Talk

• Spanish Music

• Hip Hop

• Weather

• News

• Information

• Sports

• Talk

• Rock

• Classic Rock

• Adult Hits

• Soft Rock

• Top 40

• Country

• Oldies

• Soft

• Nostalgia

• Jazz

76 Audio

Table 30. FM Categories: RDS, Other Regions

OPTION

OPTION

• Weather

• Finance

• Children's Programs

• Social Affairs

• Religion

• Phone-in

• Travel

• Leisure

• Jazz Music

• Country Music

• National Music

• Oldies Music

• Folk Music

• Documentary

• News

• Current Affairs

• Information

• Sport

• Education

• Drama

• Culture

• Science

• Varied

• Pop Music

• Rock Music

• Easy Listening

• Light Classical

• Serious Classical

• Other Music

Station List (EU)

Radios equipped with station list feature will have a Stat icon
in upper left corner on FM screen. The radio scans and creates

a list of all available stations in the FM band. Radios with a
dual tuner will continually update the list as stations come in
and out of range.

See Figure 51.

Access station list:

Press station categories

icon in upper left corner of the FM band screen (if equipped).

See Figure 52.

Select a station:

Use scroll controls and select

desired station from list.

1172011

Figure 51. FM Tuner Station List (EU)

Audio 77

1

2

1171992

Categories

1.

Stations (showing current station or program
information)

2.

Figure 52. Station List

RBDS/RDS

Some radio stations broadcast data which can be used to
display station identification, program information and support
other features in the radio (depending on the region).

Radio Broadcast Data System (RBDS) is primarily used in
North America. Stations broadcasting RBDS typically provide
information such as radio station name, artist and song title to
the radio.

Radio Data System (RDS) is primarily used in Europe. Stations
broadcasting RDS data may also include time updates,
weather, traffic and other regional information. Not all radio
stations transmit RBDS or RDS data. When RBDS or RDS is
unchecked, or if the service is not available, only the radio
frequency is displayed.

Enable RDS/RBDS

1.

Navigate:

Home > Audio.

2.

Select:

Menu icon.

3.

Select:

RDS or RBDS checkbox.

RDS Features:

For dual tuner radios with RDS capability, three

separate RDS features can be enabled.

Alternate Frequency Switching (AF):

The radio monitors

signal strength of other stations playing the same program.
The radio automatically switches to another station if signal
quality is better.

Regionalization (REG):

Some radio stations split their

program into separate regional programs on different
frequencies. Regionalization automatically uses frequencies
of regional related stations for alternate frequency jumps.

78 Audio

Traffic Program/Traffic Announcement (TP/TA):

The

radio monitors stations for traffic announcements. When a
traffic announcement is discovered, the radio automatically
tunes to station playing the announcement. Traffic
Announcement icon (TA) is displayed in the status bar.
When finished, tuner returns to its previous operation. The
status bar displays Traffic Program (TP) icon when tuned
to a station that regularly plays traffic announcements. When
enabled, the radio also monitors stations for Enhanced Other
Networks (EON) transmissions.

Weather Band

See Table 31. Weather band is supported on radios for North
America. Equipped radios can tune to any of seven weather
band frequencies. The five weather band presets are originally
set to the first five weather band frequencies.

Generally only one weather band station services an area.
Using the seek function would take user to the only available
station.

In the US, National Oceanic and Atmospheric Administration
(NOAA) operates National Weather Radio (NWR) stations
across the country. These stations continually broadcast
weather announcements using seven different frequencies
designated for weather band.

In

Canada,

Weatheradio

Canada

broadcasts

weather

information.

NOTE

RBDS/RDS must be enabled for WB channel to show.

1.

Listen to weather band:

a.

Navigate:

Home > Audio.

b.

Select:

Source field.

c.

Select:

WB.

d.

Use Cursor/Select switch to advance through the
seven weather band frequencies or select a preset.
See Table 31.

Table 31. Weather Band Channels

FREQUENCY

CHANNEL

162.400 MHz

WB1

162.425 MHz

WB2

162.450 MHz

WB3

162.475 MHz

WB4

162.500 MHz

WB5

162.525 MHz

WB6

162.550 MHz

WB7

Weather Alert

Weather band alert feature is only available on radios built for
North America with a CB module.

Audio 79

When weather alert feature is turned on, CB module
continuously scans the weather band for an alert tone from
weather band stations. The rider can continue to play media,
listen to other stations or use other features on the radio. When
an alert tone is detected, the radio changes to weather band
and tunes to the channel with alert announcement. The alerts
indicate extreme weather conditions such as tornados, storms,
floods or other environmental warnings. See www.weather.gov
for weather band and alert broadcast information.

Turn weather alert ON:

See Figure 53. On weather band

screen, press the weather alert on/off icon (2).

3

2

4

1

1171664

Current channel

1.

Alert indicator

2.

On/Off icon

3.

Station presets (1-5)

4.

Figure 53. Weather Band

MEDIA

Media Screen

See Figure 54. The Media screen shows the status of the
currently playing song. The media screen also displays cover
art for the song, if available.

80 Audio

8

4

7

5

3

1

6

2

1154883

Media filter (USB shown)

1.

Media device (USB shown)

2.

Settings

3.

Repeat

4.

Time remaining

5.

File sequence (device/playlist/album)

6.

Time elapsed

7.

Shuffle

8.

Figure 54. Media Screen

Media Devices

The

radio

supports

various

types

of

USB

and

Bluetooth-connected media devices. As a general guideline,
support for devices is listed in Table 32. Some features or
menus may not be available depending on device, file type or
connection type.

For mass storage devices (such as USB drives), the file
organization on the device can impact performance. For best
performance and indexing of files, store media files at the root
directory of the USB device, rather than in multiple levels of
folders.

Audio 81

Table 32. Media Device Support

FEATURES OR LIMITATIONS

FILES SUPPORTED

CONNECTIONS

DEVICES SUPPOR-

TED

DEVICE

Supports all find features. Ring tone files
cannot be downloaded. iPods with a hard
drive can be damaged and are not recom-
mended.

All iPod supported
file types

Apple proprietary
connector.

iPod supporting iAP

iPod

May support find features. NTFS-formatted
drives can only be used for read-only
functions (such as playing media). NTFS
drives will not support functions like
ride/trail exports or navigation database
updates.

MP3, MP4, MPEG-4
AAC, M4A, M4B,
WAV, WMA

Direct connection to
USB port. USB con-
nector and reader
required for SD card.

USB drive (exFAT,
FAT16, FAT32, NT-
FS, HFS+) or SD
card

USB mass storage
device

May support find features.

MP3, MP4, MPEG-4
AAC, M4A, M4B,
WAV, WMA

USB cable.

USB-connected
phone. PlaysFor-
Sure compatible
device. Media
Transfer Protocol
(MTP) compatible
device.

Media player

No preset capability. File metadata may
not be displayed. Audio from an app or in-
ternal player can be streamed to radio.

Bluetooth device de-
pendent. Bluetooth
audio is streamed by
the device and not
decoded by radio.

A2DP/AVRCP pro-
files.

Varies. Requires
minimum Bluetooth
profile interoperabil-
ity.

Bluetooth device

82 Audio

Connecting Media Device: USB

1.

Connect media device to the USB port. Use a connector
or reader as needed.

2.

If the media device is not automatically recognized, check
device settings. Some devices need to be configured to
connect as a hard drive or as a media device before media
files can be accessed. See the device manual.

• If connecting a device for the first time, the radio begins

playing the first song found on device. If reconnecting a
previously used device, the radio attempts to resume the
last played file.

• The radio will begin collecting file information from the

device. Some information and features may not be available
until the radio has finished synchronizing with the device.
The radio will play remaining files in alphabetical order.

Connecting Media Device: Bluetooth

1.

Pair the device. See Bluetooth (Page 106).

2.

Navigate:

Home > Audio.

3.

Select:

Source field.

4.

Select device from list.

Device Players and Applications: Bluetooth

Streaming audio can be played from an internal player or
application on a connected Bluetooth device. The radio can
control some features, such as previous or next file selections
within some players or applications.

1.

With motorcycle stopped, connect with the Bluetooth
device.

2.

Start the media application or internal player within the
Bluetooth-connected device. The audio begins playing
through the motorcycle speakers or headsets.

NOTE

The volume level and equalization within the device can affect
the streaming volume to the radio. If sound cannot be heard
or is distorted, check the volume within the application or
device.

3.

Use

the

Home/Volume/Previous/Next

switch

and

Mute/Power button on the radio faceplate to operate the
application or internal player, as applicable.

Selecting Media Device

1.

See Figure 55.

Navigate:

Home > Audio.

2.

Select:

Source field.

Audio 83

3.

A list of paired or connected devices is displayed. Items
are marked with either a USB or Bluetooth symbol.

NOTE

Some bluetooth devices can not be controlled through the
radio.

4.

Select a device from the list. If connected, the first song
from the device begins playing.

1179572

Figure 55. Select Media Device

Play Previous/Next Media File: Previous/Next

The Previous/Next switch on the left hand control will advance
to the previous or next song in the device.

Play Previous/Next Media File: Preset

The Cursor/Select switch on the right hand control will advance
to the previous or next preset on the radio.

Pause, Rewind or Fast Forward Media File

Pause:

Press the Power/Mute button to pause or unpause

media.

Rewind:

Press and hold Previous switch to the left. Rewinding

will accelerate as switch continues to be held.

Fast Forward:

Press and hold Next switch to the right. Fast

forwarding will accelerate as switch continues to be held.

Scanning Media Files

1.

Navigate:

Home > Audio.

2.

Select:

Menu icon.

3.

See Figure 56.

Select:

Scan. The radio begins playing

each song on the device sequentially, dwelling on each
song for five seconds. The Scan icon is displayed in the
status bar.

84 Audio

1171305

Figure 56. Scan Icon Location (typical)

4.

Press any switch to stop the scan.

Repeat Current File

1.

Navigate:

Home > Audio.

2.

Select:

Menu icon.

3.

Select:

Repeat checkbox. The Repeat icon is displayed

and the current file will play repeatedly until unselected.
Pressing Repeat a 2nd time will allow the radio to
continuously play the existing song list.

Play Random Files: Shuffle

1.

Navigate:

Home > Audio.

2.

Select:

Menu icon.

NOTE

An iPod may exclude audio books and podcasts from shuffle
selection.

3.

Select:

Shuffle checkbox. The Shuffle icon is displayed.

The radio will randomly select files from the device.

Play Songs From Track List

The track list shows a full list of all songs on the connected
device. When selecting a song from the list, the radio remains
in the track list and does not transition back to the media
screen. Track lists are not available for Bluetooth streaming
media devices.

1.

Navigate:

Home > Audio.

2.

Select:

Menu icon.

3.

See Figure 57.

Select:

Track List. A complete list of all

songs from the currently selected device, playlist, artist or
album are displayed.

Audio 85

4.

Select a song from the list to play.

1179580

Figure 57. Track List Icon

Media Presets

The radio stores up to 20 presets for each connected device.
The screen only shows media presets for the currently
connected device. The media presets are retained in memory
and are available the next time the media device is connected.
Presets are only available for USB connected devices.

Set media preset:

With song playing, press and hold one of

the presets. When the radio beeps and the preset is stored
release preset.

Select media preset:

Select desired preset. Song will begin

playing.

Finding a Media File

See Figure 58. The Find feature can be used to browse for
different types of media files on USB-connected media devices
as shown in Table 33. File browsing features are not available
for Bluetooth streaming media devices.

1.

Navigate:

Home > Audio.

2.

Select:

Media filters.

Genres

Artists

Songs

Albums

Composers

23:59

Find

1179592

Figure 58. Find Media Selections

86 Audio

Table 33. Finding a Media File

DESCRIPTION

CATEGORY

Lists all songs by selected artist. Radio
will play a selected song, then plays re-
maining songs by the artist.

Artist

Lists all songs on selected album. Radio
will play a selected song, then plays re-
maining songs on the album.

Album

Lists songs by selected genre.

Genre

Searches for song by title.

Song Title

Lists all songs by selected composer.
Radio will play a selected song, then
plays remaining songs by the composer.

Composers

List of all playlists on device.

Playlist

List of all podcasts on device (Apple
devices only).

Podcast

List of all audio books on device (Apple
devices only).

Audio Book

List of video files on device (only audio
portion is played).

Video, TV Show,
Movie or Music
Video

Finding a Media File: Playlist

A playlist is a file stored on the device which includes a
sequential list of songs. All playlists native to the iPod are
supported. The radio also supports the following playlist types
for other USB-connected devices.

• Windows Media Player Advanced Stream Redirector format

(*.asx)

• Windows Media Player Playlist (*.wpl)

• M3U Moving Pictures Expert Group Audio Layer 3 Uniform

Resource Locator (*.m3u)

• PLS file (*.pls)

• iTunes XML (*.xml )

• RealPlayer Metadata Package (*.rmp)

NOTE

• M3U, PLS and WPL playlists only allow relative pathnames

to files. Absolute pathnames are not supported.

• All XML files on USB mass storage media will be displayed,

even if the files are not actually XML-formatted playlists.

1.

Navigate:

Home > Audio.

2.

Select:

Media filters.

3.

Select:

Playlist.

4.

Select item from list.

5.

Select song from the playlist. To play the entire playlist,
select the first song.

Audio 87

Information accurate as of January 28th, 2019. Go to https://serviceinfo.harley-davidson.com to check for the latest version.

Finding a Media File: Artist, Album, Genre or
Composer

1.

Navigate:

Home > Audio.

2.

Select:

Media filters.

3.

Select:

Artist, Album, Genre or Composer to browse.

4.

Select item from list.

5.

Select song from the list. The radio begins playing files for
the artist, album, genre or composer starting at the selected
file. To play all songs for this artist, album or genre, select
the first song from the list.

Finding a Media File: Song Title

1.

Select

Navigate:

Home > Audio.

2.

Select:

Media filters.

3.

Select:

Songs. A full list of all songs on the device is

displayed.

4.

Select a song from the list. If necessary, select the letter
jump icon between the scroll controls and type the first
letter of the song name.

Finding a Media File: Podcast

The Podcast category is displayed in the Find menu when a
properly configured podcast is identified on the device. An
audio file (ID3 tag) must be coded properly to display on the
radio as a podcast. If needed, right-click on the file in iTunes
and select the proper option for characterizing the file (movie,
music, video, podcast, and so on).

Some files identified as podcasts are not actually podcast files,
but just media files. These files may be listed with other song
files.

1.

Navigate:

Home > Audio.

2.

Select:

Media filters.

3.

Select:

Podcast.

4.

Select a podcast from the list.

5.

Select an episode from the list.

Finding a Media File: Audio Book

The audio book option is displayed when audio book files have
been discovered on the device. Some audio books are MP3
files which may be listed with other song files.

1.

Navigate:

Home > Audio.

88 Audio

Information accurate as of January 28th, 2019. Go to https://serviceinfo.harley-davidson.com to check for the latest version.

2.

Select:

Media filters.

3.

Select:

Audio book. A list of audio books is displayed.

4.

Select an audio book from the list.

5.

Select a chapter from the audio book, if applicable.

Finding a Media File: Video, TV Show, Movie,
Music Video

The radio can play some types of video files. To minimize
distraction, the radio only plays the audio portion of the files.

Files from Apple devices may be categorized as TV Show,
Movie or Music Video. Supported video files from a USB device
are categorized as Video.

1.

Navigate:

Home > Audio.

2.

Select:

Media filters.

3.

Select:

Video, TV Show, Movie or Music Video.

4.

Select a file from the list. Audio from the video file will begin
playing.

Selecting Media File: Using Voice Recognition

See Voice Recognition (Page 171) for detailed instructions on
all voice recognition commands.

1.

Select:

Voice recognition switch.

2.

Speak:

Artist, Album, Genre, Playlist or Song followed by

the name or title to be played.

3.

The radio may prompt for more information. Respond to
any remaining prompts to select and play the media.

Saving Media File as Favorite

See Favorites (Page 193).

Saving Media File as Ring Tone

NOTE

The media file must be playing.

1.

Select:

Menu. If the current file type is compatible for use

as a ring tone, a Ring Tone icon is displayed.

2.

Select:

Ring Tone. The radio will attempt to download the

media file for use as a ring tone. The radio allows only one
ring tone to be downloaded into the radio. Replace the
existing file if necessary.

Audio 89

Information accurate as of January 28th, 2019. Go to https://serviceinfo.harley-davidson.com to check for the latest version.

3.

Select:

OK.

SATELLITE RADIO

SiriusXM Satellite Radio

SiriusXM radio is equipped on select vehicles in North America.
See Features and Specifications (Page 19). The radio includes
over 200 digital channels of music, news, talk, entertainment
and sports. The radio broadcast is over satellite (with ground
repeaters) to provide consistent programming and signal quality
nationwide without a break in coverage.

SiriusXM specialty services provide weather mapping, weather
forecast data, fuel price information and traffic data service.
SiriusXM traffic provides information for traffic events and road
conditions. This data is integrated with the navigation system
to provide speed flow along selected routes and notifications
of traffic situations (such as accidents or lane closures).

Optional SiriusXM Accessory

SiriusXM functionality is standard on select vehicles in covered
regions. For vehicles not equipped with SiriusXM, the optional
SiriusXM accessory can be purchased at www.h-d.com/store
or at an authorized Harley-Davidson dealer. See dealer or
website for fitment and requirements when adding this
accessory.

Follow the instruction sheet procedures or have an authorized
Harley-Davidson dealer install the accessory. After installation,

use the instructions in this manual to set up, subscribe and
operate the SiriusXM features.

Trial Subscription

New vehicles equipped with SiriusXM from the factory include
a three-month trial subscription for SiriusXM Radio, Traffic and
Travel Link service in regions where service is available. This
trial subscription is only available to the original purchaser of
a new SiriusXM equipped vehicle. This is not included with
SiriusXM modules that may be subsequently purchased or
installed by the customer or dealer. Terms and conditions of
service may be modified from time to time by SiriusXM. See
www.siriusxm.com.

Check Subscription Status

1.

Navigate:

Home > Setup > System Information > XM

subscription.

2.

Select:

Radio. See Figure 59. The Radio Services

subscription status is displayed with an ESN number and
SiriusXM phone number for assistance or activation.

3.

Select:

Specialty Services. See Figure 60. The subscription

status for each service (traffic, fuel, weather and forecast
services) is displayed with an ESN number and SiriusXM
phone number for assistance or activation.

90 Audio

Information accurate as of January 28th, 2019. Go to https://serviceinfo.harley-davidson.com to check for the latest version.

1172042

Figure 59. Radio Service Subscription Screen

1172038

Figure 60. Specialty Services Subscription Information

Subscribing to SiriusXM

1.

See Figure 60. Get ESN number for radio.

2.

Verify that the SiriusXM signal is being received. Check
the SiriusXM Signal Strength icon in the status bar.
Channel 1 (preview channel) should be playing audio.
SiriusXM starts up with a preview channel (channel 1) until
subscription is active.

Audio 91

Information accurate as of January 28th, 2019. Go to https://serviceinfo.harley-davidson.com to check for the latest version.

3.

Subscribe:

a.

See Figure 60.

By Phone:

Phone number will be

displayed after selecting SiriusXM in the Band screen
or call the phone number on the ESN screen.

b.

By Internet:

Go to www.siriusxm.com. Click the

subscription link.

4.

Keep the radio turned on until the subscription process is
complete. Activation may take up to an hour. Since the
vehicle will automatically turn off after 20 minutes in
accessory mode, it may be necessary to start up and ride
the motorcycle.

Listening to SiriusXM Radio

SiriusXM features take a few moments to be displayed after
the motorcycle is first started.

1.

Navigate:

Home > Audio.

2.

Select:

Source field.

3.

Select:

SiriusXM.

SiriusXM Presets

Channel presets can be programmed to quickly access favorite
channels. The radio up to 20 SiriusXM presets.

1.

Navigate:

Home > Audio.

2.

Select:

Source field.

3.

Select:

SiriusXM.

4.

Select a channel.

5.

Press and hold a preset until the system beeps.

Selecting a Channel: Hand Controls

Press the Previous/Next switch on the left hand control to
change the channel.

Selecting a Channel: Channel List

1.

Navigate:

Home > Audio.

2.

Select:

Source field.

3.

Select:

SiriusXM.

4.

Select:

SiriusXM Channels.

92 Audio

Information accurate as of January 28th, 2019. Go to https://serviceinfo.harley-davidson.com to check for the latest version.

5.

Select a desired category from the list.

Selecting a Channel: Direct Tune

1.

Navigate:

Home > Audio.

2.

Select:

Source field.

3.

Select:

SiriusXM.

4.

Select:

Menu.

5.

Select:

Direct tune.

6.

See Figure 61. Use the keypad (3) to enter a channel
number (2).

7.

Select Tune (4) to change to the selected channel.

3

4

1

2

1172477

Backspace/delete

1.

Channel number

2.

Keypad

3.

Tune

4.

Figure 61. Direct Tune

Selecting a Channel: Voice Recognition

See Voice Recognition (Page 171) for more commands and
instructions.

1.

Select:

Voice recognition switch.

2.

Speak one of the following commands into the microphone:

a.

To listen to SiriusXM radio:

SiriusXM

Audio 93

Information accurate as of January 28th, 2019. Go to https://serviceinfo.harley-davidson.com to check for the latest version.

b.

To select a channel:

Channel (followed by the

channel name or number)

c.

To select next channel up:

Channel Up

d.

To select next channel down:

Channel Down

e.

To scan channels:

Channel Scan

Scanning SiriusXM Channels

1.

Navigate:

Home > Audio.

2.

Select:

Source field.

3.

Select:

SiriusXM.

4.

Select:

Menu.

5.

Select:

Scan. The radio advances through each channel,

dwelling for five seconds on each channel.

6.

Press the Cursor/Select hand control switch to select a
channel.

1173312

Figure 62. SiriusXM Menu Screen

Tagging an Artist or Song

Tagging allows you to be alerted when a tagged artist or song
is playing on any SiriusXM channel. Up to 20 songs or artist
tags can be saved.

1.

Navigate:

Home > Audio.

2.

Select:

Source field.

3.

Select:

SiriusXM.

4.

Select:

Menu.

94 Audio

Information accurate as of January 28th, 2019. Go to https://serviceinfo.harley-davidson.com to check for the latest version.

5.

Select:

Tag This.

NOTE

To tag both song and artist, repeat steps for remaining choice.

6.

See Figure 63. The system prompts to tag the song or
artist. Once tagged, the system confirms your selection.

1154965

Figure 63. Tagging Screen

Viewing Tagged List

1.

Navigate:

Home > Audio.

2.

Select:

Source field.

3.

Select:

SiriusXM.

4.

Select:

Menu.

5.

Select:

Tagged.

6.

See Figure 64. To turn off alerts for a particular song or
artist, uncheck the item in the list. To resume alerts, check
the item again.

1

2

1173297

Tagged artist

1.

Tagged song

2.

Figure 64. Tagged List

Audio 95

Information accurate as of January 28th, 2019. Go to https://serviceinfo.harley-davidson.com to check for the latest version.

Tag Alert

An alert pops up when a tagged song or artist plays on any
channel. Select Listen or Ignore.

Listen:

Changes to the channel with the tagged song or artist

playing.

Ignore:

Remains on the current channel.

SiriusXM Categories

The radio can be configured to scan for particular types of
programming (such as news, sports or classical music). When
scanning, the radio only stops on stations with the selected
categories. The channel list includes only stations with the
selected categories.

1.

Navigate:

Home > Audio.

2.

Select:

Source field.

3.

Select:

SiriusXM channels.

4.

Select:

Station categories.

5.

See Figure 65. Select desired categories from the list.

1

2

1170892

Set All or Clear All field

1.

Categories (see regional list)

2.

Figure 65. Categories Screen

Game Zone

Game Zone can be set up to trigger an alert when games are
broadcasting or score changes occur for your favorite teams.
The alerts provide an opportunity to tune to the channel and
listen to the game.

Enabling Sports Alerts

Sports Alerts must be enabled before the radio provides game
or score notifications.

96 Audio

Information accurate as of January 28th, 2019. Go to https://serviceinfo.harley-davidson.com to check for the latest version.

If Sports Alerts is disabled, all the game and score settings
configured for your favorite teams are still retained. However,
the system will not provide notifications until Sports Alerts is
enabled again.

1.

Navigate:

Home > Audio.

2.

Select:

Source field.

3.

Select:

SiriusXM.

4.

Select:

Menu.

5.

Select:

Game zone.

6.

See Figure 66. Check the Sports Alerts checkbox. Game
and score alerts that have been set for any favorite teams
will be displayed as they occur.

1175875

Figure 66. Sports Alerts

Adding a Game Zone Favorite

Up to seven teams can be added as Game Zone favorites.

1.

Navigate:

Home > Audio.

2.

Select:

Source field.

3.

Select:

SiriusXM.

4.

Select:

Menu.

5.

Select:

Game zone.

Audio 97

Information accurate as of January 28th, 2019. Go to https://serviceinfo.harley-davidson.com to check for the latest version.

6.

Select the type of team (MLB, NBA and so on). A list of
teams within the selected league are shown.

7.

Select a team from the list.

NOTE

Selecting Game or Score checkbox will Automatically add team
to favorites.

8.

See Figure 67.

Select:

Add to Favorites. Game and Score

will automatically be selected.

1175882

Figure 67. Game Zone Favorites

Setting Game or Score Notification

1.

See Section Adding a Game Zone Favorite.

2.

Game notification:

To display an alert whenever a game

is being broadcast for this team, select the game checkbox.

3.

Score notification:

To display an alert whenever a score

changes in a game for this team, select the score
checkbox.

Responding To Game Zone Alert

Depending on the settings, a game zone alert pops up when
a game is being broadcast or a score change has taken place
for a favorite team.

1.

Listen:

The radio tunes to the channel that is broadcasting

the game.

2.

Ignore:

The radio continues with its current audio source.

Removing a Game Zone Favorite

1.

Navigate:

Home > Audio.

2.

Select:

Source field.

3.

Select:

SiriusXM.

98 Audio

Information accurate as of January 28th, 2019. Go to https://serviceinfo.harley-davidson.com to check for the latest version.

4.

Select:

Menu.

5.

Select:

Game zone.

6.

Select:

Sports alert.

7.

Select:

Favorite teams.

8.

Select team to be removed from the list.

9.

Select:

Clear from Favorites. The team is removed from

game zone favorites list.

Displaying Weather

1.

Navigate:

Home > Navigation.

2.

Select:

Menu.

3.

Select:

Weather.

4.

Select:

Forecast. See Figure 68.

5.

Select:

Current location or Other location.

a.

Current location:

Displays weather conditions for

current location.

b.

Other location:

Select state and location to view.

6.

Select:

Current, Daily or 5 Day.

a.

Current:

The screen displays current weather

conditions. Selecting

Details

on the screen will give

a detailed outlook of weather conditions. See Figure
69.

b.

Daily:

The screen shows forecasted weather

conditions in 3 and 6 hours. See Figure 70.

c.

5 Day:

The screen shows forecasted weather

conditions for today and tomorrow. Use scroll or
swipe for next five days of weather data. See Figure
71.

Audio 99

Information accurate as of January 28th, 2019. Go to https://serviceinfo.harley-davidson.com to check for the latest version.

1

1175500

Figure 68. Weather Forecast Icon

1174485

Figure 69. Current Weather

1174489

Figure 70. Daily Weather Forecast

100 Audio

Information accurate as of January 28th, 2019. Go to https://serviceinfo.harley-davidson.com to check for the latest version.

1174481

Figure 71. 5 Day Weather Forecast

SiriusXM Weather Map

See Figure 72. SiriusXM weather displays a map with radar
and weather front information. The map is displayed in north
up orientation and is typically updated every 12 minutes. The
weather map displays major roadways, but it is not designed
as a tool for navigation.

1.

Navigate:

Home > Navigation.

2.

Select:

Menu.

3.

Select:

Weather. The radio displays a large-scale map

with the current location of the vehicle.

4.

Select settings on the Nav Menu screen to configure the
display of the map.

Weather Map Scrolling

See Map (Page 133).

1.

With the weather map displayed, press a location on the
touchscreen or press and hold the Cursor/Select on the
hand control switch.

2.

Scroll or swipe to change the displayed location of the
map. Use the zoom controls to zoom in or out.

Weather Map Radar and Fronts

See Figure 72. The radar displays patterns of precipitation on
the map. The intensity of rain, snow or mixed precipitation is
indicated by the legend on the bottom of the map. The map
can also display weather fronts, atmospheric pressure and
isobars.

1.

While in the weather map, select the information icon on
the right side of the screen.

2.

Turn on radar:

Check the

Radar

checkbox.

3.

Turn on weather fronts:

Check the

Fronts

checkbox.

Audio 101

Information accurate as of January 28th, 2019. Go to https://serviceinfo.harley-davidson.com to check for the latest version.

4.

Select:

Back. Radar formations and weather fronts are

displayed on the map.

Weather

RAIN

MIXED
SNOW

1

1181680

Figure 72. Weather Information

Table 34. Radar Information

INTENSITY

PRECIPITATION

TYPE

Seven color levels ranging from light
rainfall (light green) to severe (red)

Rain

Light snowfall (light blue), heavy snowfall
(dark blue)

Snow

Light mixed precipitation (light pink),
heavy mixed (dark pink)

Mixed

Table 35. Weather Front Information

DESCRIPTION

INDICATOR

Shown as a blue line with triangles. Dis-
plays the leading edge of a cold air mass.
The triangles show the forward direction
of the front.

Cold front

Shows center of high atmospheric pres-
sure.

High pressure (H)

Thin line which indicates equal or con-
stant atmospheric pressure.

Isobar

Shows center of low atmospheric pres-
sure.

Low pressure (L)

Shown as an alternating red-blue line
with triangles and semi-circles. Displays
a boundary between warm and cold air
masses.

Stationary front

Shown as a red line with red semi-circles.
Displays the leading edge of a warm air
mass. The semi-circles show the forward
direction of the front.

Warm front

Display Last Weather Update

1.

With the weather map displayed, select the option icon on
the right side of the screen.

2.

Select:

Update Information. The radio shows the date and

time for the last update to the radar and weather front
information.

102 Audio

Information accurate as of January 28th, 2019. Go to https://serviceinfo.harley-davidson.com to check for the latest version.

SiriusXM Fuel Prices

The fuel feature provides the fuel prices at stations within a
specified distance of the motorcycle. This feature can be used
to route to a selected station, or add stations to an existing
route.

Selecting Fuel Type

The screen shows locations and prices according to fuel type
that is selected (regular, medium, premium or diesel).

NOTE

Use only unleaded gasoline with fuel type and octane specified
for your motorcycle. Do not use diesel or other inappropriate
fuels for the motorcycle. See vehicle owner's manual. Using
wrong type of fuel can damage the engine, fuel system and
other components.

1.

Navigate:

Home > Navigation.

2.

Select:

Menu.

3.

Select:

Fuel prices.

4.

Select:

Fuel type.

5.

After selecting the fuel type select back to return to fuel
prices.

Viewing Fuel Prices

Fuel prices are shown per gallon or liter, depending on the
English/Metric setting.

1.

Navigate:

Home > Navigation.

2.

Select:

Menu.

3.

Select:

Fuel prices.

4.

Select:

View prices. A list of up to 30 nearest stations

within 100 miles are displayed. Stations are listed by
distance from current location.

5.

See Figure 73.

Select:

Sort by distance/brand/price icon

(2). This will sort the list by brand (station name), fuel price
or distance to the station.

6.

Select a station from the list.

Audio 103

Information accurate as of January 28th, 2019. Go to https://serviceinfo.harley-davidson.com to check for the latest version.

4

3

1

2

1175928

Fuel grade

1.

Sort by distance/brand/price

2.

Price and name of fuel station with address

3.

Direction and distance to station

4.

Figure 73. Fuel Prices

7.

See Figure 74. Options for the station are displayed.

a.

Fuel Station:

The company brand name or brand

of fuel is displayed.

b.

Route/View:

Selecting

Options

lets you select

desired route. Selecting

Save

lets you save it to a

list or save it as home. Selecting

Go

calculates and

takes you to selected gas station.

c.

Call:

With phone connected, the phone dials the gas

station (to confirm prices, check operating hours and
so on).

d.

Fuel Prices:

Displays the price for all fuel types and

a date stamp.

2

1

3

4

1175932

Fuel station/brand

1.

Route or view fuel station on map

2.

Call fuel station

3.

View all fuel prices at station

4.

Figure 74. Gas Station Selected

104 Audio

Information accurate as of January 28th, 2019. Go to https://serviceinfo.harley-davidson.com to check for the latest version.

SiriusXM Traffic

Displays a list of messages regarding traffic, construction,
accidents or other events nearby that may impact your chosen
route. The system can be configured to provide popups of traffic
events, and provide new routes to avoid traffic obstructions.

Turning Traffic On

When using the traffic feature, the system will automatically
prompt to turn on traffic if necessary. Traffic can also be
enabled in the system settings. See Traffic (Page 157).

Traffic Notification Popups

The system can be configured to automatically display traffic
alerts that affect the current navigation route. The system will
only display the notification when a route is active and an
alternative route would reduce the current ride time by five
minutes or more.

See Traffic (Page 157).

Traffic Icons

Navigate:

Home > Setup > Traffic > Legend. A description of

all traffic icons are displayed in the Setup menu.

Also see Traffic (Page 157).

Traffic Reroute

See Traffic (Page 157).

Traffic Message List

1.

Navigate:

Home > Navigation.

2.

Select:

Menu.

3.

Select:

(SiriusXM) Traffic.

4.

If prompted to turn on traffic, select

Yes

.

5.

See Figure 75. A list of nearby traffic events (1) is
displayed. Each item displays the direction and distance
to the traffic event. Road signs and traffic icons are also
displayed.

a.

To toggle between all nearby events or only events
along the route, select the switch-view icon (2).

6.

Select traffic event (1) from list. This displays a detailed
traffic message.

Audio 105

Information accurate as of January 28th, 2019. Go to https://serviceinfo.harley-davidson.com to check for the latest version.

1

2

1175928

1178717

Traffic event

1.

Switch-view icon

2.

Figure 75. Traffic Message List

7.

See Figure 76.

Select:

Traffic event. The radio reads the

text message over the speakers or headset by using the
text-to-speech feature. While riding, the scroll feature for
the message is locked out.

8.

Select the map icon (4) to display the incident location on
the map.

4

3

1179249

Text-to-speech feature

3.

Map icon

4.

Figure 76. Traffic Message

BLUETOOTH

Enabling Bluetooth

NOTE

Bluetooth must be enabled before pairing or connecting with
Bluetooth devices.

1.

Navigate:

Home > Setup.

2.

Select:

Bluetooth Setup.

106 Audio

Information accurate as of January 28th, 2019. Go to https://serviceinfo.harley-davidson.com to check for the latest version.

3.

See Figure 77.

Select:

Bluetooth to enable. A checkmark

appears in the box.

1154887

Figure 77. Bluetooth Setup Menu

Pairing a Bluetooth Device

A maximum of six devices can be paired with the radio at one
time. However, the radio only maintains an active Bluetooth
connection with up to one device for phone service and one
device for media at a time.

The motorcycle identifies itself as "Boom! Box GTS". The name
for the Bluetooth device is specified within the settings for your
device.

NOTE

Phones may request permission to share information with
"Boom! Box GTS" (such as phone book contacts and text
messages). These requests may occur during the pairing
process or on other occasions when the phone is connecting
with the radio.

1.

In the Bluetooth-compatible device, enable Bluetooth and
set the device as discoverable. See the manual for your
device.

2.

Navigate:

Home > Setup.

3.

Select:

Bluetooth setup.

4.

Select:

List paired devices.

5.

Select:

Add a new device. All discoverable devices within

range appear in the list of found devices.

6.

Select device to be paired.

7.

The device displays a PIN code (auto-generated) and
prompts for permission to pair with the "Boom! Box GTS".
Allow pairing with the device.

8.

Select:

Yes. The radio attempts to pair and connect with

the device.

Audio 107

Information accurate as of January 28th, 2019. Go to https://serviceinfo.harley-davidson.com to check for the latest version.


Content      ..     2      3      4      5     ..