Mercury Sable (2009 year). Instruction - part 15


  Index      Mercury     Mercury Sable (2009 year) - instruction in english


Search            copyright infringement  


Content      ..     13      14      15      16     ..


Mercury Sable (2009 year). Instruction - part 15


If you do stall out, Do not try to turnaround because you might roll over.
It is better to back down to a safe location.

Apply just enough power to the wheels to climb the hill. Too much
power will cause the tires to slip, spin or lose traction, resulting in loss of
vehicle control.

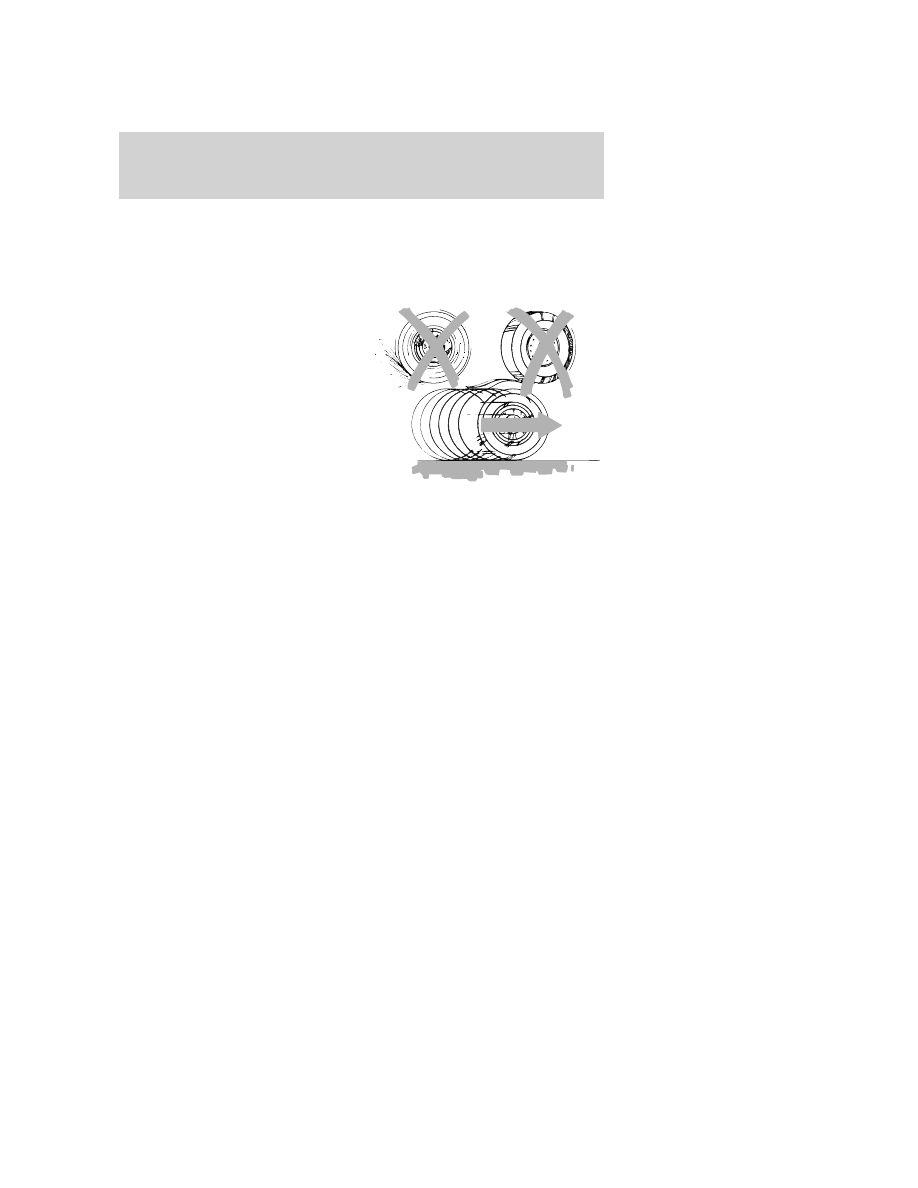
Descend a hill in the same gear you
would use to climb up the hill to
avoid excessive brake application
and brake overheating. Do not
descend in neutral; instead,
disengage overdrive or instructionly
shift to a lower gear. When
descending a steep hill, avoid
sudden hard braking as you could
lose control. The front wheels have
to be turning in order to steer the
vehicle.

Your vehicle has anti-lock brakes, therefore apply the brakes steadily. Do
not “pump” the brakes.

Driving on snow and ice

Note: Excessive tire slippage can cause transmission damage.

AWD vehicles have advantages over 2WD vehicles in snow and ice but
can skid like any other vehicle.

Should you start to slide while driving on snowy or icy roads, turn the
steering wheel in the direction of the slide until you regain control.

Avoid sudden applications of power and quick changes of direction on
snow and ice. Apply the accelerator slowly and steadily when starting
from a full stop.

Avoid sudden braking as well. Although an AWD vehicle may accelerate
better than a two-wheel drive vehicle in snow and ice, it won’t stop any
faster, because as in other vehicles, braking occurs at all four wheels. Do
not become overconfident as to road conditions.

Make sure you allow sufficient distance between you and other vehicles
for stopping. Drive slower than usual and consider using one of the lower
gears. In emergency stopping situations, apply the brake steadily. Since
your vehicle is equipped with a four wheel anti-lock brake system (ABS),
do not “pump” the brakes. Refer to the Brakes section of this chapter
for additional information on the operation of the anti-lock brake system.

2009 Sable (mgo)
Owners Guide, 2nd Printing
USA 
(fus)

Driving

225

-------------------------------------------------------------------------------------------------------------------------------------------------------------

Maintenance and Modifications

The suspension and steering systems on your vehicle have been designed
and tested to provide predictable performance whether loaded or empty
and durable load carrying capability. For this reason, Ford Motor
Company strongly recommends that you do not make modifications such
as adding or removing parts (such as lift kits or stabilizer bars) or by
using replacement parts not equivalent to the original factory equipment.

Any modifications to a vehicle that raise the center of gravity can make
it more likely the vehicle will rollover as a result of a loss of control.
Ford Motor Company recommends that caution be used with any vehicle
equipped with a high load or device (such as ladder or luggage racks).

Failure to maintain your vehicle properly may void the warranty, increase
your repair cost, reduce vehicle performance and operational capabilities
and adversely affect driver and passenger safety. Frequent inspection of
vehicle chassis components is recommended if the vehicle is subjected to
heavy off-highway usage.

DRIVING THROUGH WATER

If driving through deep or standing
water is unavoidable, proceed very
slowly especially when the depth is
not known. Never drive through
water that is higher than the bottom
of the wheel rims (for cars) or the
bottom of the hubs (for trucks).

When driving through water, traction or brake capability may be limited.
Also, water may enter your engine’s air intake and severely damage your
engine or your vehicle may stall. Driving through deep water where
the transmission vent tube is submerged may allow water into the
transmission and cause internal transmission damage.

Once through the water, always dry the brakes by moving your
vehicle slowly while applying light pressure on the brake pedal.
Wet brakes do not stop the vehicle as quickly as dry brakes.

2009 Sable (mgo)
Owners Guide, 2nd Printing
USA 
(fus)

Driving

226

-------------------------------------------------------------------------------------------------------------------------------------------------------------

ROADSIDE ASSISTANCE

Getting roadside assistance

To fully assist you should you have a vehicle concern, Ford Motor
Company offers a complimentary roadside assistance program. This
program is separate from the New Vehicle Limited Warranty. The service
is available:
• 24–hours, seven days a week
• for the coverage period listed on the Roadside Assistance Card

included in your Owner Guide portfolio.

Roadside assistance will cover:
• a flat tire change with a good spare (except vehicles that have been

supplied with a tire inflation kit)

• battery jump start
• lock-out assistance (key replacement cost is the customer’s

responsibility)

• fuel delivery – Independent Service Contractors, if not prohibited by

state, local or municipal law shall deliver up to 2.0 gallons (7.5L) of
gasoline or 5 gallons (18.9L) of diesel fuel to a disabled vehicle. Fuel
delivery service is limited to two no-charge occurrences within a
12-month period.

• winch out – available within 100 feet (30.5 meters) of a paved or

county maintained road, no recoveries.

• towing – Ford/Mercury/Lincoln eligible vehicle towed to an authorized

dealer within 35 miles (56.3 km) of the disablement location or to the
nearest authorized dealer. If a member requests to be towed to an
authorized dealer more than 35 miles (56.3 km) from the disablement
location, the member shall be responsible for any mileage costs in
excess of 35 miles (56.3 km).

Trailers shall be covered up to $200 if the disabled eligible vehicle
requires service at the nearest authorized dealer. If the trailer is disabled,
but the towing vehicle is operational, the trailer does not qualify for any
roadside services.

2009 Sable (mgo)
Owners Guide, 2nd Printing
USA 
(fus)

Roadside Emergencies

227

-------------------------------------------------------------------------------------------------------------------------------------------------------------

Canadian customers refer to your Customer Information Guide
for information on:
• coverage period
• exact fuel amounts
• towing of your disabled vehicle
• emergency travel expense reimbursement
• travel planning benefits
In Canada, for uninterrupted Roadside Assistance coverage, you may
purchase extended coverage prior to your Basic Warranty’s Roadside
Assistance expiring. For more information and enrollment, contact
1–877–294–2582 or visit our website at www.ford.ca.

Using roadside assistance

Complete the roadside assistance identification card and place it in your
wallet for quick reference. In the United States, this card is found in the
Owner Guide portfolio in the glove compartment. In Canada, the card is
found in the Customer Information Guide in the glove compartment.

U.S. Ford, Mercury and Lincoln vehicle customers who require Roadside
Assistance, call 1-800-241-3673.

Canadian customers who require roadside assistance, call
1-800-665-2006.

If you need to arrange roadside assistance for yourself, Ford Motor
Company will reimburse a reasonable amount for towing to the nearest
dealership within 35 miles. To obtain reimbursement information, U.S.
Ford, Mercury and Lincoln vehicle customers call 1-800-241-3673.
Customers will be asked to submit their original receipts.

Canadian customers who need to obtain reimbursement information, call
1–800–665–2006.

HAZARD FLASHER CONTROL

The hazard flasher control is located
on the instrument panel by the
radio. The hazard flashers will
operate when the ignition is in any
position or if the key is not in the
ignition.

Push in the flasher control and all front and rear direction signals will
flash. Press the flasher control again to turn them off. Use it when your
vehicle is disabled and is creating a safety hazard for other motorists.

2009 Sable (mgo)
Owners Guide, 2nd Printing
USA 
(fus)

Roadside Emergencies

228

-------------------------------------------------------------------------------------------------------------------------------------------------------------

Note: With extended use, the flasher may run down your battery.

FUEL PUMP SHUT-OFF SWITCH
This device stops the electric fuel pump from sending fuel to the engine
when your vehicle has had a substantial jolt.
After an accident, if the engine cranks but does not start, this switch
may have been activated.

The fuel pump shut-off switch is
located in the front passenger
footwell area in the right upper
corner.

To reset the switch:

1. Turn the ignition to the off
position.

2. Check the fuel system for leaks.

3. If no leaks are apparent, reset the
switch by pushing in on the reset
button.

4. Turn the ignition the on position.

5. Wait a few seconds and return
the key to the off position.

6. Make another check for leaks.

FUSES AND RELAYS

Fuses

If electrical components in the
vehicle are not working, a fuse may
have blown. Blown fuses are
identified by a broken wire within
the fuse. Check the appropriate
fuses before replacing any electrical
components.
Note: Always replace a fuse with one that has the specified amperage
rating. Using a fuse with a higher amperage rating can cause severe wire
damage and could start a fire.

15

2009 Sable (mgo)
Owners Guide, 2nd Printing
USA 
(fus)

Roadside Emergencies

229

-------------------------------------------------------------------------------------------------------------------------------------------------------------

Standard fuse amperage rating and color

COLOR

Fuse

rating

Mini

fuses

Standard

fuses

Maxi

fuses

Cartridge

maxi

fuses

Fuse link

cartridge

2A

Grey

Grey

3A

Violet

Violet

4A

Pink

Pink

5A

Tan

Tan

7.5A

Brown

Brown

10A

Red

Red

15A

Blue

Blue

20A

Yellow

Yellow

Yellow

Blue

Blue

25A

Natural

Natural

30A

Green

Green

Green

Pink

Pink

40A

Orange

Green

Green

50A

Red

Red

Red

60A

Blue

Yellow

Yellow

70A

Tan

Brown

80A

Natural

Black

Black

2009 Sable (mgo)
Owners Guide, 2nd Printing
USA 
(fus)

Roadside Emergencies

230

-------------------------------------------------------------------------------------------------------------------------------------------------------------

Passenger compartment fuse panel

The fuse panel is located under the instrument panel to the left of the
steering wheel.

The fuses are coded as follows.

Fuse/Relay

Location

Fuse Amp

Rating

Protected Circuits

1

30A

Smart window motor

2

15A

Brake on/off switch,
High-mounted brake lamp

3

15A

SDARS, Bluetooth, Family
entertainment system (FES)/Rear
seat control

4

30A

Not used (spare)

5

10A

SPDJB logic power

6

20A

Turn signals

7

10A

Low beam headlamps (left)

2009 Sable (mgo)
Owners Guide, 2nd Printing
USA 
(fus)

Roadside Emergencies

231

-------------------------------------------------------------------------------------------------------------------------------------------------------------

Fuse/Relay

Location

Fuse Amp

Rating

Protected Circuits

8

10A

Low beam headlamps (right)

9

15A

Interior lights, Cargo lamps

10

15A

Backlighting, Puddle lamps

11

10A

All wheel drive

12

7.5A

Memory seat/mirror switches,
Memory module

13

5A

FEPS module

14

10A

Analog clock

15

10A

Climate control

16

15A

Not used (spare)

17

20A

All power lock motor feeds,
Decklid release

18

20A

Not used (spare)

19

25A

Moon roof

20

15A

OBDII connector

21

15A

Fog lamps

22

15A

Park lamps, License lamps

23

15A

High beam headlamps

24

20A

Horn relay

25

10A

Demand lamps/Interior lamps

26

10A

Instrument panel cluster

27

20A

Adjustable pedal switch

28

5A

Radio, Radio start signal

29

5A

Instrument panel cluster

30

5A

Overdrive cancel switch

31

10A

Not used (spare)

32

10A

Not used (spare)

33

10A

Restraint control module

34

5A

AWD module

35

10A

Steering rotation sensor, FEPS,
Rear park assist, Heated seat
modules

2009 Sable (mgo)
Owners Guide, 2nd Printing
USA 
(fus)

Roadside Emergencies

232

-------------------------------------------------------------------------------------------------------------------------------------------------------------

Fuse/Relay

Location

Fuse Amp

Rating

Protected Circuits

36

5A

PATS module

37

10A

Climate control

38

20A

Subwoofer (Audiophile radio)

39

20A

Radio

40

20A

Spare

41

15A

Moon roof, Front lock switches,
Radio, EC Mirror with compass
(with and without microphone)

42

10A

Not used (spare)

43

10A

Not used (spare)

44

10A

Not used (spare)

45

5A

Relay coils: PDB, Auxiliary A/C,
Front and rear wipers, Front
blower motor

46

7.5A

Occupant Classification Sensor
(OCS), Passenger Airbag
Deactivation Indicator (PADI)

47

30A Circuit

Breaker

Power windows

48

Delayed accessory relay

Power distribution box

The power distribution box is located in the engine compartment. The
power distribution box contains high-current fuses that protect your
vehicle’s main electrical systems from overloads.

WARNING: Always disconnect the battery before servicing high
current fuses.

WARNING: To reduce risk of electrical shock, always replace
the cover to the Power Distribution Box before reconnecting the

battery or refilling fluid reservoirs.

If the battery has been disconnected and reconnected, refer to the
Battery section of the Maintenance and Specifications chapter.

2009 Sable (mgo)
Owners Guide, 2nd Printing
USA 
(fus)

Roadside Emergencies

233

-------------------------------------------------------------------------------------------------------------------------------------------------------------

The high-current fuses are coded as follows:

Fuse/Relay

Location

Fuse Amp

Rating

Protected Circuits

1

80A*

SPDJB power

2

80A*

SPDJB power

3

30A*

Front wipers

4

Not used

5

Not used

6

Not used

7

50A*

Engine cooling fan

8

Not used

9

40A*

Anti-lock Brake System
(ABS)/AdvanceTrac pump

10

30A*

Starter

11

50A*

Powertrain Control Module (PCM)
relay

12

20A*

ABS/AdvanceTrac valve

13

20A**

Power point (instrument panel)

14

20A**

Power point (2nd row)

15

Not used

2009 Sable (mgo)
Owners Guide, 2nd Printing
USA 
(fus)

Roadside Emergencies

234

-------------------------------------------------------------------------------------------------------------------------------------------------------------

Fuse/Relay

Location

Fuse Amp

Rating

Protected Circuits

16

20A**

Power point (console)

17

10A**

Alternator

18

Not used

19

Not used

20

40A*

Rear defroster

21

30A*

Power seat motors (passenger)

22

20A*

Heated seat module

23

10A**

PCM Keep alive power, Canister
vent

24

10A**

A/C clutch relay

25

Not used

26

20A**

Backup relay

27

15A**

Fuel relay (Fuel pump driver
module, Fuel pump)

28

Not used

29

Not used

30

Not used

31

Not used

32

30A*

Driver seat motors, Memory
module

33

20A*

Ignition switch (to SJB)

34

Not used

35

40A*

Front A/C blower motor

36

1A Diode

One-touch start

37

1A Diode

Fuel pump

38

10A**

IVD, Yaw rate sensor

39

10A**

Fuel diode, PCM

40

Not used

41

G8VA relay

A/C clutch

42

G8VA relay

Fuel pump

43

G8VA relay

Backup

2009 Sable (mgo)
Owners Guide, 2nd Printing
USA 
(fus)

Roadside Emergencies

235

-------------------------------------------------------------------------------------------------------------------------------------------------------------

Fuse/Relay

Location

Fuse Amp

Rating

Protected Circuits

44

Not used

45

10A**

Speed control deactivate switch,
Mass air flow sensor, Inline
module VPWR2

46

10A**

A/C clutch relay, VPWR3

47

15A**

PCM VPWR1

48

15A**

PCM VPWR4

49

15A**

Heated mirrors

50

Full ISO relay

PCM relay

51

Not used

52

Not used

53

Full ISO relay

Rear defrost relay

54

Full ISO relay

Blower motor relay

55

Full ISO relay

Starter relay

56

Not used

57

Full ISO relay

Front wiper relay

58

Not used

* Cartridge Fuses ** Mini Fuses

CHANGING THE TIRES

If you get a flat tire while driving:
• do not brake heavily.
• gradually decrease the vehicle’s speed.
• hold the steering wheel firmly.
• slowly move to a safe place on the side of the road.
Note: The tire pressure monitoring system (TPMS) indicator light will
illuminate when the spare is in use. To restore the full functionality of
the monitoring system, all road wheels equipped with tire pressure
monitoring sensors must be mounted on the vehicle.

Have a flat serviced by an authorized dealer in order to prevent damage
to the TPMS sensor, refer to Changing tires with TPMS in the Tires,
Wheels and Loading 
chapter. Replace the spare tire with a road tire as
soon as possible.

2009 Sable (mgo)
Owners Guide, 2nd Printing
USA 
(fus)

Roadside Emergencies

236

-------------------------------------------------------------------------------------------------------------------------------------------------------------

WARNING: The use of tire sealants may damage your Tire
Pressure Monitoring System and should not be used.

WARNING: Refer to Tire Pressure Monitoring System (TPMS)
in the Tires, Wheels and Loading chapter for important

information. If the tire pressure monitor sensor becomes damaged, it
will no longer function.

Dissimilar spare tire/wheel information

WARNING: Failure to follow these guidelines could result in an
increased risk of loss of vehicle control, injury or death.

If you have a dissimilar spare tire/wheel, then it is intended for
temporary use only. This means that if you need to use it, you should
replace it as soon as possible with a road tire/wheel that is the same size
and type as the road tires and wheels that were originally provided by
Ford. If the dissimilar spare tire or wheel is damaged, it should be
replaced rather than repaired.

A dissimilar spare tire/wheel is defined as a spare tire and/or wheel that
is different in brand, size or appearance from the road tires and wheels
and can be one of three types:

1. T-type mini-spare: This spare tire begins with the letter “T” for tire
size and may have “Temporary Use Only” molded in the sidewall

2. Full-size dissimilar spare with label on wheel: This spare tire has
a label on the wheel that states: “THIS TIRE AND WHEEL FOR
TEMPORARY USE ONLY”

When driving with one of the dissimilar spare tires listed above, do not:
• Exceed 50 mph (80 km/h)
• Load the vehicle beyond maximum vehicle load rating listed on the

Safety Compliance Label

• Tow a trailer
• Use snow chains on the end of the vehicle with the dissimilar spare

tire

• Use more than one dissimilar spare tire at a time
• Use commercial car washing equipment
• Try to repair the dissimilar spare tire

2009 Sable (mgo)
Owners Guide, 2nd Printing
USA 
(fus)

Roadside Emergencies

237

-------------------------------------------------------------------------------------------------------------------------------------------------------------

Use of one of the dissimilar spare tires listed above at any one wheel
location can lead to impairment of the following:

• Handling, stability and braking performance
• Comfort and noise
• Ground clearance and parking at curbs
• Winter weather driving capability
• Wet weather driving capability
3. Full-size dissimilar spare without label on wheel

When driving with the full-size dissimilar spare tire/wheel, do not:

• Exceed 70 mph (113 km/h)
• Use more than one dissimilar spare tire/wheel at a time
• Use commercial car washing equipment
• Use snow chains on the end of the vehicle with the dissimilar spare

tire/wheel

The usage of a full-size dissimilar spare tire/wheel can lead to
impairment of the following:
• Handling, stability and braking performance
• Comfort and noise
• Ground clearance and parking at curbs
• Winter weather driving capability
• Wet weather driving capability
• All-Wheel driving capability (if applicable)
• Load leveling adjustment (if applicable)
When driving with the full-size dissimilar spare tire/wheel additional
caution should be given to:
• Towing a trailer
• Driving vehicles equipped with a camper body
• Driving vehicles with a load on the cargo rack
Drive cautiously when using a full-size dissimilar spare tire/wheel and
seek service as soon as possible.

2009 Sable (mgo)
Owners Guide, 2nd Printing
USA 
(fus)

Roadside Emergencies

238

-------------------------------------------------------------------------------------------------------------------------------------------------------------

Stopping and securing the vehicle

1. Park on a level surface, set the
parking brake and activate hazard
flashers.

2. Place gearshift lever in P (Park)
and turn engine off.

Removing the spare tire and jack

1. Lift the trunk cargo cover, and
remove the wing nut that secures
the spare tire by turning it
counterclockwise.

2. Lift and remove the spare tire
from the trunk.

3. Remove the second wing nut that
secures the jack retention bracket
by turning it counterclockwise,
remove the jack kit from the
vehicle.

4. Remove the jack and the wrench
from the felt bag. Fold down the
wrench socket to use to loosen the
lug nuts and to operate the jack.

Tire change procedure

WARNING: When one of the front wheels is off the ground, the
transmission alone will not prevent the vehicle from moving or

slipping off the jack, even if the vehicle is in P (Park).

2009 Sable (mgo)
Owners Guide, 2nd Printing
USA 
(fus)

Roadside Emergencies

239

-------------------------------------------------------------------------------------------------------------------------------------------------------------

WARNING: To help prevent the vehicle from moving when you
change a tire, be sure to place the transmission in P (Park), set

the parking brake and block (in both directions) the wheel that is
diagonally opposite (other side and end of the vehicle) to the tire
being changed.

WARNING: If the vehicle slips off the jack, you or someone else
could be seriously injured.

WARNING: Do not attempt to change a tire on the side of the
vehicle close to moving traffic. Pull far enough off the road to

avoid the danger of being hit when operating the jack or changing the
wheel.

1. Block the diagonally opposite
wheel.

2. Remove wheel cover (if
equipped) with the lug wrench tip
and loosen each wheel lug nut
one-half turn counterclockwise but
do not remove them until the wheel
is raised off the ground.

WARNING: To lessen the risk of personal injury, do not put any
part of your body under the vehicle while changing a tire. Do not

start the engine when your vehicle is on the jack. The jack is only
meant for changing the tire.

2009 Sable (mgo)
Owners Guide, 2nd Printing
USA 
(fus)

Roadside Emergencies

240

-------------------------------------------------------------------------------------------------------------------------------------------------------------


Content      ..     13      14      15      16     ..