Ford Mondeo (petrol engines). Manual - part 111


  Index      Ford     Ford Mondeo - service and repair manual (petrol engines)


Search            


Content   ..  109  110  111  112   ..


Ford Mondeo (petrol engines). Manual - part 111


Chapter 11 Bodywork and fittings

Body side-trim mouldings and adhesive emblems - removal 

and refitting  . . . . . . . . . . . . . . . . . . . . . . . . . . . . . . . . . . . . . . . . . . 25

Bonnet - removal, refitting and adjustment . . . . . . . . . . . . . . . . . . . .

8

Bonnet lock - removal, refitting and adjustment  . . . . . . . . . . . . . . . . 10
Bonnet release cable and lever - removal and refitting . . . . . . . . . . .

9

Boot lid - removal and refitting  . . . . . . . . . . . . . . . . . . . . . . . . . . . . . 18
Boot lid lock components - removal and refitting . . . . . . . . . . . . . . . 19
Bumpers - removal and refitting  . . . . . . . . . . . . . . . . . . . . . . . . . . . .

6

Central locking system components - testing, removal and refitting  . 23
Centre console - removal and refitting  . . . . . . . . . . . . . . . . . . . . . . . 30
Door - removal and refitting  . . . . . . . . . . . . . . . . . . . . . . . . . . . . . . . 15
Door handle and lock components - removal and refitting . . . . . . . . 14
Door inner trim panel - removal and refitting  . . . . . . . . . . . . . . . . . . 11
Door window glass - removal and refitting  . . . . . . . . . . . . . . . . . . . . 12
Door window regulator - removal and refitting  . . . . . . . . . . . . . . . . . 13
Exterior mirror and glass - removal and refitting . . . . . . . . . . . . . . . . 16
Facia - removal and refitting  . . . . . . . . . . . . . . . . . . . . . . . . . . . . . . . 33
General information . . . . . . . . . . . . . . . . . . . . . . . . . . . . . . . . . . . . . .

1

Glovebox - removal and refitting . . . . . . . . . . . . . . . . . . . . . . . . . . . . 32
Interior mirror - removal and refitting  . . . . . . . . . . . . . . . . . . . . . . . . 17
Interior trim panels - removal and refitting  . . . . . . . . . . . . . . . . . . . . 29
Maintenance - bodywork and underframe  . . . . . . . . . . . . . . . . . . . .

2

Maintenance - upholstery and carpets  . . . . . . . . . . . . . . . . . . . . . . .

3

Major body damage - repair  . . . . . . . . . . . . . . . . . . . . . . . . . . . . . . .

5

Minor body damage - repair  . . . . . . . . . . . . . . . . . . . . . . . . . . . . . . .

4

Overhead console - removal and refitting  . . . . . . . . . . . . . . . . . . . . . 31
Radiator grille - removal and refitting  . . . . . . . . . . . . . . . . . . . . . . . .

7

Seat belts - removal and refitting  . . . . . . . . . . . . . . . . . . . . . . . . . . . 28
Seats - removal and refitting  . . . . . . . . . . . . . . . . . . . . . . . . . . . . . . . 27
Sunroof - general information and adjustment  . . . . . . . . . . . . . . . . . 26
Tailgate - removal and refitting  . . . . . . . . . . . . . . . . . . . . . . . . . . . . . 20
Tailgate lock components - removal and refitting . . . . . . . . . . . . . . . 22
Tailgate support strut - removal and refitting  . . . . . . . . . . . . . . . . . . 21
Wheel arch liner - removal and refitting  . . . . . . . . . . . . . . . . . . . . . . 34
Windscreen and fixed windows - removal and refitting  . . . . . . . . . . 24

Torque wrench settings

Nm

lbf ft

Bonnet and tailgate hinges  . . . . . . . . . . . . . . . . . . . . . . . . . . . . . . . . . . .

24

18

Boot lid  . . . . . . . . . . . . . . . . . . . . . . . . . . . . . . . . . . . . . . . . . . . . . . . . . .

10

7

Front seat mounting bolts  . . . . . . . . . . . . . . . . . . . . . . . . . . . . . . . . . . . .

38

28

Seat belt mounting nuts and bolts  . . . . . . . . . . . . . . . . . . . . . . . . . . . . .

38

28

Bumper mounting nuts  . . . . . . . . . . . . . . . . . . . . . . . . . . . . . . . . . . . . . .

10

7

11•1

Easy, suitable for
novice with little
experience

Fairly easy, suitable
for beginner with
some experience

Fairly difficult, suitable
for competent DIY
mechanic

Difficult, suitable for
experienced  DIY
mechanic

Very difficult,
suitable for expert DIY
or  professional

Degrees of difficulty

Specifications

Contents

11

The bodyshell and underframe on all

models is of all-steel welded construction,
incorporating progressive crumple zones at
the front and rear, and a rigid centre safety
cell. The bulkhead behind the engine
compartment incorporates crash grooves
which determine its energy-absorption
characteristics, and special beams to prevent
the intrusion of the front wheels into the
passenger compartment during a serious
accident. All passenger doors incorporate
side impact bars.

All sheet metal surfaces which are prone to

corrosion are galvanized. The painting
process includes a base colour which closely
matches the final topcoat, so that any stone
damage is not noticeable.

Hatchback, Saloon and Estate versions are

available. The front section of the vehicle up to
the “B” pillar is identical on all models.

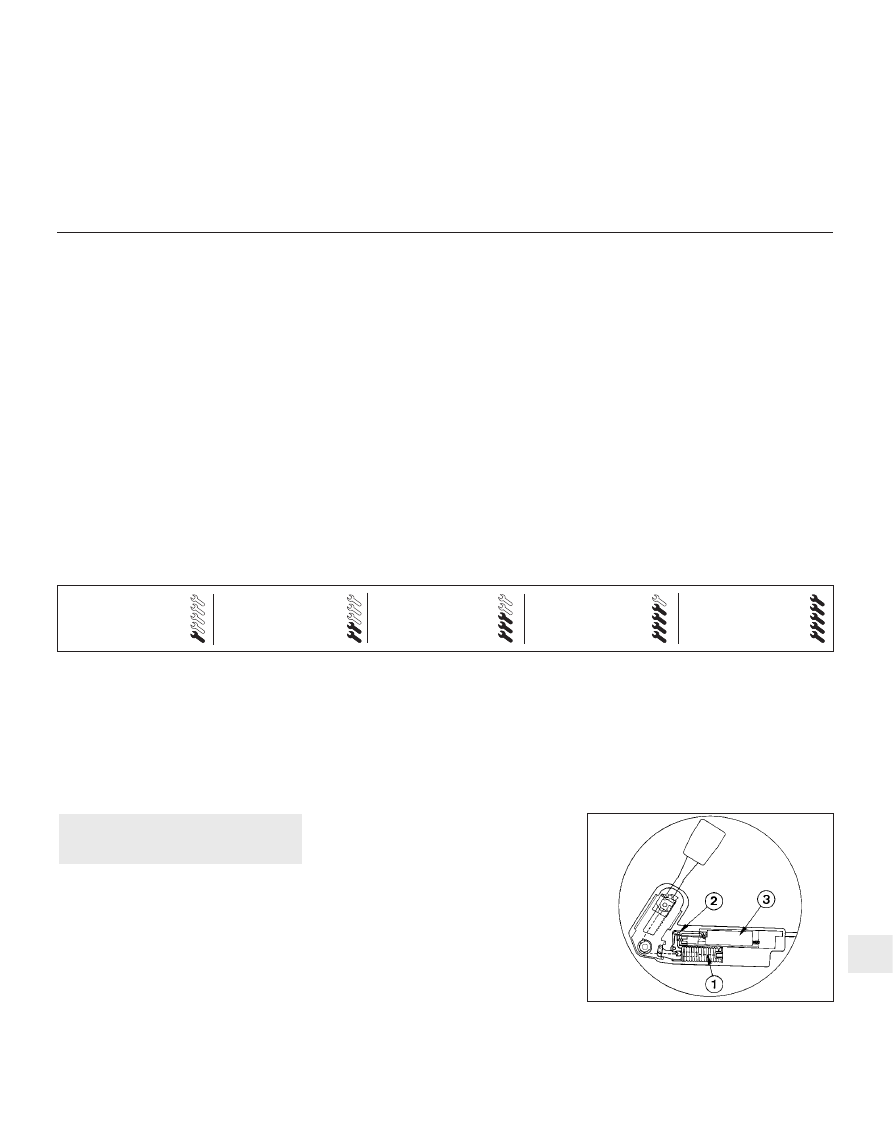
Automatic seat belts are fitted to all models,

and the front seat belt stalks are mounted on
automatic tensioners (also known as
“grabbers”) 

(see illustration). In the event of a

serious front impact, a spring mass sensor
releases a coil spring which pulls the stalk
buckle downwards and tensions the seat belt.
It is not possible to reset the tensioner once
fired, and it must therefore be renewed.

In the UK, central locking is standard on all

1 General information

1.4  Automatic seat belt tensioner

1  Coil spring

3  Spring mass sensor

2  Lever system

models (see illustration). In other countries, it
is available on certain models only. Where
double-locking is fitted, the lock mechanism
is disconnected (when the system is in use)
from the interior door handles, making it
impossible to open any of the doors or the
tailgate/bootlid from inside the vehicle. This
means that, even if a thief should break a side
window, he will not be able to open the door
using the interior handle. Models with the
double-locking system are fitted with a
control module located beneath the facia on
the right-hand side. In the event of a serious
accident, a crash sensor unlocks all doors if
they were previously locked.

Many of the procedures in this Chapter

require the battery to be disconnected. Refer
to Chapter 5, Section 1 first.

The general condition of a vehicle’s

bodywork is the one thing that significantly
affects its value. Maintenance is easy, but
needs to be regular. Neglect, particularly after
minor damage, can lead quickly to further
deterioration and costly repair bills. It is
important also to keep watch on those parts
of the vehicle not immediately visible, for
instance the underside, inside all the wheel
arches, and the lower part of the engine
compartment.

The basic maintenance routine for the

bodywork is washing - preferably with a lot of
water, from a hose. This will remove all the
loose solids which may have stuck to the
vehicle. It is important to flush these off in
such a way as to prevent grit from scratching
the finish. The wheel arches and underframe
need washing in the same way, to remove any
accumulated mud, which will retain moisture
and tend to encourage rust. Paradoxically
enough, the best time to clean the underframe
and wheel arches is in wet weather, when the
mud is thoroughly wet and soft. In very wet
weather, the underframe is usually cleaned of
large accumulations automatically, and this is
a good time for inspection.

Periodically, except on vehicles with a wax-

based underbody protective coating, it is a
good idea to have the whole of the
underframe of the vehicle steam-cleaned,
engine compartment included, so that a
thorough inspection can be carried out to see
what minor repairs and renovations are
necessary. Steam-cleaning is available at
many garages, and is necessary for the
removal of the accumulation of oily grime,
which sometimes is allowed to become thick
in certain areas. If steam-cleaning facilities are
not available, there are some excellent grease
solvents available which can be brush-
applied; the dirt can then be simply hosed off.
Note that these methods should not be used
on vehicles with wax-based underbody

protective coating, or the coating will be
removed. Such vehicles should be inspected
annually, preferably just prior to Winter, when
the underbody should be washed down, and
any damage to the wax coating repaired.
Ideally, a completely fresh coat should be
applied. It would also be worth considering
the use of such wax-based protection for
injection into door panels, sills, box sections,
etc, as an additional safeguard against rust
damage, where such protection is not
provided by the vehicle manufacturer.

After washing paintwork, wipe off with a

chamois leather to give an unspotted clear
finish. A coat of clear protective wax polish
will give added protection against chemical
pollutants in the air. If the paintwork sheen

has dulled or oxidised, use a cleaner/polisher
combination to restore the brilliance of the
shine. This requires a little effort, but such
dulling is usually caused because regular
washing has been neglected. Care needs to
be taken with metallic paintwork, as special
non-abrasive cleaner/polisher is required to
avoid damage to the finish. Always check that
the door and ventilator opening drain holes
and pipes are completely clear, so that water
can be drained out. Brightwork should be
treated in the same way as paintwork.
Windscreens and windows can be kept clear
of the smeary film which often appears, by the
use of proprietary glass cleaner. Never use
any form of wax or other body or chromium
polish on glass.

2 Maintenance 

bodywork and underframe

11•2 Bodywork and fittings

1.5  Central locking component locations

1  Indicator light
2  Buzzer
3  Central locking module

4  Infra-red receiver
5  Lock motor
6  Set/reset switch

7  Ajar switch
8  Infra-red transmitter

Mats and carpets should be brushed or

vacuum-cleaned regularly, to keep them free
of grit. If they are badly stained, remove them
from the vehicle for scrubbing or sponging,
and make quite sure they are dry before
refitting. Seats and interior trim panels can be
kept clean by wiping with a damp cloth. If they
do become stained (which can be more
apparent on light-coloured upholstery), use a
little liquid detergent and a soft nail brush to
scour the grime out of the grain of the
material. Do not forget to keep the headlining
clean in the same way as the upholstery.
When using liquid cleaners inside the vehicle,
do not over-wet the surfaces being cleaned.
Excessive damp could get into the seams and
padded interior, causing stains, offensive
odours or even rot.

Note: For more detailed information about
bodywork repair, Haynes Publishing produce
a book by Lindsay Porter called “The Car
Bodywork Repair Manual”. This incorporates
information on such aspects as rust treatment,
painting and glass-fibre repairs, as well as
details on more ambitious repairs involving
welding and panel beating.

Repairs of minor scratches in
bodywork

If the scratch is very superficial, and does

not penetrate to the metal of the bodywork,
repair is very simple. Lightly rub the area of
the scratch with a paintwork renovator, or a
very fine cutting paste, to remove loose paint
from the scratch, and to clear the surrounding
bodywork of wax polish. Rinse the area with
clean water.

Apply touch-up paint to the scratch using a

fine paint brush; continue to apply fine layers
of paint until the surface of the paint in the
scratch is level with the surrounding
paintwork. Allow the new paint at least two
weeks to harden, then blend it into the
surrounding paintwork by rubbing the scratch
area with a paintwork renovator or a very fine
cutting paste. Finally, apply wax polish.

Where the scratch has penetrated right

through to the metal of the bodywork, causing

the metal to rust, a different repair technique
is required. Remove any loose rust from the
bottom of the scratch with a penknife, then
apply rust-inhibiting paint to prevent the
formation of rust in the future. Using a rubber
or nylon applicator, fill the scratch with
bodystopper paste. If required, this paste can
be mixed with cellulose thinners to provide a
very thin paste which is ideal for filling narrow
scratches. Before the stopper-paste in the
scratch hardens, wrap a piece of smooth
cotton rag around the top of a finger. Dip the
finger in cellulose thinners, and quickly sweep
it across the surface of the stopper-paste in
the scratch; this will ensure that the surface of
the stopper-paste is slightly hollowed. The
scratch can now be painted over as described
earlier in this Section.

Repairs of dents in bodywork

When deep denting of the vehicle’s

bodywork has taken place, the first task is to
pull the dent out, until the affected bodywork
almost attains its original shape. There is little
point in trying to restore the original shape
completely, as the metal in the damaged area
will have stretched on impact, and cannot be
reshaped fully to its original contour. It is
better to bring the level of the dent up to a
point which is about 3 mm below the level of
the surrounding bodywork. In cases where the
dent is very shallow anyway, it is not worth
trying to pull it out at all. If the underside of the
dent is accessible, it can be hammered out
gently from behind, using a mallet with a
wooden or plastic head. Whilst doing this,
hold a suitable block of wood firmly against
the outside of the panel, to absorb the impact
from the hammer blows and thus prevent a
large area of the bodywork from being
“belled-out”.

Should the dent be in a section of the

bodywork which has a double skin, or some
other factor making it inaccessible from
behind, a different technique is called for. Drill
several small holes through the metal inside
the area - particularly in the deeper section.
Then screw long self-tapping screws into the
holes, just sufficiently for them to gain a good
purchase in the metal. Now the dent can be
pulled out by pulling on the protruding heads
of the screws with a pair of pliers.

The next stage of the repair is the removal

of the paint from the damaged area, and from
an inch or so of the surrounding “sound”
bodywork. This is accomplished most easily
by using a wire brush or abrasive pad on a
power drill, although it can be done just as
effectively by hand, using sheets of abrasive
paper. To complete the preparation for filling,
score the surface of the bare metal with a
screwdriver or the tang of a file, or
alternatively, drill small holes in the affected
area. This will provide a really good “key” for
the filler paste.

To complete the repair, see the Section on

filling and respraying.

Repairs of rust holes or gashes in
bodywork

Remove all paint from the affected area,

and from an inch or so of the surrounding
“sound” bodywork, using an abrasive pad or a
wire brush on a power drill. If these are not
available, a few sheets of abrasive paper will
do the job most effectively. With the paint
removed, you will be able to judge the severity
of the corrosion, and therefore decide
whether to renew the whole panel (if this is
possible) or to repair the affected area. New
body panels are not as expensive as most
people think, and it is often quicker and more
satisfactory to fit a new panel than to attempt
to repair large areas of corrosion.

Remove all fittings from the affected area,

except those which will act as a guide to the
original shape of the damaged bodywork (eg
headlight shells etc). Then, using tin snips or a
hacksaw blade, remove all loose metal and any
other metal badly affected by corrosion.
Hammer the edges of the hole inwards, in order
to create a slight depression for the filler paste.

Wire-brush the affected area to remove the

powdery rust from the
surface of the remaining metal. Paint the
affected area with rust-inhibiting paint, if the
back of the rusted area is accessible, treat
this also.

Before filling can take place, it will be

necessary to block the hole in some way. This
can be achieved by the use of aluminium or
plastic mesh, or aluminium tape.

Aluminium or plastic mesh, or glass-fibre

matting, is probably the best material to use
for a large hole. Cut a piece to the
approximate size and shape of the hole to be
filled, then position it in the hole so that its
edges are below the level of the surrounding
bodywork. It can be retained in position by
several blobs of filler paste around its
periphery.

Aluminium tape should be used for small or

very narrow holes. Pull a piece off the roll, trim
it to the approximate size and shape required,
then pull off the backing paper (if used) and
stick the tape over the hole; it can be
overlapped if the thickness of one piece is
insufficient. Burnish down the edges of the
tape with the handle of a screwdriver or
similar, to ensure that the tape is securely
attached to the metal underneath.

Bodywork repairs - filling and
respraying

Before using this Section, see the Sections

on dent, deep scratch, rust holes and gash
repairs.

Many types of bodyfiller are available, but

generally speaking, those proprietary kits
which contain a tin of filler paste and a tube of
resin hardener are best for this type of repair.
A wide, flexible plastic or nylon applicator will
be found invaluable for imparting a smooth
and well-contoured finish to the surface of the
filler.

4 Minor body damage - repair

3 Maintenance 

upholstery and carpets

Bodywork and fittings  11•3

11

If the inside of the vehicle
gets wet accidentally, it is
worthwhile taking some
trouble to dry it out properly,

particularly where carpets are involved.
Do not leave oil or electric heaters
inside the vehicle for this purpose.

Mix up a little filler on a clean piece of card

or board - measure the hardener carefully
(follow the maker’s manuals on the pack),
otherwise the filler will set too rapidly or too
slowly. Using the applicator, apply the filler
paste to the prepared area; draw the
applicator across the surface of the filler to
achieve the correct contour and to level the
surface. As soon as a contour that
approximates to the correct one is achieved,
stop working the paste - if you carry on too
long, the paste will become sticky and begin
to “pick-up” on the applicator. Continue to
add thin layers of filler paste at 20-minute
intervals, until the level of the filler is just
proud of the surrounding bodywork.

Once the filler has hardened, the excess

can be removed using a metal plane or file.
From then on, progressively-finer grades of
abrasive paper should be used, starting with a
40-grade production paper, and finishing with
a 400-grade wet-and-dry paper. Always wrap
the abrasive paper around a flat rubber, cork,
or wooden block - otherwise the surface of
the filler will not be completely flat. During the
smoothing of the filler surface, the wet-and-
dry paper should be periodically rinsed in
water. This will ensure that a very smooth
finish is imparted to the filler at the final stage.

At this stage, the “dent” should be

surrounded by a ring of bare metal, which in
turn should be encircled by the finely
“feathered” edge of the good paintwork.
Rinse the repair area with clean water, until all
of the dust produced by the rubbing-down
operation has gone.

Spray the whole area with a light coat of

primer - this will show up any imperfections in
the surface of the filler. Repair these
imperfections with fresh filler paste or
bodystopper, and once more smooth the
surface with abrasive paper. Repeat this
spray-and-repair procedure until you are
satisfied that the surface of the filler, and the
feathered edge of the paintwork, are perfect.
Clean the repair area with clean water, and
allow to dry fully. 

The repair area is now ready for final

spraying. Paint spraying must be carried out
in a warm, dry, windless and dust-free
atmosphere. This condition can be created
artificially if you have access to a large indoor
working area, but if you are forced to work in
the open, you will have to pick your day very
carefully. If you are working indoors, dousing
the floor in the work area with water will help
to settle the dust which would otherwise be in
the atmosphere. If the repair area is confined
to one body panel, mask off the surrounding
panels; this will help to minimise the effects of

a slight mis-match in paint colours. Bodywork
fittings (eg chrome strips, door handles etc)
will also need to be masked off. Use genuine
masking tape, and several thicknesses of
newspaper, for the masking operations.

Before commencing to spray, agitate the

aerosol can thoroughly, then spray a test area
(an old tin, or similar) until the technique is
mastered. Cover the repair area with a thick
coat of primer; the thickness should be built
up using several thin layers of paint, rather
than one thick one. Using 400-grade wet-and-
dry paper, rub down the surface of the primer
until it is really smooth. While doing this, the
work area should be thoroughly doused with
water, and the wet-and-dry paper periodically
rinsed in water. Allow to dry before spraying
on more paint.

Spray on the top coat, again building up the

thickness by using several thin layers of paint.
Start spraying at one edge of the repair area,
and then, using a side-to-side motion, work
until the whole repair area and about 2 inches
of the surrounding original paintwork is
covered. Remove all masking material 10 to
15 minutes after spraying on the final coat of
paint.

Allow the new paint at least two weeks to

harden, then, using a paintwork renovator, or
a very fine cutting paste, blend the edges of
the paint into the existing paintwork. Finally,
apply wax polish.

Plastic components

With the use of more and more plastic body

components by the vehicle manufacturers (eg
bumpers. spoilers, and in some cases major
body panels), rectification of more serious
damage to such items has become a matter
of either entrusting repair work to a specialist
in this field, or renewing complete
components. Repair of such damage by the
DIY owner is not really feasible, owing to the
cost of the equipment and materials required
for effecting such repairs. The basic technique
involves making a groove along the line of the
crack in the plastic, using a rotary burr in a
power drill. The damaged part is then welded
back together, using a hot-air gun to heat up
and fuse a plastic filler rod into the groove.
Any excess plastic is then removed, and the
area rubbed down to a smooth finish. It is
important that a filler rod of the correct plastic
is used, as body components can be made of
a variety of different types (eg polycarbonate,
ABS, polypropylene).

Damage of a less serious nature (abrasions,

minor cracks etc) can be repaired by the DIY
owner using a two-part epoxy filler repair
material. Once mixed in equal proportions,
this is used in similar fashion to the bodywork
filler used on metal panels. The filler is usually
cured in twenty to thirty minutes, ready for
sanding and painting.

If the owner is renewing a complete

component himself, or if he has repaired it
with epoxy filler, he will be left with the

problem of finding a suitable paint for finishing
which is compatible with the type of plastic
used. At one time, the use of a universal paint
was not possible, owing to the complex range
of plastics encountered in body component
applications. Standard paints, generally
speaking, will not bond to plastic or rubber
satisfactorily. However, it is now possible to
obtain a plastic body parts finishing kit which
consists of a pre-primer treatment, a primer
and coloured top coat. Full manuals are
normally supplied with a kit, but basically, the
method of use is to first apply the pre-primer
to the component concerned, and allow it to
dry for up to 30 minutes. Then the primer is
applied, and left to dry for about an hour
before finally applying the special-coloured
top coat. The result is a correctly-coloured
component, where the paint will flex with the
plastic or rubber, a property that standard
paint does not normally posses.

Where serious damage has occurred, or

large areas need renewal due to neglect, it
means that complete new panels will need
welding-in; this is best left to professionals. If
the damage is due to impact, it will also be
necessary to check completely the alignment
of the bodyshell; this can only be carried out
accurately by a Ford dealer, using special jigs.
If the body is left misaligned, it is primarily
dangerous, as the car will not handle properly,
and secondly, uneven stresses will be
imposed on the steering, suspension and
possibly transmission, causing abnormal wear
or complete failure, particularly to items such
as the tyres.

Removal

Front bumper

Apply the handbrake, jack up the front of
the vehicle and support it on axle stands.
Where applicable, remove the foglights
from the front bumper (Chapter 12).
Where applicable, disconnect the tubing
from the headlight washer jets.
Unscrew the screws securing the wheel
arch liners to the front bumper (see
illustration)
.
Unscrew the bumper mounting nuts, and
withdraw the bumper forwards from the
vehicle, at the same time disconnecting the
guides from the side pins (see illustrations).

Rear bumper

Chock the front wheels, jack up the rear of
the vehicle and support it on axle stands.

6 Bumpers - removal and refitting

5 Major body damage - repair

11•4 Bodywork and fittings

If bodystopper is used, it can
be mixed with cellulose
thinners, to form a really thin
paste which is ideal for filling

small holes.


Content   ..  109  110  111  112   ..