Ford F150 Pickup. Manual - part 406


  Index      Ford     Ford F150 Pickup - service and repair manual 2003 year


Search            


Content   ..  404  405  406  407   ..


Ford F150 Pickup. Manual - part 406


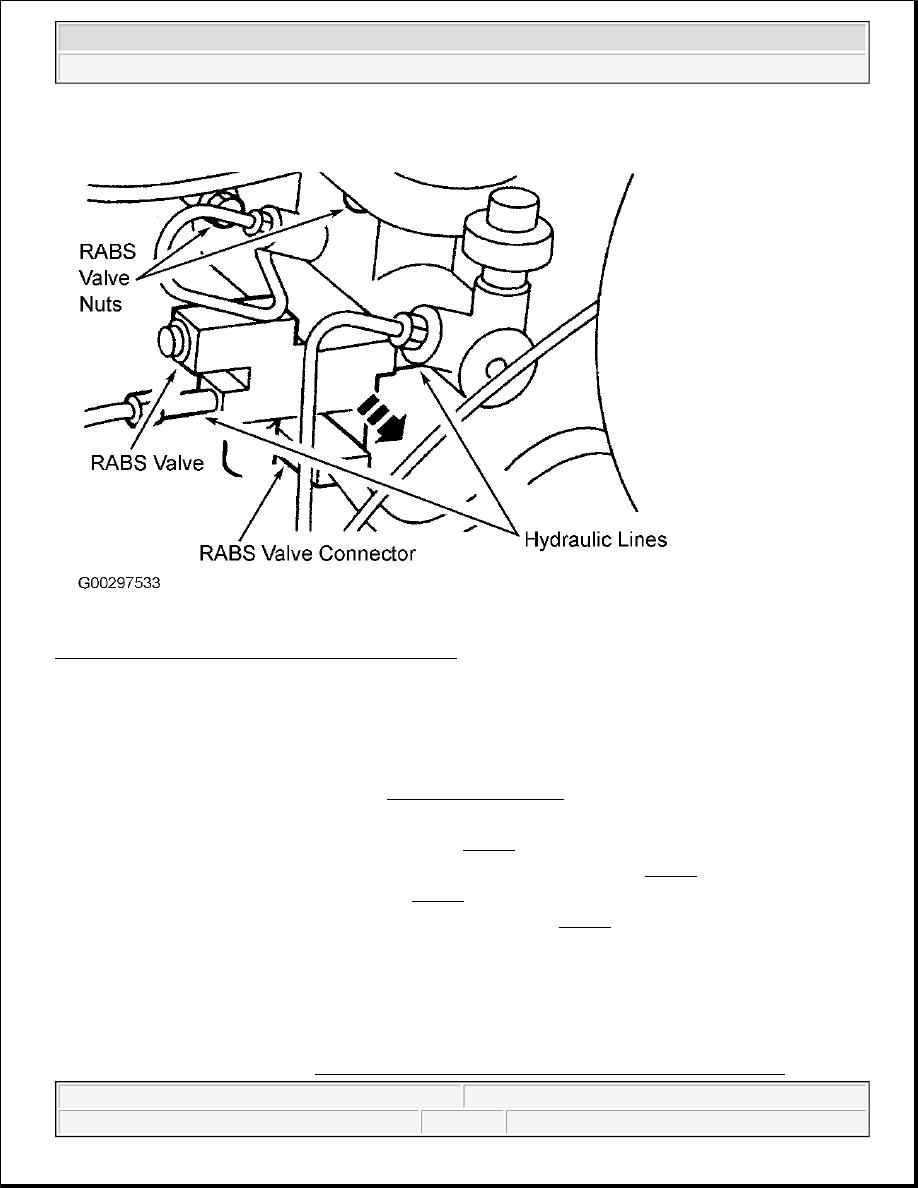
Fig. 88: Identifying RABS Valve Harness Connector 
Courtesy of FORD MOTOR CO. 

VACUUM POWER BOOSTER 

Removal & Installation 

1. Remove the brake master cylinder. See MASTER CYLINDER .  

2. Compress the clamp. Disconnect the power brake booster hose.  

3. Remove the stoplight switch self-locking pin. See Fig. 30 .  

4. Slide the stoplight switch and booster push rod off the brake pedal pin. See Fig. 31 .  

5. Remove the bulkhead sound insulator. See Fig. 32 .  

6. Remove the power brake booster nuts and remove booster. See Fig. 32 .  

7. To install, reverse removal procedure.  

WHEEL CYLINDERS (F150 HERITAGE PICKUP & F150 PICKUP) 

Removal & Installation 

1. Remove the brake shoes. See REAR BRAKE SHOES (F150 HERITAGE PICKUP & F150 


2003 Ford Pickup F150 

2002-04 BRAKES Disc & Drum - Blackwood, F150 Heritage Pickup & F150 Pickup


PICKUP) .  

2. Disconnect the brake line fitting. See Fig. 89 .  

3. Remove the two rear wheel cylinder bolts.  

4. Remove the rear wheel cylinder.  

5. To install, reverse removal procedure. Adjust brakes, and bleed hydraulic system. See BLEEDING 

BRAKE SYSTEM .  

Fig. 89: Removing Wheel Cylinder 
Courtesy of FORD MOTOR CO. 

OVERHAUL 

CALIPER 

Disassembly 

NOTE:

Use same disassembly procedures for single and dual piston calipers.

WARNING:

DO NOT place fingers between wood and piston as piston leaves 
caliper.


2003 Ford Pickup F150 

2002-04 BRAKES Disc & Drum - Blackwood, F150 Heritage Pickup & F150 Pickup


1. Remove caliper. See FRONT BRAKE CALIPER & PADS or REAR DISC BRAKE CALIPERS & 

PADS under REMOVAL & INSTALLATION. Drain fluid from caliper.  

2. Secure caliper in a vise. Place a block of wood between caliper and piston(s). See Fig. 90 . Apply low air 

pressure to brake hose inlet. Air pressure forces piston(s) outward.  

3. If piston is jammed or seized and does not come out easily, use a brass hammer to lightly tap caliper 

while applying air pressure. DO NOT pry piston from bore.  

4. Remove and discard seals and boots.  

Fig. 90: Removing Caliper Piston 
Courtesy of FORD MOTOR CO. 


2003 Ford Pickup F150 

2002-04 BRAKES Disc & Drum - Blackwood, F150 Heritage Pickup & F150 Pickup


Cleaning & Inspection 

1. Carefully clean rust and corrosion from caliper machined surfaces using a wire brush. DO NOT use wire 

brush in caliper bores. Clean all components with isopropyl alcohol and dry with compressed air.  

2. Inspect caliper bore, seal grooves and boot grooves for wear or damage. If bores are scored, corroded or 

worn, replace caliper. Replace anti-rattle clip, caliper support spring and key.  

Reassembly 

1. Apply clean brake fluid to NEW piston seal, and install in caliper bore groove. Apply clean brake fluid to 

caliper bore. Coat piston and outside beads of dust boot with clean brake fluid.  

2. Push piston through boot until boot is around bottom (closed end) of piston. See Fig. 91 or Fig. 92 . 

Position piston and boot directly over caliper bore. Spread dust boot over piston as it is installed.  

3. With bead seated in groove, carefully press straight down on piston until it bottoms in caliper bore. DO 

NOT cock or jam piston in caliper bore. If necessary, use a "C" clamp and a block of wood to bottom 
piston in caliper bore.  

Fig. 91: Exploded View Of Single Piston Caliper 
Courtesy of FORD MOTOR CO. 

CAUTION: Do not hone the caliper bores. Pistons are not available for honed caliper 

bores.


2003 Ford Pickup F150 

2002-04 BRAKES Disc & Drum - Blackwood, F150 Heritage Pickup & F150 Pickup


Content   ..  404  405  406  407   ..