Ford Fiesta (1989-1995). Manual - part 52
 

  Index      Ford     Ford Fiesta - service and repair manual 1989-1995 year


Search            


Content   ..  50  51  52  53   ..


Ford Fiesta (1989-1995). Manual - part 52


Door belt weatherseal moulding

Removal

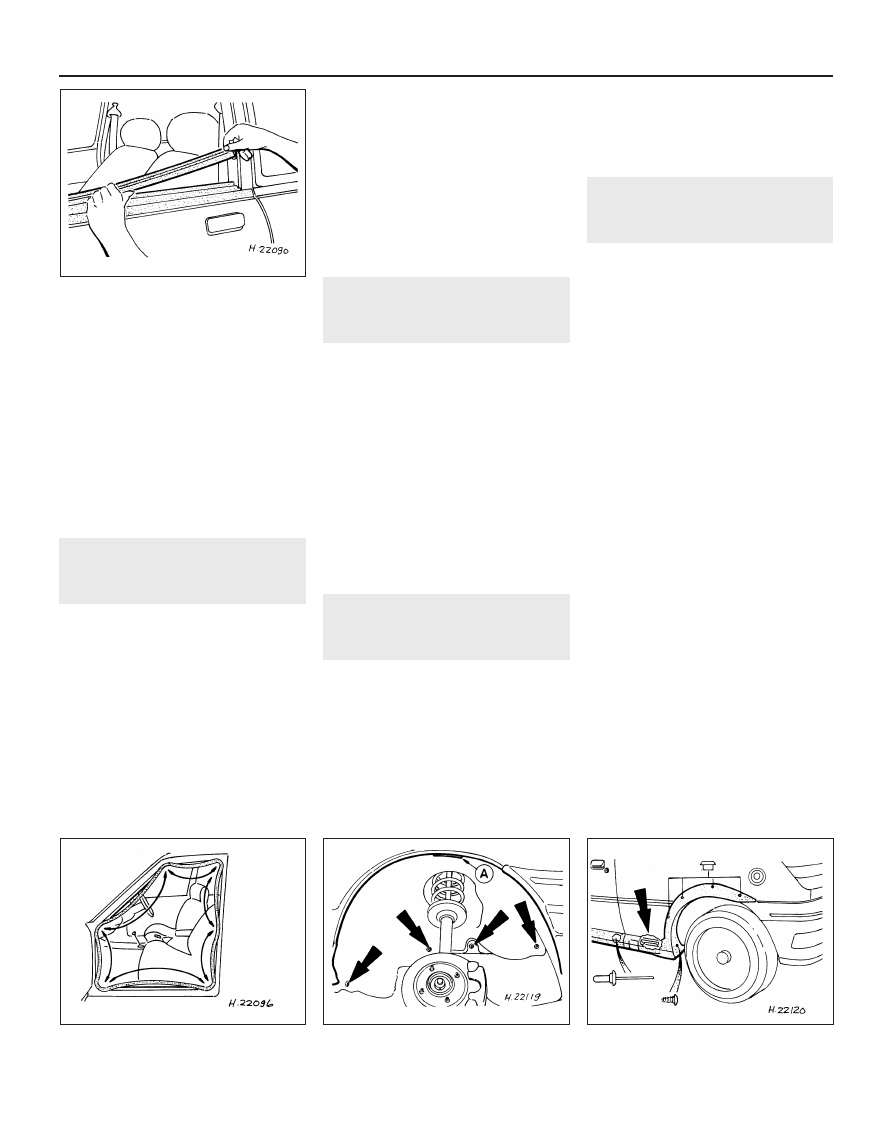
12 Remove the exterior mirror, as described
in Section 18 then, using a screwdriver,
carefully prise up the moulding and remove it
(see illustration). Do not bend or kink the
moulding, as this will permanently deform it.

Refitting

13 To refit, align the moulding to its rearward
location (latch end of the door), then carefully
tap it into position by hand.
14 Refit the mirror as described in Sec-
tion 18.

11 Door aperture weatherstrip -

removal and refitting

1

Removal

To remove, pull the weatherstrip off the
door aperture flange, starting with one end of
the joint and working around to the other end.

Refitting

To refit, roughly align the weatherstrip joint
so that it lies in the centre of the bottom (sill
panel) flange.
Loop the weatherstrip into the corners of
the door aperture (see illustration).
With all the corners roughly in position,
work around the aperture from one end of the
weatherstrip, pressing the seal fully home.

Ensure that it follows the contours of the
corners without wrinkling, and that it sits over
any interior trim edgings.
Seal the weatherstrip joint with a little
caulking compound applied to the body
flange, to prevent water entering by capillary
action.
Check that the door closes properly,
without excessive effort being required. If the
door requires excessive effort to close, 
the door striker plate may be adjusted as
necessary.

12 Sill extension moulding -

removal and refitting

2

Removal

Open the door and prise out the four
retaining studs from the upper surface of the
moulding.
From underneath, drill out the five securing
rivets then remove the moulding from the
vehicle.

Refitting

To refit, first align the moulding to its
location, centring it between the two
wheelarch mouldings, then refit the four
retaining studs to secure.
Insert the rivets to secure the moulding
from underneath.

13 Wheelarch liners 

removal and refitting

1

Removal

Chock the rear wheels then jack up the
front of the car and support it on axle stands
(see “Jacking and vehicle support”). Remove
the relevant front roadwheel.
Release the fasteners securing the
wheelarch liner in position (see illustration),
then remove the liner from the vehicle,
manoeuvring it to clear obstructions as
necessary.

Refitting

Refitting is a reversal of the removal
procedure, tightening the roadwheel nuts to
the specified torque (see Chapter 10).

14 Wheelarch mouldings -

removal and refitting

2

Front

Removal

Remove the wheelarch liner, as described
in Section 13.
From underneath the wheelarch, remove
the four fixing nuts securing the upper part of
the moulding.
Remove the plastic stud from the lower
edge of the wheelarch flange.
Remove the forward jacking position cover
from the sill extension moulding, by pulling
the lower section of the cover, then using a
suitably-sized drill, remove the rivet 
securing the rear edge of the wheelarch
moulding.
Carefully detach the wheelarch moulding
from the vehicle, sliding its rear out from
under the sill extension moulding.

Refitting

Refitting is a reversal of the removal
procedure, adjusting alignment as necessary
before riveting the rear of the moulding.

Rear

Removal

Remove the sill extension moulding, as
described in Section 12.
Drill out the rivet securing the forward end
of the wheelarch moulding (see illustration).
Remove the plastic stud from the lower
edge of the wheelarch flange.
10 From underneath the wheelarch, remove
the four fixing nuts securing the upper part of
the moulding.
11 Carefully pull the wheelarch moulding
away from the body, disengage it from the
clamp, and remove.

11•6 Bodywork and fittings

14.8  Rear wheelarch moulding fixings

(clamp cutaway arrowed)

13.2  Front wheelarch liner fixings

A  Locating lug at top of wheelarch

11.3 Loop the weatherstrip into the door

aperture

10.12  Removing a door belt weatherseal

moulding

1595Ford Fiesta Remake

Refitting

12 To refit, engage the wheelarch moulding
into the clamp, align the moulding studs with
their wheelarch locations, then position the
moulding onto the wheelarch. Refit the four
fixing nuts to secure the upper part of the
moulding, but do not fully tighten.
13 Refit the plastic stud, but do not fully
tighten.
14 Offer the sill extension moulding to its
location, centring it between the front and rear
wheelarches to check the rear wheelarch
moulding alignment. Adjust the alignment as
necessary.
15 With the rear wheelarch moulding
alignment correct, fully tighten the fixing nuts
and the plastic stud.
16 Insert the rivet to secure the forward end
of the moulding.
17 Refit the sill extension moulding, as
described in Section 12.

15 Wind deflector/radiator grille

slat - removal and refitting 

1

Removal

The radiator grille slat is secured to the front
bumper by three clips. To remove it, simply
slide the clips rearwards to release them, then
withdraw the grille slat from its bumper
locating holes.
If fitting a radiator grille slat to a service

replacement bumper, two 8.0 mm diameter
holes will need to be drilled to accommodate
the grille slat end fixings and, in addition, a
12.0 mm square central hole must also be
made (see illustration).

Refitting

Refitting is a reversal of the removal
procedure.

16 Bumpers 

removal and refitting

2

Front bumper

Removal

Open the bonnet and disconnect the
auxiliary light multi-plugs, as applicable.
Remove the bumper retaining screws from
the leading edge of the wheelarch flanges,
then ease the bumper away from its
wheelarch location (see illustration).
Remove the bumper retaining nuts from the
reverse side of the body panel beneath the
headlights (see illustration) then, with the
help of an assistant, remove the bumper
assembly from the vehicle.

Refitting

To refit, (again with assistance) position the
bumper onto its panel, ensuring that the
retaining studs pass through their body

locations, and that its ends align to the
wheelarches.
Loosely refit the bumper retaining nuts and
the bumper-to-wheelarch retaining screws.
Ensuring that the bumper is level, and that
an even gap is maintained between it and
surrounding body panels, tighten the retaining
nuts to the specified torque.
Tighten the bumper to wheelarch retaining
screws.
Refit the auxiliary light multi-plugs, as
applicable.
The alignment of light units requires the use
of optical beam setting equipment so, where
applicable, entrust this task to a Ford dealer.

Rear bumper (all models except
Courier)

Removal

10 Using a screwdriver or similar tool, prise
up the number plate light unit from the 
rear bumper, being careful not to damage the
bumper. Disconnect the bulbholder and
remove from the bumper.
11 Remove the bumper-to-wheelarch
retaining screws as necessary (see
illustration)
.
12 Open the tailgate then, using a suitably-
sized socket, remove the bumper retaining
nuts located inside the luggage compartment
(see illustration).
13 Carefully remove the bumper from its
location.

Refitting

14 To refit, first align the bumper to the
vehicle body, ensuring that the ends engage
correctly at the wheelarches and the securing
studs enter through the body panel.
15 Refit the bumper-to-wheelarch inner rim
retaining screws, as applicable.
16 Refit the bumper retaining nuts, tightening
to the specified torque.
17 Reconnect the number plate light
bulbholder, then refit the light unit to the
bumper.

Rear bumper (Courier models)

Removal

18 Unscrew the two screws securing each
bumper end moulding to its respective wheel

Bodywork and fittings 11•7

16.2  Front bumper-to-wheelarch retaining

screws (arrowed)

15.2  Radiator grille slot fixing holes

required on service replacement bumpers

(dimensions given in mm - see text)

16.12  Rear bumper retaining nut locations

(arrowed)

16.11  Rear bumper-to-wheelarch retaining

screws (arrowed)

16.3  Front bumper retaining nut location

11

1595Ford Fiesta Remake

arch, then remove the two bolts securing each
bumper mounting bracket to the rear
underside of the vehicle (see illustration).
Withdraw the bumper.
19 The mounting brackets can be unbolted, if
required, from the bumper. The end
mouldings can be unclipped for renewal
separately (see illustrations).

Refitting

20 Refitting is the reverse of the removal
procedure.

17 Bumper and rear quarter

mouldings - renewal

2

Bumper mouldings

With the bumper removed as described in
Section 16, place it on a clean flat surface,
then remove the clips from the moulding
ends.
Prise up and remove the old moulding from
its bumper recess.
Remove all trace of old adhesive from the
bumper recess, using methylated spirit, taking
all normal safety precautions. Allow the recess
to dry.
If fitting a new moulding to a service
replacement bumper, slots must be cut into
the bumper to accommodate the moulding
end fixings (see illustration).
Apply adhesive primer (available from Ford
dealers) to the recess, and allow it to dry.
Gently heat the moulding until it is warm to
the touch, then insert the first moulding end
clip into the bumper and press the moulding
to its recess, secured with its moulding end,
peeling the protective backing paper off as it
is applied.
Apply the moulding smoothly and carefully
across the bumper, rolling into its recess

using a plastic roller or similar tool, then, when
the other end is reached, secure with the
other moulding end and clip.

Rear quarter mouldings (Courier
models)

Remove the rear bumper as described in
Section 16.
Each moulding is secured by two screws at
its forward edge, in the wheel arch, and by a
single screw at the rear (see illustrations).
Remove the screws and withdraw the
moulding, unclipping it at its front end.
10 Refitting is the reverse of the removal
procedure.

18 Exterior mirror and glass -

removal and refitting

1

Mirror glass

Removal

Insert a thin flat-headed screwdriver behind
the mirror glass, at the upper outermost
corner, then carefully lever the glass assembly
forward to disconnect the outer pivot (see
illustration)
.

11•8 Bodywork and fittings

18.1  Removing the door mirror glass from

the mirror housing

17.9b  . . . and at rear of vehicle

17.9a  Courier rear quarter moulding
mounting screws (arrowed) in wheel 

arch . . .

17.4  Bumper moulding slot required on

service replacement bumpers (dimensions

given in mm)

16.19b  . . . Courier rear bumper end

moulding unclipped

16.19a  Courier rear bumper removed,

showing mounting bracket retaining nut

and end moulding clips . . .

16.18  Courier rear bumper mounting

screws (arrowed) at wheel arch - note also

bumper mounting bracket bolts (arrowed)

visible under rear of vehicle

1595Ford Fiesta Remake

Disengage the inner pivot then, using a
screwdriver, disconnect the operating link to
allow the glass assembly to be withdrawn
(see illustration).

Refitting

To refit, first reconnect the operating link
and engage the inner pivot.
Align the outer pivot in the mirror housing,
then push the glass assembly carefully into
position so that the outer pivot engages 
fully.

Mirror assembly

Removal

Remove the door inner trim panel as
described in Section 21.
Remove the door mirror operating knob by
lifting its retaining clip, using a small
screwdriver, then pulling it from its shaft (see
illustration)
.
Remove the mirror trim retaining screw,
then ease the mirror trim out from its forward
lug location and slide it out towards the rear of
the vehicle, to clear its rearward fixings (see
illustration)
.
Remove the three mirror retaining screws,
and manoeuvre the mirror from the door (see
illustration)
.

Refitting

Refitting is the reverse sequence to
removal.

19 Interior mirror 

removal and refitting

1

Removal

Using a length of strong thin cord or fishing
line, break the adhesive bond between the
mirror base and the windscreen, then remove
the mirror from the vehicle.
During installation, it is important to note
that the mirror base, windscreen black patch
and the adhesive patch should not be
touched, other than for cleaning, or the
adhesive bond may be adversely affected.
Remove all traces of old adhesive from the
mirror base, using a lint-free cloth and
methylated spirit, taking all normal safety
precautions. Allow the mirror base to dry.
Clean the windscreen black patch in a
similar manner.

Refitting

Note that, before installing the mirror, the

vehicle should have been in an ambient
temperature of approximately 20ºC for at least
an hour.
With the contact surfaces scrupulously
clean, remove the protective tape from one
side of the adhesive patch and press firmly
into contact with the mirror base.
Note that when fitting a mirror to a new
windscreen, the protective tape must be
removed from the windscreen black patch.
Warm the mirror base and adhesive patch
for about thirty seconds, to a temperature of
50 to 70ºC.
Remove the protective tape from the other
side of the adhesive patch on the mirror base,
then align the mirror base and windscreen
black patch accurately, and firmly press the
mirror base into position. Hold the mirror base
firmly in position for at least two minutes.
10 Wait at least thirty minutes before
adjusting the mirror.

20 Side doors -

removal and refitting

2

Removal

Open the door and detach the door
aperture weatherseal from around the hinge
area.
Remove the screw securing the door check
arm to the body.
Squeeze the ears together on the electrical
multi-plug and withdraw it from its body
location on the A-pillar, as applicable.
Disconnect the multi-plug.
Using a screwdriver, remove the door hinge
pin retaining clips from the top of both hinges,
by levering them off.
Ford dealers use a special tool for removing
door hinge pins. If this is not available, it is
possible to fabricate an alternative. Engage

Bodywork and fittings 11•9

18.6  Lift the retaining clip, then pull the door mirror operating

knob from its shaft

18.2  Mirror glass connections within mirror housing

A  Inner pivot         B  Operating link         C  Outer pivot

18.8  Removing the three mirror retaining

screws (arrowed)

18.7  Removing the mirror trim retaining

screw

11

1595Ford Fiesta Remake


Content   ..  50  51  52  53   ..