Daewoo Matiz (2003 year). Service manual - part 263


  Index      Daewoo     Daewoo Matiz - service and repair manual 2003 year


Search            


Content   ..  261  262  263  264   ..


Daewoo Matiz (2003 year). Service manual - part 263


GLASS AND MIRRORS  9L – 5

REPAIR INSTRUCTIONS

ON–VEHICLE SERVICE

D19E501

WINDSHIELD

Tool Required

J–24402 Glass Sealant Remover

Removal Procedure

1. Remove the cowl vent grille. Refer to Section 9R,

Body Front End.

2. Remove the inside rearview mirror. Refer to “Inside

Rearview Mirror” in this section.

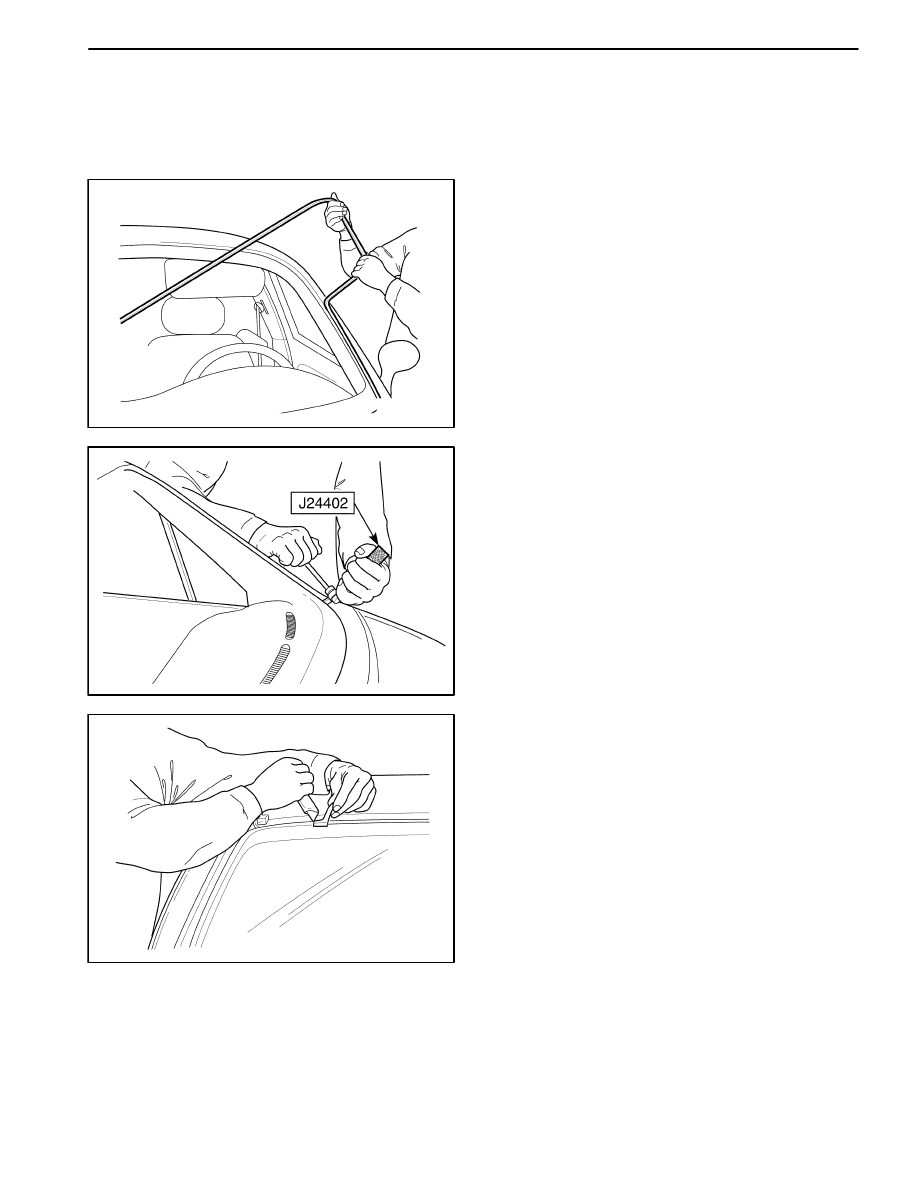
3. Remove the weatherstrip around the windshield.

D19E502

4. Using the glass sealant remover J–24402, cut the

adhesive around the windshield.

D19E503

5. Remove the windshield from the vehicle.

6. Using a knife, remove the adhesive from the wind-

shield.

9L – 6  GLASS AND MIRRORS

D19E504

Installation Procedure

1. Install the new weatherstrip to the windshield.

D19E505

2.

Apply tape to the new weatherstrip and the wind-
shield to hold the weatherstrip in place.

3.

Apply adhesive primer to the windshield frame and
the perimeter of the windshield.

D19E506

4.

Apply glass adhesive to the windshield frame.

D19E507A

5.

Install the windshield into the windshield frame.

6.

Reposition the tape over the weatherstrip, the wind-
shield and the windshield frame to hold the wind-
shield in place.

7.

Let the adhesive dry for 24 hours.

8.

Remove the tape.

GLASS AND MIRRORS  9L – 7

D19E508A

9.

Check for waterleaks by pouring water on the wind-
shield. If a leak is found, dry the windshield and fill
the area that leaks with adhesive. If the leak per-
sists, remove the windshield and repeat the entire
procedure.

10. Install the inside rearview mirror. Refer to “Inside

Rearview Mirror” in this section.

11. Install the cowl vent grille. Refer to Section 9R, Body

Front End.

D19E509

REAR WINDOW GLASS

Removal Procedure

1. Disconnect the negative battery cable.

2. Disconnect the rear window defogger electrical con-

nectors.

D19E510

3. Using the glass sealant remover J–24402, cut the

adhesive around the rear window glass.

D19E503

4. Remove the rear window glass from the vehicle.

5. Using a knife, remove the adhesive from the rear win-

dow glass.

6. Using a knife, remove the adhesive from the rear win-

dow frame.

9L – 8  GLASS AND MIRRORS

D109E511

Installation Procedure

1. Apply tape to the new weatherstrip and the rear win-

dow to hold the weatherstrip in place.

2. Apply adhesive primer to the rear window frame and

the perimeter of the rear window.

D109E512

3.

Apply glass adhesive to the rear window frame.

D19E513A

4.

Install the rear window into the rear window frame.

5.

Reposition the tape over the weatherstrip, the rear
window and the rear window frame to hold the rear
window in place.

6.

Let the adhesive dry for 24 hours.

7.

Remove the tape.

D19E514A

8.

Check for waterleaks by pouring water on the rear
window. If a leak is found, dry the window and fill the
area that leaks with adhesive. If the leak persists,
remove the rear window and repeat the entire pro-
cedure.

9.

Connect the rear window defogger electrical con-
nector.

10. Connect the negative battery cable.


Content   ..  261  262  263  264   ..