Daewoo Matiz (2003 year). Service manual - part 156


  Index      Daewoo     Daewoo Matiz - service and repair manual 2003 year


Search            


Content   ..  154  155  156  157   ..


Daewoo Matiz (2003 year). Service manual - part 156


FIVE-SPEED MANUAL TRANSAXLE  5B – 7

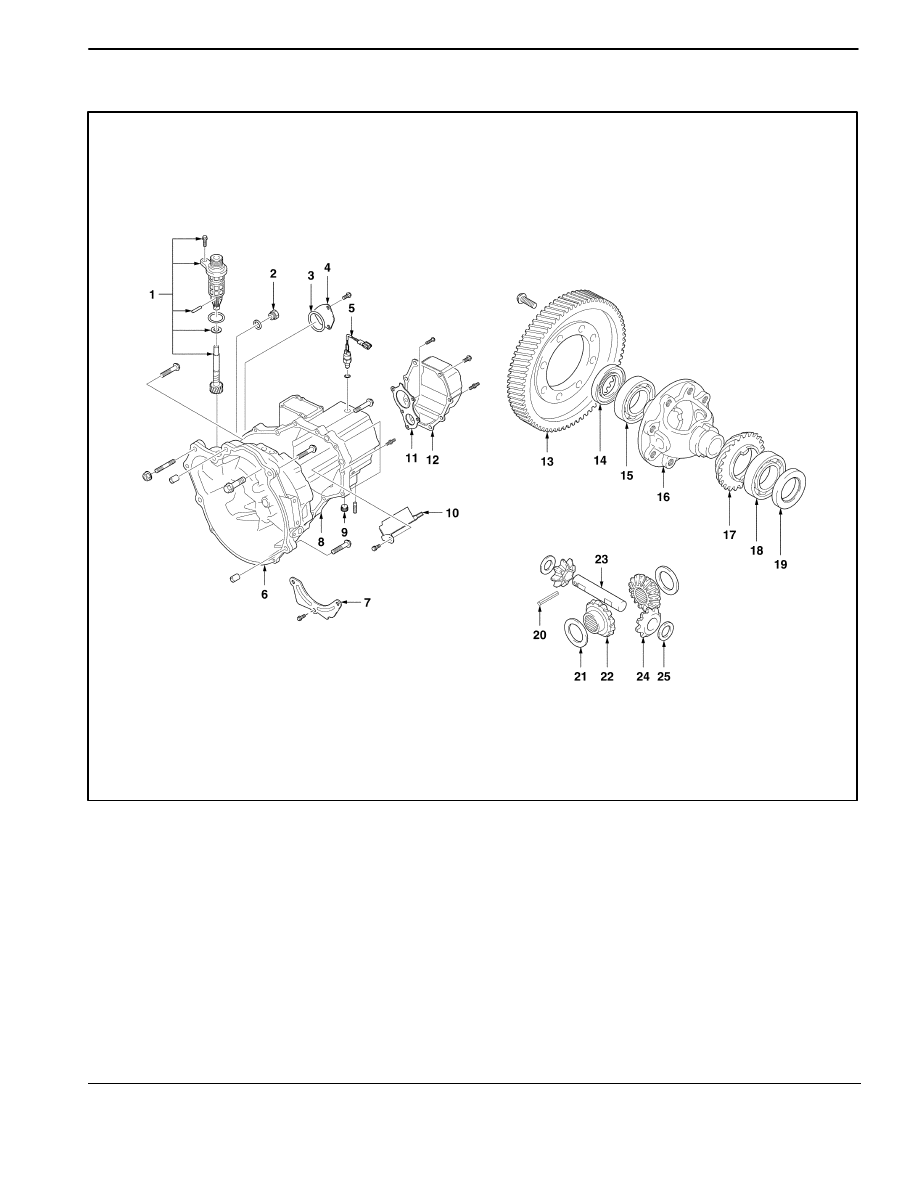
DIFFERENTIAL AND CASE

D13B4041

1 Speedometer Driven Gear
2 Oil Level Plug
3 Case Cap O–ring(Left)
4 Case Cap(Left)
5 Back Up Light Switch
6 Transaxle Case(Right)
7 Oil Plate
8 Transaxle Case(Left)
9 Oil Drain Plug

10 Oil Gutter

11 Side Cover Plate

12 Side Cover
13 Differential Ring Gear

14 Differential Oil Seal(Left)
15 Differential Bearing(Left)
16 Differential Case
17 Speedometer Drive Gear
18 Differential Bearing(Right)
19 Differential Oil Seal(Right)
20 Differential Pinion Gear Shaft Pin
21 Differential Side Gear Adjust Shim
22 Differential Side Gear
23 Differential Pinion Gear Shaft
24 Differential Pinion Gear
25 Differential Pinion Gear Washer

5B – 8  FIVE-SPEED MANUAL TRANSAXLE

DIAGNOSTIC INFORMATION AND PROCEDURE

GENERAL DIAGNOSIS

Condition

Probable Cause

Correction

Gear Slipping Out of Mesh

D

Worn shift fork.

D

Replace shift fork.

D

Worn synchronizer sleeve or gear.

D

Replace sleeve or gear.

D

Worn bearings on input shaft or
counter shaft.

D

Replace bearing.

D

Weakened or damaged location
spring.

D

Replace spring.

D

Loose or damaged synchronizer
spring.

D

Replace synchronizer spring.

D

Excessive back-lash of gear.

D

Adjust back-lash of gear.

Gear Catching

D

Bent or distorted shift shaft or shift
fork.

D

Replace shift shaft or shift fork.

D

Weakened or damaged
synchronizer spring.

D

Replace spring.

Hard Shifting

D

Worn synchronizer ring.

D

Replace synchronizer ring.

D

Worn synchronizer sleeve or gear.

D

Replace sleeve or gear.

D

Bent or distorted shift shaft.

D

Replace shift shaft.

D

Excessive free travel of all gears
in axial direction.

D

Replace gear.

D

Worn bearings on input shaft or
counter shaft.

D

Replace bearing.

D

Poor adjustment of clutch cable.

D

Adjust clutch cable.

D

Distorted or broken clutch disc.

D

Replace clutch disc.

D

Damaged pressure plate.

D

Replace pressure plate.

Noise in the Neutral Gear

D

Insufficient lubricant.

D

Supply lubricant.

D

Worn input shaft gear.

D

Replace gear.

D

Worn bearings on the input shaft
gears.

D

Replace bearing.

D

Worn clutch release bearing.

D

Replace clutch release bearing.

Noise in the All Gears

D

Insufficient lubricant.

D

Supply lubricant.

D

Worn bearings on input shaft or
counter shaft.

D

Replace bearing.

D

Worn input shaft or counter shaft
gear.

D

Replace gear.

D

Worn or damaged synchronizer
ring.

D

Replace synchronizer ring.

D

Worn or damaged synchronizer
sleeve.

D

Replace synchronizer sleeve.

D

Worn differential gear or bearing.

D

Replace gear or bearing.

Noise in the Peculiar Gear

D

Worn or damaged synchronizer
ring in the peculiar gear.

D

Replace synchronizer ring.

D

Worn or damaged gear in the
peculiar gear.

D

Replace gear.

D

Worn or damaged bearing in the
peculiar gear.

D

Replace bearing.

Leak of Lubricant

D

Damaged gasket, oil seal or
O-ring.

D

Replace gasket, oil seal or O-ing.

FIVE-SPEED MANUAL TRANSAXLE  5B – 9

CHECKING FLUID LEVEL

Check for a leak in the area of transaxle case and seal-
ing and then check fluid level and condition after remov-
ing oil level plug.

1. Operate the engine until it comes to normal operating

temperature(Coolant temperature : 80~90

°

C (176~

194

°

F)).

2. Stall the engine and raise the vehicle.

3. Remove the oil level plug and check the fluid level.

4. The fluid should slightly flow out from the oil level plug

hole.

5. If the level is low, add the recommended fluid through

the oil level plug hole until the fluid begins to run out.

6. If the fluid is contaminated or discolored, replace it

with the recommended fluid.

7. Reinstall the oil level plug and tighten it securely.

D103B301

CHANGING FLUID

1. Operate the engine until it comes to normal operating

temperature(Coolant temperature : 80~90

°

C (176~

194

°

F)).

2. Stall the engine and raise the vehicle.

3. Drain the fluid after removing the drain plug.

4. Reinstall the drain plug and tighten it securely after

coating sealant.

5. Remove the oil level plug and replenish the fluid until

it begins to run out.

a. Oil drain plug.

b. Oil level plug.

6. Reinstall the oil level plug and tighten it securely.

Fluid Specification

75W-85(GL-4)

Fluid Capacity

2.1L(2.21qt)

Service interval

Refer to Owner’s Manual

CHECKING TRANSAXLE NOISE

Many noises that appear to come from the transaxle
may actually originate with other sources such as tires,
road surfaces, wheel bearings, or engine and exhaust
system.

Identify the cause of any noise before attempting to re-
pair the clutch, the transaxle, or their related linkages.

To verify suspected transaxle noises,

1. Select a smooth, level asphalt road to reduce tyre

and resonant body noise.

2. Drive the vehicle far enough to warm up all the lubri-

cants thoroughly.

3. Record the speed and the gear range of the transaxle

when the noise occurs.

4. Check for noises with the vehicle stopped, but with

the engine running.

5. Determine if the noise occurs while the vehicle oper-

ates in.

D

Drive – Under a light acceleration or a heavy pull.

D

Float  – Maintaining a constant speed with a light
throttle on a level road.

D

Coast – With the transaxle in gear and the throttle
partly or fully closed.

D

All of the above.

CHECKING BEARING NOISE

Differential Side Bearing Noise

Differential side bearing noise and wheel bearing noise
can be confused easily. Since side bearings are pre-
loaded, a differential side bearing noise should not di-
minish much when the differential/transaxle is run with
the wheels off the ground.

Wheel Bearing Noise

Wheel bearings produce a rough growl or grating sound
that will continue when the vehicle is coasting and the
transaxle is in NEUTRAL. Since wheel bearings are not
pre-loaded, a wheel bearing noise should diminish con-
siderably when the wheels are off the ground.

5B – 10  FIVE-SPEED MANUAL TRANSAXLE

REPAIR INSTRUCTION

ON–VEHICLE SERVICE

D103B501

MANUAL TRANSAXLE ASSEMBLY

Tools Required

DW110–021 Engine Support Fixture

DW220–031 Transaxle Remove/Install Support

Removal Procedure

1. Remove the air cleaner assembly. Refer to Section

1B, SOHC Engine Mechanical.

2. Remove the battery and battery tray. Refer to Section

1E, Engine Electrical.

3. Disconnect the select and the shift cable.

D

Remove the cable pins (1).

D

Remove the washers (2).

D

Disconnect the select and the shift cable (3).

D

Remove the cable E–rings (4).

D

Disconnect the cables from the cable bracket.

D103B502

4. Remove the engine wiring harness bending strap.

5. Disconnect the ground wire and the backup lamp

switch connector.

D

Remove the ground wire bolt (1).

D

Disconnect the ground wire (2).

D

Disconnect the backup lamp switch connector (3).


Content   ..  154  155  156  157   ..