Citroen C5 (2017 year). Manual - part 6


  Index      Citroen     Citroen C5 - service manual 2017 year in english


Search            


Content   ..  4  5  6  7   ..


Citroen C5 (2017 year). Manual - part 6


3

Ease of use and comfort

79

C5_en_Chap03_ergonomie-et-confort_ed01-2016

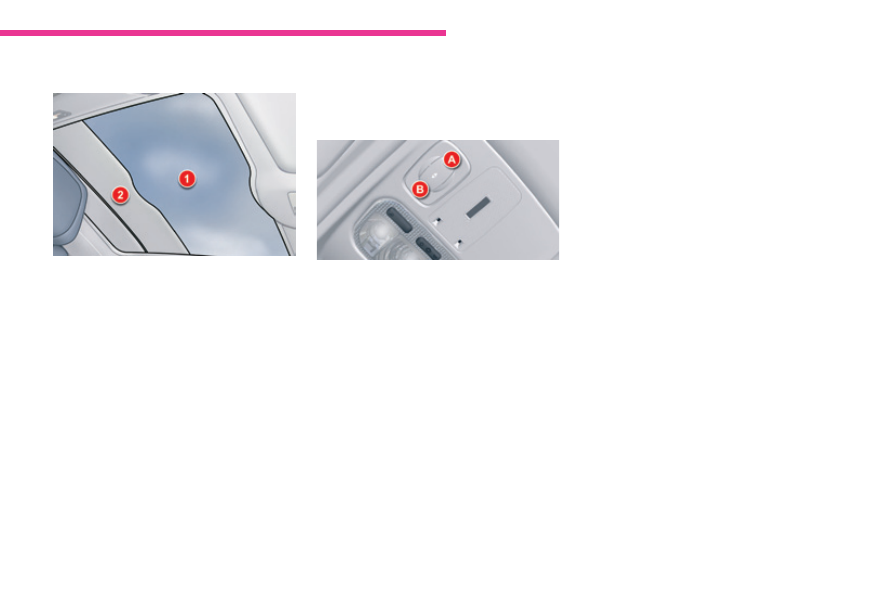
Panoramic sunroof (Tourer)

This comprises a tinted glass panoramic 
area 1

 to improve brightness and vision in the 

passenger compartment.
It is fitted with an electric blind 2 to help 
maintain a comfortable temperature and 
reduce noise.

Opening

F  Press control A

.

Pressing to the 1st notch allows you to open 
the blind step by step.
Pressing to the 2nd notch allows you to fully 
open the blind.
The blind stops in the closest pre-defined 
position (11 positions) as soon as you release 
the control.

Closing

F  Press control B

.

Press to the first notch to close the blind step 
by step.
Press to the second notch to close the blind 
completely.
The blind stops at the nearest pre-set position 
(11 positions) as soon as you release the 
control.

Sequential electric blind

Ease of use and comfort

80

C5_en_Chap03_ergonomie-et-confort_ed01-2016

Anti-pinch

If the blind meets an obstacle whilst closing, it 
stops and opens partially again.
You must re-initialise the anti-pinch function 
within 5 seconds of the blind stopping:
F  press control B until the blind is fully closed 

(closing in steps of a few centimetres).

After a battery disconnection, or if there has 
been a malfunction, you have to re-initialise the 
anti-pinch function:
F  press control B

 to the 2nd notch (fully 

closed),

F  wait until the blind is fully closed,
F  press control B

 for at least 3 seconds.

If the blind opens randomly during a closing 
operation, and straight after the blind stops:
F  Press control B

 until the blind closes fully.

During these operations, the anti-pinch 
function does not operate.

In the event of anything being caught 
when the blind is moving, you must 
reverse the movement of the blind. 
To do so, reverse the position of the 
control.
When the driver is operating the blind, 
he or she must always make sure that 
the passengers are not preventing it 
from closing properly.
The driver must ensure that passengers 
use the blind correctly.
Pay particular attention to children 
when operating the blind.

3

Ease of use and comfort

81

C5_en_Chap03_ergonomie-et-confort_ed01-2016

Sun visor

F

  With the ignition on, lift the flap; the mirror 

is illuminated automatically.

To prevent dazzle from ahead, fold the visor 
downwards.
It can be disengaged from its central fixing and 
pivoted over to the side windows if required.

Cooled glove box

F

  To open the glove box, pull the handle and 

lower the lid.

It has automatic illumination.
The glove box has an air vent A that can be 
closed manually.
It provides access to the passenger's front 
airbag deactivation switch B.

The glove box should be kept closed 
when driving.

Front fittings

F

  Pull the grip towards you to open it.

Driver's storage compartment

Ease of use and comfort

82

C5_en_Chap03_ergonomie-et-confort_ed01-2016

Mats

Removing

F

  Slide the front seat back as far as possible.

F

  Unclip the fixings.

F

  Remove the fixings, then the mat.

Refitting

F

  Position the mat correctly.

F

  Clip the fixings.

F

  Check that the mat is held is place 

correctly.

F

  Return the front seat to its original position.

Mats are provided for the driver and front 
passenger.

To avoid any interference with the 
pedals:
-  only use mats which are suitable 

for the fixings already present in the 
vehicle; the use of these fixings is 
essential,

-  never fit more than 1 mat.
The use of a mat not approved by 
CITROËN may obstruct access to the 
pedals and hinder the cruise control/
speed limiter function.
Floor mats approved by CITROËN 
are fitted with a third fixing located 
in the pedal area to avoid any risk of 
interference with the pedals.

3

Ease of use and comfort

83

C5_en_Chap03_ergonomie-et-confort_ed01-2016

Front armrest

Comfort and storage system for the driver and front passenger.

Adjustment

To optimise your driving position:
F  lift the control A,
F

  push the armrest forwards.

The armrest returns to its initial position when 
you push it rearwards.

USB port

The USB port allows the connection of a 
portable device, such as a digital player of the 
iPod

®

 type or a USB memory stick.

The USB player reads your audio files, which 
are sent to the audio system so that they can 
be heard via the vehicle's speakers.

Compartment

The front armrest includes a cup holder and a 
USB port and/or auxiliary JACK socket*.
F

  Lift the armrest for access to the cup 

holder, USB port and/or auxiliary JACK 
socket.

* Depending on equipment.

When connected to the USB port, 
the portable device is recharged 
automatically.
While charging, a message is displayed 
if the power consumption of the 
portable device exceeds the rating of 
the vehicle's port.

Auxiliary Jack socket

The auxiliary Jack socket allows the connection 
of a portable device, such as a digital player, 
so that your audio files can be heard via the 
vehicle's speakers.
The management of these files is from your 
portable device.

For more information on "Audio and 
telematics

", refer to the corresponding 

section.

The USB also allows a telephone to be 
connected by a MirrorLink™ connection, so 
that use can be made in the touch screen tablet 
of certain applications on the telephone.

The management of these files is with the 
steering mounted controls or from the audio 
system.

Ease of use and comfort

84

C5_en_Chap03_ergonomie-et-confort_ed01-2016

Rear armrest

Comfort and storage system for the rear passengers.

Cup-holder

The rear cup-holder A is located in the rear 
central armrest.
F

  Lower the rear armrest.

F

  Pull forwards to extract the cup-holder.

Storage

F  Lift up the upper part of the rear central 

armrest to access storage space B.

12 V accessory socket

This is located in the rear ashtray.
Max power: 100 W.

The connection of an electrical device 
not approved by CITROËN, such as a 
USB charger, may adversely affect the 
operation of vehicle electrical systems, 
causing faults such as poor telephone 
reception or interference with displays 
in the screens.

Rear fittings

3

Ease of use and comfort

85

C5_en_Chap03_ergonomie-et-confort_ed01-2016

Side blinds

F  Pull the tab A

 to unreel the blind.

F

  Position the blind on the hook B.

Rear blind (Saloon)

F  Pull the tab C

 to unreel the blind.

F

  Position the blind on the hooks D.

Ski flap

A flap in the backrest, located to the rear of the 
armrest, facilitates the carrying of long objects.

To open

F

  Lower the rear armrest.

F

  Pull the flap handle down.

F

  Lower the flap.

F

  Load the objects from inside the boot.

Ensure that the objects are well secured 
and that they do not impede the 
operation of the gear lever.

Ease of use and comfort

86

C5_en_Chap03_ergonomie-et-confort_ed01-2016

Boot fittings (Saloon)

1.  Boot floor 
 

(storage for the spare wheel and the tools)

2.  Boot lamp
3.
  Open storage or Closed storage well 
 

For vehicles so equipped, this is the 
location for the Hi-Fi amplifier.

Luggage securing rings

F

  Use the 4 securing rings on the boot floor 

to secure your luggage.

For safety reasons in the event of sharp 
braking, you are advised to place heavy 
objects as far forward in the boot as 
possible.

3

Ease of use and comfort

87

C5_en_Chap03_ergonomie-et-confort_ed01-2016

Boot fittings (Tourer)

1.  Hook 
  

For shopping bags.

2.  Torch 
 

To recharge, return it to its housing.

3.  Storage net

1.  Luggage cover 
 

(see details on following page)

2.  Luggage securing rings 
 

Use the 4 securing rings provided on the 
boot floor to secure your loads.

1.  Boot lamp
2.
  12 V accessory socket (100 W maximum) 
 

Cigarette lighter type 12 volt socket. It is 
located on the rear right-hand trim.

3.  Loading height control 
 

You can change the height of the vehicle to 
make loading or unloading the boot easier.

4.  Hook 
 

For shopping bags.

5.  Storage net or Closed storage well 
 

For vehicles so equipped, this is the 
location for the Hi-Fi amplifier.

As a safety measure in the event of 
sharp braking, you are advised to 
place heavy objects as far forwards as 
possible.

3.  Hooks 
 

These allow a high load net to be fitted 
(see details on following page).

Ease of use and comfort

88

C5_en_Chap03_ergonomie-et-confort_ed01-2016

Luggage cover (Tourer)

To reel in

F

  Press the handle (PRESS) gently. The 

luggage cover reels in automatically.

The moving part A can be folded along the rear 
bench seat backrest.

To remove

F

  Compress the control 1 and lift the luggage 

cover on the right then on the left to 
remove it.

To install

F

  Position the left-hand end of the luggage 

cover roller in its location B behind the rear 
bench seat.

F

  Compress the roller control 1 and put the 

roller in place in its location C

 on the right.

F

  Release the control to secure the luggage 

cover.

F

  Unreel it to its fastening on the rear pillar.

3

Ease of use and comfort

89

C5_en_Chap03_ergonomie-et-confort_ed01-2016

High load retaining net 
(Tourer)

Hooked onto the special upper and lower 
fixings, this permits use of the entire loading 
volume up to the roof:
-  behind the rear seats (row 2),
-  behind the front seats (row 1) when the rear 

seats are folded.

When positioning the net, check that the strap 
loops are visible from the boot; this will make 
slackening or tightening easier.

Installation

F

  Fold down the backrests of the rear seats.

F

  Position the high load retaining net roller 

above the two rails 1 located behind 
the rear seats (2/3 bench seat). The 
two notches 2

 must be placed above the 

two rails.

F  Slide the two rails 1 into the notches 2 and 

push the roller (lengthways) from right to 
left to secure it.

F

  Reposition the rear seat backrests.

Ease of use and comfort

90

C5_en_Chap03_ergonomie-et-confort_ed01-2016

Row 1

To use it in row 1:
F

  fold down the backrests of the rear seats,

F  open the covers 3

 of the corresponding 

upper fixings,

F

  unroll the high load retaining net and 

position one of the ends of the net's metal 
bar in the corresponding fixing cover. 
Check that the hook is secured in the rail 
located inside the cover 3,

F

  pull the high load retaining net's metal bar 

to position the other hook in the second 
fixing cover.

Row 2

To use it in row 2:
F  open the covers 4

 of the corresponding 

upper fixings,

F

  from the rear bench seat, unroll the high 

load retaining net, pushing it to detach it 
from the retaining hooks,

F

  position one of the ends of the net's metal 

bar in the corresponding fixing cover. 
Check that the hook is secured in the rail, 
located inside the cover 4,

F

  position the other hook in the second fixing 

cover and pull the metal bar towards you.

4

91

Driving

C5_en_Chap04_conduite_ed01-2016

Observe the driving regulations and remain 
vigilant whatever the traffic conditions.
Pay close attention to the traffic and keep your 
hands on the wheel so that you are ready to 
react at any time to any eventuality.
On a long journey, a break every two hours is 
strongly recommended.
In difficult weather, drive smoothly, anticipate 
the need to brake and increase the distance 
from other vehicles.

Driving on flooded  
roads

We strongly advise against driving on flooded 
roads, as this could cause serious damage 
to the engine or gearbox, as well as to the 
electrical systems of your vehicle.

Driving recommendations

Important!

Never drive with the parking brake 
applied - Risk of overheating and 
damage to the braking system!
Risk of fire!
As the exhaust system of your vehicle 
is very hot, even several minutes after 
switching off the engine, do not park 
or run the engine over areas where 
inflammable substances and materials 
are present: grass, leaves, etc.

Never leave a vehicle unsupervised 
with the engine running. If you have 
to leave your vehicle with the engine 
running, apply the parking brake 
and put the gearbox into neutral or 
position N or P

, depending on the type 

of gearbox.

If you are obliged to drive through water:

-  check that the depth of water does not 

exceed 15 cm, taking account of waves 
that might be generated by other users,

-  deactivate the Stop & Start system,

drive as slowly as possible without 
stalling. In all cases, do not exceed 6 mph 
(10 km/h),

do not stop and do not switch off the 
engine.

On leaving the flooded road, as soon as 
circumstances allow, make several light brake 
applications to dry the brake discs and pads.
If in doubt on the state of your vehicle, contact 
a CITROËN dealer or a qualified workshop.

92

Driving

C5_en_Chap04_conduite_ed01-2016

Anti-theft protection

Electronic engine immobiliser

The key contains an electronic chip which has 
a special code. When the ignition is switched 
on, this code must be recognised in order for 
starting to be possible.

In the event of a fault, you are 
informed by illumination of this 
warning lamp, an audible signal and 
a message in the screen.

In this case, your vehicle will not start; contact 
a CITROËN dealer as soon as possible.

Starting-switching off the engine

Keep safely, away from your vehicle, 
the label attached to the keys given to 
you on acquisition of the vehicle.

Ignition switch

It has 3 positions:
- position 

1 (Stop)

: insert and removing the 

key, steering column locked,

- position 

2 (Ignition on)

: steering column 

unlocked, ignition on, Diesel preheating, 
engine running,

- position 

3 (Starting)

.

Ignition on position

It allows the use of the vehicle's electric 
equipment or portable devices to be charged.

Do not attach heavy objects to the key 
or remote control: by weighing down on 
the key when in the ignition switch, this 
could cause a fault.
In addition, a heavy or sharp object 
could interfere with the deployment of 
the knee airbag or be thrown about and 
cause serious injuries in the event of 
deployment of the knee airbag.

This electronic engine immobiliser locks the 
engine management system a few moments 
after the ignition is switched off and prevents 
starting of the engine by anyone who does not 
have the key.

Once the state of charge of the battery drops 
to the reserve level, the system switches to 
energy economy mode: the power supply is 
cut off automatically to preserve the remaining 
battery charge.

4

93

Driving

C5_en_Chap04_conduite_ed01-2016

Starting the engine

Wait until this warning lamp goes off in the 
instrument panel then operate the starter 
motor by turning the key to position 3 
without pressing the accelerator pedal, 
until the engine starts. Once the engine is 
running, release the key.

With the parking brake applied and the gearbox 
in neutral or position N or P

:

F

  depress the clutch pedal fully (manual 

gearbox),

 or
F

  press the brake pedal firmly (automatic 

gearbox),

F

  insert the key into the ignition switch; the 

system recognises the code,

F

  unlock the steering column by simultaneously 

turning the steering and the key.

F

  With a petrol engine, operate the starter 

motor by turning the key to position 3 
without pressing the accelerator pedal, 
until the engine starts. Once the engine is 
running, release the key.

Never leave the engine running in 
an enclosed area without adequate 
ventilation: internal combustion 
engines emit toxic exhaust gases, 
such as carbon monoxide. Danger of 
intoxication and death!
In very severe wintry conditions 
(temperatures below -23°C), to ensure 
the correct operation and durability of 
the mechanical components of your 
vehicle, engine and gearbox, it is 
necessary to leave the engine running 
for 4 minutes before moving off.

In wintry conditions, the warning lamp 
can stay on for a longer period. When 
the engine is hot, the warning lamp 
does not come on.

In certain cases, you may have to apply 
more force to the steering (wheels on 
full lock, for example).

F

  With a Diesel engine, turn the key to 

position 2

, ignition on, to operate the 

engine pre-heating system.

If the engine does not start straight 
away, switch off the ignition. Wait a 
few moments before operating the 
starter motor again. If the engine does 
not start after several attempts, do not 
keep trying: you risk damaging the 
starter motor or the engine. Contact 
a CITROËN dealer or a qualified 
workshop.

In temperate conditions, do not leave 
the engine at idle to warm up but move 
off straight away and drive at moderate 
speed.

94

Driving

C5_en_Chap04_conduite_ed01-2016

Do not flick the accelerator at the 
moment of switching off the ignition. 
This could cause serious damage to the 
turbocharger(s).

Vehicles equipped with a 
turbocharger

Never stop the engine without having allowed it 
to run for a few seconds at idle, this being the 
time required for the turbocharger to return to a 
normal speed.

Energy economy mode

After switching off the engine (position 1-Stop), 
for a maximum of 30 minutes you can still use 
functions such as the audio and telematic 
system, the wipers, dipped beam headlamps, 
courtesy lamps, ...

Switching off the engine

F

  Stop the vehicle.

F

  With the engine running at idle, turn the key 

to position 1

.

F

  Remove the key from the ignition switch.

F

  To lock the steering column, turn the 

steering until it locks.

When you leave the vehicle, keep the 
key with you and lock the vehicle.

To facilitate unlocking of the steering 
column, it is recommended that the 
wheels be returned to the straight ahead 
position before switching off the engine.

Never switch off the ignition before the 
vehicle is at a complete stop. With the 
engine off, the braking and steering 
assistance systems are also cut off: risk 
of loss of control of the vehicle.

For more information on Energy 
economy mode
, refer to the 
corresponding section.

F

  Check that the parking brake is correctly 

applied, particularly on sloping ground.

Key left in the "Ignition on" 
position

If the key has been left in the ignition switch 
at position 2 (Ignition on)

, the ignition will be 

switched off automatically after one hour.
To switch the ignition back on, turn the  
key to position 1 (Stop), then back to  
position 2 (Ignition on)

.


Content   ..  4  5  6  7   ..