Citroen C4 Dag (2013 year). Manual - part 8


  Index      Citroen     Citroen C4 Dag - service manual 2013 year in english


Search            


Content   ..  6  7  8  9   ..


Citroen C4 Dag (2013 year). Manual - part 8


5

V I S I B I L I T Y

111 

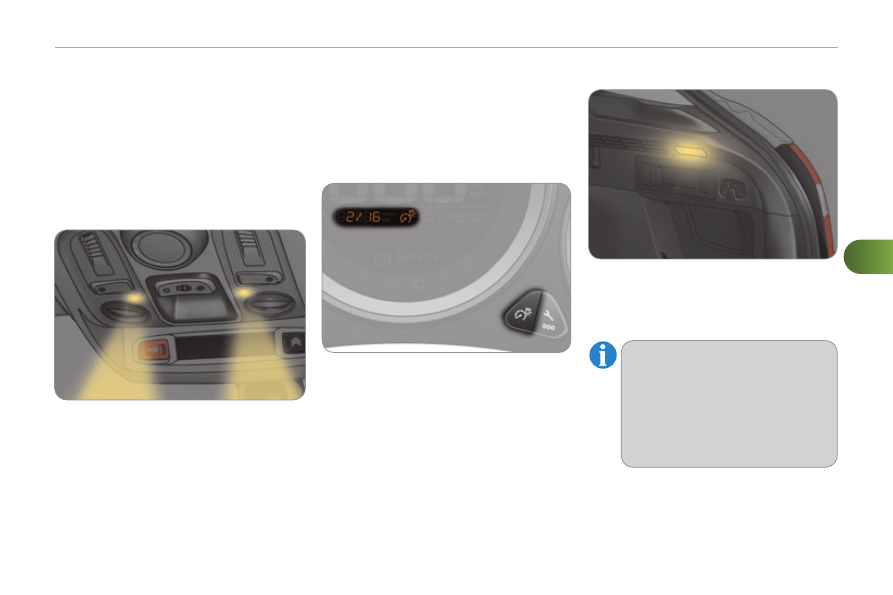
         INTERIOR MOOD LIGHTING 

 The dimmed passenger compartment 

lighting improves visibility in the vehicle 

when the light is poor. 

  Switching on 

 At night, two interior mood lamps in the 

front courtesy lamp come on automatically 

when the sidelamps are switched on.  

  Switching off 

 The interior mood lighting switches off 

automatically when the sidelamps are 

switched off. 
 It can be switched off manually by ad-

justing the instrument panel lighting 

rheostat button to one of the lowest set-

tings.  

 This comes on automatically when the 

boot is opened and goes off automati-

cally when the boot is closed. 

     BOOT LAMP 

      The lighting time varies accord-

ing to the circumstances: 
   -   when the ignition is off, ap-

proximately ten minutes, 

  -  

in energy economy mode, ap-

proximately thirty seconds, 

  -   when the engine is running, 

no limit.  

6

F I T T I N G S

112 

                  INTERIOR FITTINGS 

   1.    Grab handle  
  2.    Sun visor    
 

(see details on a following page) 

  3.    Ticket/map holder  
  4.    Illuminated   glove box    
 

(see details on a following page) 

  5.    Door pocket  s  
  6.    Large open storage box 

(without audio system)    

 or 


 Small storage box with fl ap 

(with audio system)  

  7.    Small open storage box 

(without audio system)  

  8.    USB port / Auxiliary socket    
 

(see details on a following page) 

  9.    12 V accessory socket    
 

(see details on following pages) 

  10.   Centre armrest with storage    
  

(see details on a following page)  

6

F I T T I N G S

113 

 Component which protects against sunlight 

from the front or the side, also equipped with 

an illuminated courtesy mirror. 
      With the ignition on, raise the con-

cealing  fl ap; the mirror is lit auto-

matically.  

 This sun visor is also equipped with a 

ticket holder. 

         SUN VISOR 

            ILLUMINATED GLOVE BOX 

  It has dedicated locations for storing 

a water bottle, the vehicle’s handbook 

pack... 
 Its lid has locations for storing a pen, a 

pair of glasses, tokens, maps, a cup... 
     To open the glove box, raise the 

handle.  

 It is lit when the lid is opened. 
 It houses the front passenger airbag 

deactivation switch  A . 
 If the vehicle is fi tted with air condition-

ing, it provides access to the ventilation 

nozzle  B , distributing the same condi-

tioned air as the vents in the passenger 

compartment.  

6

F I T T I N G S

114 

      12 V ACCESSORY SOCKET 

      To connect a 12 V accessory (max 

power: 120 W), lift the cover and 

connect a suitable adaptor.  

                     USB PORT / AUXILIARY SOCKET 

  The  "AUX"  connection box, located in 

the centre console, comprises an aux-

iliary JACK socket and/or a USB port. 
 It permits the connection of a portable 

device, such as a digital audio player 

of the iPod 

®

  or USB memory stick type. 

 It reads certain audio fi le formats allow-

ing them to be heard via the vehicle's 

speakers. 
 You can manage these fi les using the 

steering mounted controls or the audio 

system control panel and display them 

on the multifunction screen.  

  For more information on the use of this 

equipment, refer to the "Audio and tele-

matics" section.  

  Connected to the USB port, the 

portable device charges auto-

matically while in use.  

 LOWER CENTRE CONSOLE 

    1.    Storage pocket  
  2.    Cup holder  
  3.    Large open storage box    

6

F I T T I N G S

115 

               SEMI-RAISED CENTRE CONSOLE 

    1.    Front armrest   
 

(see details on following pages) 

  2.    Open storage  
  3.    Cup holder  
  4.    Storage pocket    

      RAISED CENTRE CONSOLE 

    1.    Front armrest    
 

(see details on following pages) 

  2.    12 V accessory socket    
 

(see details on following pages) 

  3.    Storage box  
  4.    Cup holder/Bottle holder  
  5.    Storage pocket  
  6.    Large multifunctional storage 

unit    


(see details on following pages)   

6

F I T T I N G S

116 

 LARGE MULTIFUNCTIONAL 

STORAGE UNIT 

  This storage unit is closed by a sliding 

shutter. 
 It contains: 
   -   the USB port and 12 V/auxiliary 

sockets  1 , 

  -   a retractable support  

2  to receive 

your mobile phone or portable de-

vice, 

  -   a space ventilated by a closeable 

nozzle  3 , to keep food and drinks 

fresh if the air conditioning is oper-

ating.  

        FRONT ARMREST 

 Comfort and storage system for the 

driver and front passenger. 
 The height and length of the armrest 

cover can be adjusted. 

  Height adjustment 

      Raise the cover to the required po-

sition (low, intermediate or high). 

     If you raise the cover slightly beyond 

the high position, guide it when low-

ering it to the low position.   

  Longitudinal adjustment 

     Slide the cover fully forwards or 

rearwards.   

  Storage 

 The storage space in the armrest can 

hold up to 6 CDs. 
 This storage space may be fi tted with a 

230 V/50 Hz socket. 
      Raise the lever. 
     Raise the cover fully.   

 It is illuminated only when the 

sliding shutter is fully open. 
 The sliding shutter can be partly 

closed up to the level of the re-

tractable support, so as to keep 

the storage unit cool.  

6

F I T T I N G S

117 

        FRONT ARMREST 

 Comfort and storage device for the driver 

and front passenger. 
 The length of the armrest cover can be 

adjusted. 

  Longitudinal adjustment 

      To move forwards, raise the lever. 

The armrest slides forwards to its 

stop. 

    To stow it, slide it fully back and 

press down to lock it.   

  Storage 

 The armrest's compartment can hold 

up to 6 CDs. 
      Raise the cover fully.   

6

F I T T I N G S

118 

 230 V/50 HZ POWER SOCKET 

  A 230 V/50 Hz socket (maximum power: 

120 W) is fi tted to the centre console. 
 To use the socket: 
      lift the front armrest cover for ac-

cess to its compartment, 

     check that the warning lamp is on 

green, 

    connect your multimedia or other 

electrical device (telephone char-

ger, laptop computer, CD-DVD play-

er, baby food warmer...).  

 This socket works with the engine 

running, as well as in STOP mode on 

Stop & Start. 

      To connect a 12 V accessory (max 

power: 120 W), lift the cover and 

connect a suitable adaptor.  

      12 V ACCESSORY SOCKET 

  Connect only one device at a 

time to the socket (no extension 

or multi-way connector). 
 Connect only devices with class 

II insulation (shown on the de-

vice). 
 As a safety measure, when elec-

trical consumption is high and 

when required by the vehicle's 

electrical system (particular 

weather conditions, electrical 

overload...), the current supply 

to the socket will be cut off; the 

green warning lamp goes off.   

 In the event of a fault with the socket, 

the green warning lamp fl ashes. 
 Have it checked by a CITROËN dealer 

or a qualifi ed workshop. 

6

F I T T I N G S

119 

         MATS 

 Removable carpet protection. 

  Fitting 

 When  fi tting the mat for the fi rst  time, 

on the driver's side use only the fi xings 

provided in the wallet attached. 
 The other mats are simply placed on 

the carpet.  

  Removal 

 To remove the mat on the driver's side: 
      move the seat as far back as possible, 
    unclip the fi xings, 
     remove the mat.   

  Refitting 

 To refi t the mat on the driver's side: 
      position the mat correctly, 
    refi t the fi xings by pressing, 
     check that the mat is secured cor-

rectly.  

  To avoid any risk of jamming of 

the pedals: 
   -   only use mats which are 

suited to the fi xings  already 

present in the vehicle; these 

fi xings must be used, 

  -  never 

fi t one mat on top of 

another.  

 The use of mats not approved 

by CITROËN may interfere with 

access to the pedals and hinder 

the operation of the cruise con-

trol/speed limiter.   

      STORAGE DRAWERS 

 Located under each front seat, except 

for the driver's seat on versions with 

electric seat. 

  Opening 

      Raise the front of the drawer and 

pull it open.  

 Do not place heavy objects in the drawer.  

  Removal 

 Avoid removing the drawer completely, 

as refi tting it is not easy. 
      Open the drawer fully. 
     Pull the drawer upwards to disengage it.   

  Refitting 

 However, if it has been completely re-

moved, to refi t it: 
      use the torch to illuminate the area 

under the seat, 

     engage the drawer in its runners, 
     lift the retaining tongues and slide 

the drawer under these tongues, 

     at the end of its travel, press down 

on the drawer to engage it.   

6

F I T T I N G S

120 

      REAR ARMREST 

 Comfort system for the rear passen-

gers. 

      Lower the rear armrest for a more 

comfortable position.  

 This also gives access to the ski fl ap. 

         SKI FLAP 

 Arrangement for storing and transporting 

long objects. 

  Opening 

      Lower the rear armrest. 
    Pull the fl ap handle downwards. 
    Lower the fl ap. 
    Load the objects from inside the 

boot.   

6

F I T T I N G S

121 

                  BOOT FITTINGS 

   1.    Rear parcel shelf   
 

(see details on a following page) 

  2.    Hooks   
 

(see details on a following page) 

  3.    12 V accessory socket   
 

(see details on a following page) 

  4.    Torch   
 

(see details on following pages) 

  5.    Lashing rings  
  6.    Storage box   
 

(see details on following pages) 

  7.    Retaining straps  
  8.    Storage net   

6

F I T T I N G S

122 

 To remove the shelf: 
      unhook the two cords, 
     raise the shelf slightly, then remove it.  
 There are several options for storing 

the shelf: 
   -  

either upright behind the front seats, 

  -  or 

fl at at the base of the boot.   

       Rear parcel shelf 

 The hooks can be used to secure shop-

ping bags. 

       Hooks 

 An additional hook under the 

shelf is used to hold up the boot 

fl oor using its cord, to facilitate 

access to the tools and spare 

wheel or the temporary puncture 

repair kit...   

  Access to the storage box 

      To connect a 12 V accessory (max 

power: 120 W), remove the cap and 

connect an appropriate adaptor. 

     Turn the key to the ignition on posi-

tion.   

       12 V accessory socket 

6

F I T T I N G S

123 

 This is a removable lamp, fi tted in the 

boot wall, which can be used to light the 

boot or as a torch. 
 For the boot lamp function, refer to the 

"Visibility - § Boot lamp" section. 

          Torch 

  Operation 
 This torch operates with NiMH type re-

chargeable batteries. 
 It has a battery life of approximately 

45 minutes and charges while you are 

driving. 

  Use 
      Extract the torch from its location 

pulling it upwards. 

    Press the switch, located on the 

back, to switch the torch on or off. 

     Unfold the support, located on the 

back, to set down and raise the 

torch; for example, when changing 

a wheel.   

  Storing 
      Put the torch back in place in its lo-

cation starting with the lower part.  


If you have forgotten to switch off 

the torch, this switches it off auto-

matically.  

      Raise the boot carpet for access to 

the storage box.  

 This has areas for the storage of a box 

of spare bulbs, a fi rst aid kit, two warn-

ing triangles... 
 It also contains the vehicle tools, the 

temporary puncture repair kit...  

       Storage box 

 Observe the polarities when fi t-

ting the rechargeable batteries. 
 Never replace the rechargeable 

batteries with normal disposable 

batteries.  

 It the torch is not engaged cor-

rectly, it may not charge and may 

not come on when the boot is 

opened.   

6

F I T T I N G S

124 

            LUGGAGE COVER 

(ENTERPRISE VERSION) 

     Insert the fi xings   A  on the frame  B  

while unrolling the luggage cover.   

  Stowage 

  Removal 

      Unhook all of the fi xings. 
     Lift the luggage cover on each side.   

 This conceals the interior of the vehicle 

in combination with your rear parcel 

shelf. 

  Installation 

      Roll up the luggage cover near the 

rear seats.   

  Do not place hard or heavy ob-

jects on the luggage cover. 
 They could become dangerous 

projectiles in the event of sud-

den braking or a collision.  

7

C H I L D   S A F E T Y

125 

         GENERAL POINTS RELATING TO CHILD SEATS  

               CITROËN recommends  that 

children should travel on the 

 rear seats  of your vehicle: 
   -  

 "rearward-facing"  up to the 

age of 3, 

  -  

 "forward-facing"  over the 

age of 3.    

  Although one of CITROËN main criteria when designing your vehicle, the safety of 

your children also depends on you.  

  *    The rules for carrying children are 

specifi c to each country. Refer to the 

legislation in force in your country.  

  For maximum safety, please observe 

the following recommendations: 
   -   in accordance with European regu-

lations,  all children under the age 

of 12 or less than one and a half 

metres tall must travel in ap-

proved child seats suited to their 

weight , on seats fi tted with a seat 

belt or ISOFIX mountings * , 

  -  

 statistically, the safest seats in 

your vehicle for carrying children 

are the rear seats,  

  -  

 a child weighing less than 9 kg 

must travel in the "rearwards-

facing" position both in the front 

and in the rear.       

7

C H I L D   S A F E T Y

126 

               Passenger seat adjusted to the in-

termediate longitudinal and highest 

position.    

         CHILD SEAT IN THE FRONT *  

  "Rearward-facing"  

 "Forward-facing" 

  When a "rearward-facing" child seat is 

installed on the  front passenger seat , 

adjust the seat to the intermediate lon-

gitudinal and highest position, with the 

backrest straightened. 
 The passenger airbag must be deacti-

vated. Otherwise,  the child would risk 

being seriously injured or killed if 

the airbag were to infl ate .   

  When a "forward-facing" child seat is 

installed on the  front passenger seat , 

adjust the vehicle's seat to the interme-

diate longitudinal and highest position 

with seat backrest straightened and 

leave the passenger's airbag activated.  

  *    Refer to the current legislation in your 

country before installing a child seat 

on this seat.  

  Ensure that the seat belt is cor-

rectly tensioned. 
 For child seats with a support 

leg, ensure that the support leg 

is in stable contact with the fl oor. 

If necessary, adjust the passen-

ger seat.   


Content   ..  6  7  8  9   ..