Dodge Dart (2016 year). Instruction - part 14


  Index      Dodge     Dodge Dart (2016 year) - instruction in english


Search            copyright infringement  


Content      ..     12      13      14      15     ..


Dodge Dart (2016 year). Instruction - part 14


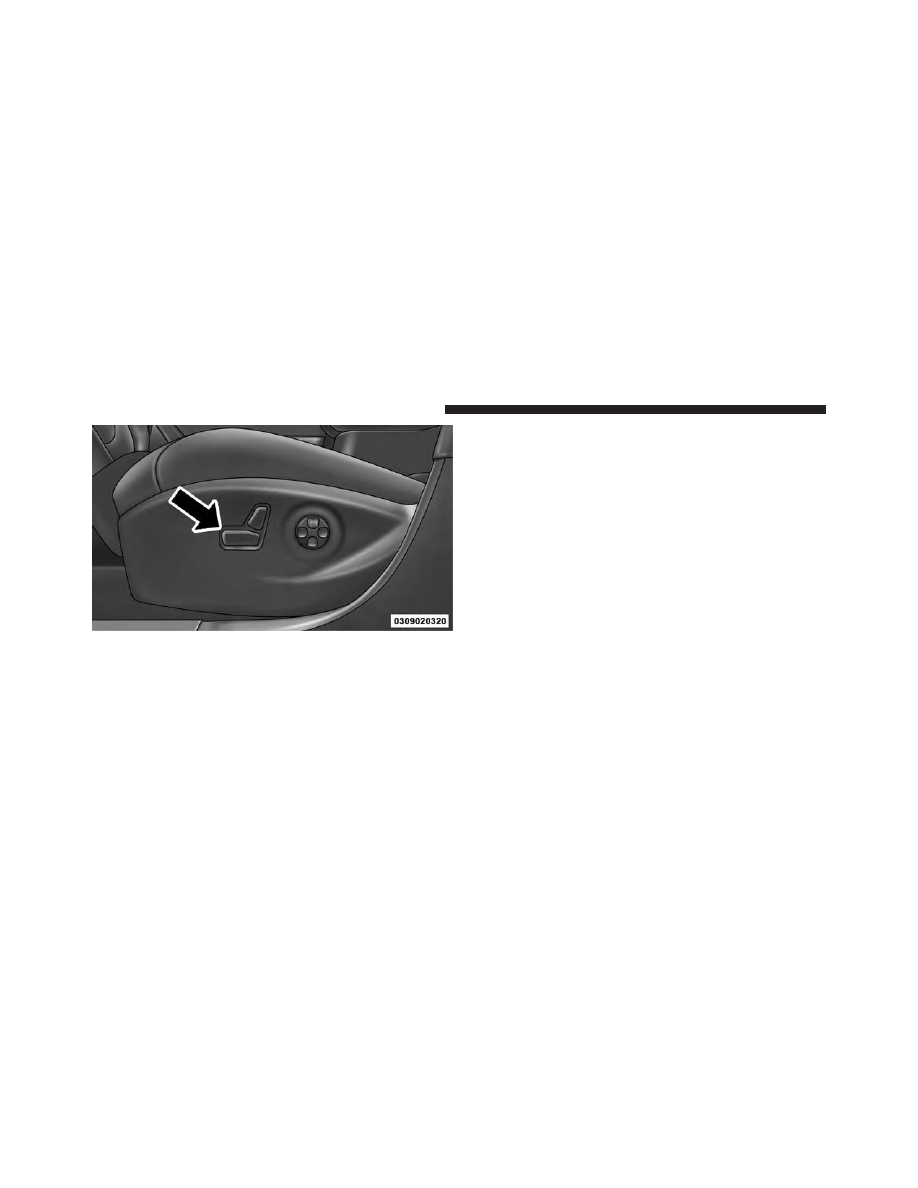
Adjusting The Seat Forward Or Rearward

The seat can be adjusted both forward and rearward.
Push the seat switch forward or rearward. The seat will
move in the direction of the switch. Release the switch
when the desired position has been reached.

Adjusting The Seat Up Or Down

The height of the seats can be adjusted up or down. Pull
upward or push downward on the seat switch. The seat
will move in the direction of the switch. Release the
switch when the desired position is reached.

Reclining The Seatback Forward Or Rearward

The seatback can be reclined both forward and rearward.
Push the seat recliner switch forward or rearward. The
seatback will move in the direction of the switch. Release
the switch when the desired position has been reached.

Power Seat Switch

220

UNDERSTANDING THE FEATURES OF YOUR VEHICLE

WARNING!

Do not ride with the seatback reclined so that the
shoulder belt is no longer resting against your chest.
In a collision you could slide under the seat belt,
which could result in serious injury or death.

Power Lumbar — If Equipped

Vehicles equipped with power driver or passenger seats
may be equipped with power lumbar. The power lumbar
switch is located on the outboard side of the power seat.
Push the switch forward or rearward to increase or
decrease the lumbar support. Push the switch upward or
downward to raise or lower the lumbar support.

Power Seat Recliner Switch

3

UNDERSTANDING THE FEATURES OF YOUR VEHICLE

221

Instruction Front Seat Forward/Rearward Adjustment

On models equipped with instruction seats, the adjusting
bar is located at the front of the seats, near the floor.

While sitting in the seat, lift up on the bar and move the
seat forward or rearward. Release the bar once you have
reached the desired position. Then, using body pressure,
move forward and rearward on the seat to be sure that
the seat adjusters have latched.

Power Lumbar Switch

Front Seat Adjustment

222

UNDERSTANDING THE FEATURES OF YOUR VEHICLE

WARNING!

• Adjusting a seat while driving may be dangerous.

Moving a seat while driving could result in loss of
control which could cause a collision and serious
injury or death.

• Seats should be adjusted before fastening the seat

belts and while the vehicle is parked. Serious
injury or death could result from a poorly adjusted
seat belt.

Instruction Front Seat Recline Adjustment

To adjust the seatback, lift the lever located on the
outboard side of the seat, lean back to the desired
position and release the lever. To return the seatback, lift
the lever, lean forward and release the lever.

WARNING!

Do not ride with the seatback reclined so that the
shoulder belt is no longer resting against your chest.
In a collision you could slide under the seat belt,
which could result in serious injury or death.

Recline Lever

3

UNDERSTANDING THE FEATURES OF YOUR VEHICLE

223

Instruction Seat Height Adjustment — If Equipped

The driver’s seat height can be raised or lowered by
using a lever, located on the outboard side of the seat.
Pull upward on the lever to raise the seat height or push
downward on the lever to lower the seat height.

Front Heated Seats — If Equipped

The front heated seats control buttons are located within
the Uconnect system. You can gain access to the control
buttons through the climate screen or the controls screen.

• Press the heated seat button

once to turn the HI

setting ON.

• Press the heated seat button

a second time to turn

the LO setting ON.

• Press the heated seat button

a third time to turn

the heating elements OFF.

If the HI-level setting is selected, the system will auto-
matically switch to LO-level after approximately 60 min-
utes of continuous operation. At that time, the display
will change from HI to LO, indicating the change. The
LO-level setting will turn OFF automatically after ap-
proximately 45 minutes.

Seat Height Adjustment

224

UNDERSTANDING THE FEATURES OF YOUR VEHICLE

NOTE:

The engine must be running for the heated seats

to operate.

Vehicles Equipped With Remote Start

On models that are equipped with remote start, the
heated seats can be programed to come on during a
remote start.

This feature can be programmed through the Uconnect
system. Refer to “Uconnect Settings” in “Understanding
Your Instrument Panel” for further information.

WARNING!

• Persons who are unable to feel pain to the skin

because of advanced age, chronic illness, diabetes,
spinal cord injury, medication, alcohol use, exhaus-
tion or other physical condition must exercise care
when using the seat heater. It may cause burns

(Continued)

WARNING! (Continued)

even at low temperatures, especially if used for
long periods of time.

• Do not place anything on the seat or seatback that

insulates against heat, such as a blanket or cushion.
This may cause the seat heater to overheat. Sitting
in a seat that has been overheated could cause
serious burns due to the increased surface tempera-
ture of the seat.

Head Restraints

Head restraints are designed to reduce the risk of injury
by restricting head movement in the event of a rear
impact. Head restraints should be adjusted so that the top
of the head restraint is located above the top of your ear.

3

UNDERSTANDING THE FEATURES OF YOUR VEHICLE

225

WARNING!

The head restraints for all occupants must be prop-
erly installed and adjusted prior to operating the
vehicle or occupying a seat. Head restraints should
never be adjusted while the vehicle is in motion.
Driving a vehicle with the head restraints improperly
adjusted or removed could cause serious injury or
death in the event of a collision.

Reactive Head Restraints — Front Seats

The front driver and passenger seats are equipped with
Reactive Head Restraints (RHR). In the event of a rear
impact the RHRs will automatically extend forward
minimizing the gap between the back of the occupant’s
head and the RHR.

The RHRs will automatically return to their normal
position following a rear impact. If the RHRs do not
return to their normal position see your authorized
dealer immediately.

To raise the head restraint, pull upward on the head
restraint. To lower the head restraint, push the adjust-
ment button, located at the base of the head restraint, and
push downward on the head restraint.

NOTE:

To remove the head restraint, raise it as far as it

can go then push the release button and the adjustment
button at the base of each post while pulling the head
restraint up. Seatback angle may need to be adjusted to
fully remove the head restraint. To reinstall the head
restraint, put the head restraint posts into the holes and
push downward. Then adjust the head restraint to the
appropriate height.

226

UNDERSTANDING THE FEATURES OF YOUR VEHICLE

WARNING!

• A loose head restraint thrown forward in a colli-

sion or hard stop could cause serious injury or
death to occupants of the vehicle. Always securely
stow removed head restraints in a location outside
the occupant compartment.

• ALL the head restraints MUST be reinstalled in the

vehicle to properly protect the occupants. Follow
the re-installation instructions above prior to oper-
ating the vehicle or occupying a seat.

• Do not place items over the top of the Reactive

Head Restraint, such as coats, seat covers or por-
table DVD players. These items may interfere with
the operation of the Reactive Head Restraint in the
event of a collision and could result in serious
injury or death.

Front Head Restraint

1 — Release Button
2 — Adjustment Button

3

UNDERSTANDING THE FEATURES OF YOUR VEHICLE

227

Rear Head Restraints

The rear outboard head restraints have three positions
UP, MID and DOWN. The center head restraint has only
two positions, UP and DOWN. When the center seat is
being occupied the head restraint should be in the raised
position. When there are no occupants in the center seat
the head restraint can be lowered for maximum visibility
for the driver.

To raise the head restraint, pull upward on the head
restraint. To lower the head restraint, push the adjust-
ment button, located at the base of the head restraint, and
push downward on the head restraint.

NOTE:

To remove the head restraint, raise it as far as it

can go then push the release button and the adjustment
button at the base of each post while pulling the head
restraint up. Seatback needs to be folded forward to fully
remove the head restraint. To reinstall the head restraint,
put the head restraint posts into the holes and push
downward. Then adjust the head restraint to the appro-
priate height.

228

UNDERSTANDING THE FEATURES OF YOUR VEHICLE

WARNING!

• A loose head restraint thrown forward in a colli-

sion or hard stop could cause serious injury or
death to occupants of the vehicle. Always securely
stow removed head restraints in a location outside
the occupant compartment.

• ALL the head restraints MUST be reinstalled in the

vehicle to properly protect the occupants. Follow
the re-installation instructions above prior to oper-
ating the vehicle or occupying a seat.

• Do not place items over the top of the Reactive

Head Restraint, such as coats, seat covers or por-
table DVD players. These items may interfere with
the operation of the Reactive Head Restraint in the
event of a collision and could result in serious
injury or death.

Rear Head Restraint

1 — Release Button
2 — Adjustment Button

3

UNDERSTANDING THE FEATURES OF YOUR VEHICLE

229

Folding Rear Seat

The rear seatbacks can be folded forward to provide an
additional storage area. To fold the rear seatback, pull on
the loops located on the upper seatback.

NOTE:

The upper seatback loops can be tucked away

when not in use.

After releasing the seatback, it can be folded forward.

Rear Seatback Loops

230

UNDERSTANDING THE FEATURES OF YOUR VEHICLE

When the seatback is folded to the upright position, make
sure it is latched by strongly pulling on the top of the
seatback above the seat strap.

WARNING!

• Be certain that the seatback is securely locked into

position. If the seatback is not securely locked into
position, the seat will not provide the proper sta-
bility for child seats and/or passengers. An improp-
erly latched seat could cause serious injury.

• The cargo area in the rear of the vehicle (with the

rear seatbacks in the locked-up or folded down
position) should not be used as a play area by
children when the vehicle is in motion. They could
be seriously injured in a collision. Children should
be seated and using the proper restraint system.

TO OPEN AND CLOSE THE HOOD

Two latches must be released to open the hood.

1. Pull the hood release lever located under the left side

of the instrument panel.

Folded Rear Seatback

3

UNDERSTANDING THE FEATURES OF YOUR VEHICLE

231

2. Move to the outside of the vehicle and push the safety

catch to the left. The safety catch is located under the
center front edge of the hood.

3. Lift upward on the hood prop rod to release it from the

stowage retainer.

Hood Release Lever

Hood Safety Latch

232

UNDERSTANDING THE FEATURES OF YOUR VEHICLE

4. Place the hood prop rod in the hood slot to secure the

hood in the open position.

CAUTION!

To prevent possible damage, do not slam the hood to
close it. Lower the hood until it is open approxi-
mately 6 inches (15 cm), and then drop it. This should

(Continued)

Hood Prop Rod

Hood Prop Rod Slot

3

UNDERSTANDING THE FEATURES OF YOUR VEHICLE

233

CAUTION! (Continued)

secure both latches. Never drive your vehicle unless
the hood is fully closed, with both latches engaged.

WARNING!

Be sure the hood is fully latched before driving your
vehicle. If the hood is not fully latched, it could open
when the vehicle is in motion and block your vision.
Failure to follow this warning could result in serious
injury or death.

LIGHTS

Headlight Switch

The headlight switch is located on the left side of
the instrument panel. This switch controls the

operation of the headlights, parking lights, instrument
panel lights, instrument panel light dimming, interior
lights and fog lights.

Rotate the headlight switch clockwise to the first detent
for parking light and instrument panel light operation.

Headlight Switch

234

UNDERSTANDING THE FEATURES OF YOUR VEHICLE

Rotate the headlight switch to the second detent for
headlight, parking light and instrument panel light op-
eration.

Automatic Headlights — If Equipped

This system automatically turns the headlights on or off
according to ambient light levels. To turn the system on,
rotate the headlight switch counterclockwise to the
AUTO position. When the system is on, the headlight
time delay feature is also on. This means the headlights
will stay on for up to 90 seconds after you place the
ignition into the OFF position. To turn the automatic
system off, move the headlight switch out of the AUTO
position.

NOTE:

The engine must be running before the headlights

will come on in the automatic mode.

Headlights On With Wipers (Available With
Automatic Headlights Only)

When this feature is active, the headlights will turn on
after the wipers are turned on if the headlight switch is
placed in the AUTO position and programmable feature
is set to ON. In addition, the headlights will turn off
when the wipers are turned off if they were turned on by
this feature.

NOTE:

The Headlights On with Wipers feature can be

turned on or off using the Uconnect System. Refer to
“Uconnect Settings/Customer Programmable Features”
in “Understanding Your Instrument Panel” for further
information.

Headlight Time Delay

This feature provides the safety of headlight illumination
for up to 90 seconds (programmable) when leaving your
vehicle in an unlit area.

3

UNDERSTANDING THE FEATURES OF YOUR VEHICLE

235


Content      ..     12      13      14      15     ..