Dodge Dart (2016 year). Instruction - part 8
 

  Index      Dodge     Dodge Dart (2016 year) - instruction in english


Search            copyright infringement  


Content      ..     6      7      8      9     ..


Dodge Dart (2016 year). Instruction - part 8


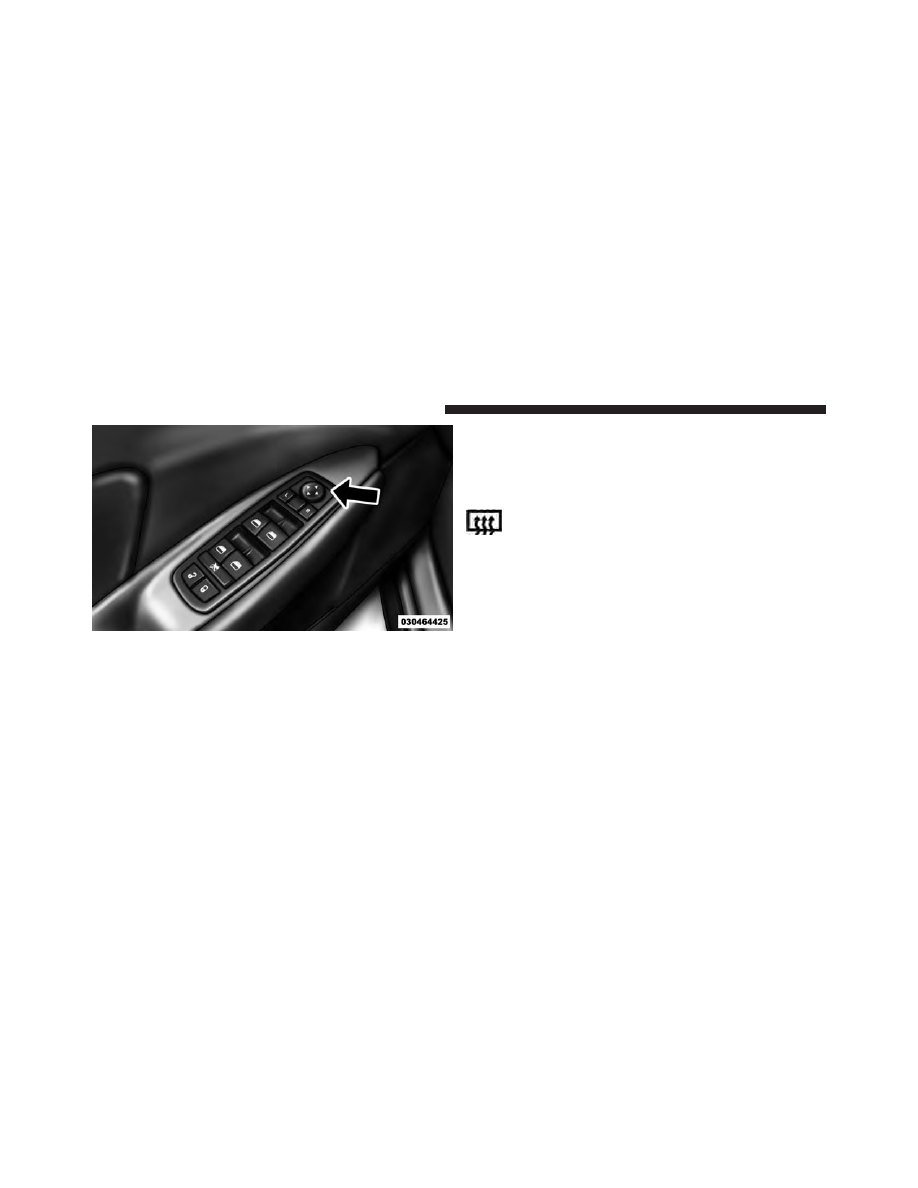
The power mirror controls consist of mirror select but-
tons and a four-way mirror control switch. To adjust a
mirror, push either the L (left) or R (right) button to select
the mirror that you want to adjust.

Using the mirror control switch, push on any of the four
arrows for the direction that you want the mirror to
move.

Heated Mirrors — If Equipped

These mirrors are heated to melt frost or ice. This
feature can be activated whenever you turn on the

rear window defroster (if equipped). Refer to “Rear
Window Features” in “Understanding The Features Of
Your Vehicle” for further information.

Illuminated Vanity Mirrors — If Equipped

An illuminated vanity mirror is on each sun visor. To use
the mirror, rotate the sun visor downward and swing the
mirror cover upward. The light will turn on automati-
cally. Closing the mirror cover will turn off the light.

Power Mirror Control

124

UNDERSTANDING THE FEATURES OF YOUR VEHICLE

Sun Visor “Slide-On Rod” Feature — If Equipped

This feature allows for additional flexibility in position-
ing the visor to block out the sun.

1. Fold down the sun visor.

2. Unclip the visor from the center clip.

3. Pull the sun visor toward the inside rearview mirror to

extend it.

BLIND SPOT MONITORING (BSM) — IF
EQUIPPED

The Blind Spot Monitoring (BSM) system uses two radar-
based sensors, located inside the rear bumper fascia, to
detect highway licensable vehicles (automobiles, trucks,
motorcycles, etc.) that enter the blind spot zones from the
rear/front/side of the vehicle.

Illuminated Vanity Mirror

3

UNDERSTANDING THE FEATURES OF YOUR VEHICLE

125

When the vehicle is started, the BSM warning light will
momentarily illuminate in both outside rear view mirrors
to let the driver know that the system is operational.

The BSM system sensors operate when the vehicle is in
any forward gear or REVERSE and enters stand-by mode
when the vehicle is in PARK (or applied PARK brake for
Instruction transmission).

The BSM detection zone covers approximately one lane
width on both sides of the vehicle 12 ft (3.8 m). The zone

Rear Detection Zones

BSM Warning Light

126

UNDERSTANDING THE FEATURES OF YOUR VEHICLE

length starts at the outside rear view mirror and extends
approximately 10 ft (3 m) beyond the rear bumper of the
vehicle. The BSM system monitors the detection zones on
both sides of the vehicle when the vehicle speed reaches
approximately 6 mph (10 km/h) or higher and will alert
the driver of vehicles in these areas.

NOTE:

• The BSM system does NOT alert the driver about

rapidly approaching vehicles that are outside the de-
tection zones.

• The BSM system detection zone DOES NOT change if

your vehicle is towing a trailer. Therefore, visually
verify the adjacent lane is clear for both your vehicle
and trailer before making a lane change. If the trailer or
other object (i.e., bicycle, sports equipment) extends
beyond the side of your vehicle, this may result in the
BSM warning light remaining illuminated the entire
time the vehicle is in a forward gear.

The area on the rear fascia where the radar sensors are
located must remain free of snow, ice, and dirt/road
contamination so that the BSM system can function
properly. Do not block the area of the rear fascia where
the radar sensors are located with foreign objects (bum-
per stickers, bicycle racks, etc).

The BSM system notifies the driver of objects in the
detection zones by illuminating the BSM warning light
located in the outside mirrors in addition to sounding an
audible (chime) alert and reducing the radio volume.
Refer to “Modes Of Operation” for further information.

The BSM system monitors the detection zone from three
different entry points (side, rear, front) while driving to
see if an alert is necessary. The BSM system will issue an
alert during these types of zone entries.

3

UNDERSTANDING THE FEATURES OF YOUR VEHICLE

127

Entering From The Side

Vehicles that move into your adjacent lanes from either
side of the vehicle.

Entering From The Rear

Vehicles that come up from behind your vehicle on either
side and enter the rear detection zone with a relative
speed of less than 30 mph (48 km/h).

Side Monitoring

Rear Monitoring

128

UNDERSTANDING THE FEATURES OF YOUR VEHICLE

Overtaking Traffic

If you pass another vehicle slowly (with a relative speed
of less than 15 mph (24 km/h) and the vehicle remains in
the blind spot for approximately 1.5 seconds, the warning
light will be illuminated. If the difference in speed
between the two vehicles is greater than 15 mph
(24 km/h), the warning light will not illuminate.

The BSM system is designed not to issue an alert on
stationary objects such as guardrails, posts, walls, foliage,
berms, etc. However, occasionally the system may alert
on such objects. This is normal operation and your
vehicle does not require service.

Overtaking/Approaching

3

UNDERSTANDING THE FEATURES OF YOUR VEHICLE

129

The BSM system will not alert you of objects that are
traveling in the opposite direction of the vehicle in
adjacent lanes.

Overtaking/Passing

Stationary Objects

130

UNDERSTANDING THE FEATURES OF YOUR VEHICLE

WARNING!

The Blind Spot Monitoring system is only an aid to
help detect objects in the blind spot zones. The BSM

(Continued)

WARNING! (Continued)

system is not designed to detect pedestrians, bicy-
clists, or animals. Even if your vehicle is equipped
with the BSM system, always check your vehicle’s
mirrors, glance over your shoulder, and use your turn
signal before changing lanes. Failure to do so can
result in serious injury or death.

Rear Cross Path

The Rear Cross Path (RCP) feature is intended to aid the
driver when backing out of parking spaces where the
vision of oncoming vehicles may be blocked. Proceed
slowly and cautiously out of the parking space until the
rear end of the vehicle is exposed. The RCP system will
then have a clear view of the cross traffic and if an
oncoming vehicle is detected, will alert the driver.

Opposing Traffic

3

UNDERSTANDING THE FEATURES OF YOUR VEHICLE

131

RCP monitors the rear detection zones on both sides of
the vehicle, for objects that are moving toward the side of
the vehicle with a minimum speed of approximately
3 mph (5 km/h), to objects moving a maximum of
approximately 20 mph (32 km/h), such as in parking lot
situations.

NOTE:

In a parking lot situation, oncoming vehicles can

be obscured by vehicles parked on either side. If the
sensors are blocked by other structures or vehicles, the
system will not be able to alert the driver.

When RCP is on and the vehicle is in REVERSE, the
driver is alerted using both the visual and audible
alarms, including reducing the radio volume.

WARNING!

Rear Cross Path (RCP) is not a Back Up Aid system.
It is intended to be used to help a driver detect an
oncoming vehicle in a parking lot situation. Drivers
must be careful when backing up, even when using
RCP. Always check carefully behind your vehicle,
look behind you, and be sure to check for pedestri-
ans, animals, other vehicles, obstructions, and blind
spots before backing up. Failure to do so can result in
serious injury or death.

RCP Detection Zones

132

UNDERSTANDING THE FEATURES OF YOUR VEHICLE

Modes Of Operation

Modes Of Operation With Uconnect System — If
Equipped

Three selectable modes of operation are available in the
Uconnect system screen. Refer to “Customer Program-
mable Features — Uconnect Access settings ” in “Under-
standing Your Instrument Panel” for further information.

Blind Spot Alert Lights Only

When operating in Blind Spot Alert mode, the BSM
system will provide a visual alert in the appropriate side
view mirror based on a detected object. However, when
the system is operating in Rear Cross Path mode, the
system will respond with both visual and audible alerts
when a detected object is present. Whenever an audible
alert is requested, the radio volume is reduced.

Blind Spot Alert Lights/Chime

When operating in Blind Spot Alert Lights/Chime mode,
the BSM system will provide a visual alert in the appro-
priate side view mirror based on a detected object. If the
turn signal is then activated, and it corresponds to an
alert present on that side of the vehicle, an audible chime
will also be sounded. Whenever a turn signal and de-
tected object are present on the same side at the same
time, both the visual and audio alerts will be issued. In
addition to the audible alert the radio (if on) volume will
be muted.

NOTE:
• Whenever an audible alert is requested by the BSM

system, the radio volume is muted.

• If the hazard flashers are on, the system will request

the appropriate visual alert only.

3

UNDERSTANDING THE FEATURES OF YOUR VEHICLE

133

When the system is in RCP, the system shall respond with
both visual and audible alerts when a detected object is
present. Whenever an audible alert is requested, the radio
volume is reduced. Turn/hazard signal status is ignored;
the RCP state always requests the chime.

Blind Spot Alert Off

When the BSM system is turned off there will be no
visual or audible alerts from either the BSM or RCP
systems.

NOTE:

The BSM system will store the current operating

mode when the vehicle is shut off. Each time the vehicle
is started the previously stored mode will be recalled and
used.

General Information

This vehicle has systems that operate on radio frequency
that comply with Part 15 of the Federal Communications
Commission (FCC) rules and with Industry Canada
Standards RSS- GEN/210/220/310.

Operation is subject to the following two conditions:

1. The device may not cause harmful interference.

2. The device must accept any interference received,

including interference that may cause undesired op-
eration of the device.

Changes or modifications to any of these systems by
other than an authorized service facility could void
authorization to use this equipment.

134

UNDERSTANDING THE FEATURES OF YOUR VEHICLE

Uconnect PHONE (Uconnect 200)

Uconnect Phone is a voice-activated, hands-free, in-
vehicle communications system. Uconnect Phone allows
you to dial a phone number with your mobile phone
using simple voice commands (e.g., “Call”

ѧ “Mike” ѧ

“Work” or “Dial”

ѧ “248-555-1212”). Your mobile phone’s

audio is transmitted through your vehicle’s audio sys-
tem; the system will automatically mute your radio when
using the Uconnect Phone.

NOTE:

The Uconnect Phone requires a mobile phone

equipped with the Bluetooth “Hands-Free Profile”, Ver-
sion 0.96 or higher. See the Uconnect website for sup-
ported phones.

For

Uconnect

phone

compatibility

-

visit

UconnectPhone.com or call 1-877-855-8400. Canadian
Residents – UconnectPhone.com or call, 1-800-465-2001
(English) or 1-800-387-9983 (French).

For additional information on Uconnect:

• U.S. residents - visit DriveUconnect.com or call 1-877-

855-8400.

• Canadian Residents - visit DriveUconnect.ca or call,

1-800-465-2001 (English) or 1-800-387-9983 (French).

Uconnect Phone allows you to transfer calls between the
system and your mobile phone as you enter or exit your
vehicle and enables you to mute the system’s microphone
for private conversation.

Uconnect features Bluetooth technology - the global
standard that enables different electronic devices to con-
nect to each other without wires or a docking station, so
Uconnect Phone works no matter where you stow your
mobile phone (be it your purse, pocket, or briefcase), as
long as your phone is turned on and has been paired to
the vehicle’s Uconnect Phone. The Uconnect Phone al-
lows up to seven mobile phones to be linked to the

3

UNDERSTANDING THE FEATURES OF YOUR VEHICLE

135

system. Only one linked (or paired) mobile phone can be
used with the system at a time. The system is available in
English, Spanish, or French languages.

WARNING!

Any voice commanded system should be used only
in safe driving conditions following all applicable
laws, including laws regarding phone use. Your at-
tention should be focused on safely operating the
vehicle. Failure to do so may result in a collision
causing serious injury or death.

Uconnect Phone Button

The steering wheel controls will contain the
two control buttons (Uconnect Phone

but-

ton and Voice Command

button) that will

enable you to access the system. When you

push the Uconnect Phone

button you will hear a

BEEP. The beep is your signal to give a command.

Voice Command Button

When you push the Voice Command

but-

ton you will hear a BEEP. The beep is your
signal to give a command.

The Uconnect Phone can be used with any Hands-Free
Profile certified Bluetooth mobile phone. See the
Uconnect website for supported phones. Refer to your
mobile service provider or the phone manufacturer for
details.

The Uconnect Phone is fully integrated with the vehicle’s
audio system. The volume of the Uconnect Phone can be
adjusted either from the radio volume control knob or
from the steering wheel radio control (right switch), if so
equipped.

The radio display will be used for visual prompts from
the Uconnect Phone such as “Phone” or caller ID.

136

UNDERSTANDING THE FEATURES OF YOUR VEHICLE

Operation

Voice commands can be used to operate the Uconnect
Phone and to navigate through the Uconnect Phone
menu structure. Voice commands are required after most
Uconnect Phone prompts. You will be prompted for a
specific command and then guided through the available
options.

• Prior to giving a voice command, one must wait for the

beep.

• For certain operations, compound commands can be

used. For example, instead of saying “Setup”, “Device
Pairing” and then “Pair a Device”, the following
compound command can be said: “Setup”, “Device
Pairing” and “Pair a Bluetooth Device”.

• For each feature explanation in this section, only the

compound form of the voice command is given. You
can also break the commands into parts and say each

part of the command when you are asked for it. For
example, you can use the compound form voice com-
mand “Phonebook New Entry”, or you can break the
compound form command into two voice commands:
“Phonebook” and “New Entry”. Please remember, the
Uconnect Phone works best when you talk in a normal
conversational tone, as if speaking to someone sitting a
few feet/meters away from you.

Voice Command Tree

Refer to “Voice Tree” in this section.

Help Command

If you need assistance at any prompt, or if you want to
know your options at any prompt, say “Help” following
the beep. The Uconnect Phone will then play some of the
options.

3

UNDERSTANDING THE FEATURES OF YOUR VEHICLE

137

To activate the Uconnect Phone, simply push the Phone

button and follow the audible prompts for direc-

tions. Uconnect Phone sessions begin with a push of
the Phone

button on the steering wheel.

Cancel Command

At any prompt, after the beep, you can say

⬙Cancel⬙ and

you will be returned to the main menu. However, in a
few instances the system will take you back to the
previous menu.

Pair (Link) Uconnect Phone To A Mobile Phone

To begin using your Uconnect Phone, you must pair your
compatible Bluetooth enabled mobile phone.

To complete the pairing process, you will need to refer-
ence your mobile phone Owner’s Instruction. The Uconnect
website may also provide detailed instructions for pair-
ing.

NOTE:

If other phones are present during the pairing

process make sure they are switched to off or the
bluetooth is disabled before proceeding.

The following are general phone to Uconnect Phone
pairing instructions:

• Push the Phone

button to begin.

• After the “Ready” prompt and the following beep, say

“Device Pairing”.

• When prompted, after the beep, say “Pair a Device”

and follow the audible prompts.

• For identification purposes, you will be prompted to

give the Uconnect Phone a name for your mobile
phone. Each mobile phone that is paired should be
given a unique phone name.

• You will then be asked “Should paired device be set as

Favorite?” If yes this phone will become the highest

138

UNDERSTANDING THE FEATURES OF YOUR VEHICLE

priority. You can pair up to seven mobile phones to
your Uconnect Phone. However, at any given time,
only one mobile phone can be in use, connected to
your Uconnect System. The priority allows the
Uconnect Phone to know which mobile phone to use if
multiple mobile phones are in the vehicle at the same
time.

• Start paring procedure on device. See device instruction

for instructions.

• Select Uconnect on the device and enter the four-digit

Personal Identification Number (PIN) displayed on
radio into your mobile phone.

Dial By Saying A Number

• Push the Phone

button to begin.

• After the “Ready” prompt and the following beep, say

“Dial.”

• The system will prompt you to say the number you

want to call.

• For example, you can say “234-567-8901.”
• The Uconnect Phone will confirm the phone number

and then dial. The number will appear in the display
of certain radios.

Call By Saying A Name

• Push the Phone

button to begin.

• After the “Ready” prompt and the following beep, say

“Call.”

• The system will prompt you to say the name of the

person you want to call.

• After the “Ready” prompt and the following beep, say

the name of the person you want to call. For example,
you can say “john doe” or “john doe, mobile,” where
John Doe is a previously stored name entry in the

3

UNDERSTANDING THE FEATURES OF YOUR VEHICLE

139


Content      ..     6      7      8      9     ..