Dodge Ram 1500 (2011 year). Instruction - part 28


  Index      Dodge     Dodge Ram 1500 (2011 year) - instruction in english


Search            copyright infringement  


Content      ..     26      27      28      29     ..


Dodge Ram 1500 (2011 year). Instruction - part 28


Maintenance

CAUTION!

Do not use ethanol mixture greater than 85% in your
vehicle. It will cause difficulty in cold starting and
may affect driveability.
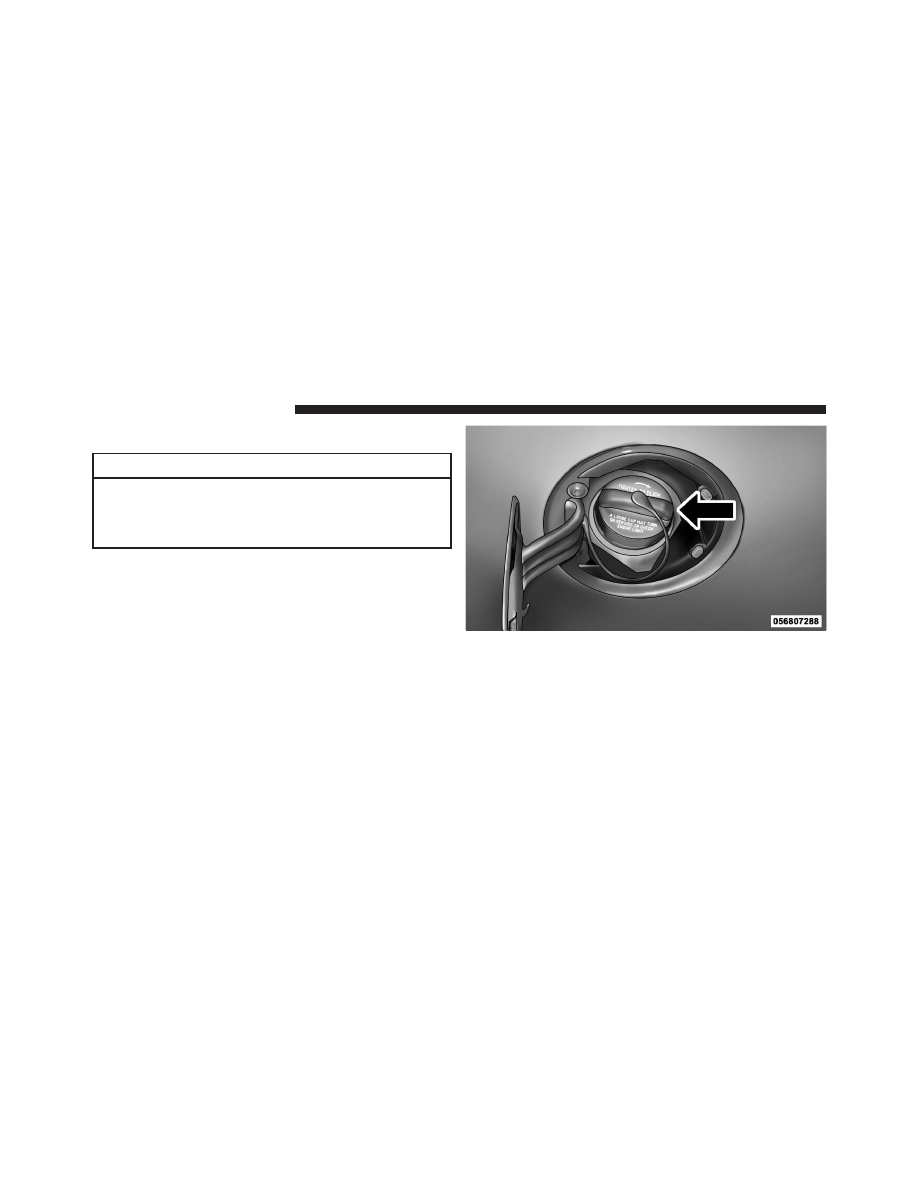
ADDING FUEL
The fuel filler cap (gas cap) is located behind the fuel
filler door, on the left side of the vehicle. Open the fuel
door and remove the fuel cap by turning it counter-
clockwise.

NOTE:

When removing the fuel filler cap, lay the cap

tether in the hook, located on the fuel filler door.

Fuel Filler Cap

444

STARTING AND OPERATING

CAUTION!

• Damage to the fuel system or emissions control

system could result from using an improper fuel
tank filler tube cap (gas cap).

• A poorly fitting gas cap could let impurities into

the fuel system.

• A poorly fitting gas cap may cause the “Malfunc-

tion Indicator Light (MIL)” to turn on.

• To avoid fuel spillage and overfilling, do not “top

off” the fuel tank after filling. When the fuel
nozzle “clicks” or shuts off, the fuel tank is full.

WARNING!

• Never have any smoking materials lit in or near

the vehicle when the gas cap is removed or the
tank is being filled.

(Continued)

WARNING! (Continued)

• Never add fuel to the vehicle when the engine is

running.

• A fire may result if gasoline is pumped into a

portable container that is inside of a vehicle. You
could be burned. Always place gas containers on
the ground while filling.

NOTE:

• Tighten the gas cap until you hear a “clicking” sound.

This is an indication that the gas cap is tightened
properly. The MIL in the instrument cluster may turn
on if the gas cap is not secured properly. Make sure
that the gas cap is tightened each time the vehicle is
refueled.

• When the fuel nozzle “clicks” or shuts off, the fuel

tank is full.

5

STARTING AND OPERATING

445

Loose Fuel Filler Cap Message

If the vehicle diagnostic system determines
that the fuel filler cap is loose, improperly
installed, or damaged, a loose gascap indicator
will display in the EVIC telltale display area.

Refer to “Electronic Vehicle Information Center (EVIC) in
“Understanding Your Instrument Panel” for further in-
formation. Tighten the fuel filler cap properly and press
the SELECT button to turn off the message. If the
problem continues, the message will appear the next time
the vehicle is started.

VEHICLE LOADING

Certification Label
As required by National Highway Traffic Safety Admin-
istration regulations, your vehicle has a certification label
affixed to the driver’s side door or pillar.

This label contains the month and year of manufacture,
Gross Vehicle Weight Rating (GVWR), Gross Axle Weight

Rating (GAWR) front and rear, and Vehicle Identification
Number (VIN). A Month-Day-Hour (MDH) number is
included on this label and indicates the Month, Day and
Hour of manufacture. The bar code that appears on the
bottom of the label is your VIN.

Gross Vehicle Weight Rating (GVWR)
The GVWR is the total permissible weight of your vehicle
including driver, passengers, vehicle, options and cargo.
The label also specifies maximum capacities of front and
rear axle systems (GAWR). Total load must be limited so
GVWR and front and rear GAWR are not exceeded.

Payload
The payload of a vehicle is defined as the allowable load
weight a truck can carry, including the weight of the
driver, all passengers, options and cargo.

446

STARTING AND OPERATING

Gross Axle Weight Rating (GAWR)
The GAWR is the maximum permissible load on the front
and rear axles. The load must be distributed in the cargo
area so that the GAWR of each axle is not exceeded.

Each axle GAWR is determined by the components in the
system with the lowest load carrying capacity (axle,
springs, tires or wheels). Heavier axles or suspension
components sometimes specified by purchasers for in-
creased durability does not necessarily increase the vehi-
cle’s GVWR.

Tire Size
The tire size on the label represents the actual tire size on
your vehicle. Replacement tires must be equal to the load
capacity of this tire size.

Rim Size
This is the rim size that is appropriate for the tire size
listed.

Inflation Pressure
This is the cold tire inflation pressure for your vehicle for
all loading conditions up to full GAWR.

Curb Weight
The curb weight of a vehicle is defined as the total weight
of the vehicle with all fluids, including vehicle fuel, at full
capacity conditions, and with no occupants or cargo
loaded into the vehicle. The front and rear curb weight
values are determined by weighing your vehicle on a
commercial scale before any occupants or cargo are
added.

Loading
The actual total weight and the weight of the front and
rear of your vehicle at the ground can best be determined
by weighing it when it is loaded and ready for operation.

The entire vehicle should first be weighed on a commer-
cial scale to insure that the GVWR has not been exceeded.
The weight on the front and rear of the vehicle should

5

STARTING AND OPERATING

447

then be determined separately to be sure that the load is
properly distributed over the front and rear axle. Weigh-
ing the vehicle may show that the GAWR of either the
front or rear axles has been exceeded but the total load is
within the specified GVWR. If so, weight must be shifted
from front to rear or rear to front as appropriate until the
specified weight limitations are met. Store the heavier
items down low and be sure that the weight is distributed
equally. Stow all loose items securely before driving.

Improper weight distributions can have an adverse effect
on the way your vehicle steers and handles and the way
the brakes operate.

CAUTION!

Do not load your vehicle any heavier than the GVWR
or the maximum front and rear GAWR. If you do,
parts on your vehicle can break, or it can change the
way your vehicle handles. This could cause you to
lose control. Also overloading can shorten the life of
your vehicle.

TRAILER TOWING
In this section you will find safety tips and information
on limits to the type of towing you can reasonably do
with your vehicle. Before towing a trailer, carefully
review this information to tow your load as efficiently
and safely as possible.

To maintain warranty coverage, follow the requirements
and recommendations in this instruction concerning ve-
hicles used for trailer towing.

448

STARTING AND OPERATING

Common Towing Definitions
The following trailer towing related definitions will assist
you in understanding the following information:

Gross Vehicle Weight Rating (GVWR)
The GVWR is the total allowable weight of your vehicle.
This includes driver, passengers, cargo and tongue
weight. The total load must be limited so that you do not
exceed the GVWR. Refer to “Vehicle Loading/Vehicle
Certification Label” in “Starting and Operating” for
further information.

Gross Trailer Weight (GTW)
The GTW is the weight of the trailer plus the weight of all
cargo, consumables and equipment (permanent or tem-
porary) loaded in or on the trailer in its

⬙loaded and

ready for operation

⬙ condition.

The recommended way to measure GTW is to put your
fully loaded trailer on a vehicle scale. The entire weight
of the trailer must be supported by the scale.

Gross Combination Weight Rating (GCWR)
The GCWR is the total permissible weight of your vehicle
and trailer when weighed in combination.

NOTE:

The GCWR rating includes a 150 lbs (68 kg)

allowance for the presence of a driver.

Gross Axle Weight Rating (GAWR)
The GAWR is the maximum capacity of the front and rear
axles. Distribute the load over the front and rear axles
evenly. Make sure that you do not exceed either front or
rear GAWR. Refer to “Vehicle Loading/Vehicle Certifica-
tion Label” in “Starting and Operating” for further
information.

5

STARTING AND OPERATING

449

WARNING!

It is important that you do not exceed the maximum
front or rear GAWR. A dangerous driving condition
can result if either rating is exceeded. You could lose
control of the vehicle and have a collision.

Tongue Weight (TW)
The tongue weight is the downward force exerted on the
hitch ball by the trailer. In most cases it should not be less
than 10% or more than 15% of the trailer load. You must
consider this as part of the load on your vehicle.

Frontal Area
The frontal area is the maximum height multiplied by the
maximum width of the front of a trailer.

Trailer Sway Control
The trailer sway control is a telescoping link that can be
installed between the hitch receiver and the trailer tongue

that typically provides adjustable friction associated with
the telescoping motion to dampen any unwanted trailer
swaying motions while traveling.

Weight-Carrying Hitch
A weight-carrying hitch supports the trailer tongue
weight, just as if it were luggage located at a hitch ball or
some other connecting point of the truck. These kind of
hitches are the most popular on the market today and
they are commonly used to tow small- and medium-
sized trailers.

Weight-Distributing Hitch
A weight-distributing system works by applying lever-
age through spring (load) bars. They are typically used
for heavier loads to distribute trailer tongue weight to the
tow vehicle’s front axle and the trailer axle(s). When used
in accordance with the manufacturer’s directions, it pro-
vides for a more level ride, offering more consistent
steering and brake control, thereby enhancing towing

450

STARTING AND OPERATING

safety. The addition of a friction/hydraulic sway control
also dampens sway caused by traffic and crosswinds and
contributes positively to tow vehicle and trailer stability.
Trailer sway control and a weight distributing (load
equalizing) hitch are recommended for heavier Tongue
Weights (TW) and may be required depending on vehicle
and trailer configuration/loading to comply with GAWR
requirements.

WARNING!

• An improperly adjusted weight distributing hitch

system may reduce handling, stability and braking
performance and could result in a collision.

• Weight distributing systems may not be compat-

ible with surge brake couplers. Consult with your
hitch and trailer manufacturer or a reputable Rec-
reational

Vehicle

dealer

for

additional

information.

EXAMPLE — Without Weight-Distributing Hitch

(Incorrect)

5

STARTING AND OPERATING

451

Fifth-Wheel Hitch
The fifth-wheel hitch is a special high platform with a
coupling that mounts over the rear axle of the tow vehicle
in the truck bed. It connects a vehicle and fifth-wheel
trailer with a coupling king pin.

EXAMPLE — With Weight-Distributing Hitch (Correct)

EXAMPLE — Improper Adjustment of Weight-

Distributing Hitch (Incorrect)

452

STARTING AND OPERATING

Gooseneck Hitch
The gooseneck hitch employs a pivoted coupling arm
which attaches to a ball mounted in the bed of a pickup
truck. The coupling arm connects to the hitch mounted
over the rear axle in the truck bed.

Trailer Hitch Classification
The rear bumper is intended to tow trailers up to
5,000 lbs (2 268 kg) without added equipment or alter-
ations to the standard equipment. Your vehicle may be
factory equipped for safe towing of trailers weighing
over 5,000 lbs (2 268 kg) with the optional Trailer Tow
Prep Package. See your dealer for package content.

The following chart provides the industry standard for
the maximum trailer weight a given trailer hitch class can
tow and should be used to assist you in selecting the
correct trailer hitch for your intended towing condition.
Refer to “Trailer Towing Weights (Maximum Trailer
Weight Ratings)” for the website address that contains
the necessary information for your specific drivetrain.

Trailer Hitch Classification Definitions

Class

Max. Trailer Hitch Industry

Standards

Class I - Light Duty

2,000 lbs (907 kg)

Class II - Medium
Duty

3,500 lbs (1587 kg)

Class III - Heavy Duty

5,000 lbs (2268 kg)

Class IV - Extra
Heavy Duty

10,000 lbs (4540 kg)

Fifth Wheel/
Gooseneck

Greater than 10,000 lbs

(4540 kg)

Refer to the “Trailer Towing Weights (Maximum
Trailer Weight Ratings)” for the Maximum Gross
Trailer Weight (GTW) towable for your given drive-
train.

All trailer hitches should be professionally installed on
your vehicle.

5

STARTING AND OPERATING

453

Trailer Towing Weights (Maximum Trailer Weight
Ratings)

NOTE:

For additional trailer towing information in-

cluding maximum trailer and tongue weight rating for
your vehicle, refer to the following website addresses:

• http:// www.dodge.com/bodybuilder.
• http:// www.dodge.ca (Canada).

Trailer and Tongue Weight
Always load a trailer with 60% to 65% of the weight in
the front of the trailer. This places 10% to 15% of the GTW
on the tow hitch of your vehicle. Loads balanced over the
wheels or heavier in the rear can cause the trailer to sway
severely

side to side which will cause loss of control of

the vehicle and trailer. Failure to load trailers heavier in
front is the cause of many trailer collisions.

Consider the following items when computing the
weight on the rear axle of the vehicle:

• The tongue weight of the trailer
• The weight of any other type of cargo or equipment

put in or on your vehicle

• The weight of the driver and all passengers.

454

STARTING AND OPERATING

NOTE:

Remember that everything put into or on the

trailer adds to the load on your vehicle. Also, additional
factory-installed options or dealer-installed options must
be considered as part of the total load on your vehicle.
Refer to “Tire Safety Information/Tire and Loading In-
formation Placard” in “Starting and Operating” for fur-
ther information.

Towing Requirements
To promote proper break-in of your new vehicle drive-
train components the following guidelines are recom-
mended:

CAUTION!

• Do not tow a trailer at all during the first 500 miles

(805 km) the new vehicle is driven. The engine,
axle or other parts could be damaged.

• Then, during the first 500 miles (805 km) that a

trailer is towed, do not drive over 50 mph
(80 km/h) and do not make starts at full throttle.
This helps the engine and other parts of the
vehicle wear in at the heavier loads.

5

STARTING AND OPERATING

455

WARNING!

Improper towing can lead to a collision. Follow these
guidelines to make your trailer towing as safe as
possible:
• Make certain that the load is secured in the trailer

and will not shift during travel. When trailering
cargo that is not fully secured, dynamic load shifts
can occur that may be difficult for the driver to
control. You could lose control of your vehicle and
have a collision.

• When hauling cargo or towing a trailer, do not

overload your vehicle or trailer. Overloading can
cause a loss of control, poor performance or dam-
age to brakes, axle, engine, transmission, steering,
suspension, chassis structure or tires.

(Continued)

WARNING! (Continued)

• Safety chains must always be used between your

vehicle and trailer. Always connect the chains to
the hook retainers of the vehicle hitch. Cross the
chains under the trailer tongue and allow enough
slack for turning corners.

• Vehicles with trailers should not be parked on a

grade. When parking, apply the parking brake on
the tow vehicle. Put the tow vehicle transmission
in PARK. For four-wheel drive vehicles, make sure
the transfer case is not in NEUTRAL. Always,
block or

chockⴖ the trailer wheels.

• GCWR must not be exceeded.

• Total weight must be distributed between the tow

vehicle and the trailer such that the following four
ratings are not exceeded:
1. GVWR

(Continued)

456

STARTING AND OPERATING

WARNING! (Continued)

2. GTW
3. GAWR
4. Trailer tongue weight rating for the trailer hitch
utilized (This requirement may limit the ability to
always achieve the 10% to 15% range of tongue
weight as a percentage of total trailer weight).

Towing Requirements – Tires

• Do not attempt to tow a trailer while using a compact

spare tire.

• Proper tire inflation pressures are essential to the safe

and satisfactory operation of your vehicle. Refer to
“Tires – General Information” in “Starting and Oper-
ating” for proper tire inflation procedures.

• Check the trailer tires for proper tire inflation pres-

sures before trailer usage.

• Check for signs of tire wear or visible tire damage

before towing a trailer. Refer to “Tires – General
Information” in “Starting and Operating” for the
proper inspection procedure.

• When replacing tires, refer to “Tires – General Infor-

mation” in “Starting and Operating” for proper tire
replacement procedures. Replacing tires with a higher
load carrying capacity will not increase the vehicle’s
GVWR and GAWR limits.

Towing Requirements – Trailer Brakes

• Do not interconnect the hydraulic brake system or

vacuum system of your vehicle with that of the trailer.
This could cause inadequate braking and possible
personal injury.

• An electronically actuated trailer brake controller is

required when towing a trailer with electronically

5

STARTING AND OPERATING

457

actuated brakes. When towing a trailer equipped with
a hydraulic surge actuated brake system, an electronic
brake controller is not required.

• Trailer brakes are recommended for trailers over

1,000 lbs (454 kg) and required for trailers in excess of
2,000 lbs (907 kg).

CAUTION!

If the trailer weighs more than 1,000 lbs (454 kg)
loaded, it should have its own brakes and they
should be of adequate capacity. Failure to do this
could lead to accelerated brake lining wear, higher
brake pedal effort, and longer stopping distances.

WARNING!

• Do not connect trailer brakes to your vehicle’s

hydraulic brake lines. It can overload your brake
system and cause it to fail. You might not have
brakes when you need them and could have a
collision.

• Towing any trailer will increase your stopping

distance. When towing you should allow for addi-
tional space between your vehicle and the vehicle
in front of you. Failure to do so could result in a
collision.

Integrated Trailer Brake Module – If Equipped
Your vehicle may have a Integrated Trailer Brake Module
for electric trailer brakes.

458

STARTING AND OPERATING

NOTE:

This module has been designed and verified for

electric trailer brakes. To determine the type of brakes on
your trailer, check with your trailer manufacturer or
dealer.

The user interface consists of the following:

GAIN/ Brake Output Power Display
Shows the current GAIN setting.

This display may also be used to display diagnostic
information, if needed.

• SC — Short Circuit to Ground
• Sb — Short to Battery
• CF — Controller Fault – If this message appears on the

display, see your authorized dealer.

When the vehicle brakes are applied, the display will no
longer show GAIN and will change to the output to the
trailer brakes.

Instruction Brake Control Lever
Slide the instruction brake control lever to the right to
activate power to the trailer’s electric brakes independent
of the tow vehicle’s brakes. If the instruction brake control

1 — GAIN/Brake Output Power Display
2 — Instruction Brake Control Lever
3 — Trailer Brake Status Indicator Light
4 — GAIN Adjustment Buttons

5

STARTING AND OPERATING

459


Content      ..     26      27      28      29     ..