Dodge Magnum (2008 year). Instruction - part 8


  Index      Dodge     Dodge Magnum (2008 year) - instruction in english


Search            copyright infringement  


Content      ..     6      7      8      9     ..


Dodge Magnum (2008 year). Instruction - part 8


inches (15 cm), and then drop it. This should secure both
latches. Never drive your vehicle unless the hood is fully
closed, with both latches engaged.

WARNING!

If the hood is not fully latched, it could fly up when
the vehicle is moving and block your forward vision.
You could have a collision. Be sure all hood latches
are fully latched before driving.
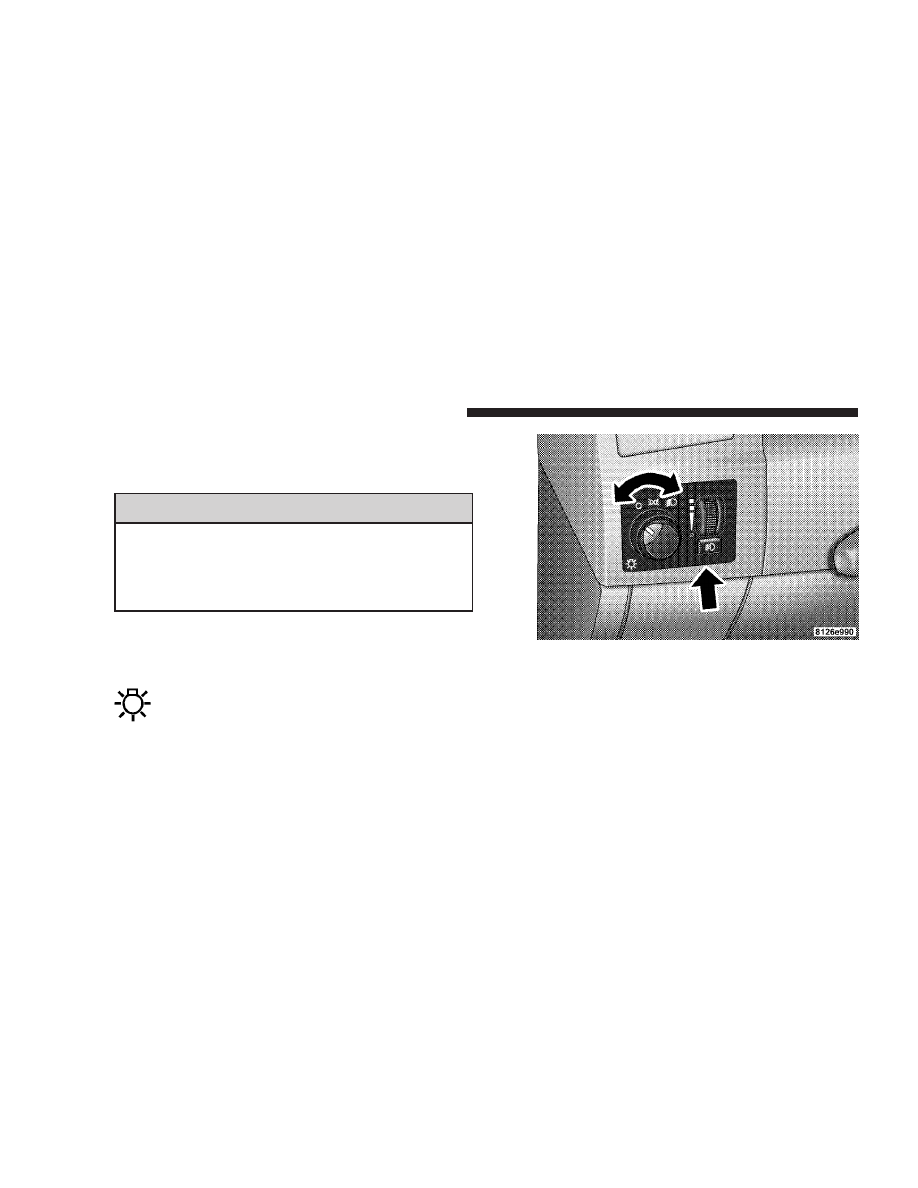
LIGHTS

Headlight Switch

The headlight switch is located on the left side of
the instrument panel. This switch controls the
operation of the headlights, parking lights, instru-

ment panel lights, instrument panel light dimming, inte-
rior lights, and fog lights.

Rotate the headlight switch clockwise to the first detent
for parking light and instrument panel light operation.
Turn it to the second detent for headlight, park light, and
instrument panel light operation.

Headlight Switch

124

UNDERSTANDING THE FEATURES OF YOUR VEHICLE

Automatic Headlights — If Equipped

This system automatically turns the headlights ON or
OFF according to ambient light levels. To turn the system
ON, rotate the headlight switch counter-clockwise to the
AUTO (A) position. When the system is ON, the Head-
light Time Delay feature is also ON. This means the
headlights will stay ON for up to 90 seconds after you
turn the ignition switch OFF. To turn the Automatic
System OFF, move the headlight switch out of the AUTO
(A) position.

NOTE:

The engine must be running before the head-

lights will come ON in the Automatic mode.

Headlight Switch

UNDERSTANDING THE FEATURES OF YOUR VEHICLE

125

3

Headlights On with Wipers (Available with Auto
Headlights Only)

When this feature is active, the headlights will turn on
approximately 10 seconds after the wipers are turned on
if the headlight switch is placed in the AUTO position. In
addition, the headlights will turn off when the wipers are
turned off if they were turned on by this feature.

The Headlights On with Wipers feature can be turned on
or off through the Electronic Vehicle Information Center
(EVIC) — if equipped. For details, refer to ”Headlights
On with Wipers,” under “Personal Settings (Customer
Programmable Features),” under “Electronic Vehicle In-
formation Center” in Section 4 of this instruction.

Headlight Time Delay

This feature provides the safety of headlight illumination
for 90 seconds (programmable) when leaving your ve-
hicle in an unlighted area.

To activate the delay feature, turn off the ignition switch
while the headlights are still on. Then, turn off the
headlights within 45 seconds. The delay interval begins
when headlight switch is turned off.

If you turn the headlights, park lights, or ignition switch
on again, the system will cancel the delay.

If you turn the headlights off before the ignition, they will
turn off in the normal manner.

NOTE:

The lights must be turned off within 45 seconds

of turning the ignition off to activate this feature.

The Headlight delay time is programmable on vehicles
equipped with the Electronic Vehicle Information Center
(EVIC). For details, refer to “Delay Turning Headlights
Off,” under “Personal Settings (Customer Programmable
Features),” under “Electronic Vehicle Information Center
(EVIC)” in Section 4 of this instruction.

126

UNDERSTANDING THE FEATURES OF YOUR VEHICLE

Daytime Running Lights — If Equipped

The high beam headlights will come on as Daytime
Running Lights, whenever the ignition switch is on, the
headlights are off, and the parking brake is off. The
headlight switch must be used for normal nighttime
driving.

Lights-on Reminder

If the headlights or parking lights are on after the ignition
is turned OFF, a chime will sound to alert the driver
when the driver’s door is opened.

Fog Lights — If Equipped

The front fog light switch is on the headlight
switch below the dimmer control. To activate the
front fog lights, turn on the parking lights or the

low beam headlights and press the fog light switch.

An indicator light in the instrument cluster illuminates
when the fog lights are turned on.

NOTE:

The fog lights will operate with the low beam

headlights, or parking lights on. However, selecting the
high beam headlights will turn off the fog lights.

Multi-Function Lever

The multi-function lever controls the operation of the turn
signals, headlight beam selection, and passing lights. The
lever is located on the left side of the steering column.

Multi-Function Lever

UNDERSTANDING THE FEATURES OF YOUR VEHICLE

127

3

Turn Signals
Move the Multi-Function Lever up or down and the
corresponding turn signal indicator in the instrument
cluster flashes to show proper operation of the front and
rear turn signal lights. You can also signal a lane change
by moving the lever partially up or down without
moving beyond the detent. Releasing the lever at the
detent will provide 3 flashes.

If either indicator has a very fast flash rate, check for a
defective outside light bulb. If an indicator fails to light
when the lever is moved, see your authorized dealer for
service.

NOTE:

A “Turn Signal On” message will appear in the

Electronic Vehicle Information Center (EVIC) — if
equipped and a continuous chime will sound if the
vehicle is driven more than 1 mile (1.6 km) with either
turn signal on.

Highbeam/Lowbeam Select Switch
Push the Multi-Function Lever away from you to switch
the headlights to HIGH beam. Pull the Lever towards
you to switch the headlights back to LOW beam.

Flash to Pass
You can signal another vehicle with your headlights by
lightly pulling the Multi-Function Lever toward you.
This will cause the headlights to turn on at high beam
and remain on until the lever is released.

Overhead Console Map/Reading Lights

These lights are mounted between the sun visors on the
overhead console. Each light is turned ON by pressing
the lens. Press the lens a second time to turn OFF the
light. These lights also turn on when a door is opened, or
when the unlock button on the remote keyless entry
transmitter is pressed, or when the dimmer control is
turned fully upward, past the second detent.

128

UNDERSTANDING THE FEATURES OF YOUR VEHICLE

Interior Lights

The interior lights come on when a door is opened.

To protect the battery, the interior lights will turn off
automatically 10 minutes after the ignition switch is
moved to the LOCK position. This will occur if the
interior lights were switched on instructionly or are on

because a door is open. This includes the glove box light.
To restore interior light operation, either turn the ignition
switch ON or cycle the light switch.

Dimmer Control

The dimmer control is part of the
headlight switch, and is located on the
left side of the instrument panel. With
the parking lights or headlights on,
rotating the dimmer control upward
will increase the brightness of the in-
strument panel lights and, if so

equipped, the lighting in the door map pockets and cup
holders.

Dome Light Position
Rotate the dimmer control completely upward to the
second detent to turn on the interior lights. The interior
lights will remain on when the dimmer control is in this
position.

Overhead Console

UNDERSTANDING THE FEATURES OF YOUR VEHICLE

129

3

Interior light Defeat (OFF)
Rotate the dimmer control to the extreme bottom “OFF”
position. The interior lights will remain off when the
doors are open.

Parade Mode (Daytime Brightness Feature)
Rotate the dimmer control upward to the first detent.
This feature brightens all text displays such as the
odometer, Electronic Vehicle Information Center (EVIC)
— if equipped, and radio when the parking lights or
headlights are on.

WINDSHIELD WIPERS AND WASHERS

The multi-function lever operates the windshield
wipers and washer when the ignition switch is in
the ON position. The lever is located on the left

side of the steering column.

Rotate the end of the multi-function lever to the first
detent past the intermittent settings for Low-speed wiper
operation, or to the second detent past the intermittent
settings for High-speed wiper operation.

Windshield Wiper/Washer Control

130

UNDERSTANDING THE FEATURES OF YOUR VEHICLE

CAUTION!

Turn the windshield wipers off when driving
through an automatic car wash. Damage to the wind-
shield wipers may result if the wiper switch is left in
any position other than OFF.

Intermittent Wiper System

Use the intermittent wiper when weather conditions
make a single wiping cycle with a variable pause be-
tween cycles desirable. Rotate the end of the multi-
function lever to the first detent position, and then turn
the end of the lever to select the desired delay interval.
There are six delay settings, which allow you to regulate
the wipe interval from a minimum of one cycle every
second to a maximum of approximately 23 seconds
between cycles.

WARNING!

Sudden loss of visibility through the windshield
could lead to an accident. You might not see other
vehicles or other obstacles. To avoid sudden icing of
the windshield during freezing weather, warm the
windshield with defroster before and during wind-
shield washer use.

Mist Feature

Push the multi-function lever inward (toward the steer-
ing column) to the first detent to activate a single wipe
cycle to clear off road mist or spray from a passing
vehicle. The wipers will continue to operate until you
release the lever.

UNDERSTANDING THE FEATURES OF YOUR VEHICLE

131

3

Windshield Washers

To use the washer, push the multi-function lever inward
(toward the steering column) to the second detent and
hold it for as long as washer spray is desired.

If you activate the washer while the windshield wiper
control is in the delay range, the wipers will operate for
two wipe cycles after releasing the lever and then resume
the intermittent interval previously selected.

If you activate the washer while the windshield wiper is
turned OFF, the wipers will operate for three wipe cycles
and then turn OFF.

Headlights On with Wipers (Available with Auto
Headlights Only)

When this feature is active, the headlights will turn on
approximately 10 seconds after the wipers are turned on
if the headlight switch is placed in the AUTO position. In
addition, the headlights will turn off when the wipers are
turned off if they were turned on by this feature.

The Headlights On with Wipers feature can be turned on
or off through the Electronic Vehicle Information Center
(EVIC) — if equipped. For details, refer to ”Headlights
On with Wipers,” under “Personal Settings (Customer
Programmable Features),” under “Electronic Vehicle In-
formation Center” in Section 4 of this instruction.

132

UNDERSTANDING THE FEATURES OF YOUR VEHICLE

Adding Washer Fluid

The windshield washer fluid reservoir is located in the
front of the engine compartment. Be sure to check the
fluid level in the reservoir at regular intervals. Fill the
reservoir with windshield washer solvent (not radiator
antifreeze) and operate the system for a few seconds to
flush out the residual water.

The fluid reservoir will hold nearly 1 gallon (4 liters) of
washer fluid when the message “Low Washer Fluid”
appears in the Electronic Vehicle Information Center
(EVIC) — if equipped.

Washer Fluid Reservoir

UNDERSTANDING THE FEATURES OF YOUR VEHICLE

133

3

WARNING!

Commercially available windshield washer solvents
are flammable. They could ignite and burn you. Care
must be exercised when filling or working around
the washer solution.

TILT/TELESCOPING STEERING COLUMN

This feature allows you to tilt the steering column
upward or downward. It also allows you to lengthen or
shorten the steering column. The tilt/telescoping control
handle is located below the steering wheel at the end of
the steering column.

To unlock the steering column, pull the control handle
outward. To tilt the steering column, move the steering
wheel upward or downward as desired. To lengthen or
shorten the steering column, pull the steering wheel
outward or push it inward as desired. To lock the steering
column in position, push the control handle inward until
fully engaged.

134

UNDERSTANDING THE FEATURES OF YOUR VEHICLE

WARNING!

Do not adjust the steering wheel while driving. The
telescoping adjustment must be locked while driv-
ing. Adjusting the steering wheel while driving or
driving without the telescoping adjustment locked
could cause the driver to lose control of the vehicle.

ADJUSTABLE PEDALS — IF EQUIPPED

The adjustable pedal system is designed to allow a
greater range of driver comfort for steering wheel tilt and
seat position. This feature allows both the brake and
accelerator pedal to move toward or away from the
driver to provide improved position with the steering
wheel. The switch is located on the front side of the
driver’s seat cushion side shield.

Press the switch forward to move the pedals forward
(toward the front of the vehicle).

Press the switch rearward to move the pedals rearward
(toward the driver).

• The pedals can be adjusted with the ignition OFF.

Adjustable Pedal Switch

UNDERSTANDING THE FEATURES OF YOUR VEHICLE

135

3

• The pedals can be adjusted while driving.
• The pedals cannot be adjusted when the vehicle is in R

(Reverse) or when the Speed Control is ON.

CAUTION!

Do not place any article under the adjustable pedals
or impede its ability to move as it may cause damage
to the pedal controls. Pedal travel may become lim-
ited if movement is stopped by an obstruction in the
adjustable pedal’s path.

ELECTRONIC SPEED CONTROL

When engaged, this device takes over the accelerator
operation at speeds greater than 25 mph (40 km/h).

Electronic Speed Control Operation

The speed control lever (located on the right side of the
steering wheel) operated the system.

1 — CANCEL
2 — RESUME ACCEL
3 — ON/OFF
4 — SET DECEL

136

UNDERSTANDING THE FEATURES OF YOUR VEHICLE

To Activate:

Push and release the (“ON/OFF”) button lo-
cated on the end of the speed control lever. The
indicator light in the instrument cluster will
illuminate to show that the speed control sys-

tem is ON. To turn the system OFF, push and release the
(“ON/OFF”) button again. The system and the indicator
light will turn off.

WARNING!

Leaving the Electronic Speed Control system on
when not in use is dangerous. You could accidentally
set the system or cause it to go faster than you want.
You could lose control and have an accident. Always
leave the system OFF when you aren’t using it.

To Set At A Desired Speed:

When the vehicle reaches the speed desired, push the
lever down and release (“SET DECEL”). Remove your
foot from the accelerator pedal and the vehicle will
operate at the selected speed.

NOTE:

• Speed control will only function in third, fourth, or

fifth gear when in the Autostick

t Mode (if equipped).

• The speed control may not engage if a different size

tire is installed on one wheel, such as the compact
spare tire.

To Deactivate:

The system will disable Electronic Speed Control without
erasing the memory if you:

• Softly tap the brake pedal.
• Depress the brake pedal.

UNDERSTANDING THE FEATURES OF YOUR VEHICLE

137

3

• Pull the speed control lever toward you (“CANCEL”).

Pushing and releasing the (“ON/OFF”) button or turning
off the ignition erases the set speed from memory.

To Resume Speed:

If you deactivated the speed control without erasing the
set speed from memory and your vehicle speed is above
20 mph (32 km/h) you can resume the previous set
speed. To do so, push the lever up and release (“RESUME
ACCEL”), and then remove your foot from the accelera-
tor pedal.

To Vary the Speed Setting:

When the speed control is set, you can increase speed by
pushing up and holding the lever (“RESUME ACCEL”).
When the lever is released, a new set speed will be
established.

Tapping (“RESUME ACCEL”) once will result in a 1 mph
(1.6 km/h) speed increase. Each time the lever is tapped,
speed increases so that tapping the lever three times will
increase speed by 3 mph (4.8 km/h), etc.

To decrease speed while speed control is set, push down
and hold the lever (“SET DECEL”). Release the lever
when the desired speed is reached, and a new set speed
will be established.

Tapping (“SET DECEL”) once will result in a 1 mph (1.6
km/h) speed decrease. Each time the lever is tapped,
speed decreases.

To Accelerate For Passing:

Depress the accelerator as you would normally. When the
pedal is released, the vehicle will return to the set speed.

138

UNDERSTANDING THE FEATURES OF YOUR VEHICLE

Using Speed Control On Hills

NOTE:

The speed control system maintains speed up

and down hills. A slight speed change on moderate hills
is normal.

The automatic transmission will downshift while climb-
ing uphill or descending downhill. This downshift is
necessary to maintain vehicle set speed.

On steep hills, a greater speed loss or gain may occur so
it may be preferable to drive without speed control.

WARNING!

Speed Control can be dangerous where the system
can’t maintain a constant speed. Your vehicle could
go too fast for the conditions, and you could lose
control. An accident could be the result. Don’t use
Speed Control in heavy traffic or on roads that are
winding, icy, snow-covered, or slippery.

OVERHEAD CONSOLE

The overhead console contains courtesy/reading lights,
an optional universal garage door opener (HomeLink

t),

storage for sunglasses, and an optional power sunroof
switch.

Overhead Console

UNDERSTANDING THE FEATURES OF YOUR VEHICLE

139

3


Content      ..     6      7      8      9     ..